Fall in Love with This Coconut Braised Beef
Ever had one of those days where you just want a hug in a bowl? Where the thought of a complicated recipe makes you want to order takeout? That was me last Sunday. I was craving something deeply flavorful but didn’t want to babysit the stove. Enter this life-changing Coconut Braised Beef. It’s my new comfort food hero. Imagine the most tender beef you’ve ever had, falling apart at the touch of your fork, bathed in a luscious, aromatic coconut sauce. The smell alone will make your whole house feel like a cozy restaurant. This dish is pure magic, and I’m so excited to share it with you.
A Journey of Flavors: The Story of Coconut Braised Beef
This Coconut Braised Beef recipe is my personal take on a beautiful fusion of ideas. While slow-cooked, saucy beef dishes are a global comfort (think the Belgian Carbonade Flamande à la Bière or the rich Italian Braised Beef), the coconut milk and curry paste pull inspiration from the aromatic kitchens of Southeast Asia. It’s not a strictly traditional dish from one place, but a delicious blend that works brilliantly. I first tried something similar at a friend’s potluck and have been tweaking it ever since to get that perfect balance of savory, sweet, and spice. The modern twist? We’re finishing it in the oven for hands-off, even cooking. It’s a fabulous example of how simple ingredients from different corners of the world can create something utterly new and wonderful on your family table.
Why You’ll Adore This Coconut Braised Beef
Let me count the ways! First, it’s a one-pot wonder. Less washing up is always a win in my book. Second, it’s incredibly forgiving. The long, gentle braising time means even if your beef chunks aren’t perfectly uniform, they’ll all end up tender. The flavors are complex and restaurant-worthy, but the process is wonderfully simple. It also makes your kitchen smell absolutely incredible for hours. This dish feels special enough for company but is easy enough for a regular Tuesday night. Plus, leftovers might even be better the next day!
Perfect Occasions for This Hearty Dish
This beef is your new secret weapon for so many events!
- Cozy Family Dinner: Serve it over steamed rice for a meal everyone will devour.
- Impressing Guests: The presentation in the pot is rustic and beautiful. Your friends will think you slaved for hours (and you can just smile knowingly).
- Meal Prep Star: It stores and reheats beautifully, making weekday lunches something to look forward to.
- Cold Weather Comfort: This is the ultimate antidote to a chilly, rainy day.
Gather Your Ingredients
Here’s what you’ll need for this aromatic feast:
- 2 tbsp neutral oil (like avocado or canola)
- 1.4 kg (3 lbs) beef chuck, cut into 5cm (2-inch) cubes
- Salt and pepper
- 1 lemongrass stalk, cut into pieces and lightly smashed
- 2 serrano chilies, sliced
- 2 tbsp fresh ginger, chopped
- 4 large garlic cloves, thinly sliced
- 6 makrut (kaffir) lime leaves
- 1/4 cup red curry paste
- 1/2 tsp turmeric
- 2 cans (400 ml each) full-fat coconut milk
- 1 cup water
- 1/4 cup palm sugar or brown sugar
- 3 tbsp fish sauce
- 1 yellow onion, chopped
- 3 carrots, peeled and cut into chunks
- For serving: steamed rice, fresh cilantro, lime wedges, chili oil
Smart Substitutions You Can Make
Don’t stress if you’re missing an item! Cooking should be fun, not a rigid test.
- Beef Chuck: Beef stew meat or boneless short ribs work great.
- Red Curry Paste: Yellow or Panang curry paste are fine substitutes; the flavor profile will shift slightly.
- Makrut Lime Leaves: Use the zest of one lime as a backup. It won’t be identical, but it adds that citrusy note.
- Fish Sauce: For a vegetarian version, use soy sauce or tamari.
- Serrano Chilies: Use jalapeños for less heat or a tablespoon of sambal oelek for more concentrated spice.
- Palm Sugar: Brown sugar is a perfect, easy-to-find alternative.
Your Step-by-Step Guide to Perfect Coconut Braised Beef
Step 1: Preheat and Prep
Start by heating your oven to 180°C (350°F). Take your beef chuck and pat it dry with paper towels. This is a key step for good browning! Cut it into generous, 5cm cubes. Season them all over with a hearty amount of salt and pepper. Don’t be shy here; it’s the foundation of flavor for the whole dish.
Step 2: Sear the Beef to Golden Perfection
Heat the oil in a large, heavy-bottomed Dutch oven over medium-high heat. Working in batches to avoid crowding, add the beef cubes. Let them sear, untouched, for a few minutes until a beautiful, dark-brown crust forms. Turn them to get color on all sides. This maillard reaction isn’t just for looks; it builds incredible depth of flavor in your sauce. Pro tip: Don’t rush this step! Proper searing is what separates a good stew from a great one. Transfer the browned beef to a plate and repeat with the rest.
Step 3: Sizzle Those Amazing Aromatics
Reduce the heat to medium. To the same pot, add the serrano chilies, ginger, garlic, lemongrass, turmeric, lime leaves, and red curry paste. The kitchen will instantly fill with the most incredible fragrance. Stir and cook this paste for 2-3 minutes. You want to “wake up” the spices in the curry paste. Watch it closely so it doesn’t burn—you’re just toasting the flavors until they become super fragrant.
Step 4: Build Your Luxurious Coconut Sauce
Now, pour in the water and both cans of coconut milk. Give it a good stir, scraping up all those tasty browned bits from the bottom of the pot. This is called deglazing, and it’s where you capture all that seared flavor. Bring the liquid to a gentle simmer. Add the sugar and fish sauce, stirring until the sugar dissolves. Taste the broth—it will be strong! Season with a pinch more salt or pepper if you like. Remember, the flavors will mellow and concentrate as it braises.
Step 5: The Long, Slow Braise
Return the seared beef and any accumulated juices back to the pot. Stir in the chopped onion and carrot chunks. The carrots will soften and sweeten during the long cook. Cover the Dutch oven with a tight-fitting lid and carefully transfer it to your preheated oven. Now, walk away for 2.5 to 3 hours. The low, steady oven heat will work its magic, gently breaking down the beef’s tough fibers until it’s spoon-tender.
Step 6: The Final Rest and Serve
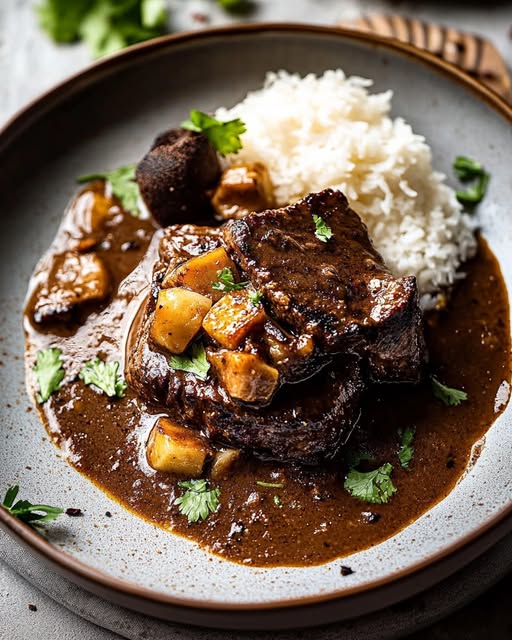
Carefully remove the pot from the oven. Fish out and discard the lemongrass pieces and lime leaves—they’ve done their job. Here’s a chef’s secret: let the beef rest in the sauce, uncovered, for about 30 minutes before serving. This allows the meat to relax and reabsorb some juices, making it even more succulent. The sauce will also thicken slightly. Serve this gorgeous Coconut Braised Beef over fluffy steamed rice. Top with fresh cilantro, a squeeze of lime juice, and a drizzle of chili oil for a bright finish.
Timing is Everything
Don’t let the clock scare you! Most of the time is hands-off.
- Prep Time: 20 minutes (chopping, seasoning, searing)
- Cook Time: 3 hours (almost entirely unattended in the oven)
- Resting Time: 30 minutes (crucial for the best texture)
- Total Time: 3 hours 50 minutes
Chef’s Secret for the Best Braise
The real secret? Don’t skip the rest. I know it’s tempting to dig right into that fragrant pot. But giving your Coconut Braised Beef a full 30 minutes to rest off the heat is a game-changer. The meat fibers, which have been working hard for hours, get a chance to relax. This means they hold onto their moisture better when you cut into them, resulting in beef that’s unbelievably tender and juicy, not dry. It also gives the flavors a final chance to marry perfectly.
A Fun Fact About Braising
Braising is one of the oldest and most universal cooking methods. Almost every culture has a beloved braised meat dish. The common thread? Transforming a tougher, more affordable cut of meat into a luxurious, tender masterpiece through patience and low heat. It’s the ultimate “low and slow” technique that turns simple ingredients into something extraordinary. This method is the core principle behind many comfort foods, like the classic Poulet Cacciatore.
What You’ll Need to Make It
- A large, heavy Dutch oven or oven-safe pot with a lid (like enameled cast iron).
- Sharp chef’s knife and cutting board.
- Tongs for turning the beef.
- Wooden spoon for stirring.
- Measuring cups and spoons.
Storing Your Delicious Creation
Let the braised beef cool completely to room temperature before storing. Do not leave it out for more than two hours. Transfer it to an airtight container. The fat from the coconut milk will rise and solidify on top when chilled—this is normal and actually helps preserve it!
It will keep in the refrigerator for up to 4 days. The flavors continue to develop, making day-two leftovers a true treat. For longer storage, you can freeze it for up to 3 months. Freeze in portion-sized containers for easy meals.
To reheat, thaw overnight in the fridge if frozen. Warm gently in a pot on the stove over low heat, adding a splash of water or broth if the sauce seems too thick. You can also reheat single portions in the microwave, stirring every 60 seconds.
My Best Tips and Advice
- Brown in batches: Crowding the pan steams the meat. Give each piece space for a proper sear.
- Use full-fat coconut milk. It provides the richest flavor and creamiest texture. Light coconut milk can make the sauce taste thin.
- If you don’t have an oven-safe pot, you can simmer it on the stove over the lowest possible heat. Check and stir occasionally to prevent sticking on the bottom.
- For a smoother sauce, you can skim off some of the oil that rises to the top after cooking, but I love it left in for maximum flavor.
Presentation Pointers
- Serve family-style right in the beautiful Dutch oven for a rustic, inviting look.
- Garnish with a big handful of bright green cilantro and vibrant lime wedges on the side.
- For individual plates, use a spoon to create a bed of rice, ladle the beef and sauce over, and finish with a delicate drizzle of red chili oil.
- Add a side of quick-pickled cucumbers or a simple green salad to cut through the richness.
Try These Tasty Variations
Love this recipe? Mix it up next time!
- Coconut Braised Chicken Thighs: Use bone-in, skin-on chicken thighs. Sear the skin, then braise for about 1 hour until tender.
- Vegetarian Coconut Curry: Swap beef for chickpeas and hearty vegetables like sweet potato and cauliflower. Add them later in the cook so they don’t turn to mush.
- Thai Basil Twist: Stir in a big handful of fresh Thai basil leaves just before serving for an anise-like burst of flavor.
- Spicy Peanut Version: Whisk in 1/4 cup of creamy peanut butter into the sauce for a satay-inspired dish.
- With Potatoes: Add small, waxy potato halves along with the carrots for a more substantial one-pot meal.
- Quick Weeknight Version: Use an slow cooking method by adding all ingredients (skip searing for ultimate ease) to your slow cooker and cooking on low for 8 hours.
Common Mistakes to Avoid
Mistake 1: Skimping on the Sear
This is the biggest flavor killer. If you dump all the beef in at once, the pot temperature plummets. The meat steams and turns gray instead of forming that delicious, caramelized crust. That crust is pure flavor for your sauce. How to avoid it: Be patient. Sear your beef in 2 or 3 batches, making sure each piece has contact with the hot surface of the pot. Don’t move them around for the first few minutes—let them brown!
Mistake 2: Using Light Coconut Milk
Light coconut milk is watered down. It lacks the rich, creamy fat that makes the sauce luscious and helps carry the flavors of the spices. Your final dish can taste thin and lacking depth. How to avoid it: Always reach for full-fat, canned coconut milk. Shake the can well before opening. The creamy layer at the top is gold—don’t discard it!
Mistake 3: Not Letting it Rest
You’ve waited hours, I know! But cutting or serving the beef straight from the oven is a mistake. The meat fibers are tight and stressed from the heat. If you disturb them immediately, all the wonderful juices will run out onto the plate. How to avoid it: Show a little restraint. Take the pot out, remove the big aromatics, and let it sit, uncovered, for a full 30 minutes. The meat will reabsorb moisture and become incredibly tender.
Mistake 4: Overcooking the Vegetables
If you add delicate veggies like bell peppers or zucchini at the beginning, they’ll dissolve into nothing after 3 hours. How to avoid it: Stick with hardy, root vegetables like carrots for the long braise. If you want softer veggies, like peppers or snap peas, stir them in during the last 20-30 minutes of cooking so they stay vibrant and retain some texture.
Answers to Your Coconut Braised Beef Questions
Can I make this in a slow cooker?
Absolutely! This recipe adapts beautifully to a slow cooker, which is perfect for true slow cooking. Follow steps 1 and 2 to sear the beef and sauté the aromatics on the stove—this step is still important for flavor. Then, transfer everything to your slow cooker. Cook on LOW for 7-8 hours or on HIGH for 4-5 hours. The beef will be fall-apart tender. Add the carrots at the beginning if you like them very soft, or about 2 hours before serving if you prefer a bit of bite.
What cut of beef is best for braising?
You want a cut with lots of connective tissue and marbling. Chuck roast (shoulder) is the absolute champion for braising. As it cooks slowly, the tough collagen melts into gelatin, making the meat incredibly tender and the sauce rich and silky. Other good options are boneless short ribs, brisket, or round roast. Avoid lean cuts like sirloin or tenderloin; they will dry out and become tough with long cooking.
My sauce is too thin. How can I thicken it?
If your sauce seems a bit runny after the braise, don’t worry. First, remove the beef and vegetables with a slotted spoon. Place the Dutch oven with just the sauce back on the stove over medium heat. Let it simmer, uncovered, for 10-15 minutes. Stir occasionally as it reduces and thickens. You can also make a quick slurry by mixing 1 tablespoon of cornstarch with 2 tablespoons of cold water. Whisk this into the simmering sauce and cook for 1-2 minutes until thickened.
Can I make this dish spicy or mild?
You have full control! The primary heat comes from the red curry paste and fresh chilies. For a milder dish, use a mild red curry paste and remove the seeds from the serrano chilies before slicing. You can also reduce the number of chilies. For more heat, leave the seeds in, add an extra chili, or stir in a teaspoon of sambal oelek or crushed red pepper flakes with the aromatics. Always taste your curry paste first to gauge its spiciness.
Is there a substitute for makrut (kaffir) lime leaves?
While the unique, floral-citrus flavor of makrut lime leaves is special, you can substitute. The best option is to use the finely grated zest of one regular lime. Add it when you add the ginger and garlic. You won’t get the exact same aroma, but it will provide a lovely bright, citrusy note that works well in the dish. Do not use bottled lime juice as a substitute; it’s too acidic and will not provide the same fragrance.
How far in advance can I prepare this?
This dish is actually better made ahead! You can cook it completely 1-2 days in advance. In fact, the flavors deepen and meld together wonderfully overnight in the fridge. Simply let it cool, store it in the refrigerator, and gently reheat it on the stove before serving. This makes it a fantastic choice for dinner parties or busy weeks. Just add the fresh garnishes (cilantro, lime) right before you serve.
What should I serve with Coconut Braised Beef?
Steamed jasmine rice is the classic and perfect companion to soak up all that glorious sauce. For a healthier twist, try cauliflower rice or quinoa. For a more substantial meal, serve it with wide rice noodles. A simple, crunchy side salad with a tangy vinaigrette or some quick-pickled vegetables are excellent for cutting through the richness. Warm, crusty bread is also great for dipping!
Can I freeze leftovers?
Yes, this beef freezes exceptionally well. Make sure it cools completely first. Portion it into airtight containers or heavy-duty freezer bags, leaving a little space for expansion. It will keep well for up to 3 months. To serve, thaw overnight in the refrigerator. Reheat gently in a saucepan on the stove over low heat, adding a splash of water or broth if needed to loosen the sauce. The texture and flavor hold up beautifully.
What’s the difference between braising and stewing?
It’s a common question! Both involve slow, moist-heat cooking. The main difference is the amount of liquid. Braising typically uses less liquid, which only comes partway up the meat (like our recipe). Stewing involves submerging smaller pieces of meat completely in liquid. Both methods are fantastic for tenderizing tough cuts. For another fabulous example of a braise, check out our recipe for flavorful Mongolian Beef, which uses a different, quicker technique.
My curry sauce separated. Did I do something wrong?
Not at all! Don’t panic if you see a layer of oil or fat on top of your sauce when it finishes cooking. This is completely normal, especially with full-fat coconut milk. It’s simply the fats rising to the surface. You can skim some of it off with a spoon if you prefer a less rich sauce. Alternatively, give the stew a gentle stir before serving—it will mostly reincorporate. This separation is a sign of a well-cooked, authentic curry.
If this kind of project is your happy place, you’ll find so many more comforting ideas in our full collection of main dish recipes.
Time to Get Cooking!
So there you have it—your new favorite recipe for a stress-free, impressive, and insanely delicious meal. This Coconut Braised Beef is more than just food; it’s an experience. It’s the promise of a warm, fragrant kitchen and happy people around your table. It proves that the best things in life (and cooking) are worth waiting for. So grab your Dutch oven, put on some music, and get ready to make some magic. I can’t wait for you to try it and make it your own. Don’t forget to tell me how it goes!
Coconut Braised Beef
Ingredients
Equipment
Method
- Preheat your oven to 180°C (350°F) and pat the beef dry. Season with salt and pepper.
- Heat oil in a Dutch oven over medium-high heat and sear the beef in batches until browned.
- Add serrano chilies, ginger, garlic, lemongrass, turmeric, lime leaves, and red curry paste to the pot. Sauté for 2-3 minutes.
- Pour in water and both cans of coconut milk. Stir and bring to a gentle simmer. Add sugar and fish sauce.
- Return seared beef to the pot along with onion and carrot. Cover and transfer to the oven for 2.5 to 3 hours.
- Remove from the oven and let beef rest in sauce for 30 minutes before serving over rice with cilantro, lime, and chili oil.