I’ll never forget the first time I made these no-bake fudgy chocolate squares for a family gathering. My oven had broken down the night before, and I was in full panic mode. I needed dessert for fifteen people, and I had no way to bake. That’s when my grandmother shared her secret recipe with me. These chocolate squares saved the day, and honestly, they became more popular than any fancy cake I’ve ever made. The best part? They only took twenty minutes to put together, and they turned out incredibly rich and smooth.
These treats are my go-to recipe now for birthday parties, holiday dinners, potlucks, and even Tuesday nights when I need something sweet. Everyone loves them, from picky kids to adults who claim they don’t have a sweet tooth. They’re rich, creamy, and have that perfect fudgy texture that melts in your mouth. You don’t need any baking skills or special equipment to make them. Just a few simple ingredients and a refrigerator.
What makes these squares special is how simple they are to make. You won’t spend hours in the kitchen or stress about getting the temperature just right. There’s no waiting for the oven to preheat or worrying about burnt edges. You mix everything together, spread it in a pan, and let the fridge do all the work. I’ve made these countless times, and they turn out perfect every single time.
Ingredients You’ll Need for No-Bake Fudgy Chocolate Squares
Let me walk you through what you’ll need to make these amazing treats. The ingredient list is surprisingly short, which is one of the reasons I love this recipe so much. You probably have most of these items in your kitchen already.
Here are the five ingredients you’ll need:
- High-quality chocolate chips or bars – About 3 cups (18 ounces)
- Sweetened condensed milk – One 14-ounce can
- Butter – 2 tablespoons of unsalted butter
- Vanilla extract – 1 teaspoon for extra flavor
- Graham cracker crumbs – 2 cups for the base layer
The chocolate you choose makes a huge difference in how your squares turn out. I learned this lesson the hard way when I tried using cheap chocolate chips from the bargain bin. The texture was grainy, and the flavor was dull. Now I always spend a little extra on good chocolate. You don’t need to buy the most expensive brand, but look for chocolate with at least 60% cocoa content. Semi-sweet or dark chocolate works best for these squares.
My favorite brands are Ghirardelli and Callebaut for chocolate chips. If you want to use chocolate bars instead, Lindt and Green & Black’s are excellent choices. You can find these at most grocery stores in the baking aisle. Some specialty stores like Trader Joe’s also carry high-quality chocolate at reasonable prices.
The 5 ingredients in no bake chocolate covered brownies are very similar to what we use here. The main difference is the base layer and how you shape the final product. Both recipes rely on chocolate, condensed milk, and butter as the core ingredients that create that incredible fudgy texture.
For the butter, I always use unsalted so I can control the sweetness level. Salted butter can make the squares taste too salty, especially if you’re using salted graham crackers for the base. The vanilla extract adds depth to the chocolate flavor. Don’t skip it, even though it seems like a small amount.
Your local grocery store will have everything you need. I shop at regular supermarkets for most ingredients. The baking aisle has graham cracker crumbs, or you can buy whole graham crackers and crush them yourself. I actually prefer crushing my own because the texture is better. Just put the crackers in a plastic bag and roll over them with a rolling pin. It takes two minutes and gives you more control over how fine the crumbs are.
If you can’t find graham cracker crumbs, digestive biscuits work great too. They’re common in European grocery stores and have a similar texture and flavor. Some people also use crushed vanilla wafers or even Oreo cookies without the filling for a different twist on the base.
Preparing the Base
The base layer is what holds everything together and gives your squares that perfect texture contrast. You want it firm enough to support the chocolate layer but not so hard that it’s difficult to cut through. I’ll show you exactly how I make mine every time.
Start by lining an 8×8 inch baking pan with parchment paper. Leave some overhang on the sides so you can lift the whole thing out later. This makes cutting the squares so much easier. I tried skipping this step once to save time, and I ended up with a mess. The squares stuck to the pan, and I had to scoop them out with a spoon. Learn from my mistake and use the parchment paper.
In a medium bowl, mix your graham cracker crumbs with 4 tablespoons of melted butter. You want the mixture to look like wet sand. When you squeeze a handful, it should stick together. If it’s too dry and falls apart, add another tablespoon of melted butter. If it’s too wet and greasy, add a few more crumbs.
Press this mixture firmly into the bottom of your prepared pan. I use the bottom of a measuring cup to pack it down evenly. Push hard and make sure you get into all the corners. The more firmly you pack it, the better your base will hold together when you cut the squares later.
Now for the chocolate layer. This is where the magic happens. Combine your chocolate chips and condensed milk in a microwave-safe bowl. Add the 2 tablespoons of butter on top. Microwave for 30 seconds, then stir. Repeat this process, heating for 30 seconds at a time and stirring between each interval.
This gradual melting is the secret to perfect fudge. If you try to melt everything at once on high heat, the chocolate can seize up or burn. I’ve ruined batches by being impatient. Take your time with this step. After about 2-3 intervals, your mixture will be smooth and glossy. Add your vanilla extract and stir well.
Pour the melted chocolate mixture over your graham cracker base. Use a spatula to spread it evenly across the entire surface. Work quickly but carefully. The mixture will start to thicken as it cools, so you want to get it spread out before that happens. I like to tilt the pan slightly in different directions to help the chocolate find all the corners.
Here’s a tip for getting a smooth and even surface. After you’ve spread the chocolate with a spatula, tap the pan gently on your counter a few times. This releases any air bubbles and helps the chocolate settle into an even layer. Then run your spatula over the top one more time in long, smooth strokes.
Place your pan in the refrigerator and let it chill for at least 3 hours. I usually make mine in the morning and let them set all day, or I make them the night before I need them. The longer they chill, the firmer they get and the easier they are to cut into perfect squares.


Adding the Fudgy Layer
Once your base is ready and waiting in that pan, you’re already halfway to chocolate heaven. Now comes the part that makes these squares absolutely irresistible – that thick, rich fudgy layer that everyone asks me about.
Here’s the thing about making the perfect fudgy layer. Temperature control is everything. I learned this from my grandmother, who made fudge for church bake sales for thirty years. She always told me that patience wins when you’re working with chocolate and condensed milk. The slow melting method I mentioned earlier isn’t just about preventing burnt chocolate. It’s about creating a smooth, glossy mixture that has the perfect consistency.
When you’re melting your chocolate with the condensed milk, watch for the moment when everything just comes together. You’ll see the mixture transform from chunky and separated to smooth and unified. It usually takes about two to three minutes total in the microwave, depending on how powerful yours is. My old apartment had a weak microwave that took forever, so I sometimes used a double boiler on the stove instead. That works beautifully too if you prefer the stovetop method.
The condensed milk is what gives these squares their signature fudgy texture. It’s thick, sweet, and creamy on its own, and when you combine it with melted chocolate, something magical happens. The milk proteins help bind everything together while the sugar content keeps the mixture smooth and prevents it from getting grainy. This is completely different from making something like Greek yogurt berry parfait, where you’re layering fresh ingredients that stay separate. Here, everything melds together into one cohesive texture.
When your chocolate mixture is completely smooth and there are no lumps at all, add that teaspoon of vanilla extract. I sometimes add a tiny pinch of sea salt too, maybe an eighth of a teaspoon. It enhances the chocolate flavor without making the squares taste salty. My friend Sarah adds a splash of espresso powder, which deepens the chocolate taste even more. You can experiment once you’ve made the basic recipe a few times.
Now for spreading that gorgeous fudgy layer over your base. Pour it right in the center of your graham cracker layer. Don’t worry about being too precise at first. I use an offset spatula for this job because the angled blade makes it easier to spread without disturbing the base underneath. If you don’t have an offset spatula, a regular rubber spatula works fine. Just be gentle.
Start spreading from the center and work your way outward toward the edges. Use long, sweeping motions rather than short choppy ones. This gives you a smoother finish and prevents you from accidentally pulling up chunks of the graham cracker base. I’ve done that before, and it’s frustrating. The chocolate and crumbs mix together, and you lose those clean layers that make the squares look so professional.
Pay special attention to the corners and edges. The chocolate mixture naturally wants to pool in the center because of gravity. Push it gently into every corner of your pan. I tilt the pan at different angles while I’m spreading, which helps the chocolate flow into any gaps I might have missed.
Topping and Setting
Funny enough, this is where people get really creative with these squares. The basic recipe is perfect on its own, but toppings can transform them into something completely different each time you make them. I’ve tried so many variations over the years that I’ve lost count.
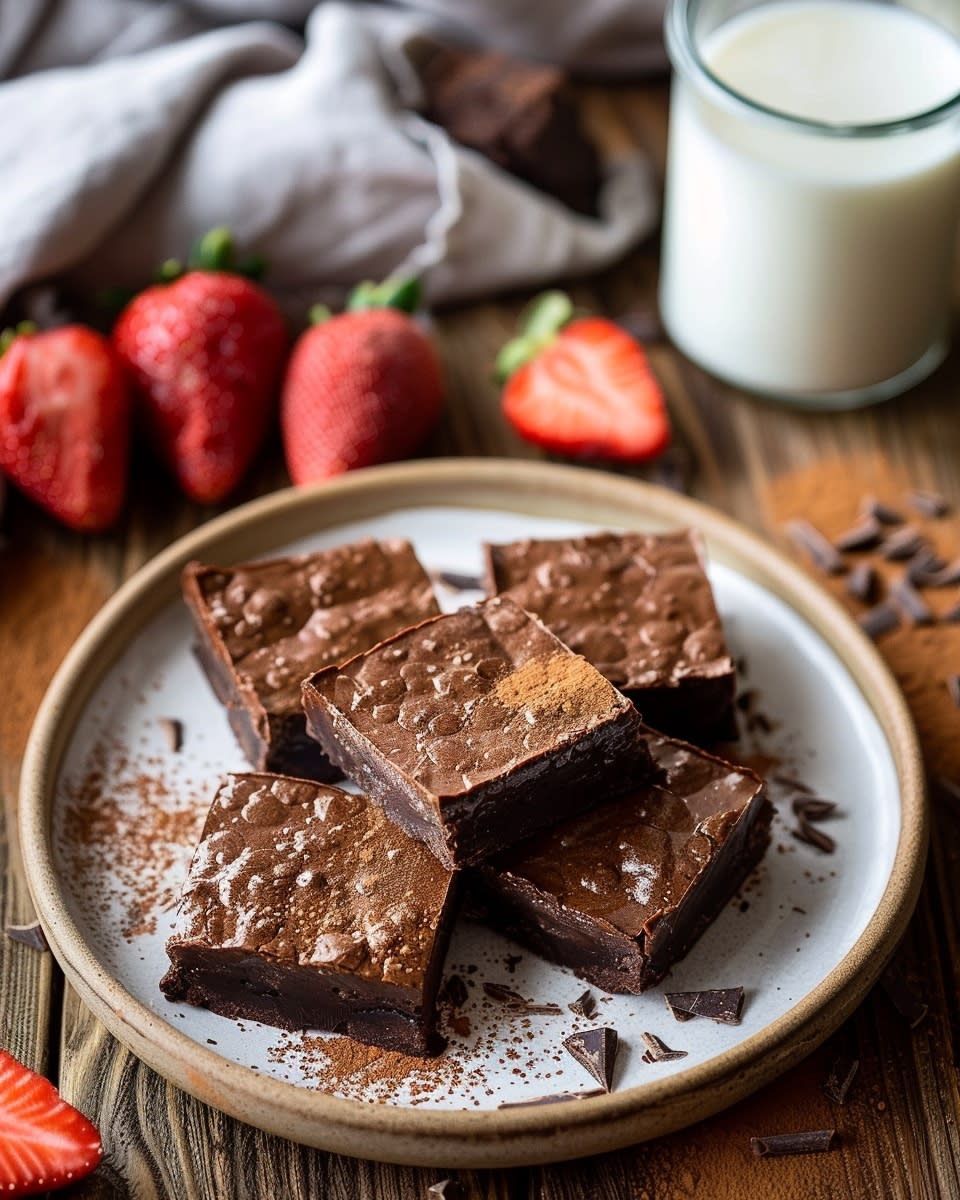
My absolute favorite topping is flaky sea salt. Just a light sprinkle across the top before the chocolate sets completely. The salt crystals catch the light and look beautiful, plus they add this amazing flavor contrast to the sweet chocolate. I use Maldon sea salt because the flakes are large and crunchy. Regular table salt doesn’t work the same way at all. Trust me on this one.
For the holidays, I’ll sprinkle crushed candy canes over the top. Red and white peppermint pieces against dark chocolate look festive and taste incredible. My kids request these every December now. Sometimes I’ll press whole pecans or walnut halves into the chocolate in a neat pattern. Toasted almonds work great too. I toast them myself in a dry pan for about five minutes until they smell nutty and delicious.
Sprinkles are always a hit with kids. Rainbow sprinkles, chocolate sprinkles, or those fancy metallic ones from the baking store. When I make these for my daughter’s class parties, I always add sprinkles because the kids go crazy for them. It’s similar to how kids love the fun presentation of a peanut butter banana protein smoothie, where the look matters almost as much as the taste.
Whatever topping you choose, add it within the first five minutes after you’ve spread the chocolate layer. You want the chocolate still soft enough that the toppings will stick and settle in slightly. If you wait too long, they’ll just sit on top and fall off when you cut the squares. Press them very gently with your fingertips or the back of a spoon so they adhere to the chocolate without sinking completely.
By the way, shredded coconut makes a wonderful topping if you’re a coconut fan. I toast it first until it’s golden brown because toasted coconut has so much more flavor than the plain white stuff straight from the bag. Mini chocolate chips create a fun textured top layer. White chocolate chips against dark chocolate look elegant for dinner parties.
Now for the waiting part, which honestly is the hardest part of this whole recipe. Slide your pan into the refrigerator carefully so you don’t mess up your beautifully smooth top. Let it chill for at least three hours, though I prefer four to be safe. Some people ask why their no-bake cookies didn’t get hard, and usually it’s because they didn’t give them enough chilling time or their fridge temperature wasn’t cold enough. These squares need proper refrigeration to set up correctly.
I’ve tried setting them in the freezer to speed things up, and while it works in about ninety minutes, I find the texture isn’t quite as good. The chocolate gets a little too hard and loses some of that smooth, fudgy quality. The refrigerator gives you the perfect firmness without making them rock solid. Kind of like how you want the right texture in a blueberry cottage cheese breakfast bake, where too much time in the oven makes it dry instead of creamy.
When you’re ready to cut them, pull the whole thing out of the pan using those parchment paper handles you created earlier. Set it on a cutting board. Get a large sharp knife and run it under hot water for about thirty seconds. Dry it off completely with a clean towel. This warm knife will cut through the chocolate like butter.
Make your first cut down the middle, then cut each half in half again. I usually get sixteen perfect squares from an eight by eight pan. Clean your knife with hot water and dry it between each cut. This keeps your edges clean and prevents chocolate from building up on the blade. It takes a few extra minutes, but the result is worth it. Your squares will look like they came from a fancy bakery.
Some people prefer rectangles instead of squares. That’s totally fine. Cut them however you want. Just remember that these are very rich, so smaller portions often work better than huge pieces. When I take these to potlucks, I cut them into smaller bite-sized pieces because people love being able to sample multiple desserts without getting too full.
Store your cut squares in an airtight container in the refrigerator. They’ll keep for up to two weeks, though they never last that long in my house. Stack them with parchment paper between layers so they don’t stick together. You can also freeze them for up to three months. I’ve done this before when I was meal prepping desserts, similar to how you might prep a savory breakfast egg and potato skillet ahead of time. Just thaw them in the fridge overnight before serving, and they taste just as good as fresh.


Troubleshooting Common Issues with No-Bake Fudgy Chocolate Squares
I wish I could tell you that every batch of these squares I’ve ever made turned out perfect, but that would be a lie. Over the years, I’ve had my share of disasters in the kitchen, and these chocolate squares taught me some valuable lessons. The good news is that once you know what can go wrong, you can easily avoid those problems.
One of the most frustrating issues people face is when their squares won’t set properly. They stay soft and gooey even after hours in the fridge. I had this happen to me during a summer heat wave when I was bringing dessert to a backyard barbecue. I pulled the squares out of my fridge, drove fifteen minutes to my friend’s house, and by the time I got there, they were practically melting. The problem wasn’t my recipe. It was the temperature difference.
If your squares aren’t hardening, the first thing to check is your refrigerator temperature. It should be at 40 degrees Fahrenheit or below. I actually bought a small fridge thermometer after my barbecue disaster, and I discovered my fridge was running at 45 degrees. That small difference matters more than you’d think. Chocolate needs proper cold to solidify correctly. When your fridge isn’t cold enough, the fats in the chocolate and butter don’t firm up the way they should.
Another common culprit is humidity. I live in a pretty humid climate, and I’ve noticed my squares take longer to set on muggy summer days compared to dry winter afternoons. Moisture in the air can affect how quickly chocolate sets. If you’re dealing with high humidity, add an extra hour to your chilling time. You can also try using a slightly higher proportion of chocolate to condensed milk, maybe adding an extra half cup of chocolate chips to make the mixture firmer.
Sometimes people tell me their chocolate layer separated or looks grainy instead of smooth. This usually happens when the chocolate gets too hot too fast. Remember how I stressed the importance of melting in thirty-second intervals? That wasn’t just me being picky. When chocolate overheats, the cocoa butter separates from the cocoa solids, and you get this weird, greasy texture that never quite comes together properly. I ruined an entire batch once by microwaving everything on high for two minutes straight without stopping to stir. The chocolate seized up into a thick, lumpy mess that I couldn’t salvage no matter what I tried.
If your chocolate does seize up, don’t panic immediately. Sometimes you can save it by adding a tablespoon of warm milk or cream and stirring vigorously. The liquid helps bring the mixture back together. I’ve rescued batches this way before, though they’re never quite as perfect as when you do it right from the start. Prevention is definitely better than trying to fix it later.
The base layer can cause problems too. I’ve had batches where the graham cracker crust was too crumbly and fell apart when I tried to cut the squares. This happens when you don’t use enough melted butter in the base mixture. The butter acts as the glue that holds all those crumbs together. If your base feels dry when you’re pressing it into the pan, add more butter, one tablespoon at a time, until it holds together when you squeeze it.
On the flip side, too much butter makes the base greasy and soggy. I made this mistake when I was distracted by a phone call and accidentally doubled the butter amount. The base wouldn’t firm up at all, and it left oil marks on my parchment paper. There’s a sweet spot right in the middle where the base is firm but not dry. You’ll know you’ve hit it when the mixture sticks together without feeling wet or oily.
Here’s something interesting about no-bake cookies not getting hard that applies to these squares too. The ratio of wet to dry ingredients is critical. Traditional no-bake cookies rely on boiling sugar, butter, and milk to reach a specific temperature that allows the mixture to set when it cools. These squares work differently because we’re using chocolate’s natural ability to solidify when cold. But the principle is similar – you need the right balance of ingredients for proper setting.
Temperature of ingredients before you start matters more than most people realize. I always bring my butter to room temperature before melting it. Cold butter doesn’t incorporate as smoothly with the other ingredients. Same goes for the condensed milk. If it’s straight from the fridge, it won’t blend as well with the melted chocolate. I leave mine on the counter for about thirty minutes before I start cooking. Small details like this make a real difference in the final texture.
Quality of ingredients affects how well your squares set and taste. Cheap chocolate often contains more vegetable oils and less actual cocoa butter, which changes how it melts and solidifies. I mentioned using good chocolate earlier, but it’s worth repeating because it solves so many potential problems before they start. Similarly, brand matters with condensed milk. Some generic brands are thinner and more watery than name brands. Eagle Brand has consistently given me the best results, though other quality brands work fine too.
One problem I see with beginners is cutting the squares too soon. I know waiting is hard, especially when they smell so good. But if you try to cut them after only an hour or two in the fridge, the chocolate layer will stick to your knife and pull away from the base. The layers need time to fully bond together. When I absolutely must speed up the process, I’ll put them in the freezer for ninety minutes instead of the fridge, though like I mentioned before, the texture isn’t quite as good.
Your cutting technique matters too for getting clean edges. Beyond using a hot knife, make sure you’re cutting with a firm, steady motion rather than sawing back and forth. I press straight down through all the layers in one smooth motion. Sawing creates friction that warms up the chocolate and makes it stick to the blade. One clean cut per slice keeps everything neat.
Storing these squares incorrectly can ruin even a perfectly made batch. I learned this when I stacked them directly on top of each other in a container without any separation. When I tried to pull them apart later, the chocolate layers stuck together and peeled right off the graham cracker bases. Now I always use parchment paper between layers, like I said earlier. I also make sure my storage container is truly airtight because exposure to air can make the chocolate develop that weird white film on top called bloom. It’s not harmful, but it doesn’t look appetizing.
If your squares are too soft even after proper chilling, you might be in a really warm climate or dealing with a warm kitchen. In that case, keep them refrigerated until the moment you’re ready to serve them. I do this at summer parties. I bring out just a few pieces at a time and keep the rest cold. Room temperature chocolate gets soft quickly, especially in heat. While having chocolate in your dessert does provide energy, eating sweets frequently can impact your metabolism over time, so proper storage that helps with portion control actually serves you well beyond just preserving texture.
When these squares are too hard and difficult to bite into, you’ve probably used too much chocolate or not enough condensed milk. The condensed milk provides the creamy softness that balances the firm chocolate. If you accidentally used a smaller can of condensed milk than the recipe called for, that would explain rock-hard squares. Double-check your measurements before you start, especially with the condensed milk since it’s so crucial to the texture.
Creative Problem-Solving Ideas
Let me share some creative ways I’ve adapted this recipe when things didn’t go according to plan or when I needed to work with what I had on hand.
Once I ran out of graham crackers completely and couldn’t get to the store. I used crushed pretzels mixed with a little extra butter and a tablespoon of sugar instead. The salty-sweet combination was actually amazing. The pretzel base added a completely different dimension to the chocolate. Now I make them that way on purpose sometimes because my husband loves the salt contrast.
If your squares turn out too sweet for your taste, which can happen depending on the chocolate brand you use, try adding a tablespoon of unsweetened cocoa powder to the chocolate mixture while it’s still warm. This deepens the chocolate flavor without adding more sugar. I’ve also stirred in a tiny bit of instant coffee granules, maybe half a teaspoon, which cuts the sweetness and enhances the chocolate taste.
When I’ve made batches that were slightly too soft, I’ve turned them into a different dessert entirely. I crumbled them up and layered them in clear glasses with whipped cream and fresh berries. Suddenly my imperfect squares became a fancy parfait that everyone loved. You can also press too-soft squares into mini muffin tins, chill them until firm, and serve them as individual chocolate cups. Nobody needs to know they weren’t supposed to turn out that way.
For squares that turned out too hard, let them sit at room temperature for about fifteen minutes before serving. This softens them just enough to make cutting and eating easier. You can also warm individual squares in the microwave for about five seconds, which gives them an almost brownie-like texture that’s pretty delicious in its own right.
Experimenting with proportions has taught me a lot about how these squares work. I keep notes on my phone about small adjustments I make and how they affect the final product. This might sound overly detailed, but it’s helped me develop variations that work perfectly for different situations. My high-altitude version uses slightly less chocolate because things set differently up in the mountains where my sister lives. My hot-weather version has an extra quarter cup of chocolate chips for firmer squares that hold up at outdoor events.
The beautiful thing about this recipe is how forgiving it actually is once you understand the basics. Yes, you can run into problems, but most of them have simple solutions. And honestly, even my failed batches were still pretty tasty. They might not have looked Instagram-perfect, but nobody complained when they were eating them. I’ve found that when you’re exploring different desserts like these squares, the learning process is half the fun, and every mistake teaches you something valuable for next time.
I encourage you to make these chocolate squares your own. Try the basic recipe first exactly as written, then start experimenting once you’re comfortable with the technique. Some of my best variations came from happy accidents or ingredient substitutions I made out of necessity.
Frequently Asked Questions
How to make 3 ingredient chocolate?
The simplest version uses just chocolate chips, condensed milk, and vanilla extract. Melt two cups of chocolate chips with one can of sweetened condensed milk in the microwave, stirring every thirty seconds until smooth. Add a teaspoon of vanilla, pour into a lined pan, and refrigerate for three hours. This creates a basic fudge that’s incredibly rich. You can eat it as is or use it as a topping layer for other desserts. I make this quick version when I’m really short on time.
What are the 5 ingredients in no bake chocolate covered brownies?
No-bake chocolate covered brownies typically use chocolate chips, condensed milk, butter, graham cracker crumbs, and vanilla extract as their core ingredients. This is nearly identical to what we use for these squares. The main difference is usually in the proportions and how you shape the final product. Some versions add cocoa powder or nuts as a sixth ingredient for extra flavor and texture. The condensed milk and chocolate create that brownie-like fudgy center everyone loves.
Why didn’t my no bake cookies get hard?
No-bake cookies fail to harden when the sugar mixture didn’t boil long enough or at the right temperature. For chocolate squares specifically, they won’t set if your refrigerator isn’t cold enough or if the ratio of chocolate to liquid ingredients is off. High humidity can also prevent proper setting. Make sure your fridge is at 40 degrees Fahrenheit or below, and give the squares at least three to four hours to chill completely. Using quality chocolate with good cocoa butter content helps significantly with proper firming.
What is the secret to perfect fudge?
Perfect fudge comes down to temperature control and the right ingredient ratios. Never rush the melting process with chocolate and condensed milk. Use low heat or short microwave intervals with frequent stirring to prevent the chocolate from seizing. The condensed milk should be fully incorporated with no streaks remaining. Adding a small amount of butter creates a silkier texture. Let the mixture cool slightly before pouring it into your pan, which helps it set with a smooth surface instead of developing cracks.
Can I use different types of chocolate for this recipe?
Absolutely, and each type creates a different flavor profile. Dark chocolate makes rich, intense squares that aren’t as sweet. Milk chocolate produces sweeter, creamier results that kids especially love. White chocolate works too, though it sets a bit softer than darker chocolates. I’ve even mixed different chocolates together, like half dark and half milk, for a balanced flavor. Just avoid chocolate chips labeled as “candy coating” or “melting wafers” because they contain different fats and won’t give you the same fudgy texture.
How long do no-bake fudgy chocolate squares last?
These squares stay fresh in an airtight container in the refrigerator for up to two weeks. The chocolate may develop a slight bloom on the surface after about ten days, but they’re still perfectly safe and delicious to eat. I’ve never had a batch last the full two weeks because they get eaten so quickly. Keep them cold rather than at room temperature, especially in warm weather. Make sure your container seals well to prevent the squares from absorbing odors from other foods in your fridge.
Can I freeze the squares for later?
Yes, these freeze beautifully for up to three months. Cut them into individual squares first, then layer them in a freezer-safe container with parchment paper between each layer. This prevents them from sticking together and lets you grab just one or two at a time. Thaw them overnight in the refrigerator rather than at room temperature for the best texture. I’ve found they taste almost identical to fresh squares after freezing. This makes them perfect for making ahead for parties or special occasions.
Are there any substitutions for condensed milk?
Making your own condensed milk works well if you’re in a pinch. Simmer two cups of whole milk with three-quarters cup of sugar for about forty-five minutes until it reduces by half and thickens. Coconut condensed milk is my go-to dairy-free option and it adds a subtle tropical flavor that’s really nice with dark chocolate. Some people use cream cheese softened with a bit of milk and sugar, though this creates a slightly different texture that’s more like a truffle than traditional fudge. Each substitution changes the final result slightly, so expect some variation.
How can I make the squares vegan-friendly?
Use dairy-free chocolate chips, coconut condensed milk, and vegan butter for a completely plant-based version. Make sure your graham crackers are vegan too since some brands contain honey. I’ve made vegan versions for friends with dietary restrictions, and honestly, the texture and flavor are nearly identical to the regular recipe. The coconut condensed milk works exactly like regular condensed milk in terms of setting and creating that fudgy consistency. You might notice a very subtle coconut flavor, but most people can’t detect it once the chocolate is mixed in.
What are some creative variations for the toppings?
The possibilities are truly endless here. I’ve topped these squares with everything from crushed cookies to dried fruit. Toffee bits add a wonderful crunch and buttery flavor. Freeze-dried raspberries or strawberries provide a tart contrast to the sweet chocolate. Caramel drizzle creates an elegant look for dinner parties. Mini marshmallows pressed into the top before chilling make s’mores-inspired squares that kids go crazy for. Crushed peppermint, chopped nuts, shredded coconut, or even crumbled bacon for adventurous eaters. Try different combinations and see what becomes your signature version.
These no-bake fudgy chocolate squares have become more than just a recipe in my kitchen – they’re a reliable friend that shows up when I need something special without the stress. Give them a try this weekend, play around with the toppings, and see what delicious creation you come up with.
Ingredients
Equipment
Method
- Tapissez un moule à pâtisserie de 8x8 pouces de papier sulfurisé, en laissant un débordement pour soulever plus tard.
- Dans un bol moyen, mélangez la chapelure de biscuits Graham avec 4 cuillères à soupe de beurre fondu jusqu'à ce que le mélange ressemble à du sable humide.
- Appuyez fermement sur le mélange au fond du moule préparé.
- Dans un bol allant au micro-ondes, combinez les pépites de chocolat, le lait concentré sucré et 2 cuillères à soupe de beurre.
- Micro-ondes pendant 30 secondes, remuez et répétez jusqu'à ce que le mélange soit lisse et brillant.
- Incorporez 1 cuillère à café d'extrait de vanille une fois le mélange lisse.
- Versez le mélange chocolaté sur la base de biscuits Graham et étalez-le uniformément.
- Tapotez doucement le moule sur le comptoir pour éliminer les bulles d'air et garantir une surface uniforme.
- Réfrigérez pendant au moins 3 heures, de préférence 4 pour de meilleurs résultats.
- Une fois pris, soulevez les carrés du moule à l'aide du débordement de papier sulfurisé et coupez en formes désirées avec un couteau chaud.