The Ultimate Chocolate Peanut Butter Layer Cake: A Love Story
You know that moment when you take a bite of something so good, you just have to close your eyes? That’s this cake. I first made it for my husband’s birthday. He’s a peanut butter fanatic, and I’m a chocolate devotee. This cake was our delicious truce. Now, it’s the star of every family gathering. Friends actually request it by name. It’s the kind of dessert that makes people happy. Let me show you how to make it.
From Humble Treats to a Grand Dessert
Chocolate and peanut butter are an iconic American duo. Think of those famous peanut butter cups! This cake takes that classic pairing to a whole new level. It’s not just a snack. It’s a celebration. The moist, dark chocolate layers. The creamy, fluffy peanut butter filling. The shiny, rich chocolate ganache on top. It’s a modern classic born in home kitchens. Every bite is a little history of favorite flavors coming together.
Why You’ll Fall in Love With This Cake
This recipe is a winner for so many reasons. First, the flavor is unbeatable. It’s rich but not too sweet. The textures are amazing. You get soft cake, smooth filling, and silky ganache all in one forkful. Second, it looks impressive! The dripping ganache makes it look like it came from a fancy bakery. But secretly, it’s quite simple to make. You don’t need to be a pastry chef. You just need a love for delicious things.
When to Bake Your Masterpiece
This cake turns any day into a special occasion. It’s perfect for birthdays, of course. But don’t wait for one! It’s a showstopper at potlucks. Imagine the oohs and aahs. Bring it to a holiday dinner instead of pie. Have a slice with coffee on a lazy weekend afternoon. It’s also my secret weapon for saying “thank you” or “I’m sorry.” A slice of this cake can smooth over almost anything!
Gathering Your Ingredients
Let’s get everything ready. Using good quality ingredients makes a real difference here.
- Cake Layers:
- 2 cups of all-purpose flour
- 2 cups of granulated sugar
- 3/4 cup of unsweetened cocoa powder (use a good one!)
- 2 teaspoons of baking powder
- 1 1/2 teaspoons of baking soda
- 1 teaspoon of salt
- 1 cup of milk
- 1/2 cup vegetable oil
- 2 large eggs
- 2 teaspoons of vanilla extract
- 1 cup of boiling water
- Peanut Butter Filling:
- 1 cup creamy peanut butter
- 1/2 cup unsalted butter, softened
- 2 cups of powdered sugar
- 1/4 cup heavy cream
- Chocolate Ganache:
- 1 cup semi-sweet chocolate chips
- 1/2 cup heavy cream
Simple Swaps You Can Make
No worries if you’re missing something. Here are some easy fixes.
- Milk & Cream: Whole milk works best. For a dairy-free cake, use almond or oat milk. You can use coconut cream instead of heavy cream in the ganache and filling.
- Peanut Butter: Use a standard creamy grocery store brand. The natural kind that separates can make the filling oily. If you have a nut allergy, sunflower seed butter is a great swap.
- Flour: For a gluten-free cake, use a good 1-to-1 gluten-free flour blend.
- Chocolate Chips: Feel free to use dark chocolate chips for a less sweet ganache. Chopped chocolate bars also work wonderfully.
Let’s Bake This Beauty Together
Put on your apron and let’s get started. I’ll walk you through every step.
Step 1: Get Your Oven and Pans Ready
First, preheat your oven to 350°F (175°C). This gives it time to get perfectly hot. Grab your two 9-inch round cake pans. Grease the bottoms and sides really well with butter or baking spray. Then, line the bottoms with a circle of parchment paper. This is my foolproof trick for cakes that pop right out without sticking. You’ll thank me later!
Step 2: Mix the Dry Ingredients
Get out a big mixing bowl. Whisk together the flour, sugar, cocoa powder, baking powder, baking soda, and salt. I love this part. The cocoa powder looks so dark and rich against the white flour. Whisking gets out any little lumps. It also mixes everything evenly. This means your cake will rise perfectly and taste the same in every bite. Pro tip: Sift your cocoa powder if it seems clumpy.
Step 3: Combine the Wet and Dry
Now, make a well in the center of your dry ingredients. Pour in the milk, vegetable oil, eggs, and vanilla. Start mixing with an electric mixer on medium speed. Mix just until the batter is smooth and beautiful. It will be thick and shiny. Here comes the fun part. Slowly pour in the hot boiling water while the mixer is on low. The batter will become very thin and liquid. This is totally normal! The hot water helps make the cake incredibly moist.
Step 4: Bake and Cool the Layers
Carefully pour the thin batter into your prepared pans. Try to divide it evenly. Gently tap the pans on the counter to pop any air bubbles. Slide them into the hot oven. Bake for 30 to 35 minutes. You’ll know they’re done when a toothpick poked in the center comes out clean. Your kitchen will smell like a chocolate dream. Let the cakes cool in the pans for 10 minutes. Then, turn them out onto a wire rack. Peel off the parchment paper. Let them cool completely before frosting. A warm cake will melt your filling.
Step 5: Whip Up the Peanut Butter Filling
Time for the peanut butter magic. In a clean bowl, beat the softened butter and peanut butter together. Use your electric mixer again. Beat them until they are creamy and completely combined. It will look like a pale, dreamy paste. Gradually add the powdered sugar, about a half cup at a time. Start slow so you don’t get a sugar cloud! Finally, pour in the heavy cream. Beat it all on medium-high for 2-3 minutes. Watch it transform into a light, fluffy, spreadable cloud. Taste it. Go ahead, I won’t tell.
Step 6: Create the Silky Chocolate Ganache
This is easier than you think. Put your chocolate chips in a heat-proof bowl. A glass measuring cup works great. Heat the heavy cream in a small saucepan over medium heat. You just want to see little bubbles around the edges and steam rising. Don’t let it boil. Pour the hot cream over the chocolate chips. Now, walk away. Let it sit for a full 5 minutes. This lets the heat gently melt the chocolate. After 5 minutes, take a whisk and stir slowly from the center out. It will magically turn into a smooth, glossy, pourable chocolate sauce.
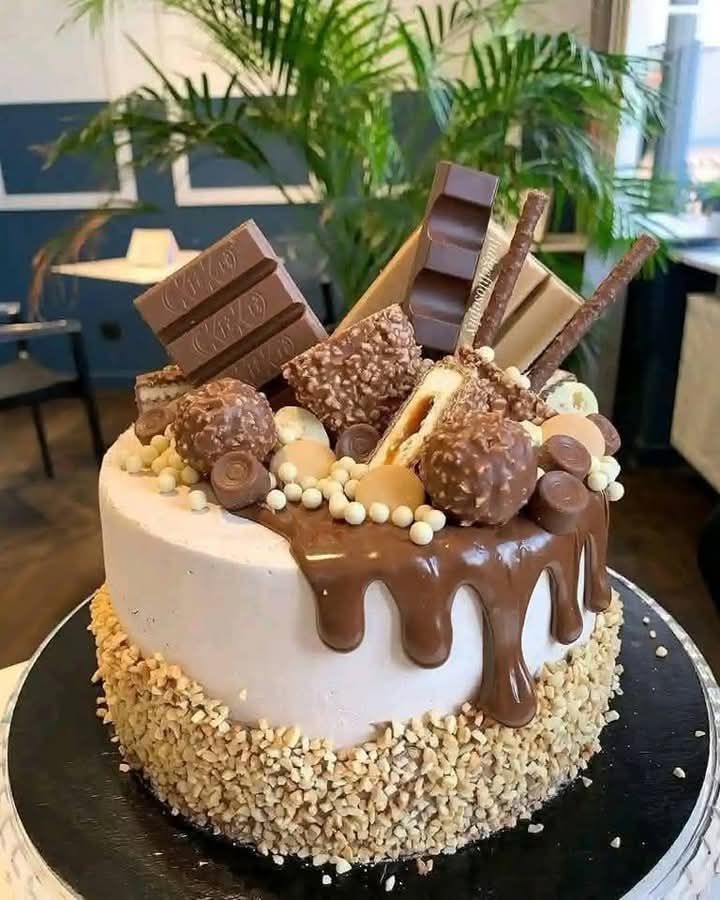
Step 7: Assemble Your Masterpiece
Place your first cake layer on a plate or cake stand. Spread all of that amazing peanut butter filling on top. Use a spoon or offset spatula to make it even. Gently place the second cake layer on top. Press down lightly. Now, pour your slightly cooled ganache right in the center of the top layer. Use a spoon to guide it to the edges so it drips beautifully down the sides. Don’t stress about perfection. The rustic drips are part of the charm. Chef’s tip: For cleaner slicing, pop the assembled cake in the fridge for 20 minutes before serving. This sets the ganache.
Timing is Everything
Planning ahead makes baking stress-free.
- Prep Time: 30 minutes
- Bake Time: 35 minutes
- Cooling Time: 1 hour (very important!)
- Frosting & Assembly Time: 20 minutes
- Total Time: About 2 hours, 25 minutes
A Secret From My Kitchen
My secret is in the cocoa. I always use a Dutch-processed cocoa powder for this cake. It has a darker color and a smoother, less acidic chocolate flavor. It makes the cake layers look extra dark and taste incredibly rich. It’s worth hunting for in the baking aisle!
A Fun Fact About Our Stars
Did you know chocolate and peanut butter weren’t paired commercially until 1928? That’s when the Reese’s Peanut Butter Cup was invented. A man named H.B. Reese got the idea while working for Hershey. He used Hershey’s chocolate for his cups. Our cake is a glorious, layered tribute to that brilliant pairing invented almost 100 years ago.
Tools You’ll Need
You don’t need fancy gear. Here’s what I use:
- Two 9-inch round cake pans
- Parchment paper
- Mixing bowls (large and medium)
- Electric hand mixer or stand mixer
- Whisk and spatula
- Wire cooling rack
- Small saucepan
- Cake stand or serving plate
How to Keep Your Cake Fresh
This cake stores beautifully. First, if you have leftovers (lucky you!), cover it loosely. Use a cake dome or a large bowl turned upside down over the plate. You can store it at room temperature for up to 2 days. The ganache will stay shiny.
For longer storage, the fridge is your friend. The cool air will firm up the ganache and filling. Just make sure the cake is in an airtight container. This prevents it from picking up other fridge smells. It will keep for up to 5 days this way.
You can also freeze this cake. Wrap the whole cake or individual slices tightly in plastic wrap. Then, place them in a freezer bag. It will keep for up to 3 months. Thaw it overnight in the fridge before serving.
My Best Tips for Success
- Always use room temperature eggs, milk, and butter. They mix together more smoothly.
- Measure your flour correctly. Spoon it into the measuring cup and level it off. Don’t scoop directly from the bag.
- Let the cakes cool completely. I know it’s hard to wait, but it’s the key to a cake that doesn’t fall apart.
- If your ganache is too thin, let it cool a bit more. If it’s too thick, add a tiny splash of warm cream.
Presentation Ideas to Wow Your Guests
- Top with chopped salted peanuts for crunch and a salty contrast.
- Add a border of mini peanut butter cups around the base.
- Dust the top lightly with extra cocoa powder or powdered sugar.
- Serve each slice with a small dollop of whipped cream on the side.
Healthier Twists on the Classic
Love the flavor but want a lighter option? Try one of these fun variations.
- Whole Wheat Wonder: Swap half the all-purpose flour for whole wheat flour. It adds a nutty flavor that pairs well with peanut butter.
- Greek Yogurt Swap: Replace the oil in the cake with an equal amount of plain Greek yogurt. This cuts fat and adds protein for a moister texture.
- Natural Sweetener: Use coconut sugar in the cake layers and a reduced amount of powdered sugar in the filling.
- Banana Boost: Mash one ripe banana into the cake batter. It adds natural sweetness and lets you reduce the sugar slightly.
- Dark Chocolate Dive: Use 85% dark chocolate for the ganache. It’s richer in antioxidants and less sweet.
- Mini Cake Madness: Bake the batter in a muffin tin for portion-controlled cupcakes. Top each with a small spoonful of filling and ganache.
Common Mistakes to Avoid
Mistake 1: Not Letting the Cakes Cool Completely
This is the biggest mistake. You are excited to frost your cake. The layers feel warm but not hot, so you think it’s okay. A warm cake will melt the peanut butter filling. It makes the layers slide and the frosting runny. The cake can even tear. Be patient. Let the cakes sit on the wire rack for a full hour. Touch the center with your finger. It should feel completely room temperature.
Mistake 2: Overmixing the Cake Batter
You mix the dry and wet ingredients. Then you keep mixing to make it super smooth. This is a problem. Overmixing develops the gluten in the flour. Too much gluten makes your cake tough and chewy. You want a tender crumb. Mix just until you see no more dry flour streaks. When you add the hot water, mix just enough to combine it. A few small lumps are just fine.
Mistake 3: Using the Wrong Peanut Butter
You grab the natural peanut butter from the fridge. It’s the healthy kind that separates. This peanut butter has more oil. When you mix it into the frosting, it can release that oil. Your fluffy filling can become a greasy, runny mess. For baking, use a standard creamy peanut butter like Jif or Skippy. These are stabilized and give you the perfect creamy texture every time.
Mistake 4: Burning the Cream for the Ganache
You heat the cream on high to make it faster. The cream boils and bubbles up violently. Boiled cream can scorch or develop a weird skin. It also gets too hot. When you pour it over the chocolate, it can cause the fats to separate. Your ganache will look grainy and oily. Heat the cream gently on medium heat. Watch for steam and small bubbles around the edge of the pan. That’s the perfect temperature.
Your Questions, Answered
Can I make this cake ahead of time?
Absolutely! You can bake the cake layers up to two days in advance. Let them cool completely. Then wrap each layer tightly in plastic wrap. Store them at room temperature. You can also make the peanut butter filling a day ahead. Keep it in an airtight container in the fridge. Let it soften at room temperature before spreading. Assemble and add the ganache the day you want to serve it for the freshest look and taste.
Why do I add boiling water to the cake batter?
It seems weird, right? The hot water does two amazing things. First, it “blooms” the cocoa powder. This means it wakes up the chocolate flavor and makes it taste deeper and richer. Second, it makes the batter very thin. This creates a super moist and tender cake crumb. The cake bakes up light and fluffy, not dense. Don’t skip this step, even if the thin batter worries you. It works every time.
My ganache is too runny. How can I fix it?
This happens if the cream was too hot or you didn’t use enough chocolate. The good news is it’s easy to fix. Just let the ganache sit at room temperature for 15-20 minutes. It will start to thicken as it cools. You can also pop it in the fridge for 5-10 minutes. Stir it every few minutes. If it’s still too thin after cooling, you can whisk in a few more chocolate chips. The residual heat will melt them and thicken the mix.
Can I use a different kind of nut butter?
Yes, you can! Almond butter or cashew butter would work very well. Just make sure to use a creamy, no-stir variety. The flavor will be different but still delicious. If you have a nut allergy, sunflower seed butter is a fantastic alternative. It has a similar texture and a mild, nutty flavor that pairs nicely with chocolate. The color of your filling might be a little greener, but it will taste great.
How do I get my cake layers to be perfectly flat?
Sometimes cakes dome in the middle. To prevent this, make sure your baking powder and soda are fresh. Old leaveners don’t work as well. You can also bake with “cake strips.” These are fabric strips you soak in water and wrap around the outside of the pan. They keep the edges cool so the cake rises evenly. A simple trick is to gently press down on the dome with a clean towel while the cake is still warm. Then level it with a serrated knife.
Can I turn this into a sheet cake?
You sure can. Pour the batter into a greased 9×13 inch baking pan. The baking time will be similar, maybe a few minutes longer. Check it with a toothpick. Let it cool in the pan. Spread the peanut butter filling over the entire top of the cake. Then, pour the ganache over the filling. Let it drip down the sides a little. This is a much easier way to serve a crowd. Just slice into squares and serve.
What’s the best way to slice a layer cake cleanly?
Use a long, thin knife. I like a chef’s knife. Run the knife under very hot water for 10 seconds. Wipe it dry with a towel. The hot knife will slice through the ganache and filling without tearing. It makes a clean cut. After each slice, wipe the knife clean and run it under hot water again. This keeps every piece looking beautiful. It’s a simple trick that makes you look like a pro.
Is there a way to make the filling less sweet?
The powdered sugar in the filling does make it sweet. For a less sweet version, you can reduce the powdered sugar a bit. Start with 1 1/2 cups instead of 2. You might need to add a tiny bit more cream to get it fluffy. You can also add a pinch of salt to the filling. Salt balances sweetness and makes the peanut butter flavor pop. A quarter teaspoon of fine sea salt mixed in is perfect.
My cake is too crumbly. What did I do wrong?
A crumbly cake usually means it was overbaked. Ovens can run hot. Next time, start checking your cake at the 28-minute mark. The toothpick should have a few moist crumbs on it, not be completely dry. Also, make sure you measured your flour correctly. Too much flour makes a dry cake. Spoon it lightly into the cup and level it. Don’t pack it down. You can also try adding an extra tablespoon of oil to the batter for more moisture.
Can I decorate this cake with frosting instead of ganache?
Of course! The world is your oyster. You can double the peanut butter filling recipe. Use half between the layers and half to frost the outside. A classic chocolate buttercream would also be heavenly. Just whip together butter, cocoa powder, powdered sugar, and a little milk. Pipe some swirls on top. Add some chocolate shavings. Make it your own. The cake layers are your blank chocolate canvas.
The Final, Delicious Slice
There you have it. My most requested, most loved cake recipe. It’s more than just dessert. It’s a experience. It’s the joy of sharing something homemade and full of love. The rich chocolate. The creamy peanut butter. The happy silence that falls over the table when everyone takes their first bite. Don’t be intimidated. You can absolutely make this. Gather your ingredients, follow the steps, and get ready for the compliments. Now, go bake a memory. And save a slice for me!
Perfect BLT Sandwich
Ingredients
Equipment
Method
- Preheat your oven to 350°F (175°C) and prepare two 9-inch round cake pans.
- Mix the dry ingredients: whisk together flour, sugar, cocoa powder, baking powder, baking soda, and salt.
- Make a well in the dry ingredients and add milk, vegetable oil, eggs, and vanilla; mix until combined.
- Slowly pour in boiling water while mixing until the batter is smooth and thin.
- Pour the batter evenly into the prepared pans and bake for 30-35 minutes.
- Let the cakes cool in the pans for 10 minutes before turning them out onto a wire rack to cool completely.
- For the peanut butter filling, beat the softened butter and peanut butter together, then gradually add powdered sugar and heavy cream.
- For the ganache, heat the heavy cream and pour it over chocolate chips; let it sit, then stir until smooth.
- Assemble the cake by placing the first layer on a plate, spreading over the peanut butter filling, and topping with the second layer.
- Pour the ganache on top, allowing it to drip down the sides.