
You know that feeling when you can’t decide between cake and cheesecake? I had this exact drama last year for my daughter’s birthday. She wanted a rich chocolate cake, but I was craving the tangy creaminess of a cheesecake. After a minor kitchen standoff, I had a wild idea: “What if we smash them together?” The result was this glorious Chocolate Covered Strawberry Cheesecake Cake. It’s the ultimate dessert compromise that feels like a fancy bakery splurge, but guess what? It’s secretly easy. Let’s get baking!
The Story Behind The Ultimate Dessert Mashup
I’ve always loved combining classic treats. This cake is my love letter to two all-time favorites. The chocolate-covered strawberry is a timeless symbol of romance. Cheesecake brings a luscious, celebratory feel. And a good chocolate cake? That’s just pure joy on a plate. This recipe borrows from all three traditions. It uses a simple cake mix as a brilliant shortcut. The creamy middle layer is inspired by no-bake cheesecake fillings. And that shiny chocolate ganache cloak? That’s pure patisserie magic you can do at home. It’s a modern, no-stress twist that never fails to impress a crowd.
Why You’ll Fall in Love With This Cheesecake Cake
This isn’t just a cake; it’s a whole dessert experience. First, it looks stunning with its glossy chocolate finish. Cutting into it reveals beautiful, surprise layers. The textures are a dream team: moist cake, creamy filling, juicy berries, and a firm chocolate shell. It’s incredibly satisfying to make. You get to build something spectacular without professional skills. The ingredient list is simple, and the method is straightforward. But the final product tastes like you spent all day in a fancy kitchen. It’s my go-to for when I need a guaranteed “wow” moment.
Perfect Occasions for a Showstopper Cake
This cake dresses up for any event! It’s a natural star for Valentine’s Day or an anniversary dinner. I’ve made it for Mother’s Day brunch to total applause. It turns a simple birthday into a gourmet celebration. Take it to a potluck, and you’ll be asked for the recipe all night. It’s also perfect for a girls’ night in or a bridal shower. Honestly, any day that ends with “day” is a good excuse for this cake. It makes ordinary moments feel extraordinarily sweet.
What You’ll Need: The Ingredients List
Gather these simple ingredients. Most are pantry staples!
- 1 box of chocolate cake mix (plus the oil, eggs, and water it calls for)
- 2 (8 ounce) packages of cream cheese, softened
- 1/2 cup granulated sugar
- 2 large eggs
- 1 teaspoon vanilla extract
- 1/2 cup strawberry preserves or jam
- 1 cup fresh strawberries, chopped
- 1 cup heavy whipping cream
- 8 ounces semisweet chocolate, finely chopped
Smart Ingredient Substitutions
No problem! Here’s how you can swap things around.
- Cake Mix: Use a devil’s food or dark chocolate mix. For a from-scratch version, use your favorite 9-inch chocolate cake recipe.
- Cream Cheese: Full-fat bricks work best for structure. Don’t use spreadable cream cheese from a tub.
- Strawberry Preserves: Raspberry or cherry jam work beautifully. Seedless is easier for a smooth layer.
- Fresh Strawberries: You can use frozen, thawed, and well-drained berries in a pinch.
- Semisweet Chocolate: Dark chocolate (60-70%) adds sophistication. Milk chocolate makes it sweeter and kid-friendly.
How to Make Your Chocolate Covered Strawberry Cheesecake Cake
Follow these steps for a flawless, gorgeous cake. Take your time and enjoy the process!
Step 1: Bake Your Chocolate Cake Layers
First, heat your oven to 350°F (175°C). Grease two 9-inch round cake pans well. I like to add a round of parchment paper to the bottom for absolute no-stick insurance. Prepare your chocolate cake mix exactly as the box directs. The smell of that chocolate batter is already a win. Divide the batter evenly between your two prepared pans. Smooth the tops with a spatula. Bake for 25-30 minutes. You’ll know it’s done when a toothpick poked in the center comes out clean or with a few moist crumbs. Let the cakes cool in the pans for 10 minutes. This helps them firm up. Then, gently turn them out onto a wire rack to cool completely. Pro tip: Level the cake tops with a serrated knife if they dome a bit for a stable stack.
Step 2: Create the Luscious Cheesecake Filling
While the cakes cool, make the filling. In a large bowl, beat the softened cream cheese and sugar together. Use an electric mixer on medium speed. Beat it until the mixture is completely smooth and no lumps remain. This might take 2-3 minutes. Scrape down the bowl often. Now, add the two eggs, one at a time. Beat well after each egg is added. Finally, mix in that teaspoon of vanilla extract. The filling should look like a thick, silky pudding. Set this aside for a moment.
Step 3: Assemble the Cake Layers
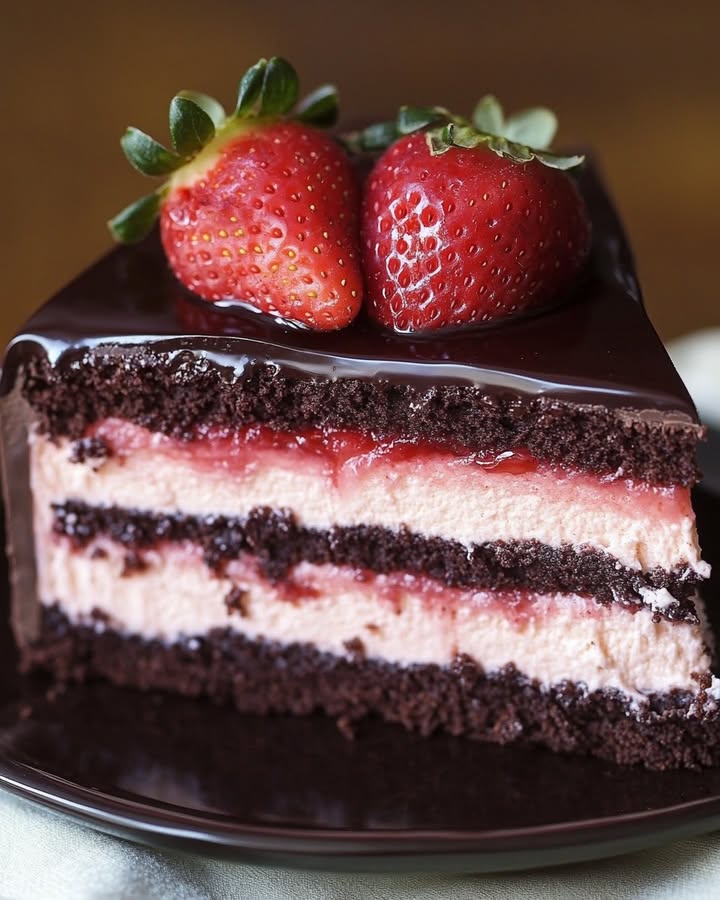
Place one completely cooled cake layer on your serving plate or cake stand. If you’re worried about sliding, put a small dollop of filling under the cake to anchor it. Take the strawberry preserves and spread them evenly over the top of this first cake layer. This adds a sweet, fruity glue. Next, gently spoon all of the cream cheese filling over the preserves. Spread it carefully to the edges with an offset spatula. Sprinkle the chopped fresh strawberries evenly over the creamy filling. Their bright red color peeking through is so pretty. Now, carefully place the second cake layer on top. Press down lightly so everything sticks together. Chef’s tip: If the filling tries to squish out, you can chill the assembled cake for 30 minutes before adding the ganache.
Step 4: Make the Shiny Chocolate Ganache
This is the fun, magical part! Chop your chocolate into small, even pieces so it melts quickly. Place it in a heatproof bowl. Pour the heavy cream into a small saucepan. Heat it over medium heat until you see small bubbles form around the edges. It should be steaming but not boiling hard. Immediately pour the hot cream over the chopped chocolate. Let it sit, untouched, for 3 minutes. This allows the heat to soften the chocolate perfectly. Then, start stirring slowly in the center. You’ll see it turn into a gorgeous, glossy, dark chocolate sauce. Keep stirring until it’s completely smooth.
Step 5: Glaze, Chill, and Serve
Working quickly while the ganache is fluid, pour it onto the center of the top cake layer. Use a spatula to gently guide it over the edges. Let the chocolate drip beautifully down the sides. Don’t worry about covering every single bit perfectly. The rustic drips look amazing. Once glazed, carefully transfer the cake to the refrigerator. Chill it for at least 2 hours. This crucial step lets the cheesecake layer set firmly and the ganache harden into a perfect shell. Then, slice with a sharp knife warmed under hot water. Get ready for the cheers!
Getting Your Timing Just Right
Good baking is all about timing. Here’s your schedule:
- Prep Time: 30 minutes (gathering, mixing, assembling)
- Cooking Time: 30 minutes (baking the cakes)
- Chilling Time: 2 hours (essential for setting)
- Total Time: About 3 hours from start to finish.
The Chef’s Secret for a Flawless Cake
My absolute best trick is about temperature. Make sure your cream cheese is truly softened at room temperature. This is non-negotiable. If it’s cold, you’ll get a lumpy filling no matter how long you mix. I take mine out of the fridge 2 hours before I start. Also, let your cake layers cool completely. A warm cake will melt the cream cheese filling and make a mess.
A Sweet Bit of Extra Info
Did you know the combination of strawberries and chocolate is a relatively modern romance? While both were beloved separately, covering strawberries in chocolate became popular in the 1960s. It was considered the height of elegance! This cake takes that chic idea and turns it into a shareable, celebratory centerpiece.
Necessary Kitchen Equipment
- Two 9-inch round cake pans
- Electric hand mixer or stand mixer
- Mixing bowls (large and medium)
- Wire cooling rack
- Small saucepan
- Offset spatula or butter knife for spreading
- Cake stand or serving plate
How to Store Your Masterpiece
Because of the creamy cheesecake layer, this cake must be stored in the refrigerator. Cover it loosely with plastic wrap or place a cake dome over it. It will keep beautifully for up to 4 days. The flavors actually meld and get even better after a day.
You can also freeze this cake for longer storage. First, chill it completely so the ganache is hard. Then, wrap the whole cake tightly in two layers of plastic wrap and a layer of aluminum foil. It will freeze well for up to 2 months.
To serve a frozen cake, transfer it to the refrigerator to thaw overnight. This keeps the texture perfect. Do not thaw it at room temperature, as the cheesecake layer could become too soft.
My Best Tips and Advice
- For clean slices, dip your knife in hot water and wipe it dry between each cut.
- If your ganache gets too thick to pour, you can gently reheat it for 5 seconds in the microwave, stirring well.
- Use ripe, sweet strawberries for the best flavor in the filling.
- Toasting the cake layers slightly before assembling adds a lovely depth of flavor.
Presentation Ideas to Impress Your Guests
Make your cake even more special with these simple touches:
- Just before serving, garnish the top with whole fresh strawberries and a dusting of powdered sugar.
- Create a pattern with sliced strawberries on top before you pour the ganache.
- Add a drizzle of white chocolate over the dark ganache for a stunning contrast.
- Serve each slice with a small dollop of whipped cream and a mint leaf.
Delicious Recipe Variations to Try
Love this idea? Mix it up with one of these tasty twists:
- Chocolate Raspberry Dream: Swap strawberry preserves for seedless raspberry jam and use fresh raspberries instead of strawberries. The tartness is divine.
- Tropical Twist: Use mango or passionfruit curd in place of the preserves and top with toasted coconut flakes after the ganache.
- Cookies and Cream: Fold crushed Oreo cookies into the cream cheese filling and use chocolate cookies on top for garnish.
- Peanut Butter Cup: Add 1/2 cup of creamy peanut butter to the cream cheese filling. Use chopped peanut butter cups as the topping instead of strawberries.
- Mint Chocolate Chip: Add 1/2 teaspoon of peppermint extract to the cream cheese filling and fold in mini chocolate chips. A refreshing classic.
- White Chocolate Berry: Use a vanilla cake mix. Make the ganache with white chocolate and swirl in a tablespoon of the strawberry preserves for a marbled look.
Common Mistakes to Avoid for a Perfect Cake
Mistake 1: Using Cold Cream Cheese
This is the number one reason for a lumpy filling. Cold cream cheese will not blend smoothly with the sugar and eggs. No amount of mixing will fix those little white lumps. Always plan ahead. Take the cream cheese out of the fridge at least 1-2 hours before you start baking. It should feel soft and slightly warm to the touch. If you forget, you can microwave unwrapped bricks on low power for 10-15 seconds, but room temperature is best.
Mistake 2: Assembling the Cake While It’s Warm
Patience is a baker’s secret weapon. If your cake layers are even slightly warm, they will melt the cream cheese filling. This makes a slippery, soggy mess that’s hard to slice. It can also cause the ganache to slide right off. Let the cakes cool in the pans for 10 minutes, then transfer them to a wire rack. Wait until they are completely cool to the touch before you start stacking and filling. This wait is worth it for perfect layers.
Mistake 3: Overheating the Ganache
The creamy texture of ganache comes from emulsifying cream and chocolate. If you boil the cream or microwave the chocolate too much, the fat can separate. This makes an oily, grainy glaze. Heat the cream just until you see small bubbles around the edge (a simmer). Pour it over the chopped chocolate and let it sit. Stir gently from the center out. If your kitchen is cold and the ganache sets too fast, you can briefly place the bowl over a pot of warm water to loosen it.
Mistake 4: Not Letting the Cake Chill Long Enough
You might be tempted to slice into this cake right after the ganache sets. Don’t do it! The chilling time is not just for the look. It’s crucial for the texture and taste. The cold fridge firms up the cream cheese layer so it slices neatly. It also lets the flavors of the cake, fruit, and cheese mingle beautifully. Two hours is the minimum. For the cleanest slices and best experience, chill it for 3-4 hours or even overnight.
Your Chocolate Cheesecake Cake Questions, Answered
Can I make this cake a day ahead?
Absolutely! In fact, I highly recommend it. Making this cake the day before you need it is a fantastic time-saver. The flavors have more time to develop and meld together. The texture also sets up perfectly for clean slicing. Just be sure to keep it covered in the refrigerator. Take it out about 15-20 minutes before serving to slightly soften the ganache for easier cutting.
Can I use frozen strawberries instead of fresh?
You can, but you need to handle them correctly. Thaw the frozen strawberries completely in a colander over a bowl. Once thawed, press them gently to remove as much excess liquid as possible. If you skip this step, the extra moisture will make your cheesecake layer runny and wet. For the best texture and flavor, fresh strawberries are always the top choice.
Why did my cream cheese filling turn out runny?
A runny filling usually has two main causes. First, the cream cheese may have been too soft or over-beaten, incorporating too much air and breaking the structure. Second, the cake layers might have been warm during assembly. Ensure your cakes are completely cool and your cream cheese is just softened, not melted. Chilling the assembled cake is essential for it to firm up properly.
Can I use a different kind of cake mix?
Of course! This recipe is very versatile. A devil’s food cake mix will give you an even deeper chocolate flavor. A red velvet mix would be gorgeous for Valentine’s Day. You could even use a vanilla or white cake mix for a different look. Just follow the package directions for the mix you choose. The contrast between a lighter cake and the dark chocolate ganache is lovely.
How do I get clean, professional-looking slices?
The secret is a hot, clean knife. Fill a tall glass with very hot water. Before your first slice, dip a sharp, non-serrated knife into the hot water. Wipe it completely dry with a clean towel. Make a smooth, confident cut. After each slice, dip the knife again, wipe it dry, and make the next cut. This melts through the firm ganache and cream cheese layer without dragging and creates beautiful, clean slices.
My ganache is too thick/thin. How can I fix it?
Ganache can be tricky! If it’s too thick and won’t pour, it may have cooled too much. Place the bowl back over a pot of barely simmering water (a double boiler) for just 5-10 seconds. Remove and stir. Repeat until it’s fluid again. If it’s too thin and runny, you likely needed more chocolate or less cream. Let it sit at room temperature for 5-10 minutes to thicken. You can also pop it in the fridge for a minute or two, stirring every 30 seconds.
Is it safe to eat the cream cheese layer with raw eggs?
This is a common concern. The eggs in the cream cheese filling do not get baked, as the filling is chilled to set. If you are serving young children, elderly individuals, pregnant women, or anyone with a compromised immune system, you may want to take precautions. You can use pasteurized shell eggs or liquid pasteurized egg product. These are heat-treated to kill bacteria while remaining liquid. Always buy fresh eggs from a reliable source and keep the cake refrigerated.
Can I decorate the top with more chocolate?
Please do! Decorating makes it extra special. After pouring the ganache, you can sprinkle on chocolate shavings, curls, or mini chocolate chips before it sets. You could also pipe little whipped cream rosettes around the edge once the cake is chilled. Adding a few whole, perfect strawberries with their stems on top is a classic and beautiful touch that hints at what’s inside.
How should I store leftover cake?
Leftover cake should always be stored in the refrigerator. Cover it loosely with plastic wrap or place it under a cake dome. It will keep well for 3-4 days. The cake may dry out slightly on the cut edges after a day or two. You can place a piece of parchment paper directly against the cut sides to help keep it moist. Always use a clean knife to cut pieces to avoid introducing bacteria.
Can I freeze individual slices?
Yes, freezing slices is a great idea for a future treat. First, freeze the whole, unsliced cake until the ganache is rock solid. Then, cut it into slices. Wrap each slice tightly in plastic wrap, then place them in a single layer in a freezer bag or airtight container. They can be frozen for up to 2 months. Thaw individual slices overnight in the fridge or for a couple of hours at room temperature when you’re ready for a sweet bite.
The Final, Sweet Slice
There you have it! The cake that solves all dessert debates. It looks like you fussed for hours, but we know the smart shortcuts. The rich chocolate, the tangy cream cheese, the sweet strawberries, and that glossy shell… it’s pure happiness on a plate. I can’t wait for you to try it. Bake it for someone you love, or just because it’s Tuesday. Every slice is a celebration. Now, go get your mixer and make some magic happen!
Baked Chili Hotdogs
Ingredients
Equipment
Method
- Preheat oven to 350°F (175°C) and grease two 9-inch round cake pans.
- Prepare chocolate cake mix as directed on the box and divide batter between pans.
- Bake for 25-30 minutes until a toothpick comes out clean. Cool in pans for 10 minutes, then transfer to a wire rack.
- While cakes cool, beat softened cream cheese and sugar until smooth, then add eggs one at a time and vanilla extract.
- Place one cooled cake layer on a serving plate and spread strawberry preserves on top.
- Spoon cream cheese filling over the preserves and sprinkle with chopped strawberries.
- Place the second cake layer on top, gently pressing down.
- Chop chocolate and place in a heatproof bowl. Heat heavy cream until steaming, then pour over chocolate and stir until smooth to make ganache.
- Pour ganache over the top layer of the cake, letting it drizzle down the sides.
- Chill in the refrigerator for at least 2 hours before serving.