My Secret Weapon for Happy Guests: No Bake Turtle Mini Cheesecakes
Let me tell you about my favorite kitchen shortcut. It’s a little recipe that saves me every time I need dessert magic without oven drama. Picture this: creamy cheesecake, rich chocolate, gooey caramel, and crunchy almonds. All piled into a perfect little cup. These No Bake Turtle Mini Cheesecakes are my go-to when life is busy but sweets are required. They look fancy. They taste incredible. And they are so simple, you can make them while chatting with a friend.
A Sweet Story: From Candy to Cheesecake
The classic “turtle” candy is a beloved treat. It started with a simple combo: chocolate, caramel, and pecans. Someone thought it looked like a turtle’s shape. The name stuck! That delicious trio is now a classic flavor profile. I’ve seen it in cookies, brownies, and ice cream. Bringing it into a no-bake cheesecake felt like a natural next step. It combines the indulgence of a full cheesecake with the fun, shareable size of a mini treat. This is a modern take on a traditional favorite. It’s perfect for today’s busy lives and love for quick, impressive desserts.
Why You’ll Adore This No-Bake Wonder
You will love this recipe for so many reasons. First, there’s no baking involved. That means no worrying about over-baking or cracked tops. It’s foolproof! Second, the flavor is pure nostalgia. It tastes like your favorite candy bar in a creamy, luxurious form. Third, they are individual servings. This means no fighting over slices! Everyone gets their own perfect little cup of joy. They are also incredibly versatile. You can make them for a fancy dinner or a casual kids’ party. They fit every occasion.
When to Whip Up These Mini Delights
This recipe shines at so many events. Think of summer parties when you don’t want to turn on the oven. Bring them to potlucks – they travel beautifully in their liners. They are a dream for holiday gatherings like Thanksgiving or Christmas. Your dessert table will look stunning. They’re perfect for birthdays, baby showers, or just a Friday night treat. I even make them as a “thank you” gift for neighbors. Pack a few in a cute box. It’s a sweet gesture that always brings smiles.
Gathering Your Turtle Cheesecake Ingredients
Here’s what you need to create these little gems. I like to group them by their job in the recipe.
For the Crust:
- 1 cup ground graham crackers
- 1 tablespoon sugar
- 5 tablespoons melted butter
For the Cheesecake Filling:
- 8 ounces cream cheese, softened
- 1/2 cup powdered sugar
- 2 teaspoons vanilla extract
- 1 cup heavy whipping cream
For the Toppings & Garnish:
- Caramel sauce (store-bought or homemade)
- 6 ounces semi-sweet chocolate, chopped
- 1/4 cup heavy cream
- Chopped almonds and mini chocolate chips
Smart Substitutions for Your Pantry
Don’t worry if you’re missing an item. You can swap many things!
- Crust: Use digestive biscuits or plain cookie crumbs. Any mild, sweet cracker works.
- Nuts: Pecans are the classic turtle choice. I use almonds often. Any chopped nut you love will be great.
- Chocolate: Dark or milk chocolate can replace semi-sweet. Use chips to avoid chopping.
- Caramel: A good store-bought sauce is fine. If you have time, homemade is amazing.
- Heavy Cream: For the ganache, you can use half-and-half in a pinch. For whipping, it must be heavy cream.
Creating Your No Bake Turtle Mini Cheesecakes
Follow these steps for a perfect result. The process is fun and messy in the best way!
Step 1: Prepare the Crust
Start with your crust. Mix the graham cracker crumbs, sugar, and melted butter in a bowl. It will feel like wet sand. The smell is buttery and sweet. Press this mixture firmly into the bottoms of a muffin tin. I always use paper liners for super easy removal. A small spoon or your fingers work for pressing. Get it nice and compact so it holds together. Then, pop the tin into the fridge. This chilling step helps the crust set and won’t crumble later.
Step 2: Make the Cheesecake Filling
Now for the creamy heart of the dessert. In a large bowl, beat the softened cream cheese, powdered sugar, and vanilla. Beat it until it’s completely smooth and has no lumps. In another bowl, whip the cold heavy cream. Watch it turn from liquid to fluffy clouds. You want stiff peaks that hold their shape. Gently fold the whipped cream into the cream cheese mix. Use a spatula and a light touch. You want to keep that airy texture. The filling will be light, pale, and dreamy.
Pro tip: Make sure your cream cheese is truly soft. Leave it out for an hour. This prevents a grainy filling.
Step 3: Assemble the Cheesecakes
Take your chilled crusts from the fridge. Spoon or pipe the filling onto each crust. Fill each cup almost to the top. I love using a piping bag for a neat, professional look. But a spoon is just fine. Smooth the tops with a spatula or the back of a spoon. You now have a row of lovely white cheesecake cups. They already look tempting. Return them to the fridge for a quick chill. This helps the filling firm up a bit before the toppings.
Step 4: Prepare the Chocolate Ganache
Let’s make the glossy chocolate crown. Combine the chopped chocolate and heavy cream in a microwave-safe bowl. Heat it in short bursts, like 30 seconds, then stir. Or use a double boiler. Stir until it’s completely smooth, dark, and glossy. The aroma is rich and inviting. Let it cool for just a minute. Then, carefully spoon or pour it over each cheesecake. Spread it gently to cover the top. You’re laying a perfect chocolate foundation for the caramel.
Step 5: Add Caramel and Garnish
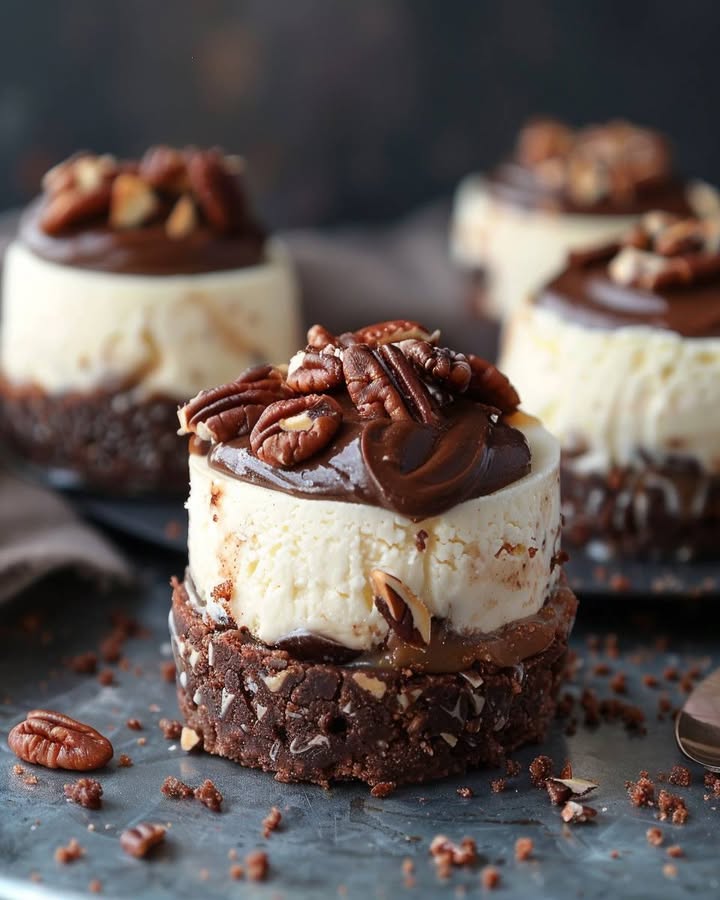
Time for the final, gorgeous layers. Drizzle caramel sauce over the chocolate ganache. Make pretty swirls or lines. Don’t be shy with the caramel! Then, sprinkle the chopped almonds and mini chocolate chips over the top. The colors and textures are beautiful. You see dark chocolate, golden caramel, brown nuts, and little chocolate dots. It’s a masterpiece in a cup. Your kitchen now smells like a candy shop.
Step 6: Chill and Serve
The last step is patience. Refrigerate the mini cheesecakes for at least 2-3 hours. This is crucial. It lets everything set and meld together. When you serve them, they should be firm but creamy. Lift them out of the tin by the paper liners. Place them on a platter. The moment you bite into the layers is pure joy. Crispy crust, creamy filling, rich chocolate, sticky caramel, crunchy nuts. It’s a party in your mouth.
Chef’s tip: For extra clean cuts, use a warm knife. Dip it in hot water and wipe dry before slicing through a cheesecake (if you’re not using liners).
Your Time Investment
This recipe respects your time.
- Prep Time: 25 minutes (active, fun work)
- Chill Time: 3 hours (passive, waiting time)
- Total Time: About 3 hours 25 minutes
- Servings: Makes about 12 mini cheesecakes
A Secret from My Kitchen
My secret is in the crust press. I use the bottom of a small, narrow glass or measuring cup. It fits perfectly into the muffin cup. It presses the crumbs down evenly and super firmly. This creates a strong, uniform base that won’t break when you eat it. A loose crust is disappointing. A solid crust makes the whole experience better.
A Fun Fact About Turtle Treats
The original “turtle” candy was created by DeMet’s Candy Company in the early 1900s. The story goes that a salesman saw the clustered pecans looked like a turtle’s shell. The caramel and chocolate resembled the body. He suggested the name, and it became a hit! Today, “turtle” is a flavor recognized everywhere. It’s a happy little piece of candy history in your dessert.
What You Need to Make Them
You don’t need fancy gear.
- Standard muffin tin (or mini cheesecake pan)
- Paper muffin liners (optional but helpful)
- Two mixing bowls
- Electric mixer or whisk (for whipping cream)
- Microwave-safe bowl or double boiler
- Spatula
- Spoons for scooping and drizzling
Storing Your No Bake Turtle Mini Cheesecakes
These cheesecakes store beautifully. After they are fully set, you can keep them in their muffin tin. Or, transfer them to an airtight container. Place them in the refrigerator. They will stay fresh and delicious for up to 4-5 days. The crust may soften slightly over time, but the flavor remains perfect.
For longer storage, you can freeze them. Freeze them individually on a tray first. Then, wrap each one tightly in plastic wrap. Place them in a freezer bag. They can freeze for up to 2 months. Thaw them in the refrigerator for a few hours before serving. The texture will be just as creamy.
If you need to transport them, keep them chilled. Use a cooler or insulated bag. The paper liners make them easy to carry. They are a fantastic dessert for picnics or outdoor parties where a full cake might be messy.
My Best Tips for Success
- Really soften the cream cheese. Room temperature is key for a smooth filling.
- Chill your bowl and beaters before whipping the heavy cream. It whips faster and better.
- When folding whipped cream into cream cheese, be gentle. You want to keep the airiness.
- Let the chocolate ganache cool slightly before pouring. Too hot can melt the filling.
- Use a squeeze bottle for the caramel drizzle. It gives you perfect control for pretty lines.
Presenting Your Cheesecakes Like a Pro
Presentation makes them even more special.
- Place each cheesecake on a small, colorful napkin on a platter.
- Add a tiny sprinkle of sea salt over the caramel for a fancy salted caramel effect.
- Serve with a small spoon or fork tied with a ribbon for a party.
- Arrange them on a tiered stand for a stunning centerpiece.
- For a holiday, add a tiny edible gold star or sprinkle on top.
Healthier Twists on the Turtle Treat
If you want lighter options, try these fun variations.
- Greek Yogurt Swap: Use half cream cheese and half full-fat Greek yogurt. It adds protein and a tangy note.
- Nut-Free Version: Skip the almonds. Use toasted sunflower seeds or just extra mini chips for crunch.
- Sugar-Free Caramel: Look for a sugar-free caramel sauce at the store. It works just as well for drizzling.
- Dark Chocolate Delight: Use 70% dark chocolate for the ganache. It’s richer and has less sugar.
- Mini Portions: Use a mini muffin tin to make even smaller bites. Perfect for calorie control.
- Date Caramel: Make a natural caramel from blended dates. It’s fruity, sweet, and has no added sugar.
Common Mistakes to Avoid
Steer clear of these pitfalls for perfect cheesecakes every time.
Mistake 1: Using Cold, Hard Cream Cheese
This is the biggest issue. Cold cream cheese will not blend smoothly. Your filling will be lumpy and grainy. It can also make it harder to fold in the whipped cream. Always let your cream cheese soften on the counter. Give it at least an hour. You can gently microwave it for a few seconds if you’re in a rush. But room temperature is best.
Mistake 2: Not Whipping the Cream Enough
Under-whipped heavy cream is sad. It will be soft and won’t hold its structure. When you fold it into the cream cheese, the whole filling can become runny. It won’t set properly in the fridge. Whip the cream until you get stiff peaks. The whisk should leave clear marks. The cream should stand up firmly when you lift the whisk. This gives you a light, airy, and stable filling.
Mistake 3: Skipping the Crust Chill Time
Don’t rush the crust. If you put the filling on a warm, soft crust, it can absorb butter and become soggy. The crust might also crumble when you try to eat the cheesecake. After pressing the crumbs, always chill the crust in the fridge. Even 15 minutes makes a difference. This lets the butter solidify and bind the crumbs. It creates a solid, tasty foundation.
Mistake 4: Pouring Hot Ganache
If your chocolate ganache is too hot, it can melt the creamy filling underneath. You might see the filling start to soften or even separate. Let the ganache cool for a few minutes after making it. Stir it occasionally. It should be warm and fluid, not hot. Test it by touching a drop on your finger. It should feel warm but not burning. Then pour it gently.
Mistake 5: Not Letting Them Set Fully
Impatience is a chef’s enemy. If you serve these too early, they will be messy. The layers might slump. The crust won’t hold. The filling might feel too soft. Respect the chill time. Give them at least 2-3 hours in the fridge. For the best texture, I often make them the day before. Overnight chilling makes them perfect. They become neat, firm, and ready to delight.
Your Questions Answered
Can I make these without a muffin tin?
Yes, you can! You have a few options. You can use a dedicated mini cheesecake pan. These often have removable bottoms. You can also use small, individual dessert cups or glasses. Simply press the crust into the bottom of each cup. Then add the layers. Paper liners help with any shape. If you use glasses, you can serve them directly in the glass. Just skip the liner. The presentation is still lovely.
How long do they last in the fridge?
They keep very well. In an airtight container in the refrigerator, they last 4 to 5 days. The caramel and chocolate toppings hold up fine. The crust might get a little softer after a few days. But the flavor is still great. I find they are best eaten within 3 days for perfect texture. Always store them covered to prevent them from drying out or absorbing fridge smells.
Can I freeze these mini cheesecakes?
Absolutely. Freezing is a great way to keep them longer. First, freeze them uncovered on a tray until solid. This prevents them from sticking together. Then, wrap each one tightly in plastic wrap. Place them all in a freezer bag or airtight container. They will freeze well for up to 2 months. To serve, thaw them in the refrigerator overnight. The texture returns to nearly perfect. The ganache may look a little less glossy, but it tastes the same.
What can I use instead of graham crackers for the crust?
Many things work! Try digestive biscuits, which are a common British cookie. You can use vanilla wafer cookies, shortbread cookies, or even Oreo crumbs (without the filling). For a nutty crust, try finely crushed pecans or almonds mixed with a little butter and sugar. Any dry, sweet cookie or cracker you like can become a crust. Just grind it finely and mix with melted butter until it holds together when pressed.
My filling is runny. What did I do wrong?
A runny filling usually has two causes. First, the cream cheese was too cold or not beaten enough. It didn’t blend smoothly with the sugar. Second, the heavy cream was not whipped to stiff peaks. It was too soft and didn’t provide enough structure. To fix it, you can try re-chilling the whole mixture. Sometimes it firms up after a few hours. If it’s very runny, you might need to start over. Ensure your cream cheese is soft and your whipped cream is very stiff.
Can I use pre-made whipped cream?
I don’t recommend it. Store-bought whipped cream in a tub or can is not stable enough. It often has a different texture and air content. It may not hold up when folded. It can make your filling watery or loose. Always whip your own heavy cream. It’s simple and gives you the perfect, stable base for your no-bake filling. It’s worth the extra few minutes of effort.
Do I have to use paper liners?
Liners are not a strict must, but they are very helpful. They make removal incredibly easy. They also keep the cheesecakes neat for serving. If you don’t use liners, make sure to grease your muffin tin well. You can also use a non-stick spray. The crust might stick a little. You can run a thin knife around the edge to help lift them out. Liners are my choice for zero stress and easy cleanup.
Can I make a big cheesecake instead of minis?
You can adapt this for a full-size cake. Use a springform pan or a regular pie dish. Increase the crust ingredients by about half. Double the filling recipe. Keep the topping amounts similar. Press the crust into the pan bottom. Spread the filling over it. Add the ganache and caramel on top. Chill it for at least 4-6 hours, or overnight. Slice and serve like a classic cheesecake. It’s a beautiful centerpiece dessert.
What’s the best caramel sauce to use?
You have choices. A good quality store-bought caramel sauce is perfectly fine. Look for one with a thick, rich texture. If you want to make your own, a simple 10-minute caramel is great. You just need sugar, butter, and cream. Homemade caramel tastes amazing and you control the flavor. For a quick hack, melt soft caramel candies with a little cream. Any thick, pourable caramel will work deliciously here.
Can I make these without nuts?
Of course. The nuts are for garnish and crunch. If you prefer no nuts, simply omit them. You can add other toppings instead. Try extra mini chocolate chips, crushed toffee bits, or even a sprinkle of sea salt. A little crushed pretzel could give a salty crunch. Or just leave them with pure chocolate and caramel. They will still be stunning and totally delicious without any nuts.
The Final Sweet Word
These No Bake Turtle Mini Cheesecakes are a little piece of joy. They bring the classic candy flavors into a cool, creamy, no-bake dessert. They save you time and impress everyone. I’ve made them for so many events. They are always a hit. Remember to soften your cream cheese, whip your cream well, and let them chill. Then, enjoy the praise from your friends and family. Happy no-bake baking!
Pizza Cupcake Delight
Ingredients
Equipment
Method
- Mix graham cracker crumbs, sugar, and melted butter in a bowl and press into the bottom of a muffin tin lined with paper liners; chill.
- In a large bowl, beat softened cream cheese, powdered sugar, and vanilla until smooth. Whip the heavy cream separately to stiff peaks and fold into the cream cheese mixture.
- Spoon or pipe the filling onto the chilled crusts, smoothing the tops, and return to the fridge to chill briefly.
- For the ganache, combine chopped chocolate and heavy cream in a microwave-safe bowl; heat until smooth and glossy. Cool slightly before pouring over each cheesecake.
- Drizzle caramel sauce over the ganache and sprinkle with chopped almonds and mini chocolate chips.
- Refrigerate for at least 2-3 hours before serving.