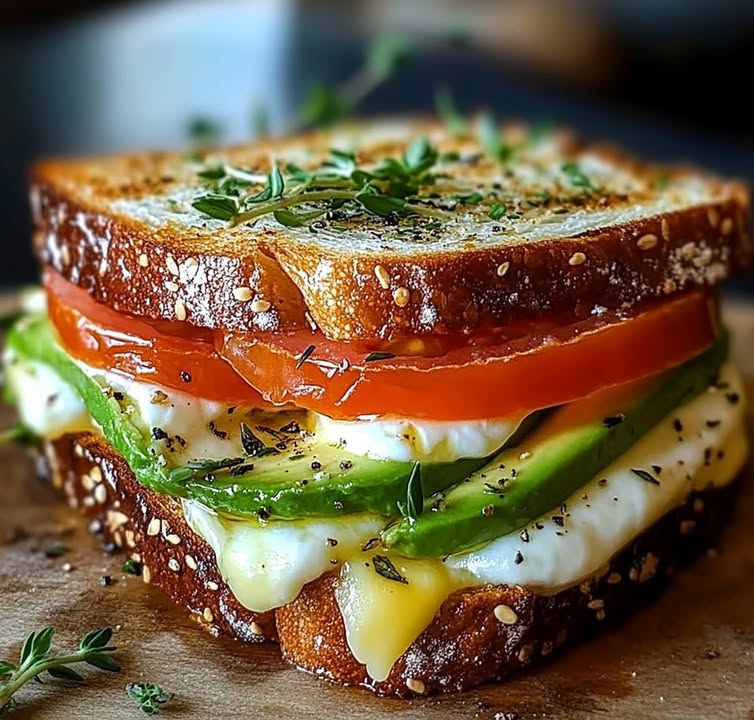
The Ultimate Avocado, Mozzarella, and Tomato Grilled Cheese
Have you ever had one of those days where a regular grilled cheese just won’t cut it? I was standing in my kitchen, staring at a ripe avocado and some juicy tomatoes, when it hit me. What if I took my favorite comfort food and made it… better? The result was pure magic. This isn’t just a sandwich; it’s a creamy, gooey, crunchy, and fresh hug on a plate. It’s the grilled cheese that dreams are made of, and I promise it will become your new go-to lunch.
From Simple Sandwich to Gourmet Treat
The classic grilled cheese is an American icon. It’s the food of childhood and cozy nights in. But like any good thing, it’s fun to play with! Adding avocado and tomato transforms it. It brings in a California freshness and an Italian caprese vibe. My version came to life during a Sunday lunch with friends. I wanted something quick, impressive, and utterly delicious. This sandwich was the star of the show. Everyone asked for the recipe! Now it’s my secret weapon for turning a simple meal into something special.
Why You’ll Love This Grilled Cheese
You will adore this recipe for so many reasons! First, it’s incredibly easy. You only need a few simple ingredients and one pan. Second, the flavor combination is unbeatable. The creamy avocado pairs perfectly with the melted, stretchy mozzarella. The tomato adds a juicy, bright pop. The buttery, toasted bread brings it all together. It’s a symphony of textures and tastes in every single bite. Plus, it’s versatile. You can use low-carb bread, dairy-free cheese, or add extra spices. It’s a recipe that adapts to you.
Perfect Occasions for This Sandwich
This isn’t just a random lunch. It’s perfect for specific moments. Think about a lazy weekend brunch alongside a fresh salad. It’s amazing for a quick and satisfying weeknight dinner when you’re short on time. It’s also a fantastic option for a casual get-together with friends. Slice it into strips for easy sharing! I’ve even packed it (wrapped in parchment paper) for picnics. It’s a crowd-pleaser that fits almost any event where good food and good company are the main ingredients.
Ingredients You’ll Need
Gather these simple, fresh items for your gourmet sandwich:
- 2 slices of bread (low-carb or regular sourdough works great)
- 1/2 ripe avocado, sliced
- 4 slices of fresh mozzarella cheese
- 4 thick slices of a ripe tomato (like Roma or Beefsteak)
- Salt and freshly ground black pepper to taste
- Butter, softened, for spreading
Easy Substitution Options
Don’t have something? No worries! This recipe is very forgiving.
- Bread: Use any bread you love! Sourdough, whole wheat, ciabatta, or gluten-free all work.
- Cheese: No fresh mozzarella? Use shredded low-moisture mozzarella, provolone, or even Monterey Jack.
- Butter: For a dairy-free version, use mayonnaise or a plant-based butter spread on the outside of the bread. It gives an amazing golden crisp!
- Add-Ins: Feel free to add a layer of fresh basil leaves, a sprinkle of red pepper flakes, or a thin spread of pesto.
How to Make Your Perfect Grilled Cheese
Follow these simple steps for a flawless, melty sandwich every single time.
Step 1: Butter Your Bread
Take your two slices of bread and spread a generous, even layer of softened butter on one side of each slice. This buttered side will become the gorgeous, golden-brown crust. Make sure you cover the bread all the way to the edges. This prevents any dry spots and ensures an even, crispy fry. Pro tip: Let your butter sit out for 15 minutes before you start. Soft butter spreads easily without tearing the bread.
Step 2: Heat Your Pan and Place the First Slice
Place a non-stick frying pan or griddle over medium heat. Let it get warm, but not smoking hot. Carefully place one slice of bread, buttered-side down, into the pan. You should hear a gentle sizzle. This is the sound of perfection starting! The bread will begin to toast slowly, allowing the cheese inside to melt completely by the time the outside is crisp.
Step 3: Layer the Goodness
Now for the fun part! Quickly layer the slices of mozzarella cheese on the bread in the pan. Top them with the juicy tomato slices. Then, artfully arrange the creamy green avocado slices on top. Season everything with a good pinch of salt and a few cracks of black pepper. The salt will brighten all the flavors. Watch as the cheese starts to soften and glisten from the heat below.
Step 4: Top It Off and Cook
Place the second slice of bread on top, buttered-side facing up. This creates the classic sandwich structure. Now, let it cook undisturbed for about 3-4 minutes. Peek at the bottom slice. You’re waiting for a deep, golden-brown color and a satisfying crunch when you gently lift it with a spatula.
Step 5: The Perfect Flip
This is the moment of truth! Slide your spatula fully under the sandwich. With a confident, smooth motion, flip the entire sandwich over. It should feel sturdy. If cheese starts to ooze out, gently press it back in with the spatula. Cook the second side for another 3-4 minutes until it matches the first side in crispness and color. You’ll know it’s done when the cheese is visibly melted and oozy.
Step 6: Serve and Savor
Transfer your masterpiece to a cutting board. Let it rest for just one minute. This allows the cheese to set slightly so it doesn’t all rush out when you cut it. Slice it in half diagonally—it just tastes better that way! Serve it immediately while it’s hot, crispy, and gloriously messy. Chef’s tip: For extra flavor, sprinkle a tiny bit of garlic powder or dried Italian herbs into the soft butter before spreading it on the bread.
Quick Timing Guide
This recipe is wonderfully fast. Here’s the breakdown:
- Prep Time: 5 minutes (slicing and buttering)
- Cooking Time: 8-10 minutes
- Total Time: About 15 minutes
- Servings: 1 very happy person (easy to double or triple!)
Chef’s Secret for Maximum Melt
Here’s my little secret: cover the pan with a lid for the first minute after you add the top slice of bread. This traps the heat and creates a steamy environment. It helps the cheese melt faster and more evenly from the inside out. This means your bread won’t burn before your cheese is perfectly gooey. Just don’t leave the lid on too long, or the bread will get soggy. One minute is the sweet spot!
A Little Extra Info
Did you know that adding a fat like butter or mayo to the *outside* of the bread is what creates the Maillard reaction? That’s the scientific term for the delicious browning and complex flavors we love in grilled cheese. It’s not just frying; it’s a flavor transformation! So, don’t be shy with that butter. It’s the key to a transcendent crust.
Necessary Equipment
You don’t need anything fancy:
- A good non-stick frying pan or griddle
- A flexible spatula (for that perfect flip)
- A sharp knife (for slicing avocado, tomato, and the final sandwich)
- A cutting board
How to Store Your Grilled Cheese
This sandwich is truly best eaten fresh and hot. The crisp bread and melted cheese are at their peak right out of the pan. If you absolutely must store it, let it cool completely to room temperature first. Then, wrap it tightly in aluminum foil or place it in an airtight container.
You can store it in the refrigerator for up to one day. The avocado will oxidize and turn brown, and the bread will lose its crunch. To reheat, the oven or a toaster oven is your best friend. Preheat to 350°F and warm it for about 10 minutes. This will help re-crisp the bread slightly, though it won’t be quite the same as fresh.
I do not recommend freezing this sandwich. The avocado and tomato do not freeze and thaw well. They will become very watery and mushy. For the best experience, make it and enjoy it right away. It’s so quick, there’s really no need to make it ahead!
Helpful Tips and Advice
- Use ripe but firm ingredients: Your avocado should be slightly soft, not mushy. Your tomato should be juicy but able to hold a slice without falling apart.
- Control your heat: Medium heat is crucial. Too high burns the bread before the cheese melts. Too low makes the bread greasy and soggy.
- Press gently: After flipping, you can gently press down on the sandwich with your spatula. This helps all the layers bond together. Don’t smash it flat!
- If you love exploring quick, flavor-packed meals, you’ll find more inspiration in our collection of easy everyday cooking recipes.
Presentation Tips to Impress
Make it look as good as it tastes!
- Slice diagonally and fan the halves out on a simple white plate.
- Add a small side salad of mixed greens with a light vinaigrette.
- For a fun appetizer, use smaller bread (like slider buns) and cut into quarters. Serve on a platter for a party.
- Drizzle a tiny bit of balsamic glaze on the plate around the sandwich for a restaurant-style touch.
Healthier and Creative Variations
Love this combo? Try these six fun twists!
- The Protein Power-Up: Add a few slices of cooked turkey bacon or grilled chicken breast for a hearty, protein-packed meal that’s still delicious.
- The Pesto Paradise: Spread a thin layer of homemade or store-bought pesto on the *inside* of the bread before adding cheese. The herby garlic flavor is incredible.
- The Spicy Kick: Add a few slices of fresh jalapeño or a sprinkle of chili flakes with the avocado. Pair with pepper jack cheese for extra heat.
- The “Everything Bagel”: Mix everything bagel seasoning into your softened butter before spreading. It creates a wonderfully savory, seedy crust.
- The Greek Style: Swap mozzarella for crumbled feta cheese and add a pinch of dried oregano. The salty feta with creamy avocado is a dream.
- The Open-Faced Melt: For a lower-carb version, skip the top slice of bread. Pile your toppings on one toasted slice and broil until bubbly. Eat with a fork and knife!
If you’re in a sweet mood after your savory sandwich, you must try our refreshing Strawberry Bliss Frappuccino for a creamy treat. Or, for your next gathering, this vibrant Flamingo Pink Piña Colada is a surefire hit. And don’t forget handy kitchen tricks, like learning how to freeze eggs when you find a good sale, which is perfect for future baking projects.
Common Mistakes to Avoid
Mistake 1: Using High Heat
It’s so tempting to crank up the stove to get things moving fast. This is a surefire way to end up with charred, blackened bread and cold, unmelted cheese in the middle. The outside cooks way too quickly, leaving the interior untouched. Always use medium heat. This gives the cheese time to slowly melt and become deliciously gooey while the bread toasts to a perfect golden brown. Patience makes perfect here!
Mistake 2: Overstuffing the Sandwich
You love avocado and tomato, so why not add more? Because too many wet ingredients can make your bread soggy. Excess moisture from the tomato and avocado steams inside the sandwich, preventing that crisp crust. It also makes the sandwich harder to flip without everything falling out. Stick to the recommended amounts. If you want more flavor, add spices or a spread, not more bulk.
Mistake 3: Slicing Ingredients Too Thick
A thick slab of tomato or a giant chunk of avocado might seem hearty, but it creates a tall, unstable sandwich. The heat can’t penetrate thick layers properly, leading to uneven cooking. Your tomato might stay cold while your bread burns. Slice your tomato and avocado to a moderate, even thickness—about 1/4 inch is ideal. This ensures every layer warms through and the sandwich holds together when you bite into it.
Mistake 4: Not Letting the Pan Heat First
Placing your buttered bread in a cold pan is a common error. The butter will simply soak into the bread as the pan slowly heats, resulting in a greasy, pale, and sad sandwich. Always give your pan 2-3 minutes to preheat over medium heat. You should be able to hold your hand a few inches above it and feel the warmth. That initial sizzle when the bread hits the pan is the sound of a crispy crust being born.
A Note on Fresh Ingredients
Using fresh, quality ingredients makes all the difference in simple recipes like this. For more guidance on understanding the food you buy, you can always check official resources like the FDA’s page on nutrition labeling to help make informed choices.
Frequently Asked Questions
Can I make this avocado grilled cheese ahead of time?
I really don’t recommend it. The beauty of this sandwich is in its fresh, contrasting textures: the hot, crispy bread and the cool, creamy avocado. Making it ahead means the bread gets soggy from the avocado and tomato moisture. The avocado will also start to turn brown. This is a “make and eat immediately” kind of meal. The good news is it only takes about 15 minutes from start to finish, so you can have a fresh one whenever the craving hits!
What’s the best type of bread to use?
You want a bread that’s sturdy enough to hold the fillings but still gets beautifully crispy. My top picks are sourdough (for its tangy flavor and great crunch), a hearty whole wheat, or a thick-cut country white bread. Avoid very soft, fluffy sandwich bread if you can, as it can tear easily and doesn’t provide as satisfying a crunch. For a low-carb option, many seeded or protein breads work wonderfully and still toast up nice and crisp.
How do I keep the avocado from turning brown?
Since you’re cooking the sandwich right after assembling, browning isn’t usually a big issue. But if you’re slicing the avocado ahead of time, squeeze a little lemon or lime juice over the slices. The acid slows down oxidation. For this recipe, just slice your avocado last, right before you’re ready to build the sandwich. Once it’s sealed inside the hot sandwich with melted cheese, it’s protected from the air and will stay a lovely green.
Can I use shredded mozzarella instead of slices?
Absolutely! Shredded low-moisture mozzarella (the kind in a bag) melts very well and will give you a more uniform, stringy cheese pull. Just be sure to use enough to cover the bread evenly. I recommend about 1/2 to 3/4 cup shredded cheese. Fresh mozzarella slices have a higher moisture content and a softer, creamier melt, which I personally prefer. Both options are delicious, so use what you have on hand.
My cheese isn’t melting before the bread burns. What am I doing wrong?
This almost always means your heat is too high. Turn it down to medium or even medium-low. Also, make sure your cheese is at room temperature when you start. Cold cheese from the fridge takes much longer to melt. Try the “lid trick” from the Chef’s Secret section: cover the pan for the first minute after assembly to trap steam and heat. This gently melts the cheese from the top down while the bottom toasts.
Is there a way to make this dairy-free?
Yes, you can easily make a fantastic dairy-free version! Use your favorite plant-based butter or mayonnaise on the outside of the bread. For the cheese, choose a melty vegan mozzarella-style shred or slice. Many brands now melt surprisingly well. Just follow the same cooking method. The avocado provides plenty of creaminess, so you won’t feel like you’re missing out at all.
Can I add meat to this sandwich?
Of course! This is a fantastic base for adding protein. A couple of slices of crispy cooked bacon, some sliced ham, or even leftover shredded rotisserie chicken would be wonderful additions. Just layer the meat in with the cheese and other fillings. If the meat is cold, make sure it’s thinly sliced so it warms through properly during the short cooking time.
What should I serve with this grilled cheese?
This sandwich is pretty satisfying on its own! For a light meal, I love it with a simple side salad of mixed greens with a lemon vinaigrette. A bowl of tomato soup is the classic, cozy pairing—the flavors complement each other perfectly. For something different, try it with sweet potato fries or a handful of crisp pickle chips. A cold, crisp apple sliced on the side is also a refreshing contrast.
Why do you butter the outside of the bread?
Buttering the outside is the secret to the perfect golden, crispy, and flavorful crust. As the sandwich cooks, the butter fries the bread, creating a delicious Maillard reaction (that’s the browning that adds deep flavor). It also creates a barrier that helps the bread crisp up instead of just drying out. Some people swear by using mayonnaise instead of butter, which also works great and adds a subtle tang.
Can I cook this in a panini press or sandwich grill?
Definitely! A panini press is a great tool for this recipe. You don’t need to butter the outside if using a press with non-stick plates, as it won’t add the same buttery flavor. The press will give you even, defined grill marks and apply gentle pressure for a compact sandwich. Just be careful with very wet fillings—the pressure can sometimes push them out the sides. Cook until the bread is marked and the cheese is melted.
Your New Favorite Sandwich Awaits
So there you have it. The grilled cheese that changed my lunch game forever. It’s simple enough for a busy day but special enough to serve to friends. The combination of creamy avocado, melty mozzarella, and juicy tomato is truly unbeatable. I hope you give this recipe a try and that it brings as much joy to your kitchen as it has to mine. Now, go grab that avocado and get cooking. Your delicious, crispy, melty masterpiece is just a few minutes away
Veggie Frittata Cups
Ingredients
Equipment
Method
- Butter both sides of each slice of bread with softened butter.
- Heat a non-stick frying pan or griddle over medium heat and place one slice of bread, buttered-side down, in the pan.
- Layer mozzarella cheese on the bread in the pan, then add tomato slices and avocado slices.
- Season with salt and pepper, then place the second slice of bread on top, buttered-side facing up.
- Cook for 3-4 minutes until the bottom slice is golden brown and crispy.
- Flip the sandwich using a spatula and cook the other side for another 3-4 minutes until it matches the first side in color and crispness.
- Transfer the sandwich to a cutting board, let it rest for a minute, then slice diagonally and serve.