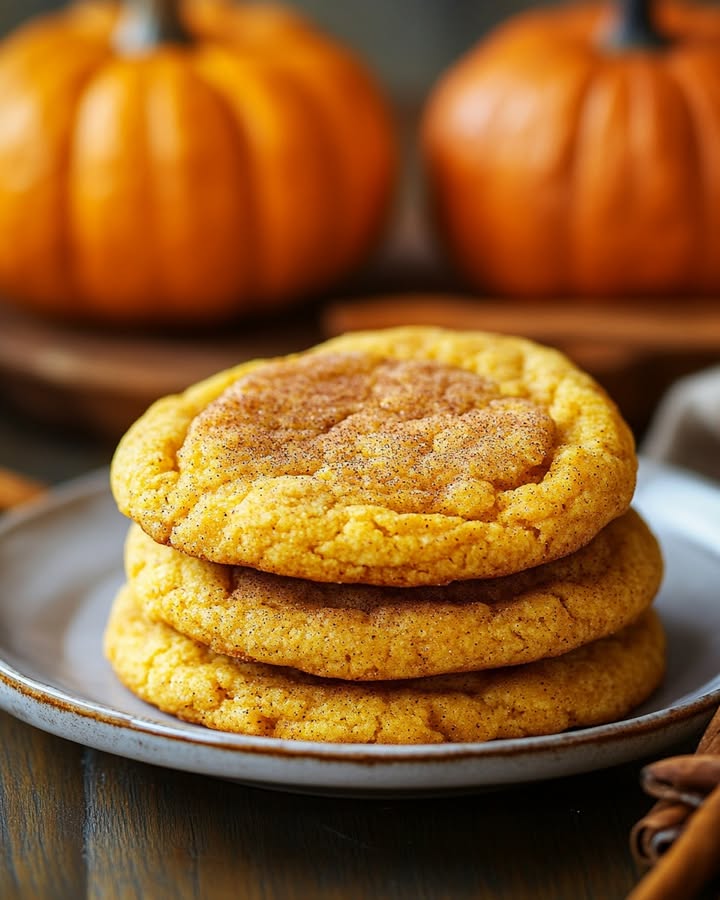
Scrumptious Snickerdoodle Pumpkin Cookies with Creamy Filling: My New Fall Favorite!
Is there anything cozier than the smell of cinnamon and pumpkin wafting through your kitchen on a crisp autumn day? I don’t think so! I created these cookies last fall when I had a little too much pumpkin puree left over from making pie. I wanted to blend the spicy charm of a classic snickerdoodle with the cozy warmth of pumpkin. The result? These pillowy-soft, spiced pumpkin cookies with a hidden pocket of sweet cream cheese filling. They were such a hit at my book club that I had to promise everyone the recipe. Trust me, your cookie jar has never seen anything this good.
A Delicious Mash-Up Story: Where Two Cookie Classics Meet
The classic snickerdoodle, with its crackly cinnamon-sugar top and soft, tangy interior, has been a staple in American homes for over a century. Its name is just plain fun to say! Pumpkin cookies, on the other hand, bring the essence of fall harvests and holiday pies to your plate. I thought, “Why choose?” By marrying the dough of a soft pumpkin cookie with the snickerdoodle’s iconic cinnamon-sugar roll, and then adding a surprise cream cheese center, we get a modern treat that honors tradition while tasting wonderfully new. It’s like a snickerdoodle and a pumpkin cheesecake had the most delicious baby.
Why You’ll Fall Head Over Heels for This Recipe
First, the texture is pure magic. The pumpkin keeps the cookie incredibly moist and cake-like, while the filling turns into a creamy, almost melt-in-your-mouth surprise. Second, it’s easier than it looks. The dough is straightforward to mix, and hiding the filling inside is a fun, hands-on process—great for getting kids involved! Finally, the flavor hits every note: warm spices, sweet pumpkin, tangy cream cheese, and that nostalgic cinnamon-sugar crust. It’s a full symphony of autumn in one bite.
Perfect Occasions for These Special Cookies
- After-School Treats: Imagine the smiles when you pull these warm cookies out of the oven as the kids get home.
- Fall Gatherings: From Halloween parties to Thanksgiving potlucks, these cookies scream festive season.
- Cookie Exchange Gifts: They’re unique and beautiful, guaranteed to make you the star of the swap.
- Just Because: A rainy Sunday afternoon is the perfect excuse to bake a batch for pure, cozy joy.
What You’ll Need: The Ingredients List
Gather these simple ingredients for a baking session filled with wonderful aromas!
- 3 and 3/4 cups all-purpose flour
- 1 and 1/2 teaspoons baking powder
- 1/2 teaspoon salt
- 1 teaspoon ground cinnamon
- 1 cup unsalted butter, room temperature
- 1 cup granulated sugar
- 1/2 cup light brown sugar
- 3/4 cup pumpkin puree (not pumpkin pie filling)
- 1 large egg
- 2 teaspoons vanilla extract
- For the Cream Cheese Filling: 8 oz. cream cheese, softened; 1/3 cup powdered sugar; 1 teaspoon vanilla extract
- For the Cinnamon-Sugar Coating: 1/2 cup granulated sugar; 1 and 1/2 teaspoons ground cinnamon
Handy Substitution Options
Don’t fret if you’re missing something! Here are some easy swaps:
- Gluten-Free: Use a 1:1 gluten-free all-purpose flour blend.
- Dairy-Free: Swap the butter for a plant-based stick butter and use dairy-free cream cheese.
- Spice It Up: Add a pinch of nutmeg, ginger, or cloves to the dough for extra warmth.
- Sugar Swap: You can use all granulated or all brown sugar, but the mix gives the best flavor and texture.
Step-by-Step: Let’s Make Cookie Magic!
Step 1: Whisk the Dry Ingredients
Grab a large bowl and your whisk. Measure out the flour, baking powder, salt, and that first teaspoon of cinnamon. Whisk them all together until you see a uniform, light beige powder. This isn’t just mixing; it’s making sure every future bite has the perfect balance of spice and lift. No one wants a mouthful of just baking powder! Doing this first sets you up for success and makes the next steps smoother.
Step 2: Cream the Butter and Sugars
In your mixing bowl, beat the room-temperature butter with the granulated and brown sugars. You’ll know it’s ready when the mixture turns pale, fluffy, and looks almost like a light cookie dough itself. This takes about 2-3 minutes with an electric mixer. Now, add in the pumpkin puree, egg, and vanilla. The bowl will become a gorgeous orange color, and the smell will start to get wonderfully autumnal. Mix until everything is just combined and silky.
Pro tip: Room-temperature butter is key! If it’s too cold, your cookies won’t spread right. If it’s too soft, they’ll spread too much.
Step 3: Combine Wet and Dry
With your mixer on low speed, slowly add the flour mixture to the wet ingredients. I like to add it in three parts to avoid a flour cloud in my kitchen! Mix until the dough just comes together and no dry streaks remain. The dough will be soft and slightly sticky, which is perfect. Overmixing here can make the cookies tough, so stop as soon as it’s unified. You’ve just made the base of your amazing pumpkin cookies!
Step 4: Make the Creamy Surprise Filling
In a separate, smaller bowl, beat the softened cream cheese, powdered sugar, and vanilla. You want this to be absolutely smooth, with no lumps. It should be thick but spreadable. I sometimes pop this bowl in the fridge for 10-15 minutes while I preheat the oven. A firmer filling is much easier to handle when you’re assembling the cookies, making your secret center less likely to ooze out prematurely.
Step 5: Preheat and Prep
Turn your oven to 350°F (175°C). This gives it plenty of time to reach the perfect temperature. Line your baking sheets with parchment paper. This is my #1 trick for no-stick cookies and easy cleanup. Don’t skip it! You can also use a silicone baking mat if you have one. Now, get your cinnamon-sugar coating ready by mixing the sugar and cinnamon in a small, shallow bowl.
Step 6: Assemble the Cookie “Pockets”
Here’s the fun part! Scoop about a tablespoon of dough and flatten it slightly in your palm. Place a small teaspoon-sized dollop of the cream cheese filling right in the center. Gently fold the dough around the filling, pinching it closed, and roll it into a neat ball between your palms. The goal is to completely enclose the filling. If a little peeks out, just patch it with a tiny bit more dough. Repeat until all the dough and filling are used.
Chef’s tip: Wash your hands lightly if they get too sticky from the dough. A little dampness helps the dough not stick to you as you roll.
Step 7: Roll in Cinnamon-Sugar
Take each dough ball and roll it generously in the cinnamon-sugar mixture. Coat it completely! This creates that classic snickerdoodle sparkle and crackly crust. The sugar will stick to the slightly sticky dough beautifully. Place each coated ball on your prepared baking sheet, leaving about 2 inches between them. They need room to spread a little as they bake into perfect, plump cookies.
Step 8: Bake to Golden Perfection
Slide the baking sheet into your preheated oven. Bake for 12 to 15 minutes. You’re looking for the edges to be just set and lightly golden. The tops may still look a little soft, and that’s perfect. They will firm up as they cool. Don’t overbake them, or you’ll lose that wonderful soft, cakey texture. The smell in your kitchen right now is your reward.
Step 9: Cool and Enjoy!
Let the cookies cool on the baking sheet for at least 5 minutes. This allows them to set so they don’t fall apart when you move them. Then, using a spatula, transfer them to a wire rack to cool completely. The filling will be very hot right out of the oven, so patience is a virtue here! Once cooled, the filling sets into a dreamy, creamy pocket.
Your Baking Timeline
- Prep Time: 20 minutes (a bit longer if you’re new to stuffing cookies!)
- Cooking Time: 15 minutes per batch
- Cooling Time: 20-30 minutes
- Total Time: About 1 hour from start to first bite
My Secret for the Best Texture
For an extra-mile snickerdoodle experience, I add a tiny pinch of cream of tartar (about 1/4 teaspoon) to the dry ingredients. It’s not in the main recipe, but it gives that signature snickerdoodle “tang” and helps keep the cookies tender. Try it next time if you have some in your spice cabinet!
A Fun Fact About Pumpkin Puree
Did you know the pumpkin we use for baking is actually a specific type of squash? It’s often called a “sugar pumpkin” or “pie pumpkin” and is denser and sweeter than the giant pumpkins used for carving jack-o’-lanterns. Using canned puree is perfectly fine and actually ensures consistent moisture and flavor for your baking every single time.
Kitchen Tools You’ll Need
- Whisk together flour, baking powder, salt, and cinnamon.
- Cream the butter with granulated and brown sugars until fluffy.
- Add pumpkin puree, egg, and vanilla to the creamed mixture and mix until combined.
- Gradually mix in the dry ingredients until a soft dough forms.
- Beat cream cheese, powdered sugar, and vanilla for the filling until smooth.
- Preheat oven to 350°F (175°C) and prepare baking sheets with parchment paper.
- Scoop dough, flatten it, add cream cheese filling, close and roll into balls.
- Roll each ball in the cinnamon-sugar mixture and place on the baking sheet.
- Bake for 12-15 minutes until edges are lightly golden.
- Cool on the baking sheet for 5 minutes before transferring to a wire rack.
Christmas Chocolate Tarts
Ingredients
Equipment
Method
Nutrition
Notes
For a dairy-free version, use plant-based butter and cream cheese.
Add spices like nutmeg or ginger for extra warmth.
These cookies are perfect for fall gatherings, after-school snacks, or just because you want a cozy treat! Store in an airtight container for freshness.