I’ll never forget the first time I tried making Crispy Onion Blossom Bites at home. My family had just gotten back from our favorite restaurant, and everyone kept talking about those golden, crunchy appetizers we’d shared. My daughter looked at me and said, “Mom, can we make these ourselves?” Challenge accepted. After a few kitchen experiments and one minor flour explosion, I figured out exactly how to get that restaurant-quality crunch at home.
These bite-sized treats have become one of the most loved appetizers at parties and family gatherings. They give you all the flavor of those giant fried onion blooms you see at steakhouses, but in a much more manageable size. No messy cutting required, and your guests can grab them easily without needing a plate and fork.
What makes these little bites so special is their perfect balance. You get a crispy, seasoned coating on the outside with tender, sweet onion on the inside. Each piece delivers that satisfying crunch we all crave in a good appetizer. They’re also incredibly versatile. Serve them with your favorite dipping sauce, and watch them disappear in minutes.
I’ve made these Crispy Onion Blossom Bites dozens of times now. I’ve learned which shortcuts work and which ones don’t. I’ve discovered the secrets to getting that extra-crispy coating and keeping the onions perfectly tender. Through trial and error, I’ve found the best oils for frying and the ideal temperature that prevents greasy results.
In this article, I’ll walk you through everything you need to know. We’ll cover the essential ingredients and discuss which onions work best. I’ll share my favorite batter recipe and explain how to get that golden color every single time. You’ll learn the proper frying technique and discover which dipping sauces pair perfectly with these bites. By the end, you’ll have all the knowledge you need to impress your friends and family with this crowd-pleasing appetizer.
Ingredients You’ll Need for Crispy Onion Blossom Bites
Getting the right ingredients makes all the difference when you’re making these bites. I’ve tested various combinations, and I can tell you which items are essential and where you have some flexibility.
Here’s what you’ll need for the onions:
- 3 to 4 medium yellow or sweet onions
- 2 cups all-purpose flour (divided)
- 1 tablespoon paprika
- 1 tablespoon garlic powder
- 1 teaspoon cayenne pepper (adjust to your heat preference)
- 1 teaspoon dried thyme
- 2 teaspoons salt
- 1 teaspoon black pepper
For the batter, gather these items:
- 2 large eggs
- 1 cup buttermilk (or regular milk with 1 tablespoon lemon juice)
- 1 cup cold water
- 1 cup all-purpose flour
- 1 teaspoon baking powder
You’ll also need:
- Vegetable oil or peanut oil for frying (about 6 to 8 cups)
- Your favorite dipping sauces
The flour creates that crispy coating everyone loves. I always divide it into two portions because you’ll use one for the initial coating and mix the other into the wet batter. This double coating technique is my secret weapon for extra crunch.
The spice blend gives these bites their signature flavor. Don’t skip the paprika because it adds both color and a subtle sweetness. Garlic powder brings savory depth, while cayenne gives just enough heat to keep things interesting. If you have kids or prefer milder food, cut the cayenne in half or leave it out completely.
Buttermilk makes the batter incredibly light and helps create those crispy ridges. If you don’t have buttermilk on hand, just add a tablespoon of lemon juice or white vinegar to regular milk. Let it sit for five minutes, and you’ve got a perfect substitute.
The cold water in the batter is important. Cold liquids help create a crispier texture when the batter hits the hot oil. I sometimes even add an ice cube to my batter bowl to keep everything nice and chilled.
Ingredient Substitutions for Different Dietary Needs:
Need to make adjustments? I’ve got you covered with these alternatives that still deliver great results.
For a gluten-free version, swap the all-purpose flour with a gluten-free flour blend. I’ve had success with blends that contain rice flour and xanthan gum. Just make sure your baking powder is also gluten-free, as some brands contain wheat derivatives.
Dairy-free folks can use plant-based milk instead of buttermilk. Mix unsweetened almond milk or oat milk with a tablespoon of apple cider vinegar. This creates the same tangy flavor that helps tenderize the coating.
Want to reduce calories? You can bake these instead of frying them. I’ll be honest though, they won’t be quite as crispy. If you go this route, brush them generously with oil and bake at 425°F, turning them halfway through cooking.
For the oil, vegetable oil works great and stays neutral in flavor. Peanut oil is my personal favorite because it has a high smoke point and adds a subtle nuttiness. Canola oil is another solid choice if you want something budget-friendly.
The seasonings are flexible too. Add some Italian herbs for a different flavor profile, or try smoked paprika instead of regular for a deeper taste. Some people love adding a bit of ranch seasoning mix to their flour for extra flavor.
What Are the Best Types of Onions to Use for Crispy Onion Blossom Bites?
This question comes up every time I share this recipe. The onion you choose really does affect the final result, and I’ve tested pretty much every variety you can find at the grocery store.
Yellow onions are my go-to choice most of the time. They have a nice balance of sweetness and sharpness that mellows perfectly when fried. They’re also affordable and available everywhere. The flavor isn’t too strong, which means they appeal to most people, even those who usually avoid onions.
Sweet onions like Vidalia or Walla Walla are fantastic if you want a milder taste. These work especially well if you’re serving kids or anyone who finds regular onions too intense. They caramelize beautifully in the hot oil and develop this lovely golden color. The downside is they can be more expensive and aren’t always in season.
White onions are sharper and more pungent than yellow ones. I use these when I want a bolder onion flavor that stands up to spicy dipping sauces. They’re common in Mexican cooking and hold their shape well during frying.
Red onions are beautiful but not my first choice for this recipe. They have a milder flavor, which is nice, but they can turn an odd purple-gray color when fried. If appearance doesn’t matter to you, go ahead and use them. They taste perfectly fine.
Size matters too. Look for medium onions, roughly the size of a tennis ball. They should feel heavy for their size, which means they’re fresh and full of moisture. Avoid onions with soft spots, sprouting tops, or papery skins that seem dried out.
I always pick onions that are as round as possible. This makes cutting uniform pieces much easier. Oddly shaped onions lead to uneven bites, with some pieces being too large and others too small.
Store your onions in a cool, dry place away from potatoes. Potatoes release moisture and gases that make onions spoil faster. A mesh bag in your pantry works perfectly and keeps air circulating around them.


Preparation and Cooking Steps
Once you’ve got your onions picked out, it’s time to get cooking. This is where the magic happens, and honestly, it’s not as complicated as you might think.
Step-by-Step Guide
The first thing I do is set up my workspace. I grab three shallow bowls and line them up on my counter. This assembly line approach makes the coating process so much smoother. Trust me, trying to do this without proper prep leads to batter everywhere and frustration.
Preparing the onions is your first task. Peel off the papery outer layers until you reach the smooth, shiny surface underneath. Cut off about half an inch from the top, but leave the root end intact for now. Then slice your onions into rings about a quarter to a half inch thick. Here’s where I differ from some recipes: I actually separate the rings completely. Some people try to keep them attached, but I find individual rings much easier to work with and they cook more evenly.
Drop your onion rings into a bowl of cold water with a pinch of salt. Let them soak for about ten minutes. This step isn’t mandatory, but it takes away some of that harsh bite and makes the onions taste sweeter. My mother-in-law taught me this trick years ago, and it really does make a difference.
While the onions are soaking, mix your seasoned flour in the first bowl. Combine one cup of flour with all your spices—the paprika, garlic powder, cayenne, thyme, salt, and pepper. Give it a good whisk to distribute everything evenly. No one wants a bite that’s all cayenne and another with no flavor at all.
In the second bowl, whisk together your eggs and buttermilk until they’re completely combined. The mixture should be smooth and slightly frothy. In the third bowl, mix your remaining cup of flour with the cold water and baking powder. This creates what I call the “magic batter” because it puffs up beautifully when it hits the hot oil.
Now comes the fun part. Pat your onion rings dry with paper towels. Seriously, don’t skip this step. Wet onions won’t hold the coating properly, and you’ll end up with a soggy mess.
The coating process follows a specific order: First, dredge each onion ring in the seasoned flour, making sure to coat both sides completely. Shake off any excess—you want a light dusting, not clumps. Next, dip it into the egg mixture, letting any extra drip back into the bowl. Finally, drag it through the batter, using a fork to help coat it evenly. Some people like to do a double dip, going back into the seasoned flour after the batter. I sometimes do this when I want an extra-thick crust.
While you’re coating the onions, heat your oil in a heavy-bottomed pot or deep fryer. You need at least three inches of oil, and the temperature should reach 375°F. I cannot stress enough how important a thermometer is here. Too cool, and your bites absorb oil and turn greasy. Too hot, and they burn on the outside while staying raw inside. I learned this the hard way during my first attempt when I eyeballed the temperature and ended up with charcoal-colored onions.
Gently lower your coated onion rings into the hot oil using a slotted spoon or spider strainer. Don’t crowd the pot. I usually do four or five rings at a time, depending on their size. Overcrowding drops the oil temperature and leads to uneven cooking.
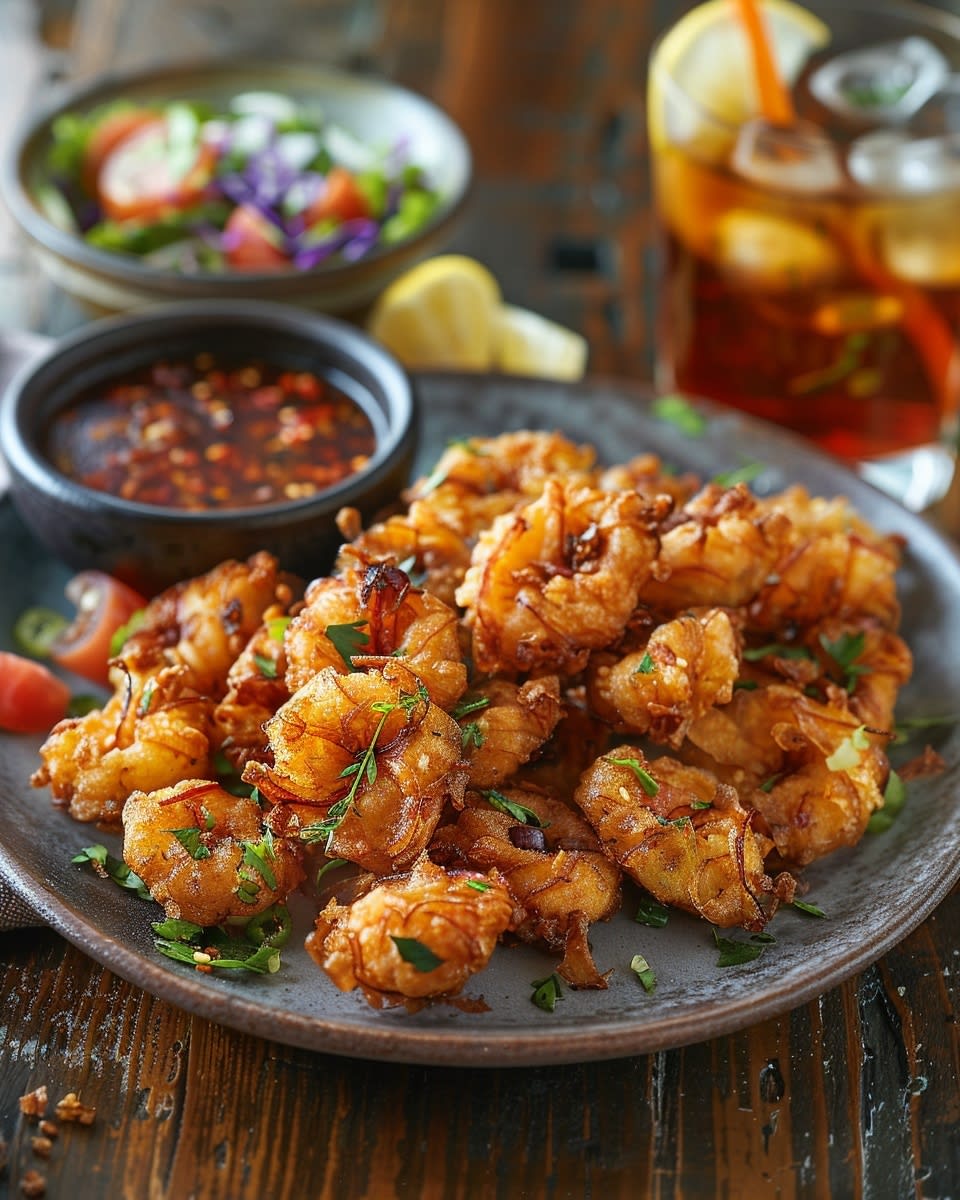
Fry them for about two to three minutes per side. You’re looking for a gorgeous golden brown color that reminds you of perfectly toasted bread. The batter should be crispy and set, not pale or doughy. Use your slotted spoon to flip them halfway through. By the way, if you’ve ever made Mini Chicken Quesadilla Bites, you’ll recognize this same careful monitoring of cooking time and temperature.
When they’re done, lift them out and let them drain on a wire rack set over a baking sheet. Never drain fried foods on paper towels if you can help it. They trap steam underneath, which makes your beautiful crispy coating turn soft. A wire rack lets air circulate all around, keeping everything crunchy.
Season them immediately with a little extra salt while they’re still hot. The salt sticks better this way and enhances all those flavors you built into the coating. I sometimes add a sprinkle of fresh herbs too, like chopped parsley or chives, just for color and a fresh note.
Common Mistakes to Avoid
I’ve made every mistake possible with these bites, so let me save you some trouble. The biggest error people make is using batter that’s too thick. It should have the consistency of heavy cream, not pancake batter. If yours looks more like cookie dough, add a splash more water. Thick batter creates a heavy, doughy coating that never gets properly crispy.
Another common problem is not drying the onions after their water bath. I mentioned this before, but it bears repeating because I see people skip this step all the time. Moisture is the enemy of crispy coatings.
Overcooking is definitely an issue. I get it—you want them extra crispy. But leaving them in too long makes them bitter and hard instead of crispy and tender. Watch for that golden brown color and pull them out promptly. Similar to when you’re making Loaded Nachos with Ground Beef, timing is everything to avoid burning while ensuring proper cooking.
Some folks try to use the same oil for too long. After frying several batches, little bits of batter accumulate and burn, creating a bitter taste and dark specks on your food. Strain your oil between batches if you’re making a large quantity, or just use fresh oil.
Not maintaining oil temperature is probably the most frequent mistake. Every time you add food, the temperature drops. You need to let it come back up to 375°F between batches. This requires patience, which I know is tough when you’re hungry and everything smells amazing.
Funny enough, people also tend to undersalt their coating mixture. Remember, flour dilutes flavors, so your seasoned flour should taste almost too salty on its own. It’ll be perfect once it’s coating the onion and diluted by the other components.
How Do You Keep the Onion Blossom Bites from Getting Soggy?
This question keeps me up at night because I hate soggy fried food. Nothing’s more disappointing than biting into what looks like a crispy treat only to find it’s turned limp and greasy.
The wire rack technique I mentioned earlier is your first line of defense. Air circulation is crucial. If you’re transporting these to a party, put paper towels in the bottom of your container to absorb any oil, but keep the bites elevated on a rack if possible.
Serve them immediately. I know this sounds obvious, but fried foods are always best straight from the oil. If you must make them ahead, you can reheat them in a 400°F oven for about five minutes. They won’t be quite as good as fresh, but this method works way better than a microwave, which basically steams them into submission.
Don’t cover them while they’re still hot. Trapped steam is what makes crispy coatings turn soggy. Let them cool completely uncovered if you’re not eating them right away. When I serve these alongside Spicy Sriracha Deviled Eggs at parties, I always put them out last so they’re as fresh as possible.
Keep your dipping sauces in separate bowls rather than drizzling them over the bites. Pre-sauced food gets soggy fast. Let people dip their own pieces so each bite stays crispy until the moment they eat it.
Here’s a trick I discovered accidentally: adding a tiny bit of cornstarch to your batter helps create an extra-crispy coating that resists sogginess longer. Just replace two tablespoons of the flour in your wet batter with cornstarch. The difference is subtle but noticeable, especially if your bites need to sit for a few minutes before serving.
If you’re making these for a gathering where they’ll sit out, consider setting up a warming station. A chafing dish or warming tray keeps them at a consistent temperature without creating steam. Just make sure the heat isn’t too high, or they’ll continue cooking and dry out.
The type of oil matters too. Oils with higher smoke points like peanut or vegetable oil create crisper results that last longer. Olive oil, while delicious, has a lower smoke point and can leave your food tasting greasy if you’re not careful.
Storage is tricky with fried foods. If you have leftovers, which rarely happens at my house, store them in a paper bag rather than an airtight container. The paper absorbs excess oil while allowing some air circulation. Reheat them in the oven or an air fryer, never the microwave.
One more thing: the batter-to-onion ratio matters. Too much coating creates a thick shell that holds moisture and turns gummy. You want a thin, even coating that crisps up nicely. When you’re dipping, let the excess batter drip off for a few seconds before adding each ring to the oil. This creates that light, crunchy texture we’re after, similar to what makes Avocado Salsa with Tortilla Chips such a perfect pairing—the contrast between crispy and creamy textures.


Serving Suggestions and Variations
Now that you’ve mastered making these crispy little treasures, let’s talk about how to serve them and put your own spin on the recipe. This is where you can really get creative and make them your own.
Dipping Sauces
The right dipping sauce can take your Crispy Onion Blossom Bites from great to absolutely unforgettable. I’ve experimented with dozens of combinations over the years, and I’ve discovered some winners that my family requests every single time.
Classic ranch dressing is the obvious choice, and there’s nothing wrong with that. It’s cool, creamy, and has that tanginess that cuts through the richness of fried food perfectly. I make mine from scratch by mixing sour cream, mayonnaise, fresh dill, chives, garlic powder, and a splash of buttermilk. The homemade version tastes so much better than store-bought, and it only takes five minutes to throw together.
Spicy mayo has become my personal favorite lately. Mix mayonnaise with sriracha, a squeeze of lime juice, and a tiny bit of honey to balance the heat. The ratio I use is about three tablespoons of mayo to one tablespoon of sriracha, but adjust based on how much heat you can handle. My teenager adds extra sriracha to his portion because he thinks he’s invincible.
Barbecue sauce works beautifully with the savory coating on these bites. I prefer a sweet and smoky variety rather than vinegar-based ones. The sweetness complements the caramelized onions, while the smokiness adds another layer of flavor. Sometimes I mix BBQ sauce with a bit of mayo to mellow it out and create a creamier texture.
Here’s something I stumbled upon accidentally: honey mustard is absolutely incredible with these. The sweetness from the honey plays off the onion’s natural sugars, while the mustard adds a sharp kick. I make mine with equal parts Dijon mustard and honey, plus a tablespoon of mayo to smooth it out. One time I served this combo at a Super Bowl party, and people literally asked for the recipe.
Blue cheese dressing might sound fancy, but it’s ridiculously easy to make. Crumble some blue cheese into sour cream and mayo, add a splash of buttermilk to thin it out, and season with black pepper and a tiny bit of garlic. This sauce is rich and pungent, so it definitely isn’t for everyone. But if you love blue cheese, this pairing will blow your mind.
For something lighter, try Greek yogurt-based tzatziki. Mix Greek yogurt with grated cucumber, minced garlic, lemon juice, dill, and a drizzle of olive oil. The cucumber makes it refreshing, and the yogurt provides tanginess without being as heavy as mayo-based sauces. This works especially well if you’re serving these as part of a Mediterranean-themed meal.
Chipotle aioli brings smoky heat that pairs wonderfully with the crispy coating. Blend mayo with chipotle peppers in adobo sauce, lime juice, and a pinch of cumin. Start with half a pepper and taste as you go because those chipotles pack serious heat. I learned this after making a batch so spicy my eyes watered.
By the way, thousand island dressing is an underrated option. It’s sweet, tangy, and has that pickle relish flavor that somehow makes everything taste better. You can buy it pre-made, or mix mayo, ketchup, sweet pickle relish, and a dash of paprika. My kids love this one because it tastes like their favorite burger sauce.
What Are Some Creative Dipping Sauce Ideas for Crispy Onion Blossom Bites?
If you want to go beyond the classics, I’ve got some unusual combinations that might surprise you. These aren’t traditional choices, but they’ve all been tested and approved in my kitchen.
Curry ketchup sounds weird, but hear me out. Mix regular ketchup with curry powder, a tiny bit of mayo, and a splash of Worcestershire sauce. This German-inspired condiment has a complex flavor that’s both familiar and exotic. It’s become a staple at my house after my neighbor, who’s originally from Berlin, introduced me to it.
Try balsamic reduction drizzled with honey. This isn’t really a dipping sauce in the traditional sense, but you can drizzle it over the bites right before serving. The sweet-tart flavor combination is sophisticated and turns these appetizers into something you might see at a fancy restaurant. I reduce balsamic vinegar by half in a small saucepan, let it cool, then mix in honey to taste.
Wasabi cream is for the adventurous eaters out there. Mix a small amount of wasabi paste into sour cream or Greek yogurt with a squeeze of lime. Start with just a quarter teaspoon of wasabi because it’s incredibly potent. This sauce has that nose-tingling heat that clears your sinuses and makes every bite exciting.
Maple bourbon glaze might sound fancy, but it’s just maple syrup simmered with a splash of bourbon until it thickens slightly. Let the alcohol cook off, then cool it down before serving. The sweetness of the maple balances the savory onions perfectly, and there’s a subtle warmth from the bourbon that makes this feel extra special.
Peanut sauce inspired by Thai cuisine brings an entirely different flavor profile. Mix peanut butter with soy sauce, lime juice, a bit of honey, and a splash of water to thin it out. Add some ginger and garlic if you’re feeling ambitious. This creamy, nutty sauce pairs surprisingly well with the crispy coating. It’s similar to the contrast you get when sautéing vegetables and serving them with a rich dipping sauce—different textures and temperatures creating harmony on your plate.
Garlic parmesan butter is decadent and wonderful. Melt butter with minced garlic, let it cool slightly, then stir in grated parmesan cheese and fresh parsley. You’ll want to serve this one warm because the butter solidifies when cold. Dipping hot, crispy bites into warm garlic butter is an experience everyone should have at least once.
For something tangy and bright, make cilantro lime crema. Blend cilantro, lime juice, sour cream, jalapeño, and garlic until smooth. This bright green sauce looks beautiful on the plate and has a fresh flavor that cuts through the richness of fried food. Just don’t serve this to anyone who has that genetic thing where cilantro tastes like soap.
Creative Variations
Once you’ve got the basic recipe down, there are endless ways to customize these bites. I love experimenting with different flavor combinations depending on what I’m serving them with or what sounds good that day.
Add different spices to your flour mixture to create entirely new flavor profiles. I’ve done Italian seasoning with dried basil, oregano, and rosemary for a Mediterranean twist. For a Mexican-inspired version, I use cumin, chili powder, and a bit of lime zest in the coating. Indian spices like garam masala or curry powder create a completely different experience that pairs beautifully with yogurt-based dipping sauces.
Try adding grated parmesan cheese directly into your batter. About half a cup mixed into the flour coating creates little crispy cheese bits that are absolutely addictive. Make sure you use finely grated cheese, not the shredded kind, or it won’t incorporate properly.
Beer batter is another variation worth trying. Replace the water in the batter with cold beer. The carbonation helps create an even lighter, crispier texture, and the beer adds a subtle malty flavor. I use a light lager for this, nothing too hoppy or dark that might overpower the other flavors.
For a sweet and savory combination, add a tablespoon of brown sugar to your flour mixture. It caramelizes during frying and creates this incredible sweet crust that contrasts with the savory seasonings. This works especially well if you’re using sweet onions.
Panko breadcrumbs mixed into the batter create extra texture and crunch. Add about half a cup to your wet batter, and you’ll get these beautiful crispy ridges all over the coating. The batter becomes thicker, so you might need to thin it out with a bit more water.
Experiment with different liquids in your batter too. I’ve used club soda instead of water for extra bubbles that make the coating lighter. Some people swear by vodka in their batter because the alcohol evaporates quickly, leaving behind an extra-crispy crust. I haven’t noticed a huge difference with vodka, but it’s worth trying if you’re curious.
Add fresh herbs right before serving. Chopped parsley, chives, or cilantro sprinkled over the hot bites adds color and freshness. Sometimes I toss them with a bit of lemon zest too, which brightens everything up.
For a spicier version, add hot sauce directly into the batter. A few tablespoons of your favorite hot sauce mixed into the wet ingredients distributes heat evenly throughout the coating. This is different from just sprinkling cayenne in the flour because the heat is in every bite rather than concentrated in the outer layer.
Can You Add Spices to the Batter for Extra Flavor?
Absolutely, and I actually recommend it. While seasoning the flour coating is important, adding spices to the wet batter creates layers of flavor that make these bites really special.
The key is balancing wet and dry seasonings. Too much spice in the batter can make it gritty or change the texture. I usually add about a teaspoon of garlic powder and half a teaspoon of paprika to the wet batter itself. This reinforces those flavors throughout the entire coating instead of just on the surface.
Fresh herbs work better in the batter than dried ones. Finely minced garlic, ginger, or green onions mixed into the wet ingredients add pops of fresh flavor. Just chop them very fine so they don’t interfere with the coating process.
Hot sauce in the batter is one of my favorite tricks. It adds both flavor and a bit of heat without making the coating gritty like cayenne pepper sometimes can. Plus, the acidity in hot sauce helps tenderize the coating slightly, making it a bit more delicate.
Worcestershire sauce is another liquid seasoning that works beautifully in the batter. Just a tablespoon adds this deep, savory umami flavor that’s hard to identify but makes everything taste better. My husband always comments that these taste “restaurant quality” when I add Worcestershire, though he can never quite figure out what’s different.
Smoked paprika in the batter instead of regular creates this incredible smoky flavor that reminds me of barbecue. It’s subtle but noticeable, especially if you’re serving these with a tangy dipping sauce. I discovered this variation when I accidentally grabbed the wrong spice jar, and it turned out to be a happy mistake.
If you’re looking to explore more creative ways to serve appetizers, you’ll find plenty of inspiration in our collection of appetizers and snacks that pair perfectly with these crispy bites at any gathering.
Here’s the thing: making Crispy Onion Blossom Bites at home really isn’t as intimidating as it might seem. Sure, there’s a learning curve with the frying temperature and getting the coating just right, but after your first batch, you’ll have the hang of it. These bites bring so much joy to gatherings, and there’s something satisfying about making restaurant-quality appetizers in your own kitchen. Don’t be afraid to experiment with different seasonings and dipping sauces until you find your perfect combination. Start with the basic recipe I’ve shared, then make it yours.
FAQ
How long do Crispy Onion Blossom Bites last after being made?
Honestly, they’re best eaten within an hour of frying. The coating starts losing its crispiness after that, though they’re still edible. If you have leftovers, store them in a paper bag in the refrigerator for up to two days. Reheat them in a 400°F oven or air fryer for about five minutes to restore some crunch. Never use a microwave because it turns them soggy and sad. They won’t be quite as good as fresh, but this method makes them acceptable for next-day snacking.
Can you bake Crispy Onion Blossom Bites instead of frying them?
Yes, you can bake them at 425°F for about 15 to 20 minutes, flipping halfway through. Brush them generously with oil before and after flipping to help them crisp up. I won’t lie to you though—they won’t be as crispy as the fried version. The texture is more crunchy than crispy, and the coating tends to be a bit thicker. If you’re trying to avoid deep frying for health reasons, they’re still delicious and worth making. Just adjust your expectations about the crispiness level.
What is the best way to store leftover Crispy Onion Blossom Bites?
Store them in a paper bag or loosely covered container in the refrigerator. Never use an airtight container while they’re still warm because trapped steam makes them soggy instantly. Paper bags absorb excess oil while allowing some airflow. You can also store them on a plate covered loosely with aluminum foil. They’ll keep for about two days, though the coating softens over time. When you’re ready to eat them, reheat in the oven or air fryer rather than the microwave for the best texture.
Can you make the batter ahead of time?
You can make the seasoned flour mixture days in advance and store it in an airtight container. The wet batter, however, should be made fresh right before coating your onions. The baking powder starts reacting with the liquid immediately, creating those bubbles that make the coating light and crispy. If you make it too far ahead, it loses its effectiveness. I usually prep all my dry ingredients the night before, then whisk together the wet components right before I’m ready to start cooking.
Why is my coating falling off during frying?
This usually happens because the onions weren’t dry enough before coating, or the batter was too thin. Make sure you pat your onion rings completely dry with paper towels after their water bath. Also check that your batter has a thick enough consistency—it should coat the back of a spoon. Another culprit is oil temperature that’s too low, which prevents the coating from setting quickly. Make sure your oil is at 375°F before adding the onions. Finally, don’t move them around too much in the oil during the first minute of cooking.
Can you freeze Crispy Onion Blossom Bites?
You can freeze them either before or after frying. To freeze uncooked bites, coat them completely and place them on a baking sheet in the freezer until solid, then transfer to a freezer bag. Fry them straight from frozen, adding an extra minute or two to the cooking time. For already-fried bites, let them cool completely, then freeze on a baking sheet before bagging. Reheat frozen cooked bites in a 375°F oven for about 10 minutes. I prefer freezing them uncooked because the texture is better after frying.
What kind of pot should I use for frying?
Use a heavy-bottomed pot or Dutch oven that’s at least four inches deep. Cast iron works beautifully because it maintains temperature really well. Stainless steel pots work too, though they don’t hold heat quite as consistently. Avoid thin pots because they create hot spots that lead to uneven frying. The pot should be large enough that the onion rings have room to float freely without crowding. I use a five-quart Dutch oven, which gives me plenty of space to work with.
How do you know when the oil is ready without a thermometer?
Drop a small piece of bread or a bit of batter into the oil. If it sizzles immediately and floats to the surface within a second or two, your oil is ready. If it sinks and sits on the bottom, the oil is too cold. If it browns within seconds, the oil is too hot. Honestly though, I strongly recommend investing in a thermometer because guessing leads to inconsistent results. You can find clip-on thermometers for about ten dollars, and they make such a difference in getting perfect results every time.
Can you use an air fryer for Crispy Onion Blossom Bites?
Air fryers work pretty well for these, though the texture is different from deep-fried versions. Spray the coated onion rings generously with cooking oil and arrange them in a single layer in the basket. Cook at 400°F for about 8 to 10 minutes, flipping halfway through and spraying with more oil. They won’t get quite as golden or crispy as deep-fried ones, but they’re still tasty and much lower in oil. If you’re using an air fryer regularly, you might want to adjust the coating to be slightly thinner since air fryers tend to make thick batters gummy.
What should I do if my coating is too thick?
Thin it out with cold water, adding just a tablespoon at a time and stirring well. The batter should be thick enough to coat the onions but thin enough to drip off slowly. Think heavy cream consistency rather than pancake batter. If you’ve already coated some onions and realize the coating is too thick, you can gently scrape off some of the excess batter with your fingers before frying. Thick coatings create a heavy, doughy texture that never quite crisps up properly, so it’s worth taking the time to get the consistency right before you start coating.
Ingredients
Equipment
Method
- Pelez les oignons et coupez-les en rondelles d'environ un quart à un demi pouce d'épaisseur, en séparant les anneaux.
- Faites tremper les anneaux d'oignons dans un bol d'eau froide avec une pincée de sel pendant environ dix minutes.
- Dans le premier bol, mélangez 1 tasse de farine avec paprika, poudre d'ail, cayenne, thym, sel et poivre.
- Dans le deuxième bol, battez les œufs et le babeurre jusqu'à obtenir une consistance lisse et mousseuse.
- Dans le troisième bol, mélangez la tasse restante de farine avec l'eau froide et la poudre à lever pour créer la pâte.
- Épongez les anneaux d'oignons trempés avec du papier absorbant.
- Roulez chaque anneau d'oignon d'abord dans la farine assaisonnée, puis trempez dans le mélange d'œufs, et enfin enrobez-le avec la pâte.
- Chauffez l'huile dans une casserole à fond épais ou une friteuse à 190°C.
- Plongez délicatement les anneaux d'oignons enrobés dans l'huile chaude sans surcharger la friteuse.
- Faites frire pendant 2 à 3 minutes de chaque côté jusqu'à ce qu'ils soient dorés et croustillants.
- Égouttez sur une grille placée sur une plaque de cuisson et assaisonnez immédiatement avec du sel.