Honey Mustard Apple Chicken: A Sweet & Savory Hug on a Plate
You know those days when you just need a warm, comforting hug from your dinner? That’s exactly what led me to create this Honey Mustard Apple Chicken recipe. I was craving something familiar yet exciting—a dish that felt like a cozy sweater but tasted like a special occasion. After a few happy experiments (and a very pleased family), this became our go-to for turning a regular weeknight into something deliciously memorable.
The Story Behind This Comforting Dish
Honey mustard chicken is a classic for good reason. It’s sweet, tangy, and always a crowd-pleaser. My twist came from a happy kitchen accident. I had some apples sitting on the counter, destined for a pie, and thought, “Why not?” Adding them to the savory skillet with onions created a magical base. The apples soften and mingle with the onions, their natural sugars caramelizing into the sauce. It’s like a modern take on rustic, home-style cooking where sweet fruit and savory meat belong together. This version with a splash of apple cider vinegar and a hint of cayenne is my family’s favorite modern classic.
Why You’ll Fall in Love With This Recipe
You’ll love this recipe because it checks all the boxes. It’s incredibly flavorful with layers of sweet honey, sharp mustard, and mellow fruit. It’s surprisingly simple to make, using just one skillet for easy cleanup. The tender chicken bathed in that glossy, aromatic sauce is a guaranteed hit with both kids and adults. Plus, it fills your kitchen with the most incredible, welcoming smell that promises a fantastic meal is just minutes away.
Perfect Occasions for Honey Mustard Chicken
This dish is wonderfully versatile. It’s perfect for a busy Tuesday family dinner when you need something hearty and fast. It also shines as a centerpiece for a casual weekend gathering with friends—just double the batch! I love serving it in the fall when apples are at their peak, but honestly, its cozy vibes work any time of year. It’s a fantastic alternative to the usual roast when you want something with a bit more zing.
What You’ll Need: Ingredients List
Gathering your ingredients is the first step to kitchen success. Here’s everything you need for this sweet and savory chicken dish:
For the Chicken:
- 6 boneless, skin-on chicken thighs or 4 large chicken breasts
- 2 tbsp cooking oil (vegetable, canola, or grapeseed), plus extra for drizzling
- Kosher salt, to taste
- Ground black pepper, to taste
- 1 tbsp paprika
For the Sauce and Vegetables:
- 2 red apples, cored and sliced
- 1 medium yellow onion, sliced
- 1 tbsp fresh garlic, minced
- 1/2 cup apple cider vinegar
- 1 tbsp liquid smoke (optional, for extra depth)
- 1/2 cup coarse ground Dijon mustard
- 3/4 cup honey
- 1/8 tsp cayenne pepper
- 1/4 cup fresh parsley, minced
No Stress Substitutions
Don’t worry if you’re missing an item! Cooking is about flexibility.
- Chicken: Use what you have! Bone-in thighs will add more flavor and need a longer cook time. For a lighter option, try this Sheet Pan Lemon Garlic Chicken.
- Mustard: No coarse-ground Dijon? Standard Dijon or a good whole-grain mustard works perfectly.
- Honey: Maple syrup is a wonderful substitute for a different kind of sweetness.
- Apples: Gala, Fuji, or Honeycrisp apples hold their shape well. Granny Smith will give a tarter punch.
- Liquid Smoke: It adds a smoky BBQ-like note, but you can skip it for a brighter, fruitier sauce.
Let’s Get Cooking: Your Step-by-Step Guide
Step 1: Prepare the Chicken
Start by patting your chicken pieces completely dry with paper towels. This is the secret to getting a gorgeous, golden sear instead of a steam. Drizzle a little oil over them and rub it in. Then, season generously on all sides with kosher salt, black pepper, and that beautiful, ruby-red paprika. You should see a nice coating of color and flavor. Let them sit for a few minutes while you heat your pan.
Step 2: Sear the Chicken
Heat the 2 tablespoons of oil in a large skillet over medium-high heat. You’ll know it’s ready when the oil shimmers. Carefully place the chicken in the pan, skin-side down (or the thickest side down for breasts). Listen for that satisfying sizzle! Let it cook without moving for 3-4 minutes until a deep golden crust forms. Flip and sear the other side. The smell of searing chicken and paprika is heavenly. Remove the chicken to a plate—it won’t be cooked through yet, and that’s perfect.
Step 3: Cook the Apples and Onions
Drain any excess oil from the skillet, leaving just a nice film. Turn the heat down to medium. Add your sliced apples and onions. You’ll hear them sizzle as they hit the warm pan. Cook, stirring now and then, for 6-8 minutes. Watch as the onions become soft and translucent and the apple slices just begin to soften at the edges. Stir in the minced garlic and cook for one more minute until its fragrance fills the air. Pro tip: Don’t rush this step. Letting the apples and onions soften properly builds a sweet, caramelized foundation for your sauce.
Step 4: Make the Savory Honey Mustard Sauce
Now for the magic! Pour in the apple cider vinegar—it will sizzle and steam, lifting all the tasty browned bits from the pan bottom. Add the liquid smoke (if using), Dijon mustard, honey, cayenne pepper, and half of the fresh parsley. Give it a good stir. Watch as the honey and mustard swirl together into a luscious, glossy sauce. Let it come to a gentle simmer. Taste it! This is your chance to adjust with a pinch more salt or pepper. The balance of sweet, tangy, and savory should make your taste buds dance.
Step 5: Finish Cooking the Chicken
Nestle the seared chicken back into the skillet, spooning that gorgeous sauce all over the top. Cover the pan with a lid and reduce the heat to medium-low. Let it simmer gently for 15-20 minutes. The sauce will bubble softly around the chicken, infusing it with flavor. The chicken is done when it reaches an internal temperature of 165°F (75°C) and is tender enough to cut with a fork. If you love saucy dishes, you should check out this delicious Teriyaki Chicken Bowl as well.
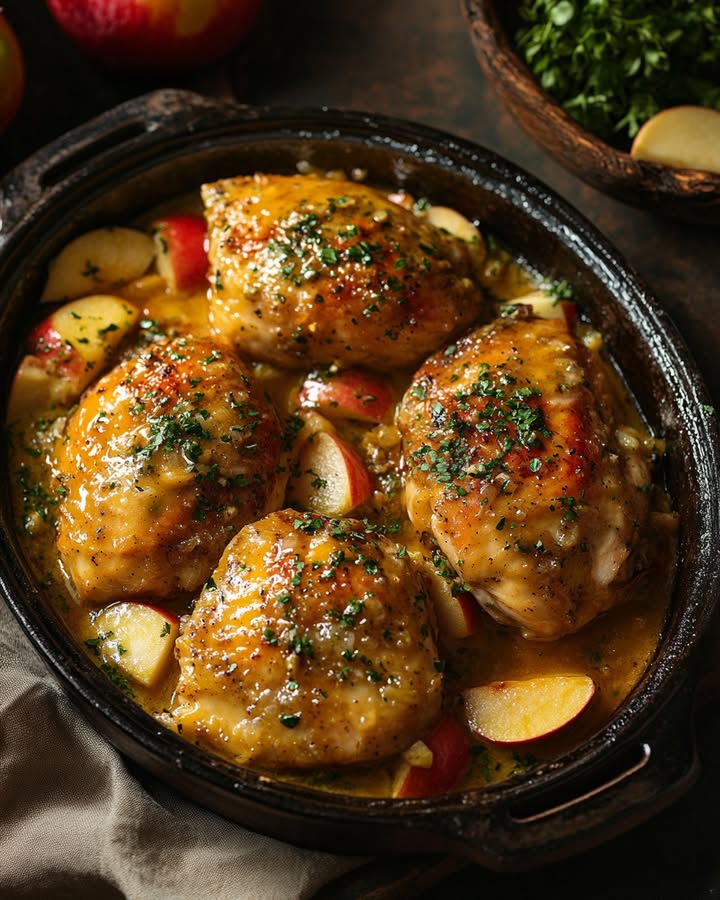
Step 6: Serve and Garnish
Your kitchen should smell absolutely incredible by now. Carefully transfer the chicken to a serving platter. Spoon the tender apples, onions, and plenty of sauce over the top. Finish with a bright, fresh sprinkle of the remaining minced parsley. The green pops beautifully against the golden sauce. Serve it warm with your favorite sides and get ready for the compliments!
Chef’s Secret Tip
For an extra-restaurant-quality finish, after the chicken is cooked, remove it from the skillet. Turn the heat up to medium and let the sauce bubble and reduce for 2-3 minutes until it thickens slightly. This concentrates the flavors and makes it extra glossy and clingy when you pour it back over the chicken.
Your Recipe Timing Breakdown
Good food doesn’t have to take all day. Here’s your quick timeline:
- Prep Time: 15 minutes
- Cook Time: 30 minutes
- Resting Time: 5 minutes (to let the juices settle)
- Total Time: About 50 minutes
A Little Extra Info
Did you know the combination of fruit and meat dates back centuries? It was a popular way to balance flavors before refined sugar was common. Apples, in particular, add natural sweetness and pectin, which helps give body to the sauce. This dish is a delicious nod to that timeless culinary tradition.
Kitchen Equipment You’ll Need
You don’t need fancy gear for this! Just a few basics:
- A large, heavy-bottomed skillet or braiser with a lid
- Kitchen tongs
- A sharp knife and cutting board
- Measuring cups and spoons
- A meat thermometer (for perfect doneness every time)
Storing Your Leftovers
Let the dish cool completely to room temperature before storing. Don’t leave it out for more than two hours. Transfer the chicken and sauce into an airtight container.
It will keep well in the refrigerator for 3 to 4 days. The flavors often meld and become even richer the next day, making fantastic leftovers!
To reheat, warm it gently in a covered skillet over low heat with a splash of water or chicken broth to loosen the sauce. You can also microwave single portions, covered, in 30-second intervals until hot.
My Best Tips & Advice
- Dry Chicken is Key: Always pat your protein dry. Moisture is the enemy of a good sear.
- Don’t Crowd the Pan: Sear the chicken in batches if needed. Overcrowding steams the chicken instead of browning it.
- Taste as You Go: Always taste your sauce before adding the chicken back. Adjust the sweet (honey), tang (mustard/vinegar), and heat (cayenne) to your liking.
- For another fantastic one-pan meal full of veggies, try my One-Pot Ground Beef & Zucchini Skillet.
Presentation Ideas to Impress
Make your plate look as good as it tastes!
- Spoon the chicken and sauce over a bed of fluffy mashed potatoes or creamy polenta.
- Serve with a side of roasted carrots or Brussels sprouts for a colorful, veggie-filled plate.
- Garnish with extra apple slices briefly sautéed in butter and a final drizzle of honey.
- For a hearty grain bowl, serve slices of the chicken on a mix of quinoa or brown rice, which are great sources of complex carbohydrates for lasting energy.
Healthier & Creative Recipe Variations
Love the idea but want to mix it up? Here are six tasty twists:
- Pork Chop Version: Use thick-cut pork chops instead of chicken. Sear them just like the chicken. The sweet and savory sauce pairs wonderfully with pork.
- Slow Cooker Honey Mustard Chicken: Sear the chicken quickly, then add everything to your slow cooker. Cook on low for 5-6 hours. The chicken becomes fall-apart tender.
- Dairy-Free Creamy Sauce: Stir in 1/2 cup of canned coconut milk (full-fat) during the last 5 minutes of cooking for a rich, creamy, dairy-free version.
- Extra Veggie Load: Add sliced bell peppers and mushrooms when cooking the apples and onions for a more vegetable-forward dish. It’s a great way to clean out the fridge!
- Spicy Kick: Double the cayenne pepper or add a teaspoon of crushed red pepper flakes for those who love a real fiery touch to their sweet and savory chicken.
- Turkey Meatball Bake: Make turkey meatballs, brown them in the skillet, and then proceed with the apples, onions, and sauce. Bake covered for a fun, family-friendly alternative. Speaking of bowls, if you enjoy bold flavor combinations, the Hot Honey Cottage Cheese Sweet Potato Beef Bowl is a must-try.
Common Mistakes to Avoid
Mistake 1: Not Patting the Chicken Dry
Adding wet chicken to a hot pan is a recipe for steam, not sear. The moisture creates a barrier that prevents that beautiful, crispy, golden-brown crust from forming. You’ll end up with pale, boiled-looking chicken instead of flavorful, seared pieces. Always take that extra 30 seconds to thoroughly pat each piece dry with paper towels before seasoning. It makes all the difference in texture and flavor.
Mistake 2: Moving the Chicken Too Soon While Searing
We’ve all been tempted to peek or shift the chicken right after placing it in the pan. Resist! The chicken needs uninterrupted contact with the hot surface to develop a proper sear. If you try to move it too early, it will stick and tear, leaving the tasty crust behind in the pan. Place it in the oil and let it be for a full 3-4 minutes. It will naturally release from the pan when a proper crust has formed.
Mistake 3: Overcooking the Chicken in the Sauce
It’s easy to think, “A little longer won’t hurt,” but chicken, especially breasts, can go from juicy to dry very quickly. Simmering it in the sauce for 15-20 minutes is usually perfect. The best way to know for sure is to use a meat thermometer. Pull the chicken when it hits 165°F internally. Remember, it will continue to cook a little from residual heat even after you take it off the stove.
Mistake 4: Skipping the Sauce Reduction Step
If your sauce seems a bit thin or watery after cooking, you might be serving it too soon. After removing the cooked chicken, let the sauce simmer on its own for a few extra minutes. This reduces and thickens it, concentrating the flavors into a rich, glossy glaze. It’s a simple trick that elevates your dish from “home-cooked” to “chef’s table” with minimal extra effort.
Looking for more inspiration for your dinner table? You can find this recipe and many other comforting ideas in our full collection of main dish recipes.
Frequently Asked Questions
Can I make Honey Mustard Apple Chicken ahead of time?
Absolutely! This dish is a great candidate for meal prep. You can fully cook it, let it cool, and store it in the fridge for up to 3 days. The flavors often improve overnight. When ready to eat, reheat it gently on the stovetop with a splash of broth or water to refresh the sauce. You can also do partial prep: sear the chicken and chop the apples and onions the night before. Store them separately in the fridge. Then, you can pull dinner together in about 30 minutes on a busy weeknight.
What are the best apples to use for cooking with chicken?
You want an apple that holds its shape and offers a balance of sweet and tart. My top picks are Honeycrisp, Fuji, or Gala apples. They are sweet, crisp, and won’t turn to complete mush in the sauce. If you prefer a sharper, more tangy flavor to cut through the sweetness of the honey, Granny Smith apples are a fantastic choice. They provide a bright contrast that many adults love. Avoid very soft apples like Red Delicious, as they can become too mushy.
Is liquid smoke necessary in the recipe?
Not at all! Liquid smoke is listed as optional because it adds a specific, deep, smoky BBQ-like note that some people adore. If you have it and enjoy that flavor, it adds a wonderful layer of complexity. If you don’t have it or prefer not to use it, your honey mustard apple chicken will still be delicious. The dish will simply have a brighter, more focused sweet-tangy-fruity profile without the smoky backdrop. Don’t let the absence of one ingredient stop you from making this tasty meal.
Can I use chicken breasts instead of thighs?
Yes, you can easily swap in chicken breasts. I recommend using 4 large breasts. Because breasts are leaner and can dry out faster, pay close attention to the cooking time. Make sure you pound them to an even thickness or slice them horizontally to create cutlets for more even cooking. Use a meat thermometer and pull them from the heat as soon as they reach 165°F. Thighs are more forgiving due to their higher fat content, but breasts work perfectly with a watchful eye.
My sauce is too thin. How can I thicken it?
A thin sauce is an easy fix! First, try letting it simmer uncovered for a few extra minutes after removing the chicken. The extra evaporation will naturally thicken it. If it still needs help, make a quick slurry. Mix 1 teaspoon of cornstarch with 1 tablespoon of cold water in a small bowl until smooth. Whisk this mixture into the simmering sauce and cook for 1-2 minutes until thickened. Be careful not to add too much, or it can become gloppy.
What should I serve with this chicken dish?
This saucy chicken is incredibly versatile! It’s fantastic over something that can soak up all that delicious sauce. My family loves it with creamy mashed potatoes, buttered egg noodles, or soft polenta. For a healthier option, try it with cauliflower rice, quinoa, or a simple side of steamed green beans or roasted broccoli. A crisp green salad with a vinaigrette dressing also balances the richness of the meal beautifully.
Can I freeze leftover Honey Mustard Chicken?
You can freeze it, but with a few caveats. The texture of the cooked apples may become a bit softer upon thawing. Chicken also sometimes becomes a little drier after freezing and reheating. To freeze, let the dish cool completely, then store it in a freezer-safe airtight container for up to 2 months. Thaw overnight in the refrigerator. Reheat gently on the stovetop, adding a little liquid to help the sauce come back together smoothly.
Is this recipe gluten-free and dairy-free?
This recipe is naturally dairy-free as written, as it uses oil instead of butter. It is also gluten-free, provided all your condiments are certified gluten-free. Always check the labels on your Dijon mustard and apple cider vinegar, as some brands may have additives or be processed in facilities with gluten. Most common brands are safe, but it’s always good to verify if you have a severe sensitivity or celiac disease.
How can I make this recipe less sweet?
If you’re sensitive to sweetness, you have a couple of great options. First, you can reduce the amount of honey. Start with 1/2 cup instead of 3/4 cup and taste the sauce before adding the chicken. You can also increase the amount of Dijon mustard or add a splash more apple cider vinegar to boost the tangy element, which will balance the sweetness. Using a tarter apple like Granny Smith will also help cut through the sweetness naturally.
What does the cayenne pepper do in a sweet recipe?
The small amount of cayenne pepper isn’t meant to make the dish spicy. Its purpose is to add a subtle, warm depth and complexity in the background. It enhances the other flavors without announcing itself with obvious heat. It keeps the sweet sauce from becoming one-dimensional or cloying. If you are very sensitive to spice, you can omit it entirely. If you love heat, feel free to add a pinch more!
Final Thoughts on This Cozy Meal
This Honey Mustard Apple Chicken with a savory twist is more than just a recipe. It’s a promise of a warm, satisfying, and flavorful meal that brings everyone to the table. It combines simple techniques with exciting flavors, making you look like a kitchen hero without any stress. I hope it becomes a cherished favorite in your home, just like it is in mine. Now, go grab that skillet and create some delicious memories!
Honey Mustard Chicken
Ingredients
Equipment
Method
- Pat chicken pieces dry with paper towels, drizzle with oil, and season with salt, pepper, and paprika.
- Heat oil in a skillet over medium-high heat, add chicken skin-side down, and sear for 3-4 minutes until golden.
- Flip the chicken and sear the other side, then remove it from the skillet.
- In the same skillet, add apples and onions, cook for 6-8 minutes until soft, then add garlic and cook for 1 additional minute.
- Pour in apple cider vinegar, add liquid smoke (if using), mustard, honey, cayenne, and half of the parsley; stir and let simmer.
- Nestle the seared chicken back into the skillet, spoon sauce over it, cover, and simmer for 15-20 minutes until cooked through.
- Transfer chicken to a serving platter, spoon apples and sauce over, and garnish with remaining parsley.