Discover the Magic of Fluffy Homemade Naan
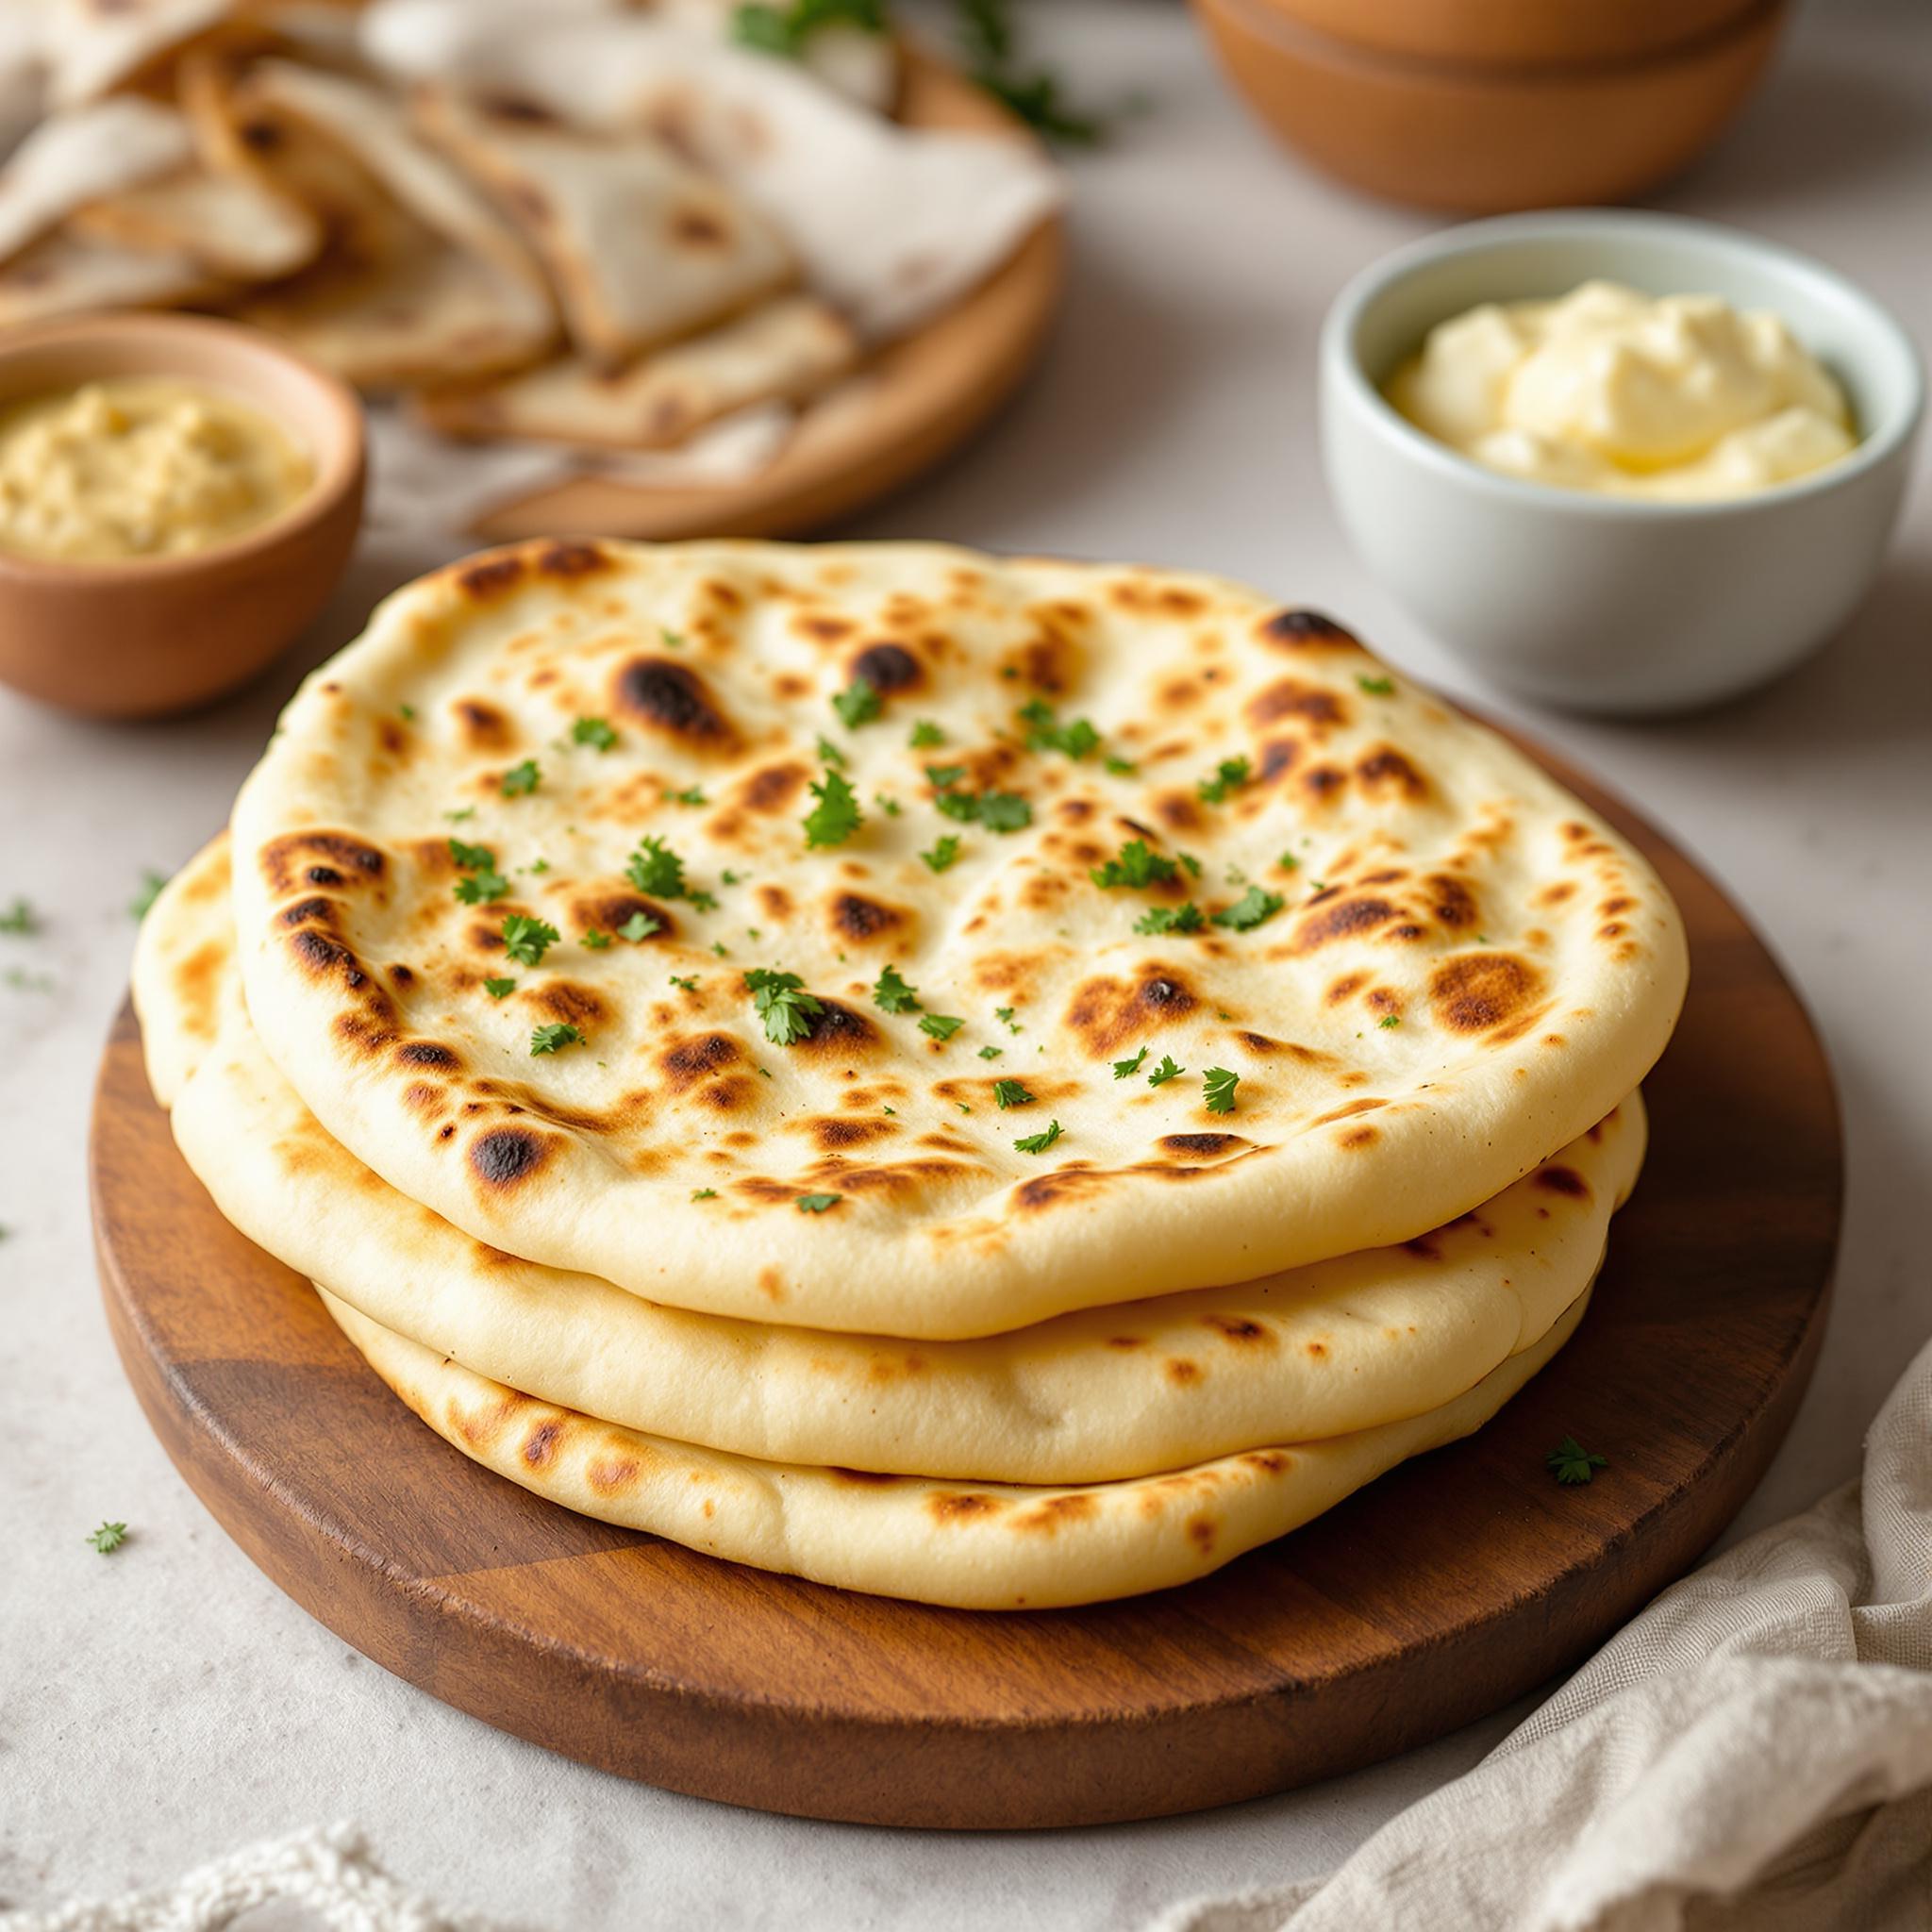
There’s something truly magical about fresh, warm naan straight out of the oven—or off the skillet. The aroma alone is enough to make your mouth water! Whether you’re pairing it with a rich curry or using it as a base for creative wraps, this homemade naan recipe is guaranteed to become a family favorite. I first tried making naan during a weekend cooking challenge with my best friend, and let me tell you—it was love at first bite. Unlike store-bought versions, this homemade version has that perfect pillowy texture and subtle charred flavor that makes every bite unforgettable.
The Story Behind Naan: A Culinary Treasure
Naan originated in the Indian subcontinent centuries ago, traditionally baked in tandoor ovens. These clay ovens gave naan its signature softness and slight smokiness. Over time, variations like garlic naan, butter naan, and even stuffed naans have emerged, each adding its own twist to the classic bread. While many people associate naan with South Asian cuisine, similar flatbreads are found worldwide, from Middle Eastern pita to Mediterranean focaccia. Testing this recipe reminded me how versatile and universal good bread can be—whether served alongside hearty stews or enjoyed on its own with a dollop of yogurt dip.
Why You’ll Fall in Love with This Naan Recipe
This flavorful homemade naan is incredibly easy to whip up, even if you’ve never made bread before. The dough comes together quickly, and the results are consistently delicious. Plus, nothing beats the satisfaction of creating something so comforting from scratch. Whether you’re looking for a simple side dish or a fun project to involve the kids, this recipe ticks all the boxes. Trust me; once you taste the difference between homemade and store-bought naan, there’s no going back!
Perfect Occasions to Make Naan
Naan is incredibly versatile and works well for almost any occasion. Serve it alongside a flavorful chicken tikka masala for a cozy weeknight dinner, or use it as a base for mini appetizers at your next party. It’s also perfect for casual brunches when paired with scrambled eggs and avocado. Honestly, whenever I bake a batch of naan, it disappears faster than anything else on the table!
Ingredients for Your Homemade Naan
- 2 cups all-purpose flour (plus extra for dusting)
- 1 teaspoon active dry yeast
- 1 teaspoon sugar
- ¾ cup warm water (about 110°F/43°C)
- 2 tablespoons plain yogurt
- 2 tablespoons melted butter, plus more for brushing
- 1 teaspoon salt
- Optional: minced garlic, chopped cilantro, or sesame seeds for garnish
Substitution Options
If you want to experiment with this recipe, here are some great substitutions:
– Swap all-purpose flour with whole wheat flour for a nuttier flavor.
– Use coconut yogurt instead of regular yogurt for a dairy-free option.
– Replace melted butter with olive oil for a lighter touch.
Feel free to play around with these swaps based on your preferences or dietary needs!
Preparation Steps
Step 1: Activate the Yeast
To start, dissolve the sugar in warm water in a small bowl. Sprinkle the yeast over the top and let it sit for about 5-10 minutes until it becomes frothy. This step ensures your dough will rise beautifully. Pro tip: If the yeast doesn’t foam, it might be expired, so double-check the expiration date before proceeding. Watching the yeast activate always reminds me of the little miracles happening in our kitchens every day!
Step 2: Mix the Dough
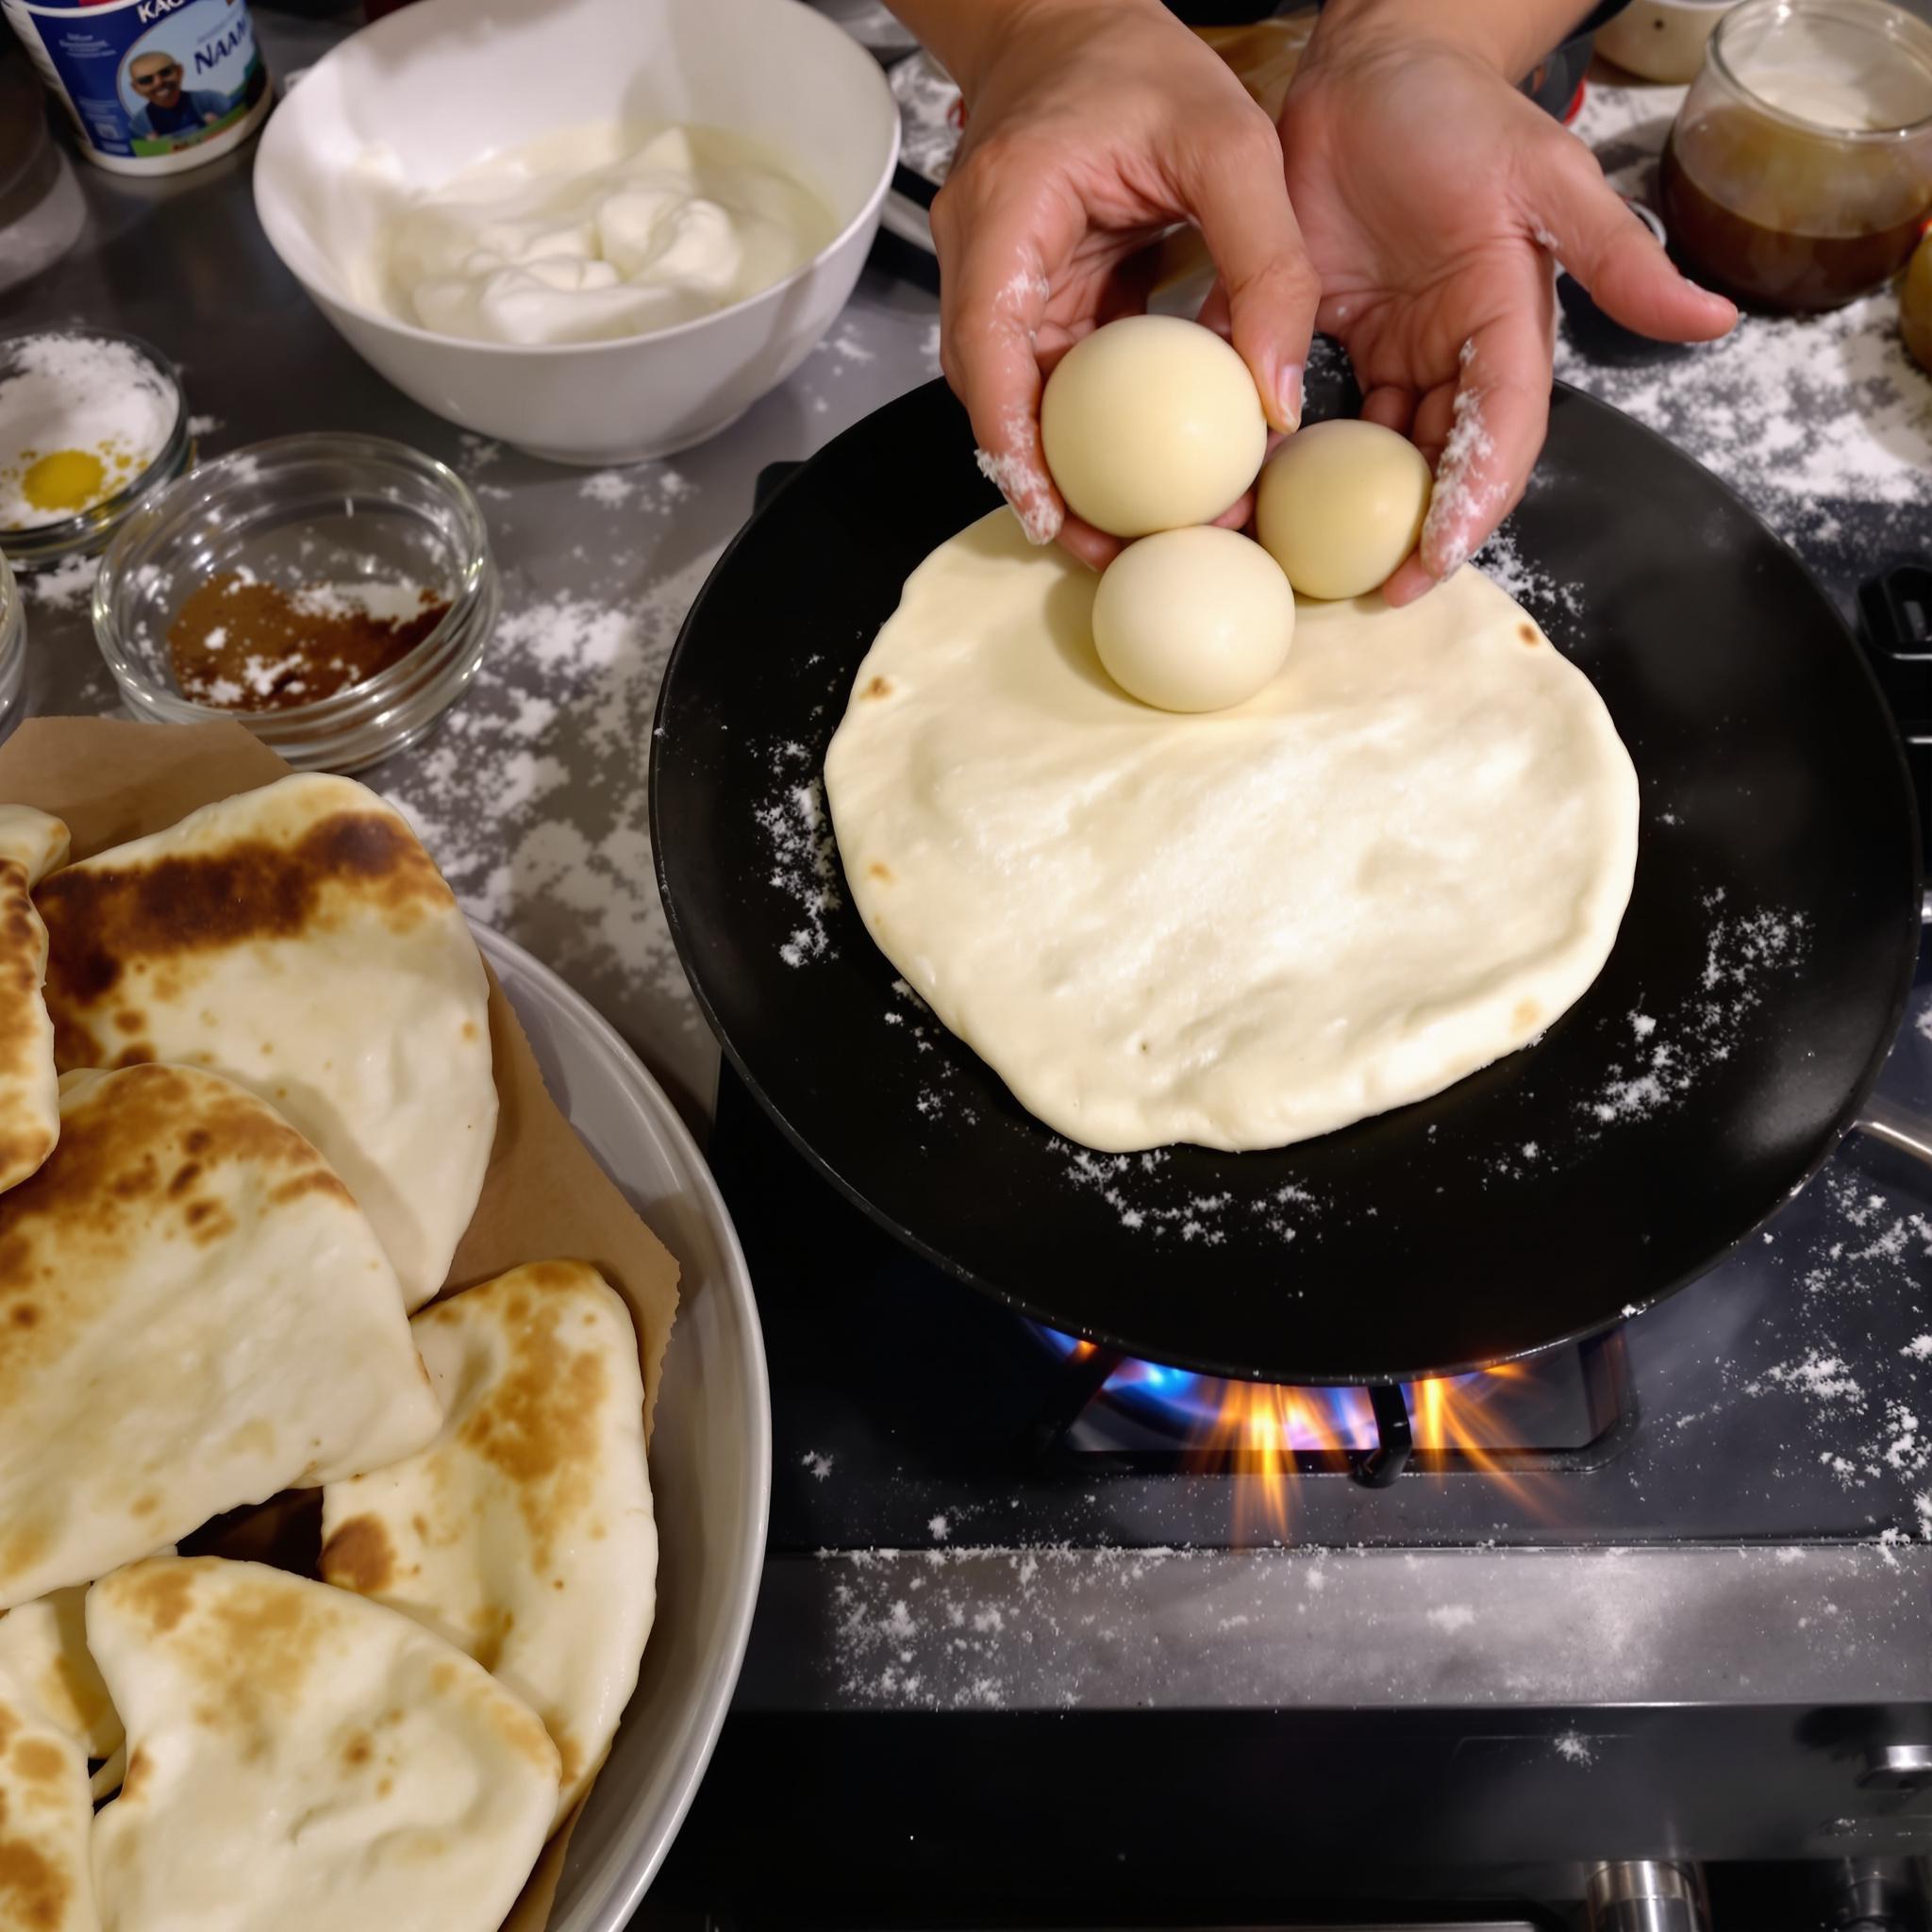
In a large mixing bowl, combine the flour and salt. Add the activated yeast mixture, yogurt, and melted butter. Stir until a shaggy dough forms, then transfer it to a floured surface. Knead the dough for about 8-10 minutes until smooth and elastic. As you knead, notice how the dough transforms from sticky to silky—a sign that gluten is developing properly. Once kneaded, place the dough in a lightly oiled bowl, cover it with a damp cloth, and let it rest for an hour or until doubled in size.
Step 3: Shape and Cook the Naan
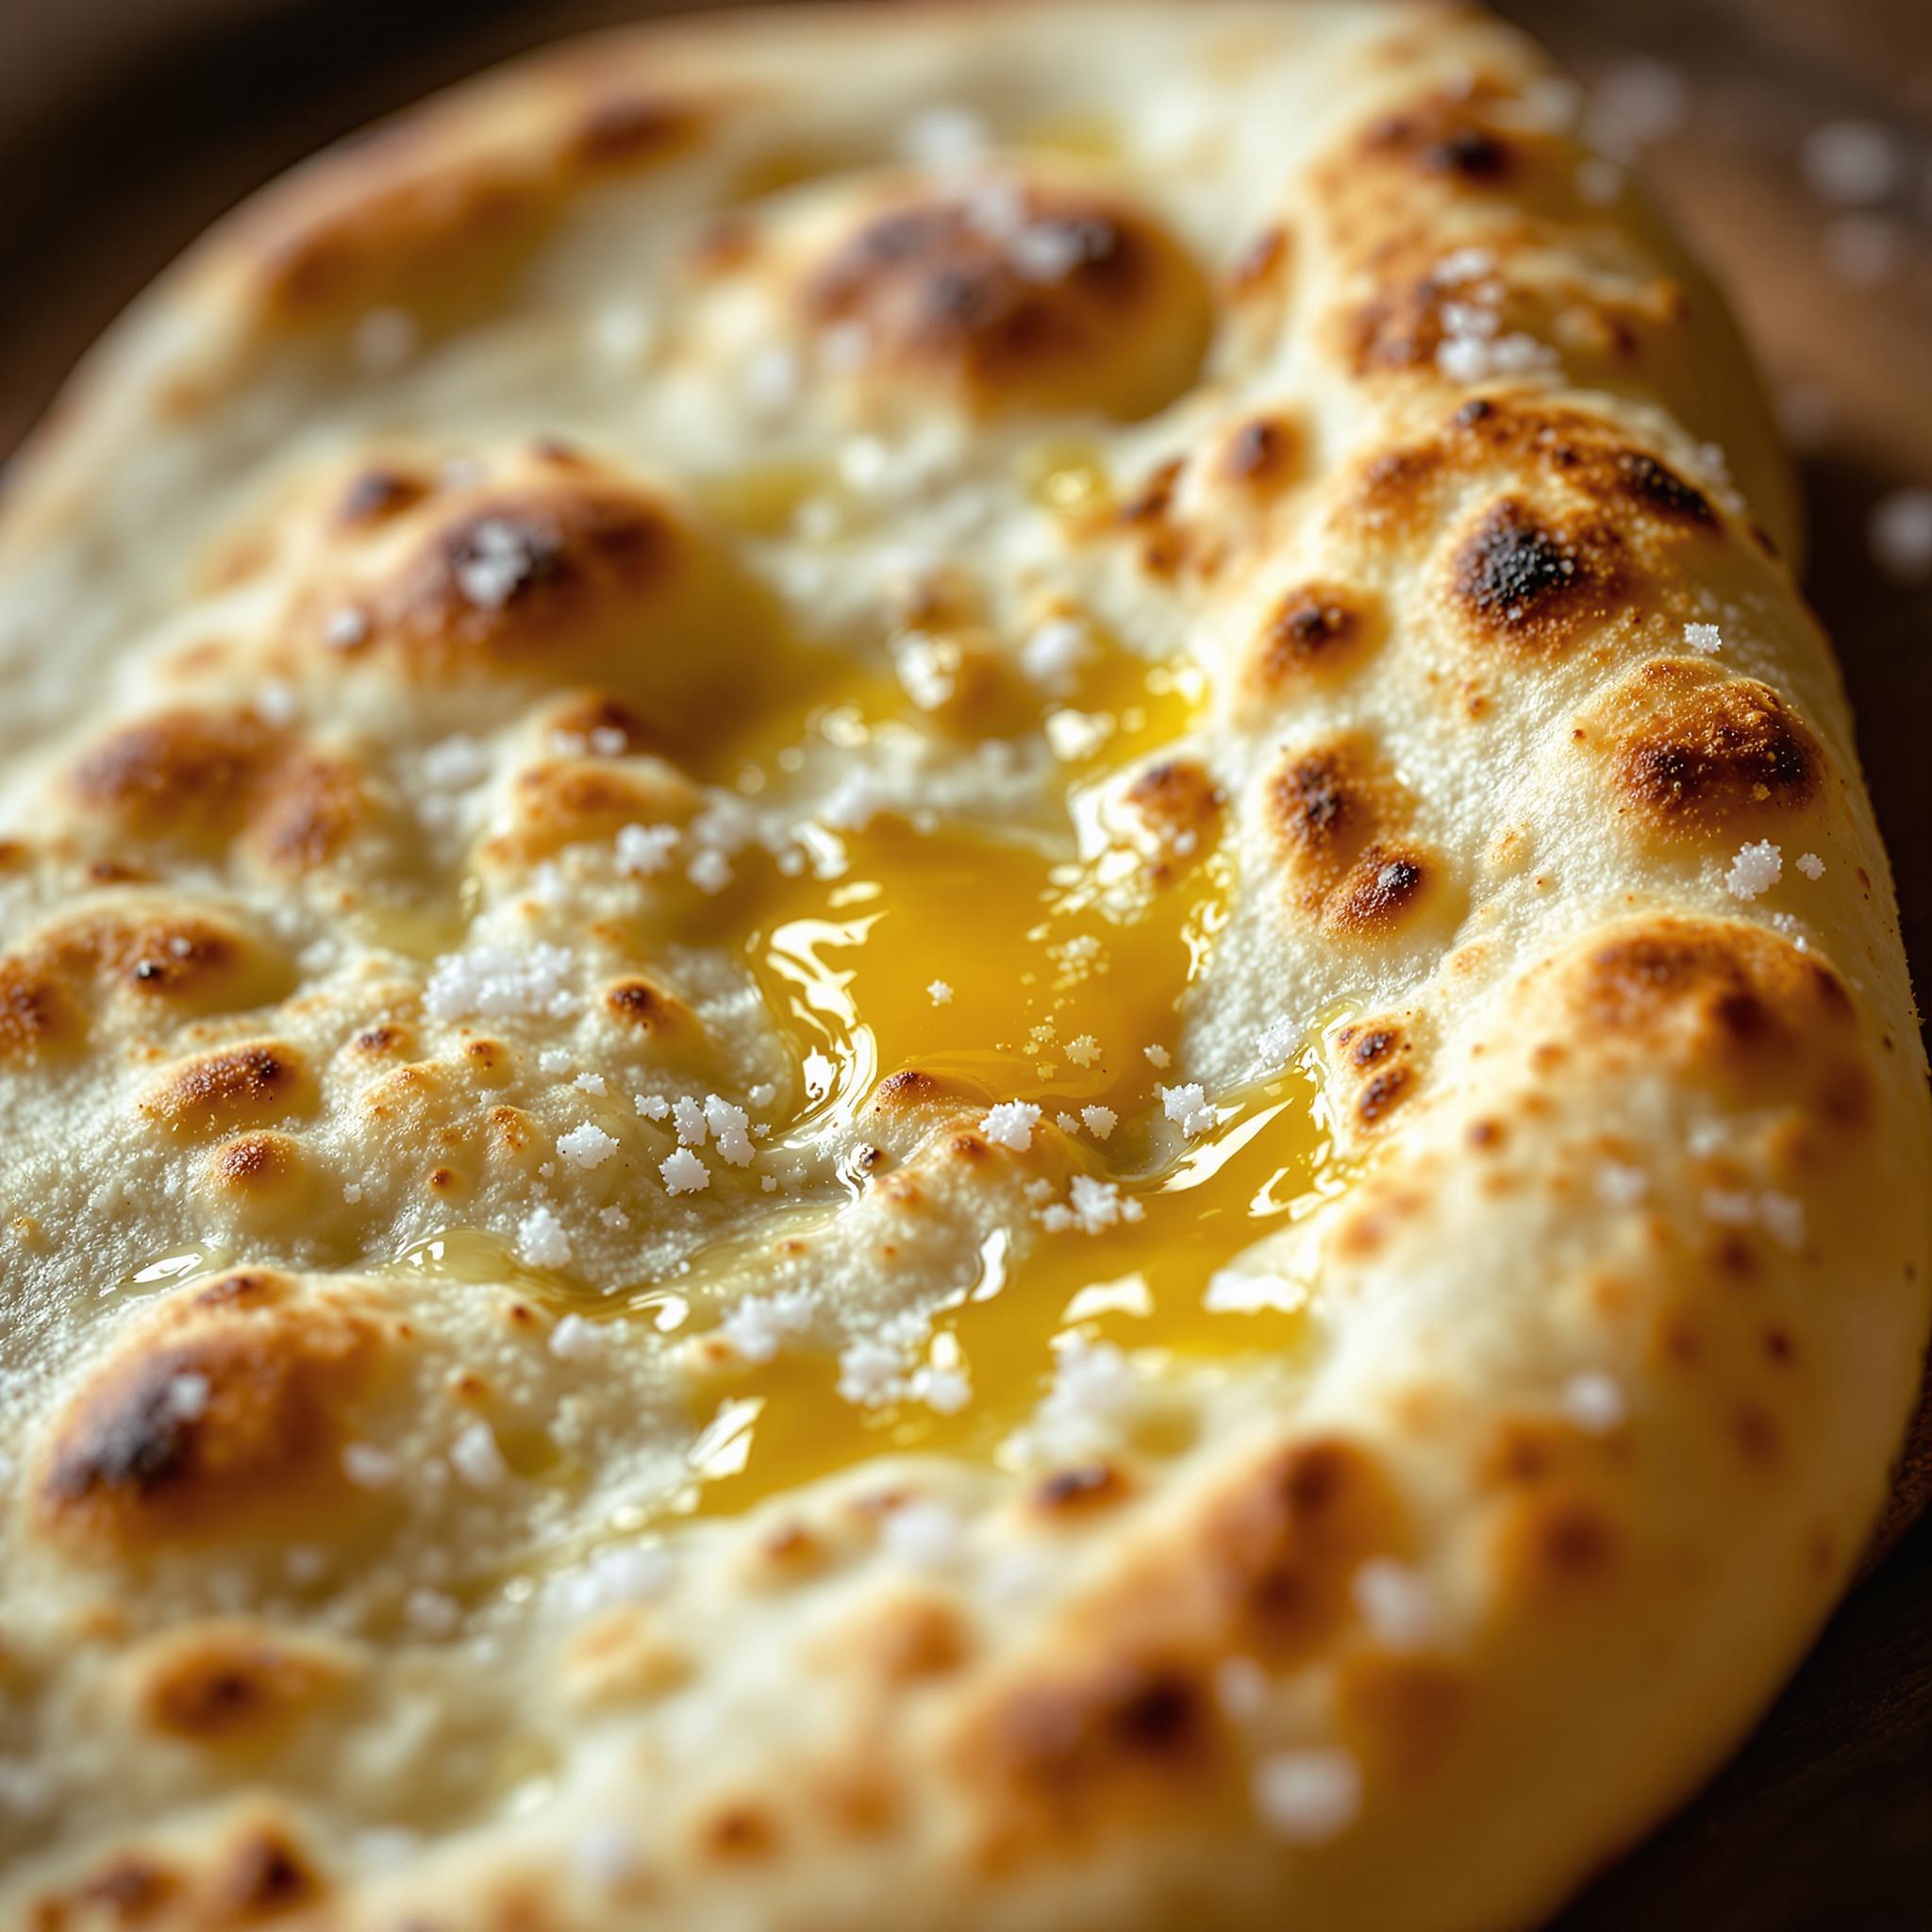
Punch down the risen dough and divide it into equal portions. Roll each piece into an oval shape, roughly ¼ inch thick. Heat a cast-iron skillet or nonstick pan over medium-high heat. Place one rolled-out naan onto the hot skillet and cook for 1-2 minutes per side, or until bubbles form and the surface turns golden brown with charred spots. Brush the cooked naan generously with melted butter and sprinkle with optional toppings like garlic or cilantro. The sizzle and aroma during this step are pure kitchen therapy!
Chef’s Tip
For an authentic touch, try cooking the naan directly on a pizza stone or under the broiler for a few seconds after skillet-cooking. This mimics the high heat of a traditional tandoor oven and gives your naan those irresistible charred edges.
Time Required
- Prep Time: 15 minutes
- Rising Time: 1 hour
- Cooking Time: 15 minutes
- Total Time: 1 hour 30 minutes
Nutritional Information
Per serving (1 piece): Calories: 180 | Protein: 4g | Fat: 6g | Carbohydrates: 28g | Fiber: 1g | Sugar: 2g
Extra Information
Did you know that naan is often used as a utensil in South Asian cultures? Instead of forks and knives, people tear pieces of naan to scoop up curries and dips. It’s not just delicious—it’s practical too!
Necessary Tools
- Large mixing bowl
- Rolling pin
- Cast-iron skillet or nonstick pan
- Pizza stone or broiler (optional)
Storage Instructions
Homemade naan is best enjoyed fresh but can be stored for later enjoyment. To keep it soft, wrap the cooled naan tightly in aluminum foil or plastic wrap. For longer storage, freeze individual pieces in resealable bags for up to three months. When ready to serve, simply reheat in a skillet or microwave for a few seconds to restore its fluffy texture. Storing leftovers properly ensures you’ll always have a stash of naan ready for impromptu meals.
If you’re freezing naan, consider layering parchment paper between pieces to prevent sticking. And remember, reheating frozen naan in a skillet brings back that delightful crispiness we all crave.
Finally, don’t forget to label your freezer bags with dates. This simple habit helps you rotate your stock and avoid wasting food—a win-win for both your wallet and the planet!
Tips and Tricks
Here are a few tips to elevate your naan game:
– Let the dough rise in a warm spot to speed up the process.
– Experiment with different seasonings like za’atar or nigella seeds for unique flavors.
– Always preheat your skillet thoroughly before adding the dough—it makes all the difference in achieving that perfect char.
Pro tip: Keep a spray bottle of water handy while cooking. Spritzing the skillet creates steam, which enhances the naan’s texture.
Serving Suggestions
- Serve alongside creamy butter chicken or spicy paneer tikka masala.
- Use as a base for open-faced sandwiches topped with hummus and veggies.
Healthier Alternatives for Naan
If you’re aiming for a healthier take on this classic bread, here are six variations to try:
1. **Whole Wheat Naan**: Substitute half or all of the all-purpose flour with whole wheat flour for added fiber.
2. **Low-Fat Naan**: Reduce the amount of butter and replace it with a light brushing of olive oil.
3. **Gluten-Free Naan**: Use a gluten-free flour blend designed for bread baking.
4. **Herb-Infused Naan**: Add dried herbs like rosemary or thyme to the dough for extra flavor without extra calories.
5. **Vegan Naan**: Skip the yogurt and use plant-based milk mixed with lemon juice as a substitute.
6. **Keto Naan**: Replace the flour with almond flour and add a bit of xanthan gum for structure.
Each variation offers a new way to enjoy this beloved bread while catering to different dietary preferences.
Common Mistakes to Avoid
Mistake 1: Using Cold Water for Yeast Activation
Yeast loves warmth—not cold temperatures. Using water that’s too cold won’t activate the yeast properly, leading to dense, unrisen dough. Always aim for lukewarm water around 110°F (43°C). Pro tip: Test the temperature by dipping your finger in—if it feels comfortably warm, you’re good to go.
Mistake 2: Overworking the Dough
Kneading is essential, but overdoing it can lead to tough naan. Stop kneading once the dough feels smooth and elastic. Trust your instincts—you’ll know when it’s ready!
Mistake 3: Skipping the Resting Time
Rushing the rising process compromises the texture of your naan. Patience pays off here, so give the dough ample time to double in size for that pillowy softness we all adore.
Frequently Asked Questions
Can I make naan without a skillet?
Absolutely! While a skillet is ideal, you can bake naan in the oven at 475°F (245°C) on a preheated pizza stone or baking sheet for 5-7 minutes. Just keep an eye on it to prevent burning.
How do I store leftover naan?
Wrap the cooled naan tightly in foil or plastic wrap and store it at room temperature for up to two days. For longer storage, freeze individual pieces in resealable bags.
What can I use instead of yogurt?
Coconut yogurt or sour cream works wonderfully as substitutes for plain yogurt in this recipe. Both provide the necessary tanginess and moisture.
Is naan gluten-free?
Traditional naan contains gluten, but you can easily adapt it by using a gluten-free flour blend. Be sure to include xanthan gum for elasticity.
Can I freeze naan dough?
Yes, you can freeze the dough after the first rise. Divide it into portions, wrap tightly, and freeze for up to three months. Thaw overnight in the fridge before shaping and cooking.
Why does my naan stick to the skillet?
Make sure your skillet is adequately preheated before adding the dough. Additionally, lightly flour the surface of the naan to prevent sticking.
How can I add flavor to my naan?
Try incorporating minced garlic, chopped cilantro, or sesame seeds into the dough or brushing them on after cooking for enhanced flavor profiles.
Do I need a rolling pin?
No, you can press the dough into shape using your hands. However, a rolling pin ensures even thickness, which promotes uniform cooking.
Why isn’t my dough rising?
Check the freshness of your yeast and ensure the water temperature is correct. Also, allow the dough to rise in a warm, draft-free area.
Can I grill naan?
Definitely! Grilling adds a delightful smoky flavor. Simply place the shaped dough directly on the grill grates over medium-high heat and cook for 1-2 minutes per side.
Conclusion
With its soft, chewy texture and endless customization options, homemade naan is a must-try for anyone who loves good bread. Whether you’re whipping up a batch for dinner or experimenting with healthier alternatives, this recipe promises to bring joy to your kitchen. So grab your ingredients, roll up your sleeves, and get ready to create something truly special. Happy baking!