No-Bake Shortbread Cake: The Easiest, Dreamiest Dessert You’ll Ever Make
Have you ever stared at a stunning dessert in a bakery window and thought, “I could never make that”? I used to, all the time. Then I discovered this no-bake shortbread cake. The first time I made it for a family picnic, everyone thought I’d bought it from a fancy patisserie. The secret? It’s embarrassingly easy. No oven, no fuss, just layers of buttery biscuits and the most luxurious chocolate cream you can imagine. It’s the dessert hero that makes you look like a superstar without breaking a sweat.
A Slice of Simple Joy: Where This Cake Came From
This cake isn’t about a grand, centuries-old tradition. It’s about smart, modern home cooking. It belongs to the wonderful family of “icebox cakes,” which became popular in mid-20th America when refrigerators (iceboxes) became common. The idea was pure genius: use simple, store-bought biscuits and let time in the cold do the magic of setting a creamy filling. My version is a love letter to that practicality, but I’ve dressed it up a bit with mascarpone and dark chocolate. It’s the traditional concept meets a modern craving for something deeply indulgent yet simple to assemble.
Why Your Heart (And Stomach) Will Love This Recipe
You’ll love this cake because it’s a guaranteed crowd-pleaser that respects your time. The texture is pure magic—crunchy cookies softening into a cake-like layer, surrounded by a cloud of rich, chocolatey cream. It requires zero baking skills, which is perfect if the oven intimidates you. Best of all, you make it ahead of time. No last-minute panic before guests arrive. Just pull it from the fridge, decorate, and accept the compliments with a knowing smile.
The Perfect Times to Whip Up This Wonderful Cake
This cake is your secret weapon for so many occasions! It’s a lifesaver for hot summer days when turning on the oven feels like a crime. It’s a star at potlucks and picnics because it travels so well in its pan. Birthday party? Check. Easy Friday night treat? Double-check. I even made it for my book club last month, and let’s just say we talked more about the cake than the book! It’s that versatile and always a hit.
Gathering Your Simple, Star Ingredients
Here’s what you’ll need to create this masterpiece. The beauty is in its simplicity!
- 500 g butter biscuits – The sturdy, buttery foundation.
- 200 g cream – For whipping into soft peaks.
- 2 packs of vanilla sugar – Adds a sweet, fragrant note.
- 200 g dark chocolate couverture – The rich, chocolate soul of the cream.
- 500g mascarpone – Creates that luxurious, thick texture.
- 60 g natural yogurt – A touch of tang to balance the sweetness.
- 100 g sweetened condensed milk – The secret ingredient for a uniquely silky cream.
- 50 g dark chocolate couverture (for decoration) – For that beautiful, finishing touch.
No Stress Substitutions
Don’t have an exact ingredient? No problem! Cooking is about making it work for you.
- Butter Biscuits: Any plain, sturdy tea biscuit or digestive biscuit will work beautifully.
- Dark Chocolate Couverture: High-quality dark chocolate baking bars are a perfect substitute.
- Mascarpone: For a slightly tangier version, use full-fat cream cheese. Let it soften first!
- Natural Yogurt: Sour cream is an excellent 1:1 swap here.
- Vanilla Sugar: Use 2 teaspoons of pure vanilla extract added to the cream while whipping.
Creating Your No-Bake Masterpiece, Step-by-Step
Step 1: Building Your Foundation
First, line your baking tray with paper. Place your frame or pan on top. Now, get your biscuits ready. Lay out a perfect rectangle, 4 cookies by 4 cookies. This is your first layer. Snuggle them close together. You’re building the base of your edible tower! Adjust the frame to fit them snugly. If you’re using a pan, just line it. See? You’re already an architect.
Pro tip: If your biscuits have a slight curve, place the curved side down. This gives you a flatter surface for the cream.
Step 2: Whipping Up Cloud-Like Cream
Pour your cold cream into a tall, clean bowl. Using an electric mixer, start beating on medium speed. Slowly sprinkle in the vanilla sugar as it whips. Watch it transform from liquid to soft, billowy clouds. You want peaks that hold their shape gently. Once done, pop this bowl right into the fridge. Keeping it cold is the key to a stable, fluffy cream later.
Pro tip: Chill your bowl and beaters in the freezer for 10 minutes before you start. Cold tools help the cream whip faster and higher.
Step 3: Crafting the Luxurious Chocolate Cream
Chop your main chocolate into small pieces. Melt it gently over a pan of simmering water. Don’t let the bowl touch the water! In a separate large bowl, mix the mascarpone, yogurt, and condensed milk. Stir until it’s completely smooth and dreamy. Now, pour in the warm, melted chocolate. The aroma is incredible! Fold it in until you have a uniform, beautiful brown cream. Finally, gently fold in the cold whipped cream. Be gentle to keep it airy. Spread a quarter of this heaven onto your biscuit base.
Step 4: The Joy of Layering
This is the fun, rhythmic part! Place another layer of biscuits (4×4) right on top of the cream. Press down lightly so they stick. Then, spread another quarter of the cream. Repeat: biscuits, cream, biscuits, cream. You’ll end with four biscuit layers and the final, beautiful layer of cream on top. Smooth the top cream layer like you’re frosting a cake. It’s so satisfying!
Step 5: The Chill That Makes It Magic
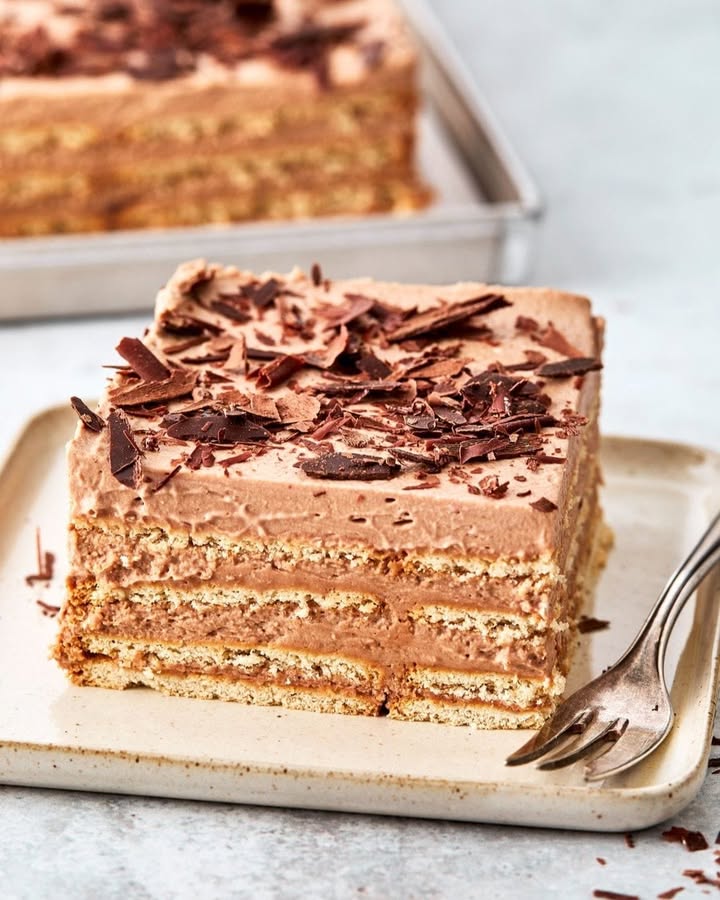
This is the most important “cooking” step, and it happens in your fridge. Place a piece of cling film directly on the surface of the cream. This stops it from absorbing any fridge smells. Now, walk away. Let it chill for at least 5 hours, but overnight is pure gold. This time lets the biscuits soften perfectly into a cake-like texture. For decoration, use a vegetable peeler on your remaining chocolate to make pretty curls. Sprinkle them over the cake, cut into pieces, and serve cold.
Chef’s tip: For super clean cuts, dip your knife in hot water and wipe it dry between each slice.
Your Time Investment (It’s Mostly Waiting!)
This recipe is perfect for busy people. The active work is minimal, but patience is rewarded.
- Prep Time: 30 minutes
- Chill Time: 5 hours (or overnight)
- Total Time: 5 hours 30 minutes
- Servings: Makes about 24 perfect little pieces.
My Little Secret for the Best Texture
Use slightly stale biscuits! Sounds odd, right? If your biscuits are very fresh and super crunchy, they can stay a bit too hard. Biscuits that have been open a day or two absorb the cream moisture just right. They become tender and cake-like, not soggy. If you only have fresh ones, just let them sit out on a plate for a few hours before you start.
A Sweet Bit of Trivia
The mascarpone in this recipe is the same cheese used in the famous Italian tiramisu. It’s not really a cheese but a “crema di latte,” a cream cultured with acidic fruit juice. This process gives it that incredibly rich, velvety, and spreadable texture that makes our chocolate cream so impossibly smooth and decadent.
What You’ll Need to Make It
You don’t need fancy equipment for this cake. Just a few basics from your kitchen.
- A 20×30 cm (approx 8×12 inch) baking pan or a springform pan with baking paper.
- Electric hand mixer or stand mixer.
- Two mixing bowls (one large, one medium).
- A saucepan for the water bath.
- A rubber spatula for folding.
- A sharp knife or vegetable peeler for the chocolate decoration.
How to Keep Your Cake Delicious
This cake stores wonderfully, making it perfect for make-ahead plans. Always keep it covered in the refrigerator. The cling film on the surface is your best friend for freshness.
It will stay perfectly delicious for up to 4 days. The flavors actually meld and get even better after the first day. Just make sure it’s well-covered.
I do not recommend freezing this cake. The creamy filling can separate and become grainy when thawed. It’s best enjoyed fresh from the fridge.
Handy Tips and Advice for Success
- Make sure all your dairy ingredients (mascarpone, cream, yogurt) are cold. This helps everything whip and set properly.
- When folding in the whipped cream, use a gentle hand and a folding motion. You want to keep as much air in it as possible.
- If you’re in a hurry, you can speed up the chill time by putting the cake in the freezer for 1.5-2 hours. Then transfer it to the fridge.
- Let the cake sit at room temperature for about 10 minutes before serving. This takes the extreme cold edge off the cream.
Presenting Your Beautiful Creation
How you serve it can make it even more special! Here are a few ideas.
- Dust the top lightly with unsweetened cocoa powder before adding the chocolate curls.
- Serve each slice with a few fresh raspberries or strawberries on the side.
- For a dinner party, place each square on a individual dessert plate with a dollop of lightly sweetened whipped cream.
- Add a sprinkle of flaky sea salt over the chocolate curls for a trendy sweet-and-salty finish.
Healthier Twists and Fun Variations
Love the idea but want to mix it up? Try one of these six delicious variations.
- Berry Bliss: Add a thin layer of mashed raspberries or strawberry jam between the biscuit and cream layers for a fruity punch.
- Citrus Zing: Add the zest of one orange to the chocolate cream mixture. It brightens the whole flavor profile beautifully.
- Nutty Crunch: Sprinkle finely chopped toasted hazelnuts or almonds between the layers for added texture and flavor.
- Coffee Lover’s Dream: Dissolve 1-2 teaspoons of instant espresso powder into the melted chocolate for a mocha version.
- White Chocolate Wonder: Swap the dark chocolate for white chocolate. Use vanilla biscuits and add a handful of dried cranberries.
- Peanut Butter Cup: Swirl ½ cup of smooth peanut butter into the mascarpone mixture before adding the chocolate. A dream for PB fans!
Common Mistakes to Avoid
Mistake 1: Using Warm Ingredients
This is the biggest culprit for a runny cake. If your mascarpone, cream, or bowl is too warm, the cream won’t whip well and the filling won’t set. Always start with cold ingredients straight from the fridge. A warm kitchen can also work against you. If it’s a hot day, work quickly and get that cake into the fridge as fast as you can.
Mistake 2: Over-Whipping or Under-Whipping the Cream
Whipped cream has a sweet spot. Under-whipped cream is too soft and won’t hold the layers. Over-whipped cream becomes grainy and buttery. You want stiff peaks that are smooth and glossy. Stop your mixer when the cream holds its shape firmly. If you see it start to look curdled, you’ve gone too far.
Mistake 3: Skipping the Long Chill
Patience is not just a virtue here; it’s a requirement. If you only chill the cake for an hour or two, the biscuits will be hard and the cream soft. The magic happens during that long, slow chill. The biscuits have time to absorb moisture from the cream and become tender. Plan for the overnight chill. It makes all the difference in texture.
Mistake 4: Rushing the Chocolate Mix-In
If you pour very hot melted chocolate directly into the cold mascarpone mix, it can cause the mascarpone to seize or separate. Let the melted chocolate cool for a few minutes so it’s warm, not hot. Then, mix it in gradually. This ensures a smooth, velvety cream without any lumps or oily patches.
Your Questions, Answered
Can I use milk chocolate instead of dark chocolate?
Absolutely! The recipe will work just fine with milk chocolate. Keep in mind that milk chocolate is sweeter and softer than dark. Your cream might be a bit softer because of milk chocolate’s different cocoa butter content. The flavor will be milder and sweeter, which is great if you’re serving kids or prefer less intense chocolate. Just chop and melt it the same way.
What can I use if I don’t have a baking frame?
Don’t worry at all. A standard 9×13 inch baking pan works perfectly. Just line it with parchment paper, letting some paper hang over the sides. This “sling” makes it super easy to lift the whole cake out for cutting and serving later. A springform pan is another excellent option, especially for a round cake.
Why did my cream filling turn out grainy?
A grainy texture usually happens if the mascarpone was over-mixed or if it was too cold when mixed with other ingredients. Mascarpone can “break” if beaten too vigorously. Always mix it on low speed or by hand just until smooth. Also, make sure it’s not ice-cold. Letting it sit out for 10 minutes to slightly soften can help it blend more smoothly.
How far in advance can I make this cake?
This cake is a fantastic make-ahead dessert. You can prepare it up to two days in advance. In fact, it often tastes even better on the second day as the flavors have more time to meld. Just keep it tightly covered with cling film in the refrigerator. Add the chocolate decoration on the day you plan to serve it so it looks fresh.
My biscuits are still hard after chilling. What went wrong?
This usually means the cake didn’t chill long enough, or the cream layer between biscuits was too thin. The biscuits need time to absorb moisture. Make sure you chill for the full 5 hours, preferably overnight. Also, ensure you are spreading a good, even quarter of the cream mixture on each layer. A thicker cream layer helps soften the biscuits more effectively.
Can I freeze this no-bake shortbread cake?
I do not recommend freezing this particular cake. The creamy filling, which contains dairy like mascarpone and whipped cream, does not freeze and thaw well. It can become watery, separate, and develop an unpleasant grainy texture. For the best experience, enjoy it fresh from the refrigerator. It keeps well for several days anyway.
Is there a non-dairy version of this recipe?
You can experiment with dairy-free substitutes. Use full-fat coconut cream (chilled) for the whipping cream. Look for a plain, thick coconut yogurt and a vegan mascarpone alternative. Use vegan butter biscuits. The condensed milk is trickier, but you can find vegan versions or make a syrup with coconut milk and sugar. The texture will be different but can still be delicious.
The cake is too sweet for me. How can I adjust it?
The sweetness mainly comes from the biscuits, condensed milk, and vanilla sugar. To reduce it, use a darker chocolate with a higher cocoa percentage (70% or more). You can also reduce the condensed milk slightly, or use a plain, unsweetened yogurt. Choosing less-sweet butter biscuits will make a big difference, too. Taste the cream mixture before adding the whipped cream and adjust.
Can I add fruit to this cake?
You can, but be careful with fresh fruit. Juicy fruits like oranges or pineapple can make the biscuits soggy. It’s safer to use berries like raspberries or strawberries between the layers, but pat them dry first. Another great option is to use a layer of firm fruit jam or preserves. Or, simply serve the cake with fresh fruit on the side rather than inside it.
The chocolate curls are breaking. How do I make them perfectly?
Perfect curls need the right chocolate temperature. If the chocolate is too cold, it will shatter. If too warm, it will melt. Let your decoration chocolate block sit at room temperature for about 30 minutes. Use a sharp vegetable peeler or a cheese plane. Apply steady, firm pressure and pull towards you. If it’s not working, try slightly warming the block in your hands for a minute.
The Final, Sweet Slice
So there you have it. Your new go-to dessert that promises maximum wow with minimum work. This no-bake shortbread cake is more than a recipe. It’s a little bit of kitchen magic, a guaranteed smile-maker, and proof that the best things don’t have to be complicated. I hope you make it, share it, and love it as much as my family does. Now, go enjoy your well-deserved slice of cool, creamy, chocolatey bliss. You’ve earned it!
Cajun Chicken Pasta
Ingredients
Equipment
Method
- Line your baking tray with paper and place your frame or pan on top.
- Lay out the first layer of biscuits in a 4x4 rectangle, adjusting the frame to fit snugly.
- Pour cold cream into a bowl, beat with an electric mixer, and sprinkle in vanilla sugar until soft peaks form.
- Melt dark chocolate gently over a pan of simmering water.
- In a separate bowl, mix mascarpone, yogurt, and condensed milk until smooth.
- Fold in the warm melted chocolate and then gently fold in the whipped cream.
- Spread a quarter of the chocolate cream over the biscuit base.
- Add another layer of biscuits, press down lightly, and spread another quarter of the cream.
- Repeat the layering until finished with a layer of cream on top and smooth it out.
- Cover with cling film and chill in the fridge for at least 5 hours or overnight.
- Decorate with chocolate curls before serving.