Crispy Outside, Melty Inside: My Homemade Fried Ice Cream Adventure
Have you ever eaten something that made you do a happy dance right in your kitchen? That was me the first time I successfully made fried ice cream. I was so worried it would be a melty disaster, but magic happened! That perfect crunch giving way to cold, creamy vanilla is a party trick everyone needs in their back pocket. It’s easier than you think, and today I’m sharing all my secrets so you can wow your family and friends.
A Sweet Treat with a Surprising History
Fried ice cream feels like a modern restaurant marvel, but its story is a fun mix of tales. Some say it was invented at the 1893 Chicago World’s Fair. Others credit Japanese tempura chefs or Mexican culinary creativity. Wherever it truly began, the idea of frying something frozen is pure genius. My version uses simple cornflakes for that incredible texture. It’s a beautiful blend of hot and cold, crisp and soft, that feels fancy but is totally doable at home.
Why You’ll Fall in Love With This Recipe
This recipe is a crowd-pleaser for so many reasons! First, the “wow” factor is off the charts. Serving a dessert that’s warm and crispy on the outside but still frozen inside never gets old. Second, you can make the balls ahead of time. Just coat them and keep them in the freezer until your guests arrive. Finally, it’s incredibly versatile. While we’re using vanilla today, you can use any ice cream flavor you love. It’s a simple, fun project with deliciously impressive results.
The Perfect Occasion for a Little Magic
This isn’t your everyday dessert—it’s a celebration in a bowl! It’s perfect for summer barbecues when you want something cool but special. I love making it for birthday parties because kids (and adults!) are utterly fascinated by it. It’s also a fantastic finale for a taco night or any fiesta-themed meal. Honestly, any time you want to end a meal with smiles and delightful confusion (“How did you *do* that?!”), this is your recipe.
Gathering Your Ingredients
Here’s everything you’ll need for this magical dessert. The short list is part of the charm!
- 4 cups vanilla ice cream
- 2 cups corn flakes, crushed
- 2 teaspoons ground cinnamon
- 2 tablespoons granulated sugar
- 1 quart vegetable oil, for frying
- Whipped cream (optional, but recommended!)
- Chocolate syrup (optional)
- Maraschino cherries (optional)
No Cornflakes? No Problem! Handy Substitutions
Out of something? Don’t rush to the store! Here are some easy swaps:
For the Coating: Crushed frosted flakes, crushed graham crackers, or even finely chopped nuts mixed with a little brown sugar work beautifully.
For the Ice Cream: While vanilla is classic, feel free to experiment! Chocolate, cookies and cream, or even a dulce de leche flavor would be incredible.
For Frying: Any neutral oil with a high smoke point works. Canola oil or peanut oil are great alternatives to vegetable oil.
Let’s Make Some Magic: Your Step-by-Step Guide
Step 1: Sculpting and Freezing the Base
Start by scooping your vanilla ice cream. I use a large ice cream scoop to make even balls. Work quickly so the ice cream doesn’t melt in your hands. Place each perfect, round scoop onto a baking sheet lined with parchment paper. Slide that baking sheet straight into your freezer. This is the most important step! You need the balls to be rock solid, so give them at least 2 hours. I sometimes make them the night before for ultimate firmness.
Step 2: Creating the Crunchy Cinnamon Shell
While the ice cream firms up, make your coating. Grab a shallow bowl or pie dish. Pour in your crushed cornflakes—you want them to have a sandy texture with a few bigger pieces for extra crunch. Add the ground cinnamon and granulated sugar. Now, get your hands in there and mix it all up! The air will smell sweet and warmly spiced. This mixture is what will create that gorgeous, golden, crackly shell around your frozen treasure.
Pro tip: If you want extra-crispy coating, you can toast the crushed cornflakes in a dry pan for a few minutes first. Let them cool completely before mixing with the cinnamon and sugar.
Step 3: The Double-Freeze for a Perfect Seal
Take your rock-hard ice cream balls out of the freezer. One at a time, roll each ball in the cornflake mixture. Press gently so the crumbs stick to every single surface. You’re creating a protective armor! Place each coated ball back on the parchment-lined tray. Once they’re all coated, it’s back into the freezer they go for another 30 minutes. This second freeze is key. It locks the coating onto the ice cream, so it doesn’t fall off in the hot oil.
Step 4: Heating the Oil to the Perfect Temperature
Pour your vegetable oil into a heavy-bottomed pot or deep fryer. You need enough oil so the ice cream balls can float. Attach a candy or deep-fry thermometer to the side of the pot. Heat the oil over medium-high heat until it reaches 375°F (190°C). This temperature is crucial. If the oil is too cool, the coating will get greasy. If it’s too hot, it will burn before you get a good seal. Be patient and watch that thermometer.
Step 5: The Big Fry: Fast and Fearless
Now for the fun part! Using a slotted spoon or spider strainer, carefully lower one coated ice cream ball into the hot oil. Don’t overcrowd the pot—fry just one or two at a time. You’ll hear a fierce sizzle! Fry for only 15 to 30 seconds. Watch as the coating turns a beautiful, deep golden brown. The hot oil instantly sears the crust, creating a barrier that keeps the ice cream inside blissfully frozen.
Step 6: Draining and Dressing for Delight
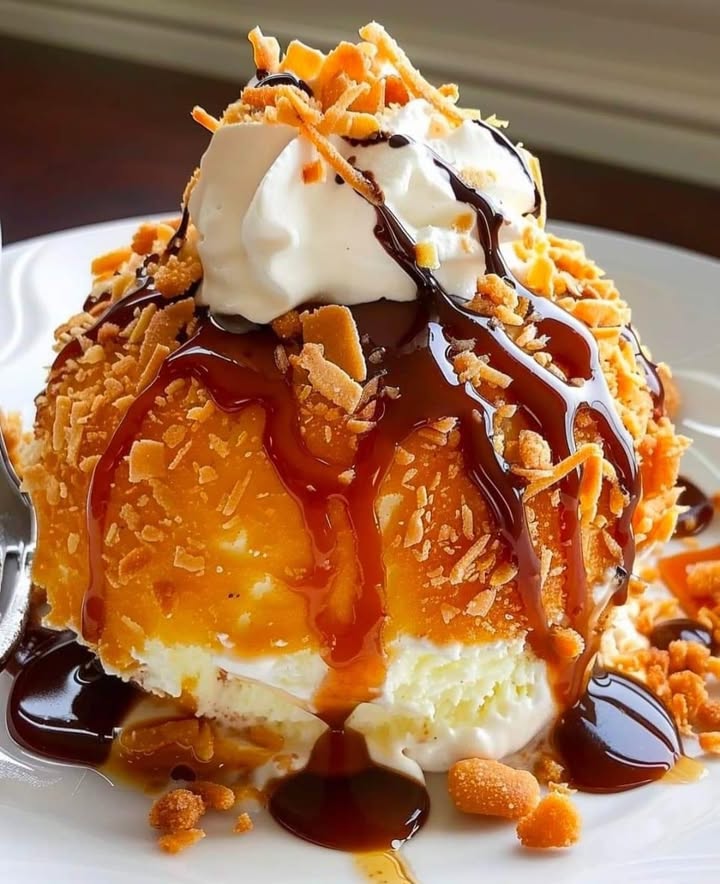
Quickly lift your golden fried ice cream ball out of the oil. Let the excess oil drip back into the pot for a second. Then, place it on a plate lined with a few paper towels. The paper will soak up any extra grease. You must serve these immediately! They are best within the first minute or two. Place each ball in a bowl and go crazy with toppings. A cloud of whipped cream, a drizzle of chocolate syrup, and a cheerful cherry on top make it pure happiness in a dish.
Chef’s tip: For an extra flair, serve with a side of warm caramel sauce or dulce de leche for dipping. The combination of hot sauce and cold ice cream is divine!
Timing is Everything
Let’s break down the clock so you can plan your dessert masterpiece:
Prep Time: 20 minutes (plus scooping)
Freezing Time: 2 hours 30 minutes (this is not optional!)
Cooking Time: 2 minutes (per batch)
Total Time: About 3 hours (mostly hands-off freezing)
Servings: Makes about 6-8 balls, depending on scoop size.
My Number One Secret for Success
My biggest secret is the double-freeze. That first long freeze makes the ice cream solid enough to handle. The second, shorter freeze after coating is what seals the deal. It gives the coating time to stick and get very cold again. This cold coating meets the hot oil and forms an instant, impenetrable crust. Skip this step, and you risk a crumbly, melty mess. Trust me, set that timer!
Did you know the idea of frying ice cream is over 130 years old? One popular story says it debuted at a huge fair in 1893. A chef accidentally dropped some ice cream into a fryer. Instead of a disaster, he discovered this amazing contrast. Whether that’s true or not, it’s a fun tale to tell while everyone enjoys their surprising dessert!
Gear You’ll Need in Your Kitchen
- Baking Sheet
- Parchment Paper
- Ice Cream Scoop
- Shallow Dishes (for coating)
- Heavy Pot or Deep Fryer
- Candy/Deep-Fry Thermometer
- Slotted Spoon or Spider Strainer
- Paper Towels
Storing Your Fried Ice Cream (The Rare Leftovers!)
Let’s be honest, you’ll probably eat it all. But if you have extra coated, unfried balls, they store beautifully. Place them in a single layer in an airtight container. Separate layers with parchment paper. They can live in your freezer for up to 2 weeks. This is a fantastic make-ahead trick for parties.
However, you cannot store them after frying. Once fried, the magic is immediate. The shell will lose its crispness and become soggy in the freezer. The ice cream may also develop ice crystals. The best plan is to only fry what you will serve right away.
For the best experience, I recommend doing all the prep work—scooping, coating, and the second freeze—ahead of time. Then, simply fry them fresh when your guests are ready for dessert. It takes just minutes and guarantees that perfect hot-cold crunch everyone loves.
My Best Tips for Foolproof Fried Ice Cream
- Work Fast with Cold Hands: When scooping and coating, handle the ice cream as little as possible. If your hands are warm, run them under cold water first.
- Thermometer is a Must: Don’t guess the oil temperature. An accurate thermometer is the most important tool for this recipe.
- Dry Everything: Make sure your ice cream balls have no wet spots before coating. Any moisture will make the coating slide off.
- Fry in Batches: Frying too many at once drops the oil temperature fast, leading to oily, soft coating.
Presentation Ideas That Spark Joy
- Serve in colorful Mexican-style clay bowls (cazuelitas) for a fiesta feel.
- Create a topping bar with sauces (chocolate, caramel, strawberry), sprinkles, chopped nuts, and fresh berries.
- For a fun twist, use small martini glasses for a fancy, individual dessert.
- Drizzle sauces in artistic swirls on the plate before placing the fried ice cream ball in the center.
Want to Mix It Up? Try These 6 Fun Variations!
1. Chocolate Lover’s Dream: Use chocolate ice cream and roll the balls in crushed chocolate cookies (like Oreos) mixed with a pinch of cinnamon.
2. Tropical Paradise: Coconut ice cream rolled in sweetened shredded coconut and panko breadcrumbs. Serve with a mango or pineapple puree.
3. Cookies and Cream: Use cookies and cream ice cream. Coat with more crushed chocolate sandwich cookies. The double cookie crunch is amazing.
4. Nutty Delight: Roll vanilla or butter pecan ice cream in finely chopped pecans or almonds mixed with brown sugar.
5. Birthday Cake Fun: Use birthday cake or funfetti ice cream. Coat with crushed vanilla wafers or funfetti cake crumbs. Top with rainbow sprinkles!
6. S’mores Style: Use chocolate ice cream. Coat with crushed graham crackers and mini chocolate chips. Serve drizzled with marshmallow fluff.
Common Mistakes to Avoid
Mistake 1: Skipping the Long Freeze
This is the biggest error. If your ice cream balls are not frozen solid, they will melt the second you handle them. The coating won’t stick, and frying will be a soupy disaster. The ice cream must be hard as a rock. Plan ahead and give it the full 2 hours, or even overnight. A solid core is your foundation for success.
Mistake 2: Frying in Oil That’s Not Hot Enough
If you add the ice cream to oil that’s below 375°F, it will just sit there and soak up the grease. Instead of a quick, crisp seal, you get a soggy, oily shell that falls off. The ice cream inside will start to melt from the prolonged heat. Always use a thermometer and wait for the oil to reach the right temperature before you start frying.
Mistake 3: Overcrowding the Pot
It’s tempting to fry several at once to save time. Don’t do it! Adding too many balls at once makes the oil temperature plummet. Suddenly, you’re back to mistake #2—greasy, soft coating and melting ice cream. Fry one or two balls at a time. This keeps the oil hot and ensures each one cooks perfectly and quickly.
Mistake 4: Frying for Too Long
We are not frying chicken here! This is a quick sear, not a long cook. Fifteen to thirty seconds is all you need. If you leave it in longer, the heat will travel through the crust and start melting the ice cream. You’ll end up with a puddle in your fryer. Set a timer if you need to. Look for golden brown color, then get it out immediately.
Your Fried Ice Cream Questions, Answered!
Can I bake fried ice cream instead of deep-frying it?
You can try a “fake fry” in the oven, but it won’t be the same. To bake, spray the coated balls well with cooking spray and bake at 475°F for 2-3 minutes. Watch them closely! The result is warmer and less crispy than true frying. The oil’s intense, immediate heat is what creates the signature magic shell. For the real deal, frying is best.
What’s the best oil for frying ice cream?
Use a neutral oil with a high smoke point. Vegetable oil, canola oil, and peanut oil are all great choices. They won’t add their own flavor to the dessert. Avoid oils like olive oil or butter—they have lower smoke points and stronger flavors that don’t pair well with the sweet ice cream and cinnamon coating.
Can I make these completely ahead of time?
You can do almost all of it ahead! Scoop, coat, and do the second freeze. Keep the fully coated, unfried balls in an airtight container in the freezer for up to 2 weeks. When you’re ready to serve, just heat your oil and fry them fresh. This makes it a perfect, stress-free dessert for entertaining.
My coating fell off in the oil! What did I do wrong?
This usually means the ice cream wasn’t frozen hard enough before coating, or the coated balls didn’t get that second freeze. Moisture is the enemy. If the surface of the ice cream ball is at all wet or soft, the crumbs can’t grip. Ensure everything is bone-dry and frozen solid before they hit the hot oil. The double-freeze method is your best friend here.
Is there a way to make this recipe healthier?
For a lighter version, you can use low-fat ice cream. For the coating, try whole-grain, low-sugar cereal. Instead of deep-frying, try the quick bake method mentioned above. Remember, this is a special treat! Enjoying the full-fat, fried version in reasonable portions is a perfectly wonderful way to celebrate.
Can I use an air fryer for this recipe?
An air fryer can work, but manage your expectations. Spray the coated balls very generously with oil. “Fry” at the highest temperature (usually 400°F) for 3-4 minutes. The crust will be drier and more like a toasted coating than a classic fried one. It’s a good alternative if you want to avoid deep-frying, but the texture is different.
What other cereals can I use for the coating?
Get creative! Frosted flakes add extra sweetness. Crushed graham crackers give a s’mores vibe. Crushed vanilla wafers or shortbread cookies are delicious. Even crushed pretzels add a great sweet-and-salty twist. Just make sure whatever you use is crushed into small, sandy pieces so it forms a good shell.
How do I prevent the ice cream from melting while I coat it?
Work in a cool kitchen and handle the ice cream as little as possible. I take only one or two balls out of the freezer at a time. Roll them in the crumbs quickly and get them back onto the cold baking sheet. If your hands run warm, rinse them in cold water and dry them thoroughly before you start. Speed and cold are key.
What do I do with all the leftover frying oil?
Let the oil cool completely in the pot. Once cool, strain it through a fine-mesh sieve or cheesecloth into its original container or a jar. Store it in a cool, dark place. You can reuse oil for frying 2-3 more times, as long as it still smells fresh and wasn’t burned. Never pour oil down your drain!
Can I use this method with frozen yogurt or nondairy ice cream?
Absolutely! The method works the same. Just be aware that some nondairy ice creams or frozen yogurts may melt at a slightly different rate. Make sure whatever base you choose gets very firm in the freezer. The double-freeze technique is even more important here to ensure a solid, fry-able center.
Ready to Create Some Kitchen Magic?
There you have it! My complete guide to making unforgettable fried ice cream at home. Don’t let the hot oil scare you—with a good thermometer and frozen-solid ice cream, you are set up for success. The look on your friends’ faces when you serve this is worth every minute of freezing time. It’s a joyful, surprising dessert that turns an ordinary night into a celebration. So grab your scoop, freeze those balls solid, and get ready to fry up some happiness. You’ve got this!
Cheesy Beef Tortellini
Ingredients
Equipment
Method
- Scoop vanilla ice cream into balls and place on a baking sheet lined with parchment paper, then freeze for at least 2 hours.
- Mix crushed cornflakes with ground cinnamon and granulated sugar in a shallow bowl.
- Roll the frozen ice cream balls in the cornflake mixture, then return them to the freezer for another 30 minutes.
- Heat vegetable oil in a heavy-bottomed pot or deep fryer to 375°F (190°C).
- Carefully lower one coated ice cream ball into the hot oil and fry for 15 to 30 seconds until golden brown.
- Remove the fried ice cream and drain on paper towels. Serve immediately with optional toppings.
Nutrition
Notes
The oil temperature is crucial for the perfect fry; use a thermometer to monitor it closely.
Prepare the ice cream balls ahead of time and fry them just before serving for maximum freshness.
If you have leftover coated ice cream balls, store them in an airtight container in the freezer for up to 2 weeks before frying.