The Dream Dessert: Ultimate Banana Pudding Cheesecake
You know that magical dessert that makes everyone go quiet for a second after the first bite? That’s this cheesecake. I made it for my family’s Sunday dinner last month, and my uncle, a man of few words, just put a hand over his heart and sighed. It’s the love child of two classic desserts, bringing together the creamy comfort of banana pudding with the rich, decadent feel of cheesecake. Trust me, this isn’t just a dessert; it’s an event on a plate.
From Southern Side Dish to Star of the Show
Banana pudding is a staple in Southern kitchens, often served in a big glass bowl with layers of wafers, custard, and bananas. Cheesecake, of course, has its own grand history. This recipe is my little twist on tradition, merging the two into a show-stopping single creation. It’s like taking Grandma’s best potluck recipe and giving it a glamorous upgrade, perfect for a modern table while keeping all that soulful flavor. The mashed banana in the filling is my secret nod to the original pudding’s texture, making every forkful unbelievably smooth and familiar.
Why You’ll Fall in Love With This Banana Pudding Cheesecake
First, it’s a guaranteed crowd-pleaser. I’ve never brought it anywhere without someone asking for the recipe. Second, it’s surprisingly straightforward to make. The crust is a simple press-in situation, and the filling comes together in one bowl. The hardest part is waiting for it to chill! You get the impressive, elegant height of a cheesecake with the nostalgic, everyone’s-favorite taste of banana pudding. What’s not to love?
When to Make This Show-Stopping Cheesecake
This dessert is your secret weapon for any gathering that calls for a “wow” factor. It’s perfect for potlucks because it travels so well in its pan. Bring it to a summer barbecue for a cool, creamy treat. It makes birthdays and holidays extra special. I love serving it for Mother’s Day brunch or as the grand finale to a dinner party with friends. Honestly, any day that ends with a slice of this feels like a celebration.
Gathering Your Ingredients for Banana Pudding Cheesecake
Let’s get everything ready. The beauty of this recipe is its simple ingredient list. Most items are pantry staples or easy to find.
For the Crust:
- 1 ½ cups crushed vanilla wafers
- ¼ cup granulated sugar
- ½ cup unsalted butter, melted
For the Cheesecake Filling:
- 16 oz (two blocks) cream cheese, softened
- 1 cup granulated sugar
- 3 large eggs
- 1 teaspoon vanilla extract
- 1 cup ripe bananas, mashed (about 2 bananas)
- 1 cup whipped cream, store-bought or homemade
For the Topping:
- Sliced bananas
- Whipped cream
- Additional crushed vanilla wafers
Easy Swaps: Your Cheesecake, Your Rules
Don’t stress if you’re missing something. Here are some easy swaps. Use graham crackers instead of vanilla wafers for the crust. A brown sugar crust also adds a nice caramel note. For the filling, full-fat Greek yogurt can replace a small portion of the cream cheese for a slight tang. If you need a shortcut, cool whip or another stabilized whipped topping folds in beautifully. For a nutty crunch, sprinkle some toasted pecans on top along with the extra wafers.
Step-By-Step to Cheesecake Bliss
Follow these simple steps, and you’ll have a perfect dessert. The key is to take your time and not rush the process.
Step 1: Preheat and Prep
Start by preheating your oven to 325°F (160°C). This lower temperature is crucial for a creamy cheesecake that doesn’t crack. Take a 9-inch springform pan and give it a good greasing with butter or non-stick spray. This ensures your beautiful cheesecake will release cleanly later. Feel that warm air from the oven? That’s the smell of success starting.
Step 2: Create the Buttery Base
In a medium bowl, combine the finely crushed vanilla wafers and sugar. Pour that glorious melted butter over the crumbs. Mix it with a fork until it looks like wet sand and holds together when pinched. Press this mixture firmly and evenly into the bottom of your prepared pan. A flat-bottomed glass works great for this. Bake this crust for just 10 minutes. You’ll know it’s ready when the edges look lightly golden and your kitchen smells like buttery cookies.
Pro tip: Make sure your crust layer is even, so every slice has the perfect base.
Step 3: Whip Up the Dreamy Filling
In a large mixing bowl, beat the softened cream cheese until it’s completely smooth and lump-free. This is the most important step for a silky texture. Gradually add in the sugar and beat until it’s fully incorporated and fluffy. Now, add the eggs one at a time, beating well after each addition. This prevents the batter from splitting. Stir in the vanilla and those beautifully mashed ripe bananas. Finally, gently fold in the whipped cream with a spatula until no white streaks remain. The batter will be light, airy, and speckled with banana.
Step 4: Bake and Chill to Perfection
Pour the luscious filling over your now-cooled crust. Smooth the top with your spatula. Place it in the preheated oven and bake for 50 to 60 minutes. The center should look set but still have a slight jiggle, like Jell-O. When it’s done, turn the oven off, crack the door open with a wooden spoon, and let the cheesecake cool inside for an hour. This slow cooling helps prevent cracks. Then, move it to the refrigerator to chill for at least 4 hours, but overnight is best for the perfect slice.
Chef’s tip: Place a pan of hot water on the rack below the cheesecake while it bakes. The steam creates a more humid oven environment, which is the best secret for a crack-free top.
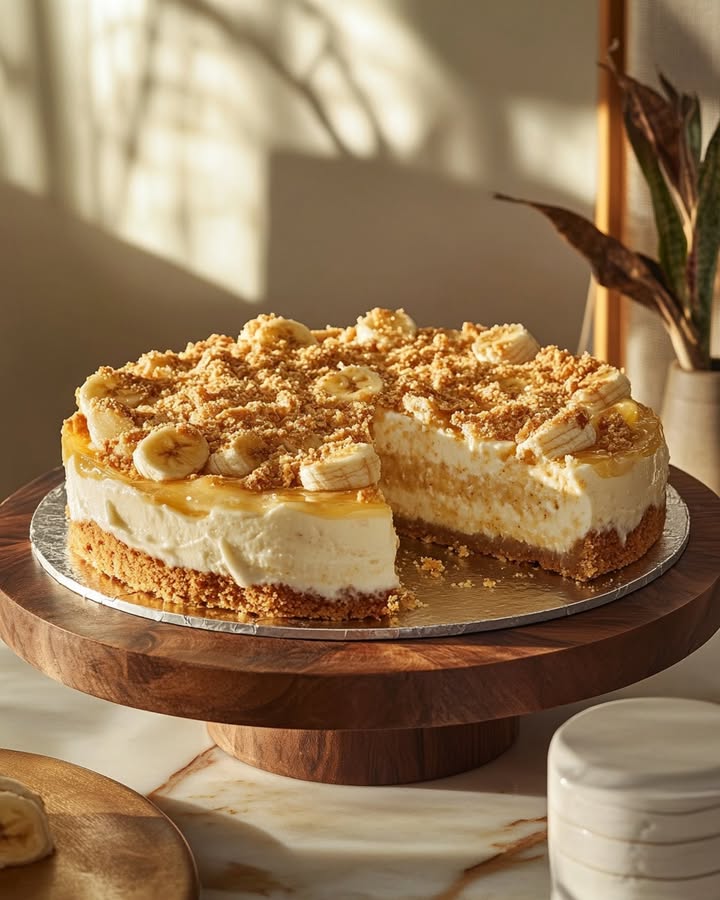
Step 5: The Grand Finale Topping
Right before you’re ready to serve, add the fresh toppings. This keeps the bananas from turning brown. Arrange a ring of fresh banana slices on top of the chilled cheesecake. Pipe or dollop on generous swirls of whipped cream. Then, sprinkle a handful of those crushed vanilla wafers over everything for that final texture and classic banana pudding look. Slice, serve, and get ready for the compliments!
Timing is Everything
Here’s your game plan. The active prep is quick, about 20 minutes of hands-on work. The crust bakes for 10 minutes. The cheesecake itself needs 50-60 minutes in the oven, plus an hour cooling inside. The longest part is the chilling time—a minimum of 4 hours, but I always plan for overnight. So, from start to finish, you’re looking at about 6.5 hours, with most of that being hands-off waiting. It’s the perfect “make today, enjoy tomorrow” dessert.
Your Secret Weapon for a Perfect Cheesecake
My absolute top trick is the steam bath. As mentioned in Step 4, placing a shallow pan of hot water on the oven rack below your cheesecake is a game-changer. The steam it creates gently envelops the cake, cooking it evenly and keeping the surface moist and supple. This single step dramatically reduces the chance of unsightly cracks forming on top of your masterpiece. It’s like a spa day for your cheesecake, and it always works.
A Fun Fact About Your Main Ingredient
Those vanilla wafers in the crust have a fun history! The most famous brand, Nilla Wafers, was actually named after one of the most popular flavors of vanilla extract from the late 1800s, called “Nilla.” They were originally marketed as a dessert ingredient, perfect for crushing into crusts or layering in puddings. So when you use them in this recipe, you’re participating in a baking tradition that’s over a century old!
What You’ll Need to Make It
- 9-inch springform pan
- Mixing bowls (large and medium)
- Electric hand mixer or stand mixer
- Measuring cups and spoons
- Spatula
- Flat-bottomed glass (for pressing crust)
- Knife for slicing bananas
- Fork or potato masher (for bananas)
How to Store Your Banana Pudding Cheesecake
Once assembled with the fresh toppings, this cheesecake is best enjoyed within a day. The moist banana slices on top will start to soften and release juice. If you have leftovers, cover the pan tightly with plastic wrap or transfer slices to an airtight container.
Store it in the refrigerator for up to 3 days. The chilled environment keeps the dairy filling fresh and safe to eat. The crust will naturally get a little softer from the moisture of the filling the longer it sits, but it will still taste delicious.
You can also freeze the cheesecake before adding the fresh toppings for longer storage. Wrap the entire chilled cheesecake (topping-free) tightly in plastic wrap and then aluminum foil. It will keep in the freezer for 1-2 months. Thaw it overnight in the fridge before adding your banana, whipped cream, and wafer topping and serving.
Tips and Advice for Guaranteed Success
- Room temperature is key: Make sure your cream cheese, eggs, and even the whipped cream are at room temperature before mixing. This prevents a lumpy batter.
- Mash thoroughly: Get those bananas as smooth as possible. No one wants a big chunk of banana in their otherwise creamy slice.
- Don’t overmix after adding eggs: Mix just until the egg is combined to avoid incorporating too much air, which can cause cracking.
- Use ripe bananas: The more brown spots, the better! They are sweeter and have a stronger banana flavor.
Presenting Your Masterpiece
How you serve it makes the experience even better. Drizzle a little caramel sauce on the plate before placing the slice. For a party, create a “banana split” vibe by adding a maraschino cherry on top of each slice. Serve it on a beautiful cake stand for extra height. Garnish individual slices with a single, perfect vanilla wafer standing up in the whipped cream. Use a hot, clean knife to slice—dip it in hot water and wipe it dry between each cut for clean, professional-looking pieces.
Healthier Twists on the Classic
If you’re looking for a lighter version, here are some ideas.
- Greek Yogurt Blend: Replace half the cream cheese with full-fat plain Greek yogurt. You’ll add protein and reduce fat while keeping it creamy.
- Sweetener Swap: Use a natural sweetener like maple syrup or honey in the filling. Remember to reduce other liquids slightly.
- Nutty Crust: Make a crust from blended dates and almonds instead of wafers and butter. It’s no-bake and adds fiber.
- Chocolate Dipped: For a decadent but portion-controlled version, make mini cheesecakes in a muffin tin and dip the tops in dark chocolate.
- Vegan Version: Use vegan cream cheese, coconut whipped cream, a flax egg substitute, and a vegan butter crust.
- No-Bake Style: Use a stabilized gelatin or avocado-based filling in a pre-made crust, and just chill. Perfect for hot summer days.
Common Mistakes to Avoid
Mistake 1: Using Cold Ingredients
This is the biggest culprit for a lumpy, cracked cheesecake. Cold cream cheese doesn’t blend smoothly with sugar, leaving tiny lumps. Cold eggs can cause the fat in the cream cheese to solidify and separate. Always take your cream cheese, eggs, and sour cream or whipped cream out of the fridge at least an hour before you start. The mixture will be velvety smooth and bake evenly.
Mistake 2: Overbaking the Cheesecake
A cheesecake is done when the edges look puffed and set, but the center is still slightly wobbly like Jell-O. It will firm up as it chills. If you bake it until the center is completely firm like a cake, it will be dry and dense. That jiggle is your friend. Set a timer for the minimum bake time and check it. Remember, it continues to cook from residual heat as it cools in the oven with the door ajar.
Mistake 3: Adding Toppings Too Early
Slicing fresh bananas and adding whipped cream hours before serving is a recipe for a soggy, brown-topped dessert. The bananas will oxidize and the whipped cream can weep or deflate. Be patient. Add your beautiful fresh toppings just before you bring the cheesecake to the table. This ensures a vibrant, fresh, and crisp presentation with every bite.
Mistake 4: Not Letting it Chill Long Enough
I know it’s hard to wait, but slicing into a warm cheesecake is a disaster. It needs those full 4 hours, preferably overnight, in the refrigerator to fully set its structure. This chilling time allows the proteins to firm up, giving you that perfect creamy-yet-sliceable texture. Cutting it early will result in a delicious but messy pudding-like interior. Plan ahead for best results.
Your Banana Pudding Cheesecake Questions, Answered
Can I make this cheesecake ahead of time?
Absolutely, and I highly recommend it. This cheesecake is the perfect make-ahead dessert. You can bake and chill it completely (without the fresh toppings) up to two days before you need to serve it. Keep it covered in the refrigerator. Add the sliced bananas, whipped cream, and extra wafer crumbs right before you’re ready to present it. This makes party planning so much easier.
Why did my cheesecake crack on top?
A few things can cause cracks. Overbeating the batter after adding the eggs incorporates too much air, which expands and cracks during baking. A sudden temperature change, like moving a hot cheesecake to a cold fridge, can also cause it. The best prevention is to not overmix, bake in a water bath (or with a pan of water below), and cool it slowly in the oven with the door cracked as directed in the recipe.
Can I use frozen bananas for the filling?
I don’t recommend using frozen-and-thawed bananas for the cheesecake filling itself. Thawed frozen bananas release a lot of extra water, which can throw off the moisture balance of your filling and make it too runny or prevent it from setting properly. For the best texture and flavor, use fresh, very ripe bananas. Mash them well right before you add them to the batter.
How do I get a really smooth cheesecake filling?
The secret is all in the softening and mixing. First, ensure your cream cheese is truly at room temperature—soft to the touch. Beat it alone in the bowl for a good minute or two until it’s completely smooth and no lumps remain. Then, add your sugar and beat again. Finally, add eggs one at a time, mixing on low speed just until they disappear into the batter. This careful process guarantees a silky, lump-free filling.
My crust stuck to the pan! How do I prevent that?
A good greasing is your first defense. Always grease your springform pan, even if it’s non-stick. I also like to line the bottom with a round of parchment paper after greasing. Once the cheesecake is fully chilled, run a thin knife or an offset spatula carefully around the inside edge of the pan before unclasping the springform ring. This loosens any filling that may have stuck to the sides during baking.
Is it okay to use a store-bought whipped topping like Cool Whip?
Yes, you can. It works well as a stable, convenient option. Fold in one 8-ounce container of thawed whipped topping in place of the one cup of whipped cream in the filling. For the garnish on top, you can use more of the same. Some people prefer the taste and texture of real whipped cream, but the store-bought version is a perfectly fine time-saver and holds up beautifully.
How long will leftovers last in the fridge?
Once fully assembled with the fresh fruit and whipped cream, try to enjoy it within 24 hours for the best texture and to prevent the bananas from browning. If you have leftover slices, store them in an airtight container in the refrigerator. They will be safe to eat for 2-3 days, though the crust will continue to soften and the bananas on top will darken. The flavor will still be great.
Can I freeze banana pudding cheesecake?
You can freeze the baked and chilled cheesecake before adding the fresh toppings. Wrap the entire pan (or individual slices) very tightly in plastic wrap, then in foil. Freeze for up to 2 months. Thaw it overnight in the refrigerator. Add your fresh banana slices, whipped cream, and wafer crumbs just before serving. Do not freeze the cheesecake after adding the fresh fruit topping.
What’s the best way to slice bananas so they don’t brown as fast?
To slow down browning, you can toss the freshly sliced bananas in a little bit of lemon, lime, pineapple, or orange juice. The citric acid in the juice acts as an antioxidant. Pat them very dry with a paper towel before arranging them on the cheesecake to prevent the juice from making the whipped cream runny. But honestly, for the best taste and look, I just slice them at the very last minute.
Can I make this without a springform pan?
A springform pan is ideal, but you can use a regular 9-inch cake pan in a pinch. You’ll need to line the bottom with parchment paper, letting some hang over the edges so you can lift the cheesecake out after chilling. Be very careful when running a knife around the edges. It’s a bit more tricky to serve, but it will still taste just as wonderful.
Go Forth and Bake Something Amazing
This Ultimate Banana Pudding Cheesecake is more than just a list of ingredients and steps. It’s a chance to create a memorable moment around your table. It combines simple joy with a touch of elegance. Whether it’s for a special occasion or just a regular Tuesday that needs brightening, this dessert delivers. So preheat that oven, mash those bananas, and get ready for the happy silence that follows the first forkful. You’ve totally got this. Now, who’s ready for a slice?
Tzatziki Chicken Salad
Ingredients
Equipment
Method
- Preheat your oven to 325°F (160°C) and grease a 9-inch springform pan.
- In a medium bowl, combine crushed vanilla wafers and sugar, then mix in melted butter until it resembles wet sand. Press into the bottom of the pan and bake for 10 minutes.
- In a large mixing bowl, beat softened cream cheese until smooth. Gradually add sugar, then beat in eggs one at a time. Stir in vanilla and mashed bananas, then gently fold in whipped cream.
- Pour the cheesecake filling over the cooled crust and bake for 50-60 minutes until slightly wobbly in the center. Cool in the oven with the door cracked for 1 hour, then refrigerate for at least 4 hours.
- Before serving, top with sliced bananas, whipped cream, and additional crushed vanilla wafers. Serve and enjoy!