No-Bake Banana Split Cake: A Cool Summer Dream
You know those hot summer days when turning on the oven feels like a crime? This dessert is your sweet, cool pardon. I first made this No-Bake Banana Split Cake for a last-minute backyard potluck. I was met with such a chorus of “wows” and recipe requests that it instantly earned a permanent spot in my dessert hall of fame. It captures everything magical about a classic banana split—the creamy, the fruity, the crunchy, the chocolatey—but in a stunning, shareable cake form. And the best part? Not a single degree of oven heat is required.
From Ice Cream Parlor to Your Table
The banana split itself is a delightful piece of American food history, believed to have been invented in Pennsylvania in the early 1900s. This cake is a clever, modern twist on that beloved soda fountain treat. Instead of scooping ice cream into a boat, we layer all those dreamy flavors into a pan. It takes the communal joy of a sundae bar and turns it into a make-ahead masterpiece. My version stays true to the spirit with its banana, pineapple, and strawberry trio, but the cream cheese and whipped cream filling makes it luxuriously stable and rich. It’s a beautiful blend of nostalgia and no-fuss modern baking.
Why You’ll Adore This Banana Split Cake
Let me count the ways! First, it’s incredibly forgiving and requires zero baking skills. If you can mix and spread, you’re a master. Second, it’s a total crowd-pleaser that looks like you spent hours, but your secret is safe with me. The contrast of the buttery cookie crust, the cloud-like creamy filling, the burst of fresh fruit, and the final drizzle of chocolate is pure happiness in every bite. It’s also wonderfully adaptable—you can use different cookies, nuts, or fruits based on what you have. This recipe is a celebration of flavor, simplicity, and smart kitchen fun.
Perfect Occasions for This Showstopper
This cake is your secret weapon for so many events! It’s a star at summer picnics and BBQs because it’s chilled and refreshing. It’s perfect for birthday parties, especially for kids (or adults who are kids at heart). Bring it to a potluck and watch it disappear first. I love serving it on casual family movie nights—it turns an ordinary Friday into a mini celebration. Honestly, any day that needs a little extra sweetness is the right day for this no-bake wonder.
What You’ll Need: The Ingredients List
Gathering your ingredients is the first fun step! Here’s your shopping list for this delightful no-bake dessert.
For the Crust:
- 2 cups cookies, crumbled (like graham crackers or vanilla wafers)
- 1/3 cup butter, melted
- 1 tsp salt
For the Filling:
- 500g (about 2 blocks) cream cheese, softened
- 1/2 cup granulated sugar
- 250ml (1 cup) cold whipping cream or heavy cream
- 1 tsp pure vanilla extract
For the Topping:
- 3 to 4 ripe bananas, sliced
- 1 can (20 oz) crushed pineapple, thoroughly drained
- 200g strawberries, hulled and sliced
- Extra whipped cream for garnish
- 1/2 cup chopped hazelnuts (or peanuts, walnuts)
- Chocolate sauce for drizzling
Easy Ingredient Swaps
No stress if you’re missing something! This recipe is wonderfully flexible.
- Cookies: Graham crackers are classic, but try vanilla wafers, shortbread cookies, or even chocolate sandwich cookies for a different twist.
- Nuts: Chopped peanuts are the traditional banana split choice. Walnuts or pecans work beautifully too. For a nut-free version, use toasted coconut flakes.
- Fruit: Fresh peaches or maraschino cherries are fabulous additions or substitutes for the strawberry or pineapple.
- Cream Cheese: Use full-fat for the best texture, but reduced-fat will work in a pinch. Avoid fat-free.
Creating Your No-Bake Masterpiece
Now for the fun part! Let’s build this beautiful cake layer by layer.
Step 1: Crafting the Buttery Crust
First, let’s make the foundation. Place your cookies in a zip-top bag and crush them with a rolling pin until you have fine, even crumbs. You can also pulse them in a food processor. Pour the crumbs into a bowl and mix in the melted butter and salt. The mixture should look like wet sand and hold together when pinched. Press this firmly and evenly into the bottom of a 9×13 inch pan or a springform pan. I like to use the bottom of a measuring cup to get it really smooth and compact. Pop this into the fridge to set up while you make the filling. This chilling time helps the crust stay firm when you add the creamy layers.
Step 2: Whipping Up the Creamy Dream Filling
This filling is the heart of the cake. In a large bowl, beat the softened cream cheese and sugar together until completely smooth, creamy, and lump-free. This takes about 2-3 minutes with a hand mixer. Then, pour in the cold whipping cream and vanilla extract. Start beating on low, then increase the speed to high. Watch as the mixture transforms from liquidy to thick and fluffy, forming soft peaks. Pro tip: Make sure your cream cheese is truly soft at room temperature and your whipping cream is ice-cold. This ensures maximum fluffiness! Spread this glorious cloud of cream evenly over your chilled crust.
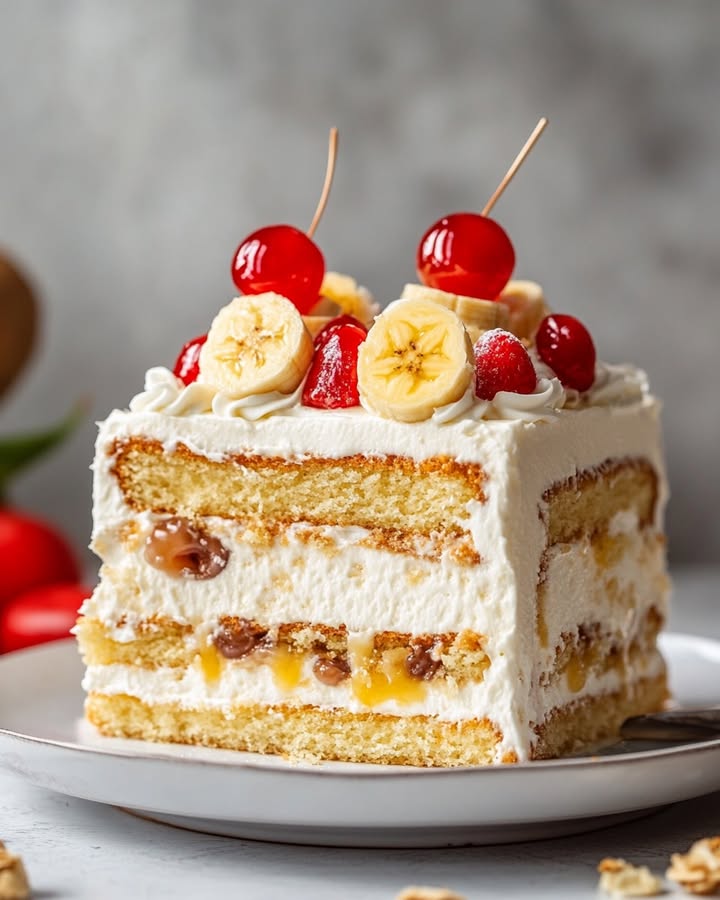
Step 3: Artfully Arranging the Fruit Toppings
Here’s where the cake gets its beautiful, colorful personality. Start by slicing your bananas. Layer the banana slices in neat rows or a fun pattern over the cream layer. Next, take your very well-drained crushed pineapple and sprinkle it over the bananas. The key is to get as much liquid out as possible—I even press it in a fine-mesh strainer—so your cake doesn’t get soggy. Finally, artistically place your bright red strawberry slices on top. You’re creating a vibrant mosaic of flavor that promises a perfect bite every time.
Step 4: The Grand Finale of Garnishes
Time for the decorations that make everyone say “wow!” Pipe or dollop fresh whipped cream over the fruit layer. Then, sprinkle the chopped hazelnuts (or your nut of choice) generously over everything. The nuts add a wonderful crunch. Last but never least, take your chocolate sauce and drizzle it back and forth in ribbons, or get creative with swirls and dots. Don’t be shy with the chocolate—it’s the signature finish of any great banana split! Chef’s tip: For a professional touch, warm the chocolate sauce slightly so it drizzles in thin, elegant lines.
Step 5: The Essential Chill Time
Patience is the final ingredient. You must let the cake chill in the refrigerator for at least 3 hours, or ideally overnight. This isn’t just to make it cold. This crucial resting time allows all the layers to meld together and the filling to set up firmly, making it sliceable like a dream. When you’re ready to serve, run a knife around the edge if using a springform pan, release the clasp, and cut into generous squares or slices. Prepare for the compliments to roll in!
Your Time Investment
This recipe is a fantastic time-saver. The active preparation time is only about 20 minutes of hands-on work. The chilling time is 3 hours minimum, but I often make it the night before. That means the total time to your first bite is about 3 hours and 20 minutes, most of which is completely hands-off. This recipe generously serves 8-10 happy people.
A Secret from My Kitchen
My secret weapon for an extra-stable and luscious filling? A tiny pinch of cream of tartar when I’m whipping the cream and cream cheese together. It just helps stabilize the whipped cream a bit more, especially on humid days, ensuring your cake layers stay picture-perfect for hours.
Fun Fact: The Pineapple Pinch
That can of crushed pineapple is more important than you think! In a traditional banana split, the pineapple provides a vital tangy note that cuts through the sweetness of the ice cream and chocolate. In our cake, it does the same job, balancing the rich cream cheese and sweet sauce. It’s the flavor ambassador that makes the whole dessert taste bright and not too heavy.
Tools You’ll Need
You don’t need any fancy equipment! Here’s your simple toolkit:
- 9×13 inch baking dish or a 9-inch springform pan
- Mixing bowls (one large, one medium)
- Electric hand mixer or stand mixer
- Rolling pin or food processor for crushing cookies
- Spatula for spreading
- Fine-mesh strainer for draining pineapple
- Knife and cutting board for fruit
Storing Your Leftover Slice of Heaven
Cover the cake tightly with plastic wrap or store it in an airtight container in the refrigerator. It will keep beautifully for 2-3 days. The bananas will slowly start to brown, but the flavor will still be fantastic.
Unfortunately, this cake does not freeze well due to the fresh fruit and creamy filling. Freezing will cause the fruit to become mushy and the filling to separate when thawed. It’s truly best enjoyed fresh within a few days.
If you need to make parts ahead, you can prepare the crust and the cream filling separately, store them covered in the fridge, and assemble the cake with fresh fruit and toppings a few hours before serving. This helps keep the bananas looking their brightest.
My Best Tips for Success
- Drain, Drain, Drain! Squeeze every last drop of juice from the canned pineapple. This is the number one trick to prevent a soggy crust.
- Room Temp is Key. Let your cream cheese sit out for an hour before baking. Soft cream cheese blends smoothly without lumps.
- Slice Bananas at the Last Minute. To prevent browning, slice and place the bananas directly onto the cream layer right before the final chill. You can also toss them in a tiny bit of lemon juice if you’re very concerned.
- Go Nuts with Toppings. Feel free to add other classic sundae toppings like a sprinkle of rainbow sprinkles or a handful of maraschino cherries on top!
How to Present Your Cake Like a Pro
- Serve slices on individual plates with a drizzle of extra chocolate sauce and a cherry on top.
- For a party, present the whole cake on a beautiful cake stand decorated with banana slices and whole strawberries around the base.
- Use a piping bag to create elegant whipped cream rosettes on each slice just before serving.
- For a fun twist, make individual mini cakes in mason jars or dessert cups, layering the ingredients in the same order.
6 Tasty Variations to Try
Love this recipe? Here are some delicious ways to mix it up!
- Tropical Twist: Swap the strawberries for diced mango and kiwi. Use toasted coconut flakes instead of hazelnuts.
- Chocolate Lover’s Dream: Use chocolate cookie crumbs for the crust. Mix 1/4 cup of cocoa powder into the cream cheese filling. Top with chocolate shavings.
- Peanut Butter Cup: Swirl 1/2 cup of creamy peanut butter into the cream cheese filling. Use chopped peanuts and a drizzle of both chocolate and caramel sauce.
- Berry Blast: Omit the pineapple and banana. Use a mix of fresh blueberries, raspberries, and sliced strawberries on top.
- Lighter Version: Use Neufchâtel cheese, a sugar substitute, and light whipped topping. Load up on more fresh fruit.
- Cookies and Cream: Crush chocolate sandwich cookies (filling included) for the crust. Fold crushed cookies into the filling and use chocolate sauce.
Common Mistakes to Avoid
Avoid these simple pitfalls for a perfect cake every single time.
Mistake 1: Not Draining the Pineapple Enough
This is the biggest culprit for a soggy, mushy crust. The liquid from the canned fruit will seep down and soften your beautiful buttery base. To avoid this, don’t just pour it out of the can. Place the crushed pineapple in a fine-mesh strainer and press down on it firmly with the back of a spoon or a clean hand. Let it sit over a bowl for a few minutes to release every last drop of juice. Your crust will thank you by staying crisp.
Mistake 2: Using Cold Cream Cheese
Straight-from-the-fridge cream cheese will never blend smoothly with the sugar. You’ll end up with a lumpy, gritty filling instead of a silky cloud. Plan ahead and let your cream cheese blocks sit on the counter for at least 30-60 minutes until they are soft to the touch. When you press it, your finger should leave an indentation. This ensures a perfectly smooth and creamy mixture.
Mistake 3: Skipping the Long Chill
It’s so tempting to dig in right away! But this cake needs its beauty sleep in the fridge. The chill time is not just about temperature; it’s what allows the filling to set and firm up. If you skip it, your cake will be messy and hard to slice. The layers might slide apart. Be patient and give it a full 3 hours, or even better, overnight. The clean slices you get will be worth the wait.
Mistake 4: Slicing Bananas Too Early
Bananas brown quickly when exposed to air. If you slice them and assemble the cake hours in advance, you might end up with a top layer of brown fruit, which is still tasty but not as pretty. To keep them bright and fresh-looking, slice your bananas and place them on the cake right before it goes into the refrigerator for its final chill. If you must do it earlier, a quick toss in a little lemon or pineapple juice can help.
Your Questions, Answered
Can I make this cake a day ahead?
Absolutely! In fact, I highly recommend it. Making the cake the night before gives it plenty of time to set perfectly in the refrigerator. The flavors also have more time to meld together. Just wait to add any final whipped cream dollops, nuts, and chocolate sauce until a few hours before serving so those garnishes look their freshest. Cover the assembled cake well with plastic wrap.
What kind of cookies are best for the crust?
Graham crackers are the classic choice and give a lovely honey-like flavor that pairs perfectly with the banana. Vanilla wafers are another fantastic option—they taste just like the crispy edges of a baked cake. For a chocolatey twist, you can use chocolate graham crackers or even crushed Oreo cookies (with the filling). Just about any dry, slightly sweet cookie will work as a great base.
My filling turned out runny. What happened?
A runny filling usually has two common causes. First, the whipping cream may not have been cold enough when you whipped it. Cream whips best when it’s very cold. Second, you might have under-whipped it. You need to whip until the cream and cream cheese mixture forms soft peaks that hold their shape when you lift the beaters. Don’t worry, you can sometimes fix it! Whip the runny filling for a few more minutes with cold beaters, or gently fold in an extra 1/4 cup of powdered sugar to help stiffen it.
Can I use frozen fruit instead of fresh?
It’s not recommended for the bananas and strawberries on top, as frozen fruit becomes very soft and releases a lot of water when thawed, making the cake soggy. However, for the crushed pineapple, canned is actually preferred because it’s consistently sweet and soft. If you must use frozen fruit for toppings, thaw it completely in a strainer over a bowl and pat it very, very dry with paper towels before using.
Do I have to use a springform pan?
No, you don’t! A springform pan is just convenient because you can release the sides for a beautiful presentation. A standard 9×13 inch rectangular baking dish works just as well. You’ll simply serve it directly from the dish. Make sure you line the dish with parchment paper for easier lifting, or just cut and serve squares straight from the pan.
How can I make this nut-free?
Easily! Just omit the chopped hazelnuts altogether. The cake will still be delicious. For a similar crunchy texture that’s nut-free, try sprinkling the top with toasted coconut flakes, crushed pretzel pieces, or even a few sprinkles of crunchy granola. These add that nice contrast to the creamy filling without any nuts.
Can I use whipped topping instead of real whipping cream?
You can, but the flavor and texture will be different. Real whipping cream gives a richer, less sweet taste and a slightly softer texture. An 8-ounce container of frozen whipped topping (like Cool Whip), thawed, can be folded into the sweetened cream cheese instead of whipping the cream. It’s a bit quicker, but I find the homemade whipped cream version is far superior in taste.
Why did my crust fall apart when I sliced it?
This usually means the crust wasn’t pressed firmly enough into the pan or there wasn’t enough butter binding it together. When you mix the crumbs and butter, it should hold together when you squeeze a handful. Press it down very firmly with the bottom of a cup or measuring cup. Chilling it before adding the filling also helps it set and become more solid.
Is there a way to prevent the bananas from browning overnight?
While a little browning is natural and doesn’t hurt the flavor, to minimize it you can toss the banana slices in a tablespoon of lemon juice, pineapple juice (from the can!), or even a little orange juice before placing them on the cake. The citric acid slows down oxidation. The best method, though, is to assemble and chill the cake just a few hours before serving.
What other sauces can I use besides chocolate?
Get creative! A drizzle of caramel sauce is heavenly with the bananas. A strawberry or raspberry sauce would be lovely with the berries. You could even do a mix of chocolate, caramel, and strawberry for a truly epic “supersplit” cake look. Hot fudge sauce also works great—just let it cool a bit before drizzling so it doesn’t melt the whipped cream.
Get Ready for Rave Reviews
And there you have it—my go-to recipe for a dessert that is always a hit. This No-Bake Banana Split Cake proves that the most impressive treats don’t have to be complicated. It’s about layering joyful flavors and textures we all love. The next time you need a guaranteed crowd-pleaser that keeps your kitchen cool, remember this cake. Whip it up, let it chill, and get ready to share a slice of pure, nostalgic happiness. Happy no-baking!
Coconut Chocolate Cake
Ingredients
Equipment
Method
- Crush cookies in a zip-top bag or food processor, then mix with melted butter and salt to form a crust.
- Press the mixture into the bottom of a 9x13 inch or springform pan and chill.
- Beat softened cream cheese and sugar in a bowl until smooth, then add whipped cream and vanilla, whipping until soft peaks form.
- Spread the filling over the chilled crust evenly.
- Layer banana slices on top, followed by the thoroughly drained crushed pineapple, then the sliced strawberries.
- Pipe or dollop fresh whipped cream on top, sprinkle with chopped hazelnuts, and drizzle with chocolate sauce.
- Chill the assembled cake in the refrigerator for at least 3 hours, or ideally overnight before serving.