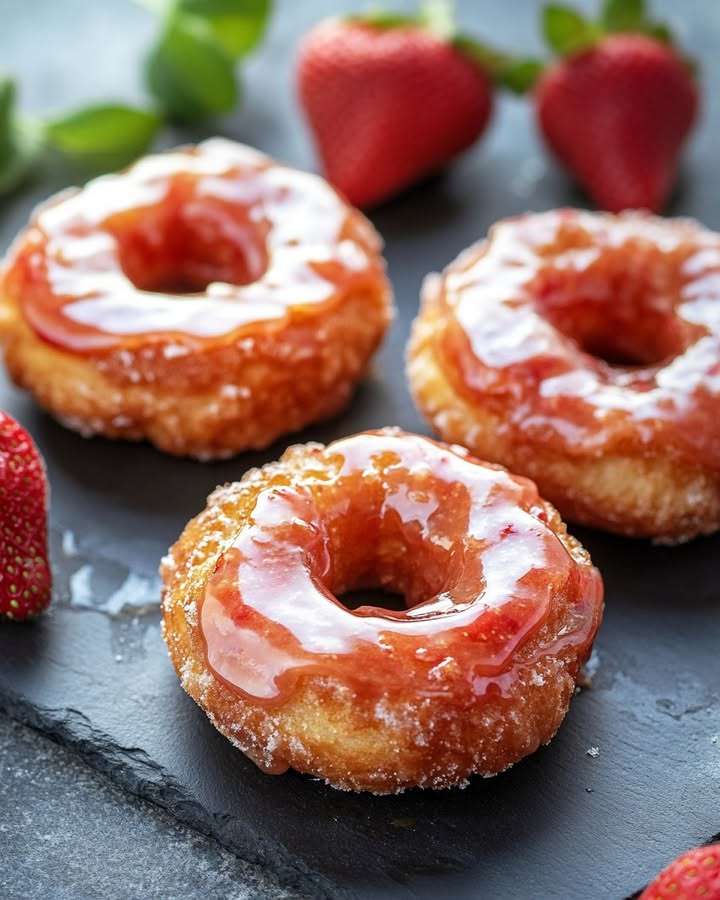
Strawberry Glazed French Crullers: A Sweet, Springtime Dream
There’s something so joyful about a recipe that feels fancy but is secretly a fun kitchen project. Picture this: light, airy, golden-brown doughnuts, still warm, dipped into a glaze the color of a perfect summer sunset. That’s exactly what these Strawberry Glazed French Crullers are. I first tried making them for my niece’s baby shower brunch, and the “oohs” and “aahs” from the crowd were the best compliment a home cook could get. They look like they came from a Parisian patisserie, but trust me, with a little courage and a pot of hot oil, you can absolutely create this magic in your own kitchen.
From Parisian Streets to Your Kitchen
Crullers have a wonderfully tangled history. The French “cruller” comes from the word *cruller*, meaning “curly,” which perfectly describes their twisted, ring-like shape. These pastries traveled across the ocean with European immigrants and became a staple of American bakeries and doughnut shops. Our version today is a delightful mash-up: it uses a classic French pâte à choux dough (the same as eclairs and cream puffs!) which fries up into an incredibly light, almost hollow pastry. Then, we ditch the traditional plain glaze for a vibrant, fresh strawberry one. It’s a modern, fruity twist on a very old-world treat that feels both nostalgic and brand new.
Why You’ll Fall in Love With This Recipe
You will love these crullers because they are deceptively impressive. They seem complex, but the process is straightforward and so satisfying. The dough comes together in one pot. The frying transforms it into a crispy, puffy marvel. And the glaze? It’s made with real strawberries, giving you a burst of natural flavor you just can’t get from a pink bottle. They’re lighter than cake doughnuts, more special than your average breakfast pastry, and making them fills your home with the most incredible, sweet aroma. It’s a baking adventure with a delicious, shareable reward at the end.
Perfect Occasions for These Pretty Crullers
These aren’t your everyday doughnuts—they’re for celebrating! They are the star of any brunch gathering, whether it’s Mother’s Day, a bridal shower, or a lazy Sunday with friends. Pack them in a beautiful box for a thoughtful homemade gift. They make a spectacular finish to a fancy dinner party. Or, let’s be honest, they are the perfect project for a rainy afternoon when you want to create something beautiful and treat your family. Any day becomes sweeter with a plate of these on the table.
Gathering Your Ingredients
Here’s what you’ll need to make about 18 delightful crullers:
For the Crullers:
- 1 cup Water
- 1/2 cup Whole Milk
- 1/2 cup Unsalted Butter
- 2 tablespoons Granulated Sugar
- 1/2 teaspoon Salt
- 1 cup Bread Flour
- 4 Large Eggs
- Vegetable or Canola Oil for frying
For the Strawberry Glaze:
- 2 cups Powdered Sugar, sifted
- 1/4 cup Fresh Strawberries, mashed or pureed
- 3-4 tablespoons Whole Milk
For the Strawberry Sugar (Optional):
- 1/4 cup Freeze-Dried Strawberries, processed into fine bits
- 1/4 cup Granulated Sugar
Handy Substitution Options
Don’t fret if you’re missing an item! Here are some easy swaps:
- Bread Flour: All-purpose flour works in a pinch, but bread flour gives a better chew.
- Whole Milk: You can use 2% milk for the dough and glaze.
- Fresh Strawberries: For the glaze, you can use 2 tablespoons of high-quality strawberry jam, warmed and strained, instead of fresh puree.
- Freeze-Dried Strawberries: For the sugar garnish, a tiny drop of pink food coloring mixed with sugar is a visual substitute, but you’ll miss the tart strawberry flavor.
Step-by-Step to Cruller Success
Follow these steps, and you’ll be a cruller pro in no time!
Step 1: Prepare Your Parchment Paper Squares
This little trick is a game-changer for neat crullers. Cut 18 squares of parchment paper, about 4×4 inches each. Use a cookie cutter or a lid to trace a 3-inch circle in the center of each square. This is your piping guide. Lightly spray the squares with baking spray later. This setup keeps their perfect ring shape as you move them to the hot oil. It feels crafty and sets you up for a win.
Step 2: Make the Choux Pastry Dough
In a medium saucepan, combine the water, milk, butter, sugar, and salt. Bring it to a full, rolling boil over medium heat. The butter should be completely melted. Pro tip: Don’t walk away! Boiling liquid can bubble over quickly. Once boiling, take the pan off the heat and immediately dump in all the bread flour. Stir vigorously with a wooden spoon. The mixture will look shaggy at first, then suddenly come together into a smooth ball that pulls away from the sides of the pan. This cooks the flour and is a key step.
Step 3: Cool the Dough and Add Eggs
Scrape the hot dough into the bowl of a stand mixer fitted with the paddle attachment. Let it mix on medium for 4-5 minutes. This cools it down so the eggs don’t cook when added. You should be able to touch the bottom of the bowl comfortably. Then, add the eggs one at a time, mixing fully after each addition. The dough will look slippery and broken at first. Keep mixing! It will transform into a thick, glossy, and super sticky paste that holds its shape. This is your magic cruller batter.
Step 4: Pipe Your Cruller Rings
Fit a large piping bag with a star tip (I use a 1M tip). Spoon your glossy dough into the bag. Pipe a ring onto each prepared parchment square, following the circle guide. Try to connect the ends neatly. You’ll see the beautiful ridged star pattern form. This is what gives crullers their classic, crispy edges. Now, they’re ready for their hot bath!
Step 5: Fry to Golden Perfection
Pour oil into a heavy pot or deep fryer until it’s about 3 inches deep. Heat it to 370°F. Carefully lower a cruller, parchment paper side UP, into the oil. Fry for about 45 seconds. The cruller will puff up and release from the paper. Use tongs to gently peel off the parchment. Fry for 2-3 minutes per side until deeply golden brown and puffed. They should feel light. Drain on a wire rack set over a baking sheet. Chef’s tip: Fry in small batches and let the oil temperature recover between batches for even cooking.
Step 6: Whip Up the Fresh Strawberry Glaze
While the crullers cool slightly, make the glaze. Mash or puree your fresh strawberries until smooth. In a wide bowl, whisk the sifted powdered sugar with the strawberry puree. Start with 3 tablespoons of milk, whisking until you have a smooth, shiny, pink glaze. Add the last tablespoon of milk only if you need it thinner. The glaze should be thick enough to coat the back of a spoon but drip off slowly.
Step 7: Make the Strawberry Sugar (Optional)
For an extra special touch, blitz freeze-dried strawberries in a blender or food processor until they’re a fine powder. Mix this vibrant pink powder with granulated sugar. It adds a delightful crunch and an intense strawberry flavor that looks like fairy dust.
Step 8: Glaze, Garnish, and Devour!
Ensure your crullers are just warm or completely cool. Dip the top of each cruller straight into the strawberry glaze. Twist your wrist slightly as you lift it for an even coat. Let the excess drip back into the bowl. Immediately sprinkle with the strawberry sugar, if using. The glaze will set into a beautiful, slightly crackly shell. Serve them fresh and enjoy the crispy, creamy, fruity bliss!
Your Cruller Timeline
Here’s a quick breakdown of your time investment for these homemade delights:
- Prep Time: 30 minutes (includes piping)
- Cooking Time: 15 minutes (per batch)
- Total Time: About 1 hour (including cooling/glazing)
- Servings: Makes about 18 crullers
- Calories: Approximately 150 per glazed cruller
Chef’s Secret for the Best Crullers
My big secret is in the fry. After you drop the cruller in, don’t touch it for that first minute. Let it puff and release from the paper on its own. Trying to pry it off early can deflate it. Patience here gives you that magnificent, airy interior. Also, a stable oil temperature is non-negotiable. Use a thermometer!
A Fun Dough Fact
The choux pastry used here is a culinary marvel. It’s the only pastry dough that is cooked twice: once on the stovetop and once in the oven (or fryer, in our case). The high moisture content in the dough turns to steam in the hot oil. This steam is what causes the dough to puff up dramatically, creating the hollow center perfect for holding all that delicious strawberry glaze.
Necessary Equipment
You don’t need specialty gear, just a few key tools:
- Medium saucepan
- Stand mixer or a strong arm and a wooden spoon
- Piping bag and a large star tip (like Ateco 846 or Wilton 1M)
- Parchment paper and scissors
- Deep fry thermometer or a deep fryer
- Slotted spoon or spider strainer
- Wire cooling rack
How to Store Your Homemade Crullers
Crullers are absolutely best the day they are made. The glaze will stay shiny and the interior perfectly tender for about 8 hours at room temperature. Just keep them on a plate, lightly covered.
If you need to keep them overnight, place them in a single layer in an airtight container. Store them in the refrigerator for up to one day. The glaze will become sticky and the exterior will soften, but they will still taste wonderful.
I do not recommend freezing glazed crullers. The glaze will become watery and the texture suffers. For the best experience, share them fresh on the day you make them!
Tips for Cruller Victory
- Oil Temp is Key: Keep it between 365°F and 375°F. Too hot, and they brown outside but stay raw inside. Too cool, and they soak up oil and become greasy.
- Sift that Sugar: For a perfectly smooth, lump-free strawberry glaze, always sift your powdered sugar.
- Piping Practice: If your first ring isn’t perfect, just scoop the dough back into the bag and try again. The parchment paper is very forgiving.
- Drain Well: Let them drain on a wire rack, not on paper towels, after frying. This keeps the bottom crisp instead of soggy.
Presentation Ideas to Wow Your Guests
- Stack them on a vintage cake stand for a beautiful brunch centerpiece.
- Drizzle with a little melted white chocolate for extra decadence.
- Arrange them on a wooden board with fresh strawberries and mint sprigs scattered around.
- For a party, place each cruller in a colorful cupcake liner for easy grabbing.
Delicious Recipe Variations to Try
Love this idea? Mix it up with these fun twists:
- Lemon-Berry Crullers: Add 1 tbsp lemon zest to the choux dough. Use a mixed berry puree (raspberry and strawberry) for the glaze.
- Chocolate-Dipped Crullers: Skip the strawberry glaze. Dip half of a plain, cooled cruller in melted dark chocolate and let it set.
- Matcha Green Tea Crullers: Add 1 tbsp matcha powder to the powdered sugar for a green tea glaze. Garnish with black sesame seeds.
- Baked “Healthier” Crullers: Pipe the rings onto a silicone mat. Bake at 425°F for 15-20 mins until puffed and golden. They’ll be more like choux pastries than fried doughnuts, but still delicious.
- Vanilla Bean Glaze: For a classic flavor, make a simple glaze with powdered sugar, milk, and the seeds from one vanilla bean.
- Boston Cream Style: Fill cooled, unglazed crullers with vanilla pastry cream using a piping tip. Then dip the tops in a simple chocolate ganache.
Common Mistakes to Avoid
Steer clear of these pitfalls for perfect crullers every time.
Mistake 1: Not Cooking the Flour Mixture Long Enough
When you add the flour to the boiled liquid, you must stir until a smooth ball forms and a thin film coats the bottom of the pan. This cooks the flour and removes the starchy taste. If you stop stirring too soon, your dough will be too wet. The eggs won’t incorporate properly. You’ll end up with a batter that spreads instead of puffing. Keep stirring over low heat for another minute if needed.
Mistake 2: Adding Eggs to Hot Dough
This is a sure way to get scrambled eggs in your pastry! The dough must cool down before you add the eggs. Letting it mix in the stand mixer for a few minutes is the easiest way. You should be able to hold your hand on the bottom of the mixing bowl. If the dough is still hot, the eggs will begin to cook on contact. This ruins the emulsion and your crullers won’t rise properly in the oil.
Mistake 3: Crowding the Fry Pot
It’s tempting to fry many crullers at once. Don’t do it! Adding too many at once causes the oil temperature to plummet. Your crullers will absorb oil instead of sealing quickly. They become greasy and heavy. Fry only 2-3 at a time. This gives them plenty of room to puff up and turn evenly. It also lets the oil temperature recover between batches for consistent results.
Mistake 4: Glazing Hot Crullers
Impatience here leads to a melted mess. If you dip a piping hot cruller into the strawberry glaze, the heat will thin the glaze instantly. It will slide right off and pool around the base. Let the crullers cool on the wire rack for at least 10-15 minutes. They should be warm to the touch, not hot. The glaze will set beautifully into a smooth, crackly coating.
Your Strawberry Cruller Questions, Answered
Can I make the choux dough ahead of time?
Yes, you can! Prepare the dough through Step 3 (adding all the eggs). Instead of piping, press plastic wrap directly onto the surface of the dough. This prevents a skin from forming. You can refrigerate it for up to one day. When ready to use, let it sit at room temperature for 30 minutes. Then, give it a good stir or a quick re-mix in the stand mixer before piping. The texture should be glossy and pipeable again.
What type of oil is best for frying crullers?
Use an oil with a high smoke point and a neutral flavor. Vegetable oil, canola oil, and peanut oil are all excellent choices. Avoid olive oil or butter, as they have lower smoke points and strong flavors. You’ll need enough to fill your pot about 3 inches deep so the crullers can float and fry without touching the bottom.
My dough is too runny to pipe. What happened?
A runny dough usually means one of two things. First, the flour mixture may not have been cooked enough in the pan. Second, you may have added an extra egg or the eggs were very large. To fix it, you can try adding another tablespoon of bread flour and mixing well. If it’s still too loose, you can still fry it. The crullers might not hold a perfect ring shape, but they will still taste great! Consider them “rustic.”
Why did my crullers deflate after frying?
Deflation is often caused by undercooking. If the interior isn’t set, the steam inside collapses as the cruller cools. Make sure you’re frying for the full 2-3 minutes per side at the correct temperature. They should be a rich golden brown. Also, don’t remove them from the oil too early. Let them get nice and crispy to hold their structure.
Can I bake these instead of frying?
You can bake choux pastry, but the result will be different. Baked choux rings are more like cream puffs or eclairs. They won’t have the same crispy, doughnut-like exterior. If you want to bake, pipe onto a parchment-lined baking sheet. Bake at 425°F for 15-20 minutes until puffed and golden, then reduce heat to 375°F to dry out for another 10 minutes. Poke a small hole in each to let steam escape.
The strawberry glaze is too thin/thick. How do I fix it?
Glaze consistency is easy to adjust. If it’s too thin and runny, whisk in more sifted powdered sugar, a tablespoon at a time. If it’s too thick and gloppy, add more milk, just a teaspoon at a time. Remember, it will thicken slightly as it sits and sets on the cruller. Aim for a consistency similar to thick honey.
Do I have to use bread flour?
Bread flour has a higher protein content. This gives the crullers more structure and a pleasantly chewy interior. All-purpose flour will work, and your crullers will still be delicious. They might be a tiny bit less sturdy and a little more tender. For your first try, use what you have! The difference is subtle.
How can I tell when the oil is ready?
The most reliable method is a deep-fry or candy thermometer. You want it to read 370°F. If you don’t have one, you can do a “bread test.” Drop a tiny piece of the dough into the oil. If it sizzles immediately and rises to the surface, turning golden in about 60 seconds, the oil is likely ready. Be careful with this method, as it’s less precise.
My glaze isn’t very pink. How can I make it more vibrant?
The color depends on your strawberries. Super ripe, deep red berries will give a brighter pink glaze. You can add a tiny drop of red food coloring if you want a more dramatic color. For a natural boost, add a teaspoon of the freeze-dried strawberry powder from the optional garnish to the glaze. It intensifies both color and flavor!
Are these the same as the crullers at the doughnut shop?
They’re similar but often better! Many commercial crullers are made from a cake-like batter. Our French cruller recipe uses choux pastry. This makes them lighter, airier, and less dense than the cake-style ones. The homemade strawberry glaze with real fruit also beats the standard sugary glaze hands down. Yours will have a more delicate texture and fresher flavor.
The Sweet Reward of a Kitchen Adventure
Making Strawberry Glazed French Crullers is more than just following a recipe. It’s a fun, slightly daring kitchen project that ends with the most delicious payoff. The moment you see that dough puff up in the oil, you’ll feel like a pastry chef. The smile on someone’s face when they bite into one is pure magic. So, gather your ingredients, heat that oil, and get ready to make something truly special. Don’t be intimidated—you’ve got this. And the result is a plate full of pretty, pink, perfect homemade happiness. Now, go fry up some joy!