Easy Chocolate Roll Cake Delight: Your New Go-To Dessert
You know that sudden panic when friends call saying they’re dropping by in an hour? My heart used to sink. Not anymore! This Easy Chocolate Roll Cake Delight is my secret weapon. It looks fancy, tastes incredible, and comes together with almost no effort. The best part? You probably have everything you need already. Let’s turn that simple chocolate cake into a show-stopping dessert roll.
From Simple Cake to Elegant Roll: A Sweet Transformation
I first made this recipe out of pure necessity. I had a slightly dry chocolate sponge cake leftover from a birthday. Instead of tossing it, I wondered, “What if I gave it a new life?” The idea of mixing cake with milk and chocolate to create a pliable, rollable dough was a happy accident. It’s a brilliant twist on the classic European-style roulade. Traditionally, making a roll cake means baking a thin sponge from scratch. This modern hack skips the baking drama entirely. You get all the elegance of a rolled dessert without the stress of cracking sponges.
Why You’ll Adore This Chocolate Roll Cake Delight
Honestly, what’s not to love? This recipe is a dream for busy bakers. It’s forgiving, fast, and incredibly fun to make. The texture is magically soft and fudgy. You get rich chocolate flavors in every single bite. Plus, it’s a fantastic way to reduce food waste. That lone cake sitting on your counter? It’s about to become the star of the show. Kids love to help mash and roll, making it a great family activity.
Perfect Occasions for Your Chocolate Roll Delight
This dessert is your new best friend for any gathering. It’s perfect for potlucks, book club meetings, or family Sunday dinners. I often make it for birthdays when I’m short on time—no one guesses it started as a plain cake! It slices beautifully, serving a crowd with ease. Bring it to a holiday party and watch it disappear. It’s also a cozy treat for a quiet night in with a good movie.
Gather Your Ingredients for Chocolate Roll Bliss
Here’s your simple shopping list. You’ll be amazed how few things you need.
- 1 (6-inch) chocolate sponge cake, slightly dried out works best
- 1 cup of whole milk
- 1 cup of melted dark chocolate (good quality)
- 1 batch of your favorite cream filling (whipped cream, buttercream, or chocolate mousse)
- Powdered sugar, for dusting
Smart Swaps: Ingredient Substitution Options
No dark chocolate? No problem! Use semi-sweet chocolate chips instead. For a dairy-free version, swap the milk for almond or oat milk. The cream filling can be as simple as cool whip or a flavored pudding. If you only have a vanilla cake, add a tablespoon of cocoa powder to the mixture. It will still taste wonderfully chocolatey.
Crafting Your Easy Chocolate Roll Cake Delight
Follow these simple steps for a perfect roll every single time. It’s easier than you think!
Step 1: Create Your Cake Mixture
Break your chocolate sponge cake into a large mixing bowl. Crumble it with your fingers until it resembles coarse crumbs. Pour in the milk. Now, mash and stir everything together. You want a thick, pastelike consistency. It should hold together when squeezed. Next, pour in the melted dark chocolate. Fold it in until the color is uniform and rich. The aroma of chocolate will fill your kitchen. Pro tip: If the mixture feels too wet, add a tablespoon of crushed cake crumbs. If it’s too dry, a tiny splash more milk will do.
Step 2: Form the Perfect Sheet
Lay a large sheet of cling film on your counter. Scoop the chocolate cake mixture onto it. Place another sheet of cling film on top. Now, use a rolling pin to gently roll the mixture. Aim for a rectangle about 10×14 inches. The cling film prevents sticking and makes this step mess-free. Peel off the top layer of film carefully. You should have a smooth, even sheet of chocolate cake “dough.”
Step 3: Fill and Roll with Care
Prepare your chosen cream filling. Spread it evenly over the entire surface of your cake sheet. Leave a small border at one of the shorter ends. This prevents filling from squeezing out. Using the bottom cling film to help you, start rolling from the other short end. Tuck the cake over the filling and roll forward firmly but gently. The cling film will guide you. Once rolled, wrap the log tightly in the film. This helps it hold its shape beautifully.
Step 4: The Glossy Finish
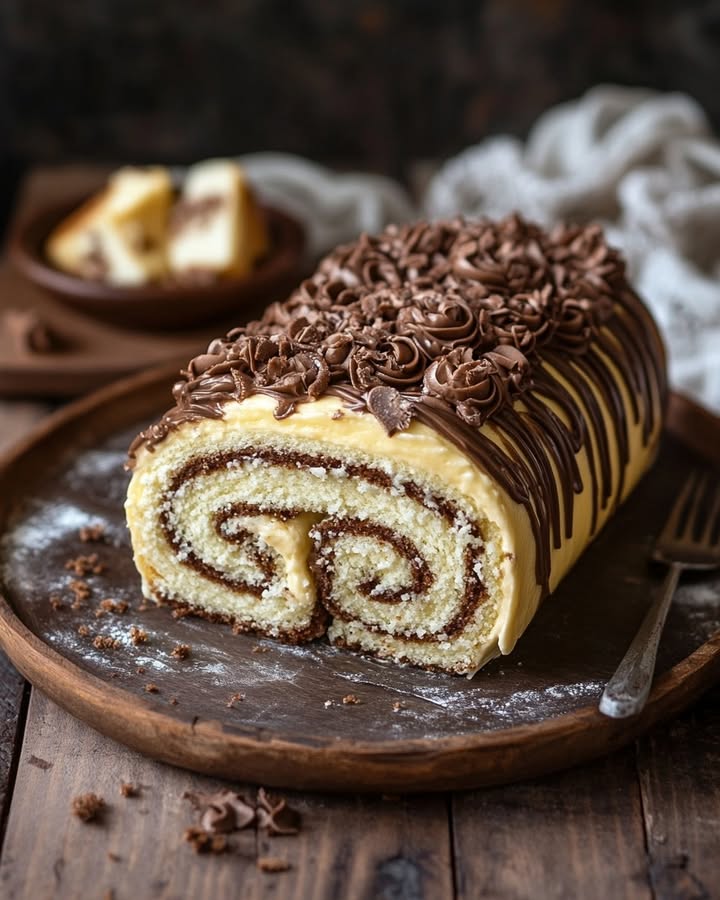
Melt another half cup of dark chocolate. Let it cool slightly. Unwrap your cake roll and place it on a serving plate or rack. Slowly pour the melted chocolate over the top. Use a spatula to spread it smoothly over the top and sides. Let the chocolate coating set at room temperature or in the fridge. Just before serving, dust the whole log lightly with powdered sugar. It creates a lovely, snowy contrast. Chef’s tip: For a professional touch, use a fork to create decorative swirls in the chocolate before it sets.
Your Easy Chocolate Roll Timeline
This dessert comes together in a flash! Active prep time is about 25 minutes. The “cooking” time is really just 10 minutes for melting chocolate and letting the glaze set. Chilling time is key. Let it rest in the fridge for at least 1-2 hours before slicing. This makes for the cleanest, most beautiful cuts. Total time from start to serving is about 2 hours, mostly hands-off chilling.
The Secret to a Roll That Never Cracks
My biggest secret? The texture of the starting cake. A cake that is a day old and slightly dry absorbs the milk and chocolate better. It creates a dough that is pliable and sturdy. If your cake is too fresh and moist, the mixture can become soggy. Don’t be afraid to let your cake sit out for a few hours before starting. It makes all the difference!
A Fun Fact About Your Ingredients
Did you know the concept of a “roulade” dates back to the 1600s? It comes from the French word “rouler,” meaning “to roll.” Originally, they were savory meat dishes. The sweet cake version became wildly popular in Europe in the 19th century. Your easy version is a fantastic modern take on that centuries-old tradition!
Tools You’ll Need for Success
- Large mixing bowl
- Rolling pin
- Cling film (plastic wrap)
- Rubber spatula
- Microwave-safe bowl for melting chocolate
- Whisk or hand mixer for cream filling
- Serving plate or tray
Storing Your Chocolate Roll Cake Delight
For short-term storage: Keep the roll cake in an airtight container in the refrigerator. It will stay fresh and delicious for up to 3 days. The cool environment helps the glaze stay firm and the filling stay fresh.
Can you freeze it? Absolutely! Wrap the unfrosted or frosted roll tightly in plastic wrap, then in aluminum foil. Freeze for up to 1 month. Thaw overnight in the fridge before serving.
Slicing in advance: If you need to slice it ahead of time, place parchment paper between the slices to prevent sticking. Store them in a sealed container in the fridge.
Tips and Advice for Roll Cake Perfection
- Use a serrated knife for slicing. Dip it in hot water and wipe it dry between cuts for super clean edges.
- Let the melted chocolate cool a bit before pouring. If it’s too hot, it can melt the cream filling underneath.
- Get creative with fillings! Try a raspberry jam swirl with your cream, or add chopped nuts for crunch.
- If your roll cracks a little while rolling, don’t worry. The chocolate glaze will cover most imperfections beautifully.
Presentation Ideas to Impress Your Guests
- Garnish with fresh berries like raspberries or strawberries.
- Add a sprinkle of sea salt on the chocolate glaze before it sets for a gourmet touch.
- Pipe little rosettes of whipped cream on top of each slice.
- Serve on a long platter with a dusting of cocoa powder around the plate.
- Add edible gold leaf flakes for a truly special occasion.
Six Delicious Variations to Try
1. Cookies and Cream Dream: Use a chocolate cookies & cream cake. Mix in some crushed Oreos. Fill with vanilla buttercream.
2. Tropical Escape Roll: Use a vanilla sponge cake. Add coconut milk instead of regular milk. Fill with whipped cream and toasted coconut. Top with a white chocolate glaze.
3. Peanut Butter Cup Bliss: Add 1/4 cup of smooth peanut butter to the cake mixture. Fill with a mix of cream cheese and peanut butter. Top with a chocolate-peanut butter glaze.
4. Mint Chocolate Chip Delight: Add 1/2 teaspoon of peppermint extract to the cake mix. Fold in mini chocolate chips. Fill with mint-flavored whipped cream.
5. Orange Chocolate Twist: Add the zest of one orange to the cake mixture. Fill with dark chocolate orange cream. Top with the standard dark chocolate glaze.
6. Salted Caramel Swirl: Before rolling, drizzle salted caramel sauce over the cream filling. Roll as normal. Top with chocolate glaze and an extra drizzle of caramel.
Common Mistakes to Avoid
Mistake 1: Using a Soggy, Fresh Cake
This is the biggest trick. A fresh, very moist cake will turn to mush when you add the milk. You’ll end up with a paste that’s too wet to roll. It will tear easily. Always use a cake that is a day old. Let it sit uncovered for a few hours. You want it slightly dry to the touch. It needs to be sturdy enough to absorb liquid without falling apart.
Mistake 2: Rolling Too Tight or Too Loose
Finding the right pressure is key. If you roll too tightly, the filling will squish out the ends. The roll might also crack. If you roll too loosely, you’ll have gaps and an unstable log. It might fall apart when slicing. Start with a firm but gentle tuck. Use the cling film to guide you evenly along the length. A snug, but not forced, roll is perfect.
Mistake 3: Spreading Filling to the Very Edge
It’s tempting to cover every bit of the cake sheet. Don’t do it! Leave about a half-inch border on the short end where you start rolling. Also leave a small border along the long sides. This gives the filling somewhere to go as you roll. It prevents a messy, leaking end. Your roll will look much neater and professional.
Mistake 4: Not Chilling Before Slicing
Patience is vital. Slicing into the roll while it’s still soft is a recipe for a squished mess. The filling will ooze. The shape will deform. Always, always chill the wrapped roll for at least 1-2 hours. This firms up the filling and sets the shape. For the cleanest slices, chill it overnight.
Frequently Asked Questions
Can I use a boxed cake mix for the sponge?
Yes, absolutely! Bake the cake mix according to package directions for a single layer. Let it cool completely and dry out a bit. This works perfectly. In fact, a plain chocolate box cake is a great, consistent starting point. Just be sure you have a 6-inch round or square cake’s worth of baked product.
My mixture is too wet. How can I fix it?
Don’t panic. This happens if the cake was too fresh. The fix is easy. Sprinkle in some crushed graham cracker crumbs, extra cake crumbs, or even a tablespoon of cocoa powder. Mix it in slowly until the mixture holds together when you pinch it. It should be like a thick, moldable dough, not a runny batter.
What’s the best cream filling to use?
Stabilized whipped cream is my top choice. It’s light and not too sweet. To make it, add a little powdered sugar and a teaspoon of unflavored gelatin to your heavy cream as you whip it. This prevents it from going watery. Buttercream is richer and holds its shape incredibly well. For a quick option, store-bought whipped topping or even a thick chocolate pudding works in a pinch.
Can I make this roll cake days in advance?
You can, but with a specific method. Assemble the roll with the filling and wrap it tightly. Freeze it without the chocolate glaze. The day before serving, take it out to thaw in the fridge. Then, add your melted chocolate glaze and let it set. This keeps the texture perfect.
Why did my chocolate glaze crack when I poured it?
This usually means the chocolate was too hot or the cake roll was too cold. A big temperature difference causes the chocolate to set too quickly and crack. Let your melted chocolate cool until it’s just warm to the touch, not hot. Also, take your cake roll out of the fridge 15 minutes before glazing to take the chill off.
How do I get a super smooth chocolate coating?
Use a pouring method. Place your cake roll on a wire rack with a baking sheet underneath. Pour the melted chocolate in the center. Then, use an offset spatula to gently push it over the sides. The excess will drip through the rack, leaving a smooth, even coat on the cake. This is much easier than trying to spread it.
Can I use milk chocolate instead of dark?
You can, but be careful. Milk chocolate is sweeter and softer. It might not set as firmly as dark chocolate. For the glaze, you can use it, but know it will stay a bit softer. For mixing into the cake, it will work just fine. The flavor will simply be milder and sweeter.
How do I transfer the rolled cake without breaking it?
The cling film is your best friend here. Once rolled and wrapped, you can lift the whole log using the film. Place it on your serving plate seam-side down. Then, carefully unwrap it. If it feels soft, chill it wrapped first. A firmer log is easier to move. You can also use two large spatulas for support.
My roll cracked a little. Is it ruined?
Not at all! Most cracks can be hidden. Position the cracked part on the bottom when placing it on the plate. The chocolate glaze will also cover a multitude of sins. Remember, it will still taste amazing. A dusting of powdered sugar can also hide minor imperfections.
What can I do with the leftover cake if I don’t have 6 inches?
Scale the recipe! The basic ratio is about 1 cup of cake crumbs to 3-4 tablespoons of milk and 3-4 tablespoons of melted chocolate. Mash and adjust until you get the right dough-like texture. You can make a smaller roll, or even form the mixture into cake pops or truffle balls.
Your Journey to Dessert Simplicity
And there you have it! The easiest, most impressive dessert you can whip up on a whim. This Easy Chocolate Roll Cake Delight proves that great baking doesn’t have to be complicated. It’s about smart shortcuts and big flavor. I promise, once you see the smiles it brings, you’ll make it again and again. So grab that cake, get rolling, and get ready for the compliments!
Tender Pork Mignon
Ingredients
Equipment
Method
- Break the chocolate sponge cake into a large mixing bowl and crumble it until it resembles coarse crumbs.
- Pour in the milk and mash and stir until you achieve a thick, pastelike consistency.
- Add the melted dark chocolate and fold it in until the mixture is uniform.
- Lay a large sheet of cling film on the counter and scoop the chocolate mixture onto it.
- Place another sheet of cling film on top and roll the mixture into a rectangle about 10x14 inches.
- Spread your chosen cream filling evenly over the cake sheet, leaving a small border at one end.
- Roll the cake from the other short end, using the cling film to help guide it.
- Wrap the rolled cake tightly in cling film to hold its shape.
- Melt another half cup of dark chocolate and let it cool slightly.
- Unwrap the cake roll and place it on a serving plate, then pour the melted chocolate over the top and smooth it out.
- Allow the chocolate coating to set at room temperature or in the fridge.
- Dust the log lightly with powdered sugar before serving.