When One Decadent Dessert Is Not Enough
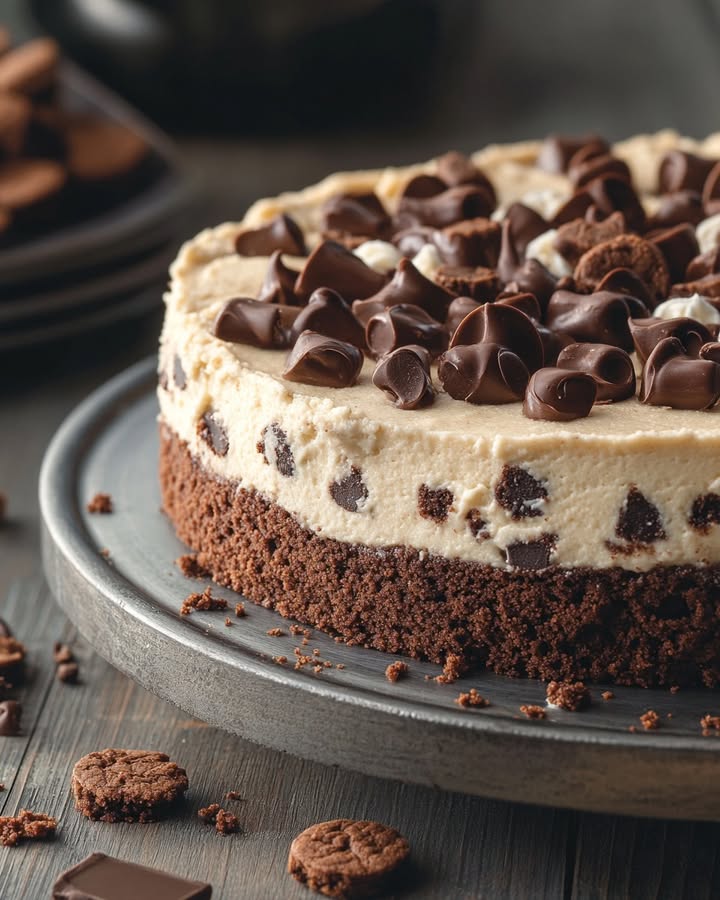
You know that feeling of standing in front of the dessert table, torn between the fudgy brownie and the irresistible bowl of cookie dough? I used to live that struggle every time my family had a get-together. My kids would beg for brownies, my husband would eye the cookie dough dip, and I’d want something truly show-stopping. That’s how this monster of a dessert was born in my kitchen. The Ultimate Cookie Dough Brownie Cake is my delicious solution—a layer of rich, dark brownie, a thick, safe-to-eat cookie dough center, another brownie layer, and a waterfall of glossy chocolate ganache. It’s not just a cake; it’s an experience.
A Love Letter to Two All-Time Favorites
Brownies and edible cookie dough don’t exactly have a long, storied history together. They come from two different dessert universes. The brownie is a classic, debated to have originated from a baking mishap in the late 1800s. Edible cookie dough is a more modern, joyfully rebellious creation born from sneaking spoonfuls from the mixing bowl. What I love is taking these two beloved traditions and smashing them together into something new. This cake is a celebration of both, a modern treat that honors the gooey goodness of a brownie and the nostalgic, buttery joy of cookie dough.
Why You’ll Fall Head Over Heels for This Cake
Let me count the ways! First, it looks absolutely spectacular with that shiny ganache drip—it’s a guaranteed showstopper. Second, it combines textures like a dream: the dense, fudgy cake, the soft and chewy cookie dough, and the smooth, rich chocolate shell. But maybe the best part? It’s surprisingly straightforward. You’re not making a fussy, delicate cake. You’re making two simple brownies and mixing a no-bake filling. It’s forgiving and fun, perfect for bakers who want big results without chef-level stress.
The Perfect Occasion for This Ultimate Treat
This isn’t your everyday Tuesday night dessert (unless you’re having a spectacularly rough Tuesday—I don’t judge!). This cake is for those moments you want to make unforgettable. Think birthday parties where you want to see eyes light up. Potlucks where you want to be the talk of the table. Holiday gatherings that call for extra indulgence. I love making it for my book club; it gives us way more to discuss than just the plot! Any event that deserves a “wow” factor is the right event for this cake.
Gathering Your Ingredients
Here’s everything you’ll need to create this masterpiece. I recommend having it all measured and ready to go before you start—it makes the process so smooth!
For the Brownie Layers:
- 1 cup unsalted butter, melted
- 2 cups granulated sugar
- 4 large eggs
- 1 tsp vanilla extract
- 1 cup all-purpose flour
- 1 cup unsweetened cocoa powder
- 1/2 tsp salt
For the Cookie Dough Layer:
- 1/2 cup unsalted butter, softened
- 3/4 cup brown sugar, packed
- 1/4 cup granulated sugar
- 2 tbsp milk
- 1 tsp vanilla extract
- 1 cup all-purpose flour
- 1/2 tsp salt
- 1 cup mini chocolate chips
For the Chocolate Ganache:
- 1 cup semi-sweet chocolate chips
- 1/2 cup heavy cream
Handy Substitution Options
Don’t panic if you’re missing an item! Baking is all about improvisation.
- Butter: You can use salted butter. Just omit the added salt in both the brownie and cookie dough.
- Cocoa Powder: Dutch-processed cocoa works beautifully here for a deeper flavor.
- Flour in Cookie Dough: To be extra cautious, you can heat-treat your flour. Spread it on a baking sheet and bake at 350°F for 5-7 minutes to kill any potential bacteria.
- Heavy Cream: For the ganache, full-fat coconut cream can be a dairy-free alternative.
- Chocolate Chips: Feel free to swap semi-sweet for dark chocolate or even milk chocolate based on your preference.
Let’s Bake: Building Your Ultimate Cake
Alright, apron on, music playing! Let’s walk through this step-by-step.
Step 1: Prepare the Brownie Layers
First, get your oven humming at 350°F (175°C). Grease two 9-inch round cake pans and line the bottoms with parchment paper circles. This is your insurance policy for perfect release! In a big bowl, whisk that warm, melted butter and granulated sugar together until it looks like dark, glossy sand. Crack in those eggs, one at a time, whisking well after each. The mix will get thick and pale. Stir in the vanilla for that warm aroma. Now, sift your flour, cocoa powder, and salt right over the wet ingredients. Gently fold it all together until just combined—no overmixing! Divide this glorious, dark batter between your two pans and smooth the tops. Bake for 20-25 minutes. You want a toothpick to come out with a few moist crumbs clinging to it. Let them cool completely right in the pans. Pro tip: Rushing this will cause your cookie dough to melt! Patience is key.
Step 2: Make the Edible Cookie Dough Layer
While the brownies cool, let’s make the star filler. In a mixing bowl, beat the softened butter with both brown and white sugars. You’re looking for it to become light, fluffy, and almost creamy. This takes a good 2-3 minutes with a mixer. Pour in the milk and vanilla, mixing until smooth. Now, add your flour and salt. Mix on a low speed just until it disappears into a soft dough. Finally, fold in those adorable mini chocolate chips by hand. When your first brownie layer is completely cool, plop the cookie dough right on top. Use an offset spatula or the back of a spoon to spread it into a beautiful, even layer that goes right to the edges.
Step 3: Prepare the Silky Chocolate Ganache
This is the elegant finishing touch. Place your chocolate chips in a heatproof bowl. Heat the heavy cream in a small saucepan until it’s just simmering around the edges—little bubbles will form. Immediately pour the hot cream over the chocolate chips. Let it sit for one minute without touching it! This allows the chocolate to melt gently. Then, take a whisk and stir from the center outward until you have a smooth, dark, mirror-like pool of ganache. Let it cool for about 5-10 minutes so it thickens slightly. You want it to be pourable but not runny.
Step 4: Assemble Your Masterpiece
The fun part! Carefully place your second brownie layer on top of the cookie dough, creating a delicious sandwich. I like to give it a gentle press to make sure it’s secure. Now, pour your slightly cooled ganache into the center of the top brownie. Using the back of a spoon or a spatula, gently coax it toward the edges, letting it cascade beautifully down the sides. Don’t worry about perfection—those drips are part of the charm! Chef’s tip: Place your cake on a cooling rack over a baking sheet before pouring. This catches any drips and makes cleanup a breeze.
Step 5: Serve and Savor
Now, the hardest part: waiting. Let the ganache set for at least 30 minutes. This gives you clean slices. For the neatest cuts, run your knife under hot water and wipe it dry between each slice. Serve this decadent slab with a cold glass of milk or, my personal favorite, a scoop of vanilla ice cream that slowly melts into the layers. Enjoy the chorus of “mmms” around the table.
Your Baking Timeline
This cake is a project of love, but the timeline is manageable.
- Prep Time: 30 minutes (measuring, mixing)
- Baking Time: 25 minutes
- Cooling & Setting Time: 35 minutes
- Total Time: About 1 hour 30 minutes
- Servings: 12 happy people
Chef’s Secret for Deep Flavor
My secret weapon for the brownie layer? A tiny pinch of espresso powder (about 1/2 teaspoon). You won’t taste coffee at all. It just makes the chocolate flavor sing louder and richer. It’s a little trick from pastry chefs that works magic in any chocolate dessert.
A Little Extra Sweet Info
Did you know the iconic “chocolate chip cookie dough” flavor was popularized by Ben & Jerry’s in 1991? It quickly became a top seller. This cake is like the gourmet, homemade version of that beloved ice cream—combining the same flavors in a stunning, shareable cake form.
Necessary Equipment
You likely have most of this in your kitchen already!
- Two 9-inch round cake pans
- Parchment paper
- Mixing bowls (large and medium)
- Whisk and spatula
- Hand mixer or stand mixer (helpful for the cookie dough)
- Measuring cups and spoons
- Small saucepan for cream
- Cooling rack
Storing Your Divine Creation
Short-Term: If you’re eating it within 2 days, you can keep it covered at room temperature. The cookie dough layer stays perfectly soft. Just make sure it’s in a cool spot away from direct sunlight.
Long-Term & Freshness: For longer storage, the refrigerator is your best friend. Cover the cake tightly with plastic wrap or store it in an airtight container. It will keep beautifully for up to 5 days. The cold makes the layers even fudgier.
Freezing: Yes, you can freeze this cake! Wrap individual slices or the whole cake (once fully set) tightly in plastic wrap, then in aluminum foil. Freeze for up to 2 months. Thaw overnight in the fridge before serving.
My Best Tips and Advice
- Room Temperature Matters: For the cookie dough, your butter must be softened, not melted. Leave it out for an hour beforehand.
- Cool Completely: I can’t stress this enough. Warm brownies will melt the cookie dough layer into a mess.
- Slice with a Hot Knife: For those picture-perfect slices, heat your knife under hot tap water, wipe it dry, and cut. Clean after each slice.
- Chill for Clean Cuts: If you have time, pop the assembled cake in the fridge for 15-20 minutes before slicing. It firms everything up beautifully.
Presentation Tips to Impress
- Dust the top lightly with powdered sugar or cocoa powder just before serving.
- Garnish with a few whole chocolate chips or even crumbled pieces of extra brownie.
- Serve each slice on a plate drizzled with a little extra chocolate sauce or caramel.
- A dollop of freshly whipped cream or a single perfect raspberry adds a lovely color contrast.
Healthier Alternative Twists
Want to lighten things up? Here are some clever variations.
- Gluten-Free Version: Use a 1-to-1 gluten-free flour blend for both the brownies and the cookie dough. The texture will be nearly identical.
- Dairy-Free Delight: Swap butter for vegan baking sticks, use a dairy-free milk, and choose dairy-free chocolate chips. Coconut cream works for the ganache.
- Lower-Sugar Swap: Reduce the granulated sugar in the brownies by 1/4 cup and use a sugar substitute designed for baking. The taste will differ slightly but can still satisfy a sweet tooth.
- Nutty Addition: Add 1/2 cup of chopped walnuts or pecans to the brownie batter for a crunchy texture and healthy fats.
- Peanut Butter Twist: Swirl 1/2 cup of creamy peanut butter into the brownie batter before baking, or add peanut butter chips to the cookie dough.
- Flourless Brownie Base: For a denser, ultra-fudgy layer, search for a flourless brownie recipe and use that as your base. It’s naturally gluten-free!
Common Mistakes to Avoid
Let’s learn from my early baking trials so you can get it perfect the first time.
Mistake 1: Using Hot Brownies for Assembly
This is the biggest pitfall. If you spread the soft cookie dough onto a warm or even slightly warm brownie, the butter in the dough will start to melt. You’ll end up with a greasy, runny layer that soaks into the cake instead of staying distinct. The brownies must be completely cool to the touch. Patience here makes all the difference between a messy cake and a clean, beautiful layered dessert.
Mistake 2: Overbaking the Brownie Layers
Brownies should be fudgy, not cakey, especially in this recipe. Overbaking dries them out and makes them crumbly. They can’t support the heavy layers on top. Remember, a toothpick test for brownies is different than for cake. You want to see a few sticky, moist crumbs clinging to the toothpick when you pull it out, not for it to be completely clean. Err on the side of under-baking by a minute or two.
Mistake 3: Not Measuring Flour Correctly for the Cookie Dough
Scooping your flour directly from the bag with the measuring cup packs it down, leading to too much flour. This creates a dry, crumbly cookie dough that’s hard to spread. The right way is to spoon the flour lightly into your measuring cup and level it off with a knife. For extra safety (and peace of mind), you can even heat-treat your flour first to kill any bacteria, as mentioned in the substitutions.
Mistake 4: Pouring Ganache That’s Too Hot or Too Thin
If your ganache is straight from the microwave or saucepan and still very hot, it will be too runny. It will flood over the sides in a thin layer and not set up with that lovely, thick, glossy coating. Let it cool and thicken for a few minutes. You want it to be the consistency of warm pudding. When you lift your whisk, it should ribbon off slowly. This creates the perfect drip and coverage.
Your Questions, Answered
Can I make this cake ahead of time?
Absolutely, and it might even taste better! You can bake the brownie layers a day ahead. Let them cool completely, then wrap them tightly in plastic wrap and store at room temperature. Make the cookie dough and keep it covered in the fridge. Assemble the cake the day you plan to serve it. The full assembled cake can also be refrigerated overnight; just let it sit at room temperature for about 30 minutes before serving to soften slightly.
Is the cookie dough safe to eat raw?
This is a very common concern. In this recipe, the cookie dough layer is designed to be eaten without baking. It contains no eggs, which removes that risk. The primary concern with raw cookie dough is usually the raw flour. To be extra safe, you can heat-treat your flour before using it. Simply spread the flour needed for the cookie dough on a baking sheet and bake at 350°F for about 5-7 minutes. Let it cool completely before using. This simple step gives you complete peace of mind.
Can I use a boxed brownie mix?
You sure can! In a pinch, a good-quality boxed brownie mix will work. Just prepare it according to the package directions for a cake-like brownie (usually this means adding an extra egg). Bake it in the two round pans as directed, adjusting the time slightly since the layers will be thinner. Using a mix can save time and still delivers a delicious, chocolatey base for your cookie dough and ganache.
My ganache split or became grainy. What did I do wrong?
This usually happens if the cream was too hot and “shocked” the chocolate, or if you stirred too vigorously and incorporated air. To fix a split ganache, try whisking in a teaspoon of room-temperature milk or cream. For grainy ganache, it often means the chocolate seized (got too hot or had a drop of water in it). Gently re-warm the mixture over a double boiler and stir patiently until it smooths out. Prevention is best: pour hot cream over chocolate chips, let sit, then stir gently from the center out.
Can I freeze the whole cake?
Yes, freezing works great! Make sure the cake is fully assembled and the ganache has set completely. Wrap the whole cake (or individual slices) tightly in plastic wrap, then follow with a layer of aluminum foil or place in a large freezer bag. It will keep for up to 2 months. To serve, thaw it overnight in the refrigerator. This is perfect for planning ahead for a big event or for having a special treat on hand.
What can I use instead of heavy cream for the ganache?
If you don’t have heavy cream, full-fat coconut cream is the best substitute and creates a rich, dairy-free ganache. In a real pinch, you can use full-fat evaporated milk, though the texture will be slightly less lush. Do not use milk or half-and-half, as they don’t have enough fat and the ganache won’t set up properly. The high fat content in heavy cream is what gives ganache its smooth, stable, glossy finish.
Why did my cookie dough layer turn out oily?
An oily cookie dough layer almost always points to one issue: the brownie underneath was still warm. The heat melts the butter in the dough. Another possibility is using melted butter instead of properly softened butter for the dough itself. Softened butter should be cool to the touch but yield easily when pressed. If it’s melted or even too soft, the dough won’t have the right structure and can release fat. Always ensure everything is at the correct temperature.
Can I make this in a 9×13 pan instead?
You can, but it becomes more of a bar than a layered cake. You would bake one thicker brownie layer in the 9×13 pan, let it cool, spread all the cookie dough on top, and then pour the ganache over that. You won’t get the same dramatic layered slice, but it will still be incredibly delicious and easier to serve to a crowd. Just adjust the brownie baking time upwards, as it will be thicker.
How do I get a really clean, sharp slice?
For pristine slices, a hot, clean knife is the secret. Run your sharp knife under very hot water, wipe it completely dry, and make your cut in one smooth, confident motion. Wipe the blade clean and reheat it between every slice. For the absolute cleanest cuts, chill the whole cake for 20-30 minutes before slicing. This firms up all the layers, especially the ganache.
Can I add nuts or other mix-ins?
Go for it! This recipe is a wonderful canvas. Chopped walnuts or pecans are classic in brownies. You could add them to the brownie batter or even sprinkle some on top of the ganache for crunch. For the cookie dough, try swapping half the chocolate chips for butterscotch chips, peanut butter chips, or even a handful of toffee bits. Just keep the total volume of add-ins about the same so the structure holds.
Ready to Be the Dessert Hero?
There you have it—the blueprint for the most decadent, talked-about dessert you’ll ever make. This Ultimate Cookie Dough Brownie Cake is more than just a recipe; it’s a memory maker. It combines the comfort of a homemade brownie with the playful joy of cookie dough, all dressed up in a sleek chocolate coat. It looks like it came from a fancy bakery, but I promise, with these simple steps, it comes straight from your heart and kitchen. So preheat that oven, gather your ingredients, and get ready for the ultimate baking adventure. Don’t forget to snap a picture before it disappears!
Creamy Parmesan Tortellini
Ingredients
Equipment
Method
- Preheat oven to 350°F (175°C). Grease two 9-inch round cake pans and line with parchment paper.
- In a large bowl, whisk together melted butter and granulated sugar until glossy.
- Add eggs one at a time, whisking after each addition, then stir in vanilla.
- Sift in flour, cocoa powder, and salt; fold until just combined.
- Divide batter between prepared pans and smooth the tops. Bake for 20-25 minutes.
- Allow brownies to cool completely in the pans.
- In a mixing bowl, beat softened butter with brown and white sugars until fluffy.
- Mix in milk and vanilla until smooth. Add flour and salt, mixing until combined.
- Fold in mini chocolate chips. Spread cookie dough layer onto the cooled brownie layer.
- To make ganache, heat heavy cream until simmering, then pour over chocolate chips and let sit for 1 minute.
- Whisk until smooth, allow to cool slightly.
- Place the second brownie layer on the cookie dough. Pour ganache over and spread to edges.
- Let ganache set for at least 30 minutes before slicing.