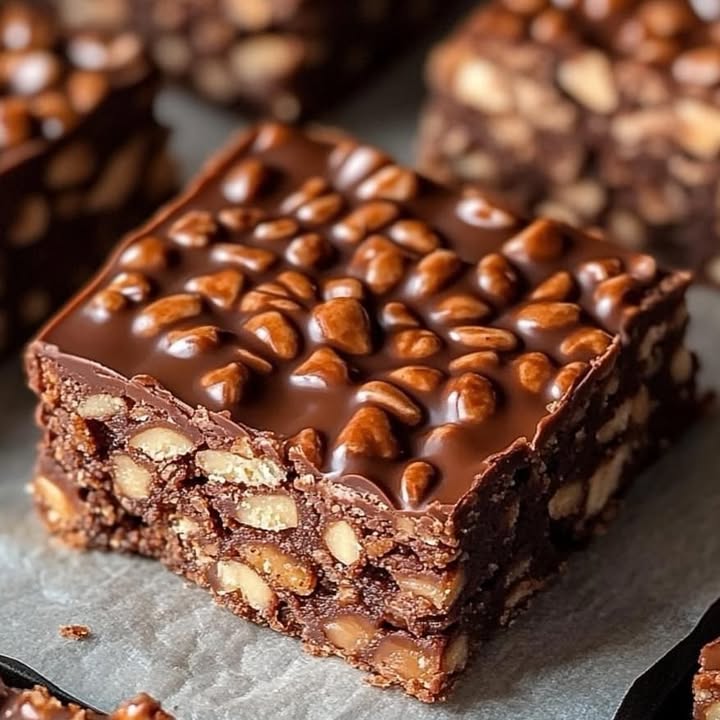
No-Bake Crunch Bars: My Family’s Favorite Chocolate Fix
Is there anything better than a treat that’s ready in minutes and requires zero oven time? I don’t think so! These No-Bake Homemade Crunch Bars are my go-to lifesaver when my kids (or let’s be honest, me) need a chocolate emergency fix. They’re the perfect mix of rich, salty, creamy, and crispy. Every single time I make a batch, they disappear faster than I can hide them. I first started making these when my oven broke down during a heatwave. It turned out to be the sweetest kitchen accident ever!
A Sweet History of Simplicity
While no-bake treats have been around for ages, these bars feel like a modern homemade hug. They take the classic “crispy rice treats” idea and give it a grown-up, chocolatey twist. I like to think of them as a love letter to the simple joy of melting chocolate and stirring in your favorite crunchy bits. I tested this recipe countless times, tweaking the peanut butter amount for perfect binding and trying different chocolates. My neighbor, Susan, introduced me to the trick of adding a pinch of salt, and wow, what a difference! It makes all the flavors pop.
Why You’ll Fall in Love With This Recipe
Honestly, what’s not to love? First, you only need a bowl, a spoon, and a pan. No fancy skills required! Second, they are wildly customizable. Don’t like peanuts? Swap them out. Need a nut-free version? Absolutely doable. They are the ultimate easy, make-ahead snack for lunchboxes, parties, or a midnight fridge raid. The combination of smooth melted chocolate, creamy peanut butter, and that delightful crunch is pure magic. Trust me, you’ll feel like a kitchen wizard.
Perfect Occasions for These Crunchy Bars
These bars are the social butterflies of the dessert world. They fit in everywhere! I always make a double batch for school bake sales (they always sell out first). They’re fantastic for potlucks, picnic baskets, movie nights, or as a thank-you gift for a friend. I once brought them to a holiday party alongside some fancy Raspberry Cheesecake Donuts, and guess what? The humble crunch bars were gone before the donuts! They have that universal, comforting appeal that everyone enjoys.
What You’ll Need: The Ingredients List
Here’s your short and sweet shopping list. You probably have most of this already!
- 1 1/2 cups chocolate chips (milk, dark, or semi-sweet work great)
- 1/2 cup peanut butter (creamy or crunchy, your choice!)
- 1/4 teaspoon salt (this is the secret flavor booster)
- 2 cups crisp rice cereal (like Rice Krispies)
- 1/2 cup chopped peanuts (optional, but oh-so-good for extra crunch)
Easy Ingredient Swaps (No Stress Allowed!)
Out of something? No worries! This recipe is super flexible.
- Chocolate Chips: Use chocolate bars chopped up. White chocolate or butterscotch chips make a fun change.
- Peanut Butter: Any nut butter works—almond butter, sunflower seed butter (for nut-free), or even cookie butter.
- Crisp Rice Cereal: Try crushed cornflakes, bran flakes, or even puffed rice for a similar effect.
- Peanuts: Swap for almonds, pecans, pretzel pieces, or even mini marshmallows.
Let’s Make Some No-Bake Magic!
Get ready for the easiest “baking” session of your life. Let’s get our hands chocolatey!
Step 1: Melting the Good Stuff
Grab a microwave-safe bowl. Pour in your chocolate chips, peanut butter, and that pinch of salt. Melt it in the microwave using 30-second bursts, stirring well after each one. Watching the chocolate and peanut butter swirl together into a glossy, smooth river is the best part! You can also use a double boiler if you prefer. Just keep the heat gentle so the chocolate doesn’t seize up. Pro tip: Stir, stir, stir! This ensures even melting and prevents burnt chocolate.
Step 2: The Big Crunch Mix-In
While your chocolate mixture is still warm and pourable, get your big mixing bowl. Add the crisp rice cereal and chopped peanuts if you’re using them. Now, slowly pour the molten chocolate mixture over the top. The sound of the cereal crackling as the warm chocolate hits it is so satisfying! Use a sturdy spatula to fold everything together. Make sure every last piece of cereal gets a gorgeous, shiny coat of chocolate. It should look like a chocolatey, crunchy paradise.
Step 3: Pressing and Chilling
Line an 8×8-inch pan with parchment paper. A little spritz of cooking spray helps the paper stick to the corners. Now, dump your mixed crunch into the pan. Use your spatula, or even better, your hands (lightly greased) to press the mixture down firmly and evenly. A good, tight pack is the key to bars that hold together. Now, show some patience! Slide the pan into the freezer for about an hour. This firms everything up perfectly. Chef’s tip: For super clean cuts, score the surface lightly with a knife after about 20 minutes of chilling, then finish freezing.
Step 4: Slicing and Serving
After your hour is up, the fun begins! Lift the entire slab out of the pan using the parchment paper “handles.” Place it on a cutting board. Grab a sharp knife and slice it into squares or rectangles. I love making 1-inch bites for little hands (and for popping many into my own mouth). Wipe the knife clean between cuts for beautiful, sharp edges. Now, try not to eat them all before you share!
Quick Timing Guide
Here’s the beauty of this recipe broken down by time:
- Prep Time: 10 minutes
- Chill Time: 1 hour
- Total Time: 1 hour 10 minutes
My Secret Kitchen Trick
My absolute secret for the best texture is to toast the chopped peanuts (or any nuts) in a dry pan for just a few minutes before adding them. It brings out their nutty flavor and makes them even crunchier against the creamy chocolate. It’s a tiny extra step that makes a huge difference!
A Little Crunchy Fact
Did you know crisp rice cereal was invented in the late 1920s? It was originally marketed as a health food! While I wouldn’t call these bars health food, it’s fun to know we’re using a classic pantry staple in such a deliciously indulgent way.
Gear You’ll Need
You don’t need much! Here’s the short list:
- Microwave-safe bowl OR double boiler setup
- Large mixing bowl
- Spatula
- 8×8-inch square baking pan
- Parchment paper
- Sharp knife for cutting
Storing Your Crunch Bars
To keep your crunch bars perfectly snappy, store them in an airtight container separated by layers of parchment paper. Keep the container in the refrigerator. They will stay firm and delicious for up to 2 weeks this way.
If you used an all-natural peanut butter with oil separation, be careful! These bars can soften more quickly at room temperature. The fridge is definitely their best friend in this case.
For long-term storage, these bars freeze like a dream. Wrap them tightly or store them in a freezer bag. They will keep their texture and flavor for up to 3 months. Just thaw for a few minutes before eating!
My Best Tips for Success
- For easy clean-up, spray your measuring cup with a little oil before measuring the peanut butter. It slides right out!
- If your melted chocolate seems too thick, add a tiny teaspoon of coconut oil to make it more pourable.
- Get creative with add-ins! A handful of mini M&Ms, dried cranberries, or even a sprinkle of flaky sea salt on top before chilling is amazing.
Making Them Look Party-Ready
Presentation is easy and fun! Drizzle melted white chocolate over the top in a zigzag pattern before slicing. Place each bar in a pretty mini cupcake liner. For a holiday touch, sprinkle on some festive sprinkles or colored sugar before the chocolate sets. Stack them on a cake stand for a real “wow” effect.
Healthier Twists & Fun Variations
Feel like mixing it up? Here are six fantastic ideas:
- Dark Chocolate Sea Salt: Use 70% dark chocolate chips and sprinkle the top with coarse sea salt. Elegant and rich.
- Tropical Crunch: Swap peanuts for chopped macadamia nuts and add 1/4 cup of toasted coconut flakes to the cereal mix.
- SunButter & Seed: For a nut-free school-safe version, use SunButter and swap peanuts for a mix of sunflower and pumpkin seeds.
- Cookie Butter Crisp: Replace the peanut butter with speculoos cookie butter. It tastes like the holidays in a bar!
- Mint Chocolate Chip: Add 1/2 teaspoon of peppermint extract to the melted chocolate and use dark chocolate chips. So refreshing.
- S’mores Style: Use golden Grahams instead of rice cereal, add mini marshmallows, and keep the peanuts out. A campfire classic.
Common Mistakes to Avoid
Avoid these little pitfalls for perfect bars every single time.
Mistake 1: Rushing the Melting Process
Zapping the chocolate mixture on high heat for too long is a common error. This can scorch the chocolate or cause the oil in the peanut butter to separate. Burnt chocolate tastes bitter and ruins the smooth texture. Always melt in short bursts on medium power, stirring patiently in between. If you see it starting to look oily or grainy, you’ve gone too far. Slow and steady wins the race here.
Mistake 2: Not Coating the Cereal Evenly
Just giving the mix a quick stir won’t do the trick. You end up with dry, uncoated cereal bits and clumps of pure chocolate. This leads to bars that fall apart. Take your time with the folding process. Use a folding motion to gently turn the cereal from the bottom up, ensuring every piece is kissed by the chocolate. The final mix should have a uniform chocolatey color with no white spots.
Mistake 3: Skipping the Firm Press
Scooping the mix into the pan and just smoothing the top is not enough. A loose press means crumbly bars that won’t hold their shape when you pick them up. Don’t be afraid to use some muscle! Press the mixture down firmly and evenly into all the corners of the pan. I like to use the bottom of a flat measuring cup or my (clean) hands to really compact it. This step is crucial for that satisfying snap when you bite into one.
Mistake 4: Cutting Before Fully Set
Impatience is the enemy of neat bars. If you try to cut them before they are completely firm, you’ll get messy, squished edges and the chocolate will smear. Respect the chill time! The full hour in the freezer is important. For the cleanest cuts, you can even pop the whole slab back into the freezer for 10 minutes after making your initial slices.
Your Crunch Bar Questions, Answered
Can I use natural peanut butter for this recipe?
Yes, you absolutely can use natural peanut butter. Just know that it often has more oil and can make the final bars a bit softer, especially if left at room temperature. For the best, firmest results with natural peanut butter, I recommend storing the bars in the fridge at all times. Also, give the jar a really good stir before measuring to incorporate all the oils. This helps prevent a greasy separation in your melted chocolate mixture.
My chocolate mixture got thick and clumpy. What happened?
This usually means your chocolate “seized.” It happens when even a tiny drop of water or steam gets into the melting chocolate. Chocolate and water are not friends! Always make sure your bowls and spoons are completely dry. If using a double boiler, ensure the bottom of your top bowl isn’t touching the boiling water, just the steam. If it does seize, it’s hard to fix. Your best bet is to gently stir in a teaspoon of a neutral oil (like vegetable oil) or more peanut butter to try to bring it back together.
How can I make these bars nut-free for my child’s school?
Making a nut-free version is simple and just as delicious. First, swap the peanut butter for a seed butter like SunButter (made from sunflower seeds). Then, simply omit the chopped peanuts altogether. You can add extra crunch with pretzel pieces or just use more crisp rice cereal. Always check the labels on your chocolate chips too, as some are processed in facilities with nuts.
Why did my bars turn out too hard or crumbly?
Bars that are too hard often have too much chocolate or were over-melted. Crumbly bars are usually from not enough binding agent (peanut butter) or not pressing them firmly enough into the pan. Double-check your measurements. Make sure you are using standard measuring cups and not eyeballing it. A proper, firm press in the pan is non-negotiable for bars that hold together well.
Can I use honey or maple syrup instead of some ingredients?
I wouldn’t recommend swapping the main ingredients for liquid sweeteners. Honey or maple syrup won’t set firm like the chocolate and peanut butter do. They would make the bars sticky and prevent them from holding their shape. This recipe relies on the fat in the peanut butter and the structure of the melted chocolate to solidify. Stick to the recipe for the right texture.
What’s the best way to cut them cleanly without cracking?
A sharp, heavy knife is your best tool. Warm the blade under hot water, wipe it dry, and make one firm, confident cut. Don’t saw back and forth. Wipe the knife clean after each cut to remove chocolate buildup. My “chef’s secret” is to score the top lightly with a knife after 20 minutes in the freezer, then finish chilling. The bars will break perfectly along those lines.
How long can I leave them out at a party?
If your kitchen is fairly cool, they can sit out for a few hours just fine. On a warm day, or if you used natural peanut butter, I’d limit it to an hour or so. After that, they start to soften and lose their signature crunch. For longer parties, I like to put out a smaller plate and refill it from the fridge as needed to keep them tasting their best.
Can I double this recipe?
Yes, doubling works great! You’ll just need a larger pan, like a 9×13-inch dish. The process is exactly the same. Keep an eye on the melting step, as a larger amount of chocolate might take a bit longer. Make sure you have a bowl big enough to mix everything without making a mess. Doubling is perfect for big gatherings or for keeping a stash in the freezer.
Are there any gluten-free options?
Yes, this recipe is naturally gluten-free as long as you choose the right ingredients. Check that your crisp rice cereal is labeled gluten-free (many brands are, but not all). Also, always verify that your chocolate chips and peanut butter are processed in a gluten-free facility if you have a severe allergy. With those simple checks, you’re good to go!
My kids don’t like peanuts. What’s a good substitute?
Almond butter is a fantastic substitute with a slightly different, milder flavor. You can also use cashew butter for a super creamy result. If you want to skip nuts entirely, try the seed butter option mentioned earlier. For the add-ins, swap the peanuts for things they do love, like pretzel bits, mini chocolate chips, or even their favorite crushed cereal.
The Final, Crunchy Bite
And there you have it! Your new favorite no-bake, no-fuss treat. These Homemade Crunch Bars are more than just a recipe; they’re a moment of simple joy. They prove that the most delicious things often come together with just a few ingredients and a little love. I hope this recipe becomes a beloved staple in your home, just like it is in mine. Now, go make a batch, hide a few for yourself, and share the rest (if you can!). Happy crunching!
Raspberry Cheesecake Donuts
Ingredients
Equipment
Method
- In a microwave-safe bowl, combine chocolate chips, peanut butter, and salt. Melt in the microwave using 30-second bursts, stirring well after each.
- In a large mixing bowl, add crisp rice cereal and chopped peanuts if using. Pour the melted chocolate mixture over the top and fold together until evenly coated.
- Line an 8x8-inch pan with parchment paper and spritz with cooking spray. Press the mixture firmly and evenly into the pan. Freeze for about 1 hour to firm up.
- Once firm, lift the bars out and slice into squares or rectangles using a sharp knife.