Let’s Take the Campfire Coziness Right Into Your Kitchen!
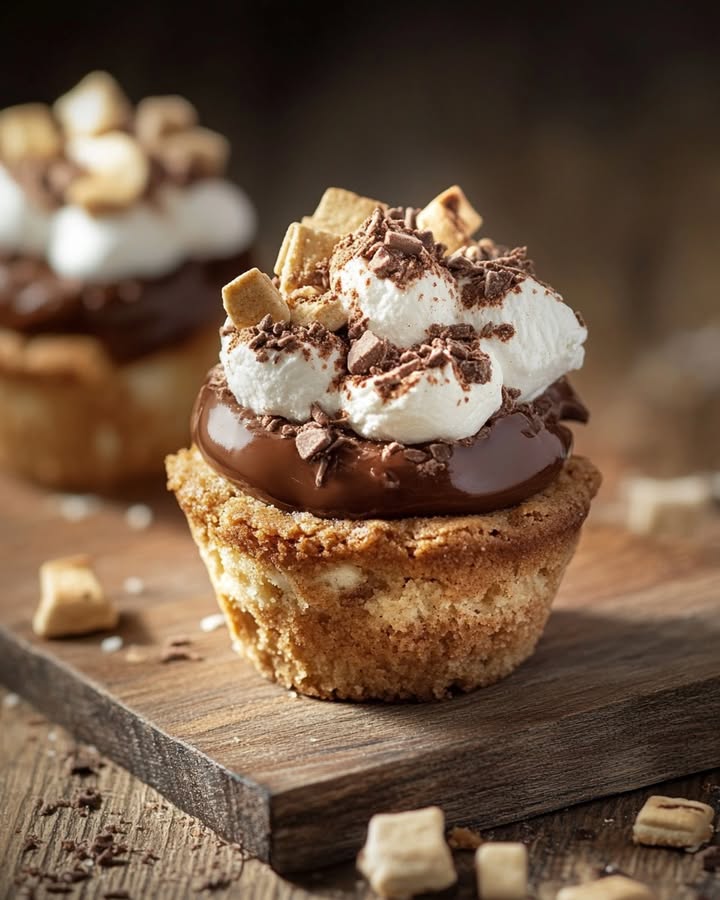
Okay, can we talk about the pure joy of a perfectly toasted marshmallow? The crispy golden outside that gives way to that gooey, sweet center, hugging a piece of chocolate, all on a graham cracker. Heaven! But as much as I love camping, I don’t always want to build a fire. That’s exactly why I became obsessed (truly, my family said “enough!”) with making the perfect Smores Cookie Cups. These little edible cups deliver all that classic s’mores magic, but they’re portable, mess-free, and ready in under 30 minutes. Trust me, your oven becomes your new best camping buddy.
A Sweet Slice of Americana, Perfected for Your Plate
The classic s’more is a true American icon. Legend has it the recipe was first published in the 1920s by the Girl Scouts, teaching young campers how to make “some more” of the delicious treat! The combo of graham crackers, marshmallow, and chocolate is timeless. My modern twist, the Smores Cookie Cups, takes that outdoor tradition and bakes it into a neat, shareable, party-ready form. They keep all the beloved elements but ditch the smoky clothes and sticky fingers. It’s the taste of summer campfires and backyard memories, made practical for playdates, parties, and “I-need-something-sweet-now” moments.
Why You’re Going to Adore These Smores Cups
First, they are ridiculously easy. No fancy mixer, no chilling dough—just mix, press, and bake. Second, they are the ultimate crowd-pleaser. Kids go wild for them, and adults get hit with a wave of sweet nostalgia with every bite. Finally, they are so versatile. You can customize them with different chocolates, add a sprinkle of sea salt, or even sneak a peanut butter chip under the marshmallow. They are little cups of pure happiness that make any day feel a bit more special.
Perfect Times to Whip Up a Batch of Smores Cookie Cups
These cups are your secret weapon for so many occasions! They are a superstar at potlucks because everyone can grab one easily. Movie nights at home become extra cozy with a plate of these nearby. I love making them for school bake sales—they travel well and always sell out first. They’re also the perfect quick dessert after a family barbecue, bridging the gap between the grill and a s’mores fantasy without ever lighting a match.
What You’ll Need to Make Smores Cookie Cups
Gathering your ingredients is the first fun step! The beauty is in the simplicity.
- 1 cup finely crushed graham cracker crumbs (about 7 whole graham crackers)
- 1/4 cup powdered sugar
- 6 tablespoons butter, melted
- 12 regular-sized marshmallows (not mini marshmallows)
- 2 full-size Hershey’s Chocolate Bars, unwrapped and divided into 24 pieces
No Graham Crackers? No Problem! Easy Swaps.
Out of something? Don’t worry, you can still make magic happen.
- Graham Cracker Crumbs: You can buy them pre-crushed, or use digestive biscuits for a slightly different, but still delicious, flavor.
- Marshmallows: If you only have jumbo marshmallows, just cut them into smaller chunks. Mini marshmallows can work in a pinch—use 3-4 per cup.
- Chocolate: This is where you can get creative! Try a dark chocolate bar for a richer taste, or use peanut butter cups or caramel-filled chocolates for a fun surprise in the middle.
- Butter: I use salted butter, but unsalted works just fine.
Let’s Make These Gooey, Delicious Smores Cookie Cups!
Ready? Aprons on! This process is fast and oh-so-satisfying.
Step 1: Preheat and Prep
Start by turning your oven on to 350°F (175°C). This gives it plenty of time to get perfectly hot. While it warms up, grab your mini muffin pan. Give it a really good spray with non-stick cooking spray. Getting into every little cup now means your little graham cracker cups will pop out beautifully later. No one wants a broken cup!
Step 2: Make the Graham Cracker “Dough”
In a medium bowl, combine your finely crushed graham cracker crumbs and powdered sugar. Pour the melted butter over the top. The warm butter will hit the dry mix and you’ll immediately smell that wonderful, toasty, honey-like aroma. Mix it with a fork until all the crumbs are evenly damp and the mixture looks like wet sand. It should hold together when you pinch it.
Step 3: Form the Little Cups
Now for the fun part! Scoop a heaping tablespoon of the crumb mixture into each prepared mini muffin cup. I like to use a small cookie scoop for this. Take your fingers or a small tool, like the bottom of a shot glass, and firmly press the crumbs into the bottom and up the sides. You’re creating a sturdy little nest for all the gooey goodness to come. Pro tip: Press firmly! This helps the cups hold their shape after baking.
Step 4: First Bake
Slide the pan into your preheated oven. Bake for just 4 minutes. Yes, only 4! You’ll see the edges turn a deeper golden brown and the kitchen will smell amazing. This short bake sets the crust so it’s firm enough to hold the filling. Pull the pan out and place it on a heat-safe surface. Chef’s tip: Don’t skip this pre-bake. It prevents the graham cracker base from getting soggy later.
Step 5: Add the Marshmallows
While the cups bake, get your marshmallows ready. Using clean kitchen scissors (a light spritz of cooking spray on the blades helps!), cut each marshmallow in half crosswise. As soon as the cups come out of the oven, place one marshmallow half, cut-side down, right into the center of each hot cup. The heat will start to soften the marshmallow bottom immediately.
Step 6: Broil to Toast
Here’s where the magic happens. Turn your oven to the broil setting. Put the pan back in, but watch it like a hawk! Broil for 1-2 minutes, just until the tops of the marshmallows puff up and turn a beautiful, speckled golden brown. It happens fast, so don’t walk away. You’re going for toasted, not torched!
Step 7: The Grand Chocolate Finale
Take the pan out of the oven—carefully, it’s hot! Immediately place one piece of your Hershey’s chocolate (or whatever chocolate you’re using) right on top of each toasted marshmallow. The residual heat from the marshmallow and the cup will begin to melt the chocolate perfectly. Let the whole pan cool for about 15 minutes. This lets everything set just enough.
Step 8: Gently Free Your Smores Cups
After cooling, take a small butter knife and gently slide it around the edge of each cup to loosen it. Then, just pop them out onto a plate or serving platter. You’ll love seeing each perfect, golden, chocolate-topped little cup. They are now ready to bring maximum joy.
Timing is Everything: Your Quick Recipe Roadmap
- Prep Time: 15 minutes
- Cook Time: 6-8 minutes (bake + broil)
- Cooling Time: 15 minutes
- Total Time: About 35-40 minutes
- Yield: 24 delightful Smores Cookie Cups
My Secret for the Absolute Best Cups
My number one trick is to use regular-sized marshmallows, cut in half. Mini marshmallows don’t give you that signature fluffy, gooey peak, and jumbo ones are too big. The half of a regular marshmallow melts and toasts into the ideal size, creating that perfect marshmallow-to-chocolate-to-crust ratio in every single bite.
A Fun Fact About Your Ingredients
Did you know the graham cracker was invented in the 1830s by a Presbyterian minister named Sylvester Graham? He promoted it as part of a bland, vegetarian diet to curb… ahem, “unhealthy” urges. I’m pretty sure he never imagined his health food would one day be the foundation for a chocolate-and-marshmallow dessert sensation. I think he’d be secretly pleased at how much happiness it brings!
Gear Up! What You’ll Need in Your Kitchen
You don’t need much! Just a few basics:
- A 24-cup mini muffin pan (this is essential)
- Mixing bowl
- Fork or spoon for mixing
- Measuring cups
- Kitchen scissors or a knife
- Butter knife for releasing the cups
- Non-stick cooking spray
How to Keep Your Smores Cookie Cups Fresh
If you have any leftovers (a rare event in my house!), store them in a single layer in an airtight container at room temperature. They are best eaten within 2 days.
The marshmallows may firm up a bit over time. To bring back that fresh-from-the-oven magic, simply place a cup on a microwave-safe plate and heat it for about 10 seconds. This will re-soften the marshmallow and melt the chocolate again.
I do not recommend storing them in the fridge, as it can cause the graham cracker cup to become soft and the chocolate to develop a whitish coating called a bloom. It’s still safe to eat, but it doesn’t look as pretty.
Handy Tips for Smores Cup Success
- Crush your graham crackers finely. Big chunks won’t form a cohesive cup.
- Really pack the crumbs into the muffin tin. The firmer you press, the less likely they are to crumble.
- Broiling is a quick process. Stay by the oven and watch for color. They go from golden to burnt in seconds!
- Let them cool completely before trying to remove them from the pan. This gives the chocolate a chance to set slightly.
Make Them Look as Good as They Taste: Presentation Ideas
- Arrange them on a rustic wooden board for a cute, campfire-like feel.
- Drizzle the tops with a little melted chocolate or caramel sauce for extra flair.
- Add a tiny pinch of flaky sea salt on the chocolate right after you place it. Sweet and salty is always a win!
- Serve them on colorful cupcake liners for a festive party look.
Want to Mix It Up? Try These Tasty Variations!
Once you master the classic, try one of these fun twists:
- Peanut Butter Lover’s Cup: Place a miniature peanut butter cup at the bottom of the graham cracker cup before adding the marshmallow.
- Nutty Crunch Cup: Mix 2 tablespoons of very finely chopped pecans or walnuts into the graham cracker crumb mixture.
- Cookies & Cream Cup: Use chocolate sandwich cookie crumbs instead of graham cracker crumbs for the base.
- Caramel Delight Cup: After broiling, place a Rolo candy on top instead of a plain chocolate piece.
- Chocolate Overload Cup: Add 1 tablespoon of cocoa powder to the graham cracker crumb mixture for a double-chocolate experience.
- Fruity S’mores Cup: Slice a fresh raspberry or strawberry in half and place it under the marshmallow for a tart, juicy surprise.
Common Mistakes to Avoid with Smores Cookie Cups
Using Mini Marshmallows
It seems like a good shortcut, but mini marshmallows don’t provide enough volume or gooeyness. They often just melt into a flat, sticky layer instead of creating that beautiful toasted peak. You lose the classic s’mores texture. Stick with regular marshmallows cut in half for the perfect size and melt.
Not Packing the Crumbs Firmly Enough
If you just spoon the crumbs in and give them a light tap, your cups will crumble when you try to eat them. They need to be compacted to hold together. Use your fingers or a small tool to really press the mixture firmly into the bottom and up the sides of the muffin cup. A solid press means a sturdy, edible cup.
Walking Away During the Broil Step
This is the number one way to end up with blackened, bitter marshmallows. The broiler is extremely intense and direct. What takes 90 seconds one time might take only 60 seconds the next, depending on your oven. Always stay by the oven door, watch closely, and pull them the second they are golden.
Trying to Remove the Cups Too Soon
Impatience can lead to broken cups! The chocolate needs a few minutes to set from the residual heat, and the graham cracker crust needs to cool and firm up. If you try to pry them out while they’re piping hot, they will fall apart. Let them rest in the pan for a full 15 minutes before using your butter knife.
Your Smores Cookie Cups Questions, Answered!
Can I make these Smores Cookie Cups ahead of time?
You can prepare the graham cracker cups a day in advance. Just bake them for the 4 minutes, let them cool completely in the pan, then store the whole pan covered at room temperature. The next day, add the marshmallows and broil as directed. This is a great party time-saver! The fully assembled cups are best eaten the same day, however, for optimal gooeyness.
My marshmallows overflowed! What did I do wrong?
This usually means the marshmallow half was too big for the cup, or the cup itself wasn’t formed deeply enough. Make sure you are pressing the crumbs well up the sides to create a taller nest. Also, regular marshmallows can vary in size. If yours look extra large, you might trim them down a bit. A little overflow is okay and tastes great!
Can I use a different kind of chocolate?
Absolutely! That’s one of the best ways to personalize this recipe. Dark chocolate, milk chocolate with almonds, or even a chocolate with caramel inside all work wonderfully. Just break the bar into appropriately sized pieces. Chocolate chips can work, but a flat piece of a chocolate bar melts more evenly and looks prettier on top.
Why do I have to bake the cups before adding anything?
That initial 4-minute bake “sets” the crust. It toasts the graham cracker crumbs slightly, giving them a deeper flavor and a firmer texture. If you skip this step and put the marshmallow in right away, the crumbs will stay soft and can become soggy from the marshmallow’s moisture during broiling. The pre-bake is your insurance for a crisp, delicious base.
How do I get a perfect, even toast on the marshmallows?
The key is the broiler rack position. Place your oven rack in the position that puts the muffin pan about 5-6 inches from the broiler element. Too close, and they’ll burn instantly; too far, and they’ll just melt. Also, make sure your marshmallow halves are placed cut-side down and are centered so they toast evenly all around.
Can I freeze Smores Cookie Cups?
I don’t recommend freezing the fully assembled cups, as the marshmallow texture becomes very odd after thawing. However, you can freeze the baked and cooled graham cracker cups (without toppings) in a single layer in an airtight container for up to a month. Thaw at room temperature, then add marshmallows and broil as if they were fresh.
What’s the best way to crush graham crackers?
You have a few easy options! Place whole crackers in a zip-top bag and roll over them with a rolling pin until you have fine crumbs. You can also pulse them in a food processor. For the quickest method, just buy a box of pre-crushed graham cracker crumbs from the baking aisle. Any of these methods works perfectly.
My chocolate isn’t melting enough from the residual heat. Help!
This can happen if your marshmallows cooled too much before you added the chocolate, or if your kitchen is quite cool. The fix is simple: after placing the chocolate piece on top, return the entire pan to the warm (but turned off) oven for just 60 seconds. The gentle ambient heat will soften everything beautifully without over-cooking.
Can I make these in a regular-sized muffin pan?
You can, but they will be quite large! You’ll need to double or triple the amount of crust mixture per cup and use a whole marshmallow (or two halves). The baking time for the crust will also need to increase slightly, likely to 6-8 minutes. Watch them closely. They become more of a shareable, open-faced s’mores tart.
Are these safe for people with nut allergies?
The recipe as written is naturally nut-free. However, you must always check the labels of your specific ingredients. Some graham cracker brands may be processed in facilities with nuts. Hershey’s milk chocolate bars are generally nut-free, but again, check the label. To be safe, choose brands that clearly state they are made in a nut-free facility.
Go Make Some Sweet Memories
So there you have it! My foolproof guide to making the most adorable, delicious, and easy Smores Cookie Cups. They really do capture the fun of a campfire in a single, neat little bite. I hope this recipe becomes a favorite in your home, creating as many sweet memories and happy faces as it has in mine. Now, go preheat that oven and get ready for the compliments to roll in. You’ve got this!
Garlic Butter Steak Bites
Ingredients
Equipment
Method
- Preheat the oven to 350°F (175°C) and spray a mini muffin pan with non-stick cooking spray.
- In a medium bowl, combine graham cracker crumbs and powdered sugar. Pour melted butter on top and mix until it resembles wet sand.
- Scoop a heaping tablespoon of the mixture into each muffin cup and press firmly to form a cup shape.
- Bake for 4 minutes until edges are golden brown.
- While baking, cut each marshmallow in half crosswise.
- Place one marshmallow half, cut-side down, in each cup immediately after baking.
- Switch the oven to broil and broil for 1-2 minutes until marshmallows are golden brown.
- Remove from the oven and place one piece of chocolate on top of each marshmallow. Let cool for about 15 minutes before serving.