I’ll never forget the first time I brought mini lemon cheesecake bites to my sister’s baby shower. Within minutes, the entire plate was empty. People kept asking me for the recipe, and one guest even snuck back to the kitchen hoping to find more. That’s the magic of these little treats. They’re small enough to pop in your mouth without feeling guilty, but packed with enough flavor to make you reach for another.
Welcome to your new favorite dessert! If you’ve been looking for a treat that works for literally any occasion, you’ve found it. Mini Lemon Cheesecake Bites are those rare desserts that fit perfectly at a fancy dinner party, a casual backyard barbecue, or even a Tuesday night when you just want something sweet. They look impressive but don’t require you to be a professional baker. The bright lemon flavor cuts through the rich creaminess of the cheesecake, creating a perfect balance that never feels too heavy.
These bite-sized desserts solve so many problems at once. No need for plates and forks at a party. No messy slicing of a full cheesecake. No worrying about portion control because they’re already the perfect size. Plus, they’re easy to make ahead and store in the fridge until you need them. I’m going to walk you through everything you need to know. We’ll cover the exact ingredients, the complete step-by-step process, and my favorite tips for making them look bakery-worthy and taste absolutely amazing.
Ingredients You’ll Need for Mini Lemon Cheesecake Bites
Let me break down what you’ll need to create these incredible treats. The ingredient list is surprisingly simple, which is one reason I love this recipe so much. You won’t need to hunt down any strange items at specialty stores.
For the Crust:
- 1 and 1/2 cups graham cracker crumbs (about 10-12 full crackers)
- 1/4 cup granulated sugar
- 6 tablespoons unsalted butter, melted
- Pinch of salt
For the Lemon Cheesecake Filling:
- 16 ounces cream cheese, softened to room temperature
- 2/3 cup granulated sugar
- 2 large eggs, room temperature
- 1/3 cup sour cream
- 1/4 cup fresh lemon juice
- 2 tablespoons lemon zest (about 2-3 lemons)
- 1 teaspoon vanilla extract
- 2 tablespoons all-purpose flour
For Optional Toppings:
- Fresh whipped cream
- Additional lemon zest
- Fresh berries
- Lemon curd
Now let’s talk about the star ingredient. Fresh lemons make all the difference in this recipe. I learned this the hard way after trying to use bottled lemon juice once. The result was flat and artificial tasting. Real lemons give you that bright, vibrant flavor that makes these bites special. When you zest the lemons, you release essential oils that pack even more lemony punch than the juice alone.
Here’s my tip for getting the most from your lemons: roll them firmly on the counter before cutting. This breaks down some of the membranes inside and helps release more juice. Room temperature lemons also yield more juice than cold ones straight from the fridge.
The lemon zest is critical. This is where so much of the lemon flavor lives. When you zest, only take the yellow part of the peel. The white pith underneath tastes bitter and will throw off your whole dessert. I use a microplane grater for the finest zest, but a regular grater works too if that’s what you have.
Let’s talk about cream cheese quality. I always use full-fat cream cheese blocks, not the whipped kind or low-fat versions. Those have different moisture contents and won’t give you the same creamy texture. Make sure your cream cheese is truly soft. I take mine out of the fridge at least an hour before baking. Cold cream cheese creates lumps that are really hard to smooth out.
The sour cream might seem like a small amount, but it adds tanginess and helps create that signature cheesecake texture. Some recipes skip it, but I think it’s important. Greek yogurt can work as a substitute if you’re in a pinch, though the flavor will be slightly different.
Graham crackers form the base of your crust. You can buy pre-made graham cracker crumbs to save time, or make your own by crushing whole crackers. I actually prefer crushing my own because the texture is better. I put the crackers in a sealed plastic bag and roll over them with a rolling pin. It takes maybe three minutes and gives you more control over how fine the crumbs are.
Room temperature eggs are important for the filling. Cold eggs don’t blend as smoothly into the cream cheese mixture. I usually set mine out when I take out the cream cheese. If you forget, you can place the eggs in a bowl of warm water for about five minutes to take the chill off.
The flour in the filling is a small but important addition. It helps stabilize the cheesecake and prevents cracking. Some recipes don’t include it, but I find it makes the texture more reliable, especially for beginners.
Quality matters with your butter too. I use unsalted butter so I can control the salt level in the crust. Salted butter can make the crust taste too salty depending on the brand.
One question I get asked all the time: What ingredients do I need to make mini lemon cheesecake bites? The answer is simple pantry staples plus fresh lemons. Nothing fancy or expensive. That’s part of why this recipe is so great. You probably have most of these items already, and the fresh lemons are easy to grab at any grocery store.
I like to prep all my ingredients before I start mixing. This is called mise en place, and it makes the actual baking process so much smoother. Measure everything out. Zest and juice your lemons. Let your dairy come to room temperature. Trust me, this preparation step saves time and stress later.
If you want to get creative, you can experiment with the crust. Vanilla wafers, shortbread cookies, or even gingersnaps make interesting alternatives to graham crackers. I’ve tried them all, and while graham crackers are my go-to, the other options add fun flavor twists.


Preparing the Crust
Now that you’ve got everything measured and ready, let’s get our hands dirty with the crust. This is honestly the easiest part of the whole recipe, though it sets the foundation for everything else.
Grab a medium mixing bowl and dump in your graham cracker crumbs. Add the sugar, that pinch of salt, and then pour in the melted butter. Here’s where it gets fun. Use a fork to stir everything together until the mixture looks like wet sand. You want every crumb coated with butter. The mixture should hold together when you squeeze it in your hand. If it’s too dry and crumbly, add another tablespoon of melted butter. If it seems too wet and greasy, sprinkle in a few more graham cracker crumbs.
I learned this trick from my grandmother who made the best pies: the crust mixture should feel like the sand you’d use to build a sandcastle at the beach. Not bone-dry sand, but that perfect damp sand that actually sticks together. That’s your goal here.
You’ll need a mini muffin tin for these bites. I prefer using a 24-cup tin, and I always line mine with paper liners. The liners make removing the finished cheesecakes so much easier. Without them, you’ll be doing a lot of careful prying with a knife, and nobody wants that stress. Plus, the liners make the bites look more professional if you’re serving them at a gathering.
Here comes the part that stumped me the first time I made these: getting the crust evenly distributed. How do I make the crust for mini lemon cheesecake bites? This question plagued me until I figured out my system. Spoon about a tablespoon of the crust mixture into each liner. Then here’s my secret weapon. I use the bottom of a small shot glass or the back of a rounded teaspoon to press down the crust. You want to press firmly but not so hard that you tear through the paper liner.
The key is to create a flat, compact base. Press straight down, then give the pressing tool a little twist. This creates an even surface and helps pack the crumbs tightly. Some people use a small tart tamper if they have one, but honestly, the shot glass method works perfectly and you probably already have one in your kitchen.
Make sure your crust layer is thin, about a quarter-inch thick. I made them too thick once and the ratio was all wrong. Too much crust overwhelms the delicate cheesecake filling. You want just enough to provide that satisfying crunch without dominating each bite.
Pop your prepared crusts into the freezer for about 10 minutes while you make the filling. This firms them up and helps them hold their shape when you pour in the wet filling. It’s a small step that makes a big difference. Similar to how the crust works in my Strawberry Shortcake Dessert Cups, that firm base keeps everything stable and delicious.
By the way, if you don’t have a mini muffin tin, regular muffin tins work too. You’ll just get fewer, larger cheesecake bites. Adjust your baking time by adding about 5-7 minutes since they’ll be thicker. The process stays exactly the same otherwise.
Making the Filling
Alright, this is where the magic happens. The filling transforms simple ingredients into that creamy, tangy perfection we’re after.
Start with your softened cream cheese. I cannot stress this enough: it needs to be truly soft. When I say room temperature, I mean you should be able to press your finger into it easily. Cold cream cheese is the enemy of a smooth cream cheese mixture. It creates lumps that no amount of mixing will fully eliminate. Trust me, I’ve tried.
Add your cream cheese to a large mixing bowl. I use my stand mixer with the paddle attachment, but a hand mixer works great too. Beat the cream cheese on medium speed for about two minutes. You’re trying to make it completely smooth and fluffy before adding anything else. This step is crucial. It’s like warming up before exercise. You’re preparing the cream cheese to accept the other ingredients without forming lumps.
Add your sugar next and beat for another minute or two. The mixture should look lighter in color and very creamy. Scrape down the sides of the bowl with a spatula. Ingredients love to hide up there and create lumps later if you don’t incorporate them now.
Here’s the thing about making cheesecake filling: you want to mix thoroughly but not overmix. Too much mixing incorporates air, which can cause cracks when baking. So mix until smooth, but don’t go crazy with it.
Add your eggs one at a time, mixing on low speed after each addition. Just mix until each egg disappears into the batter. Stop the mixer and scrape down the bowl between eggs. This ensures everything combines evenly. The mixture might look slightly curdled after the first egg, but don’t panic. It’ll smooth out once you add the second egg and the sour cream.
Now pour in your sour cream, fresh lemon juice, and vanilla extract. Add that lemon zest and the flour. Mix on low speed until everything just comes together. The batter should be smooth, pale yellow, and smell absolutely incredible. That fresh lemon scent is what we’re after.
Funny enough, I once had someone ask me, Can I use a different type of cheese for the filling? Technically, yes, but why would you want to? The whole point of cheesecake is cream cheese. That said, I’ve experimented with adding a bit of mascarpone cheese mixed with the cream cheese, which creates an even richer texture. Use about 4 ounces of mascarpone and reduce the cream cheese to 12 ounces. It’s delicious but definitely more decadent.
Some people try using Neufchâtel cheese thinking it’s similar to cream cheese. While it’ll work in a pinch, the texture won’t be quite as rich and creamy. Ricotta is too grainy. Cottage cheese is absolutely not going to work. Stick with regular, full-fat cream cheese blocks for the best results.
The consistency of your filling should be thick but pourable, similar to a thick pancake batter. If it seems too thin, that’s usually fine. It’ll firm up as it bakes. If it’s too thick and doesn’t pour easily, you might have overmeasured the flour. You can thin it slightly with a tablespoon of milk or cream, but usually it’s not necessary.
Once your filling is ready, retrieve your chilled crusts from the freezer. Use a spoon or a small measuring cup to portion the filling into each cup. Fill them almost to the top, leaving just a tiny bit of space. The filling will puff slightly as it bakes, then settle as it cools. I learned this after overfilling them once and having little cheesecake mountains that deflated into weird shapes. Not cute.
If you love working with creamy desserts like this, you might also enjoy my Peanut Butter Chocolate Lava Cake, which has a similarly luxurious texture that people go crazy for.
A little trick I picked up: tap your muffin tin gently on the counter a few times after filling. This releases any air bubbles trapped in the filling. Air bubbles can create little holes in your finished cheesecakes, which doesn’t affect the taste but can mess with the appearance if you’re trying to impress someone.
The filling process reminds me a bit of making cookie dough, like when I prepare my Soft Baked Oatmeal Chocolate Chip Cookies. That same attention to ingredient temperature and mixing technique makes all the difference in the final result.
Your mini cheesecakes are now ready for the oven. The hard part is over. Actually, was any of it really hard? I don’t think so. This recipe is forgiving and straightforward, which is exactly why it’s become one of my most-requested desserts. Unlike complex desserts such as Triple Chocolate Brownies that require precise chocolate tempering, these cheesecake bites are much more beginner-friendly while still delivering impressive results.


Baking and Cooling
Preheat your oven to 325°F. This temperature is important because cheesecakes are delicate. Too hot and they’ll crack or get that weird rubbery texture. Too cool and they won’t set properly. I’ve found that 325°F is the sweet spot for these mini versions.
Place your filled muffin tin on the middle rack of your oven. The middle rack provides the most even heat distribution. I learned this after baking a batch on the top rack once and ending up with browned tops and undercooked centers. Not my finest moment.
Now for the question everyone asks: How long should I bake the mini lemon cheesecake bites? The baking time is typically 12-15 minutes. But here’s where it gets tricky. You’re not looking for them to be completely firm. That’s actually a sign they’re overbaked. Instead, watch for the edges to look set while the centers still have a slight jiggle when you gently shake the pan. Think of how jello moves when you wiggle it, but much more subtle.
The centers will look slightly underdone, almost glossy. That’s exactly what you want. The cheesecakes will continue cooking from residual heat after you remove them from the oven. This is called carryover cooking, and it’s your secret weapon against dry, cracked cheesecakes.
Every oven is different, though. Mine runs a bit hot, so I always check at the 11-minute mark. Yours might take the full 15 minutes. Start checking around 12 minutes and trust your eyes. You’ll know they’re done when the edges are puffed slightly and set, and when you touch the top gently with your finger, it doesn’t stick or feel liquid.
Here’s something crucial: don’t open the oven door repeatedly to check on them. Each time you open it, the temperature drops and then spikes back up when you close it. These temperature fluctuations are one of the main causes of cracking. Set a timer for 12 minutes, check once, and make your decision.
When they’re done, turn off the oven but don’t remove the cheesecakes yet. Crack the oven door open about an inch and let them sit there for 10 minutes. This gradual temperature decrease is gentler on the delicate custard and significantly reduces the chance of cracks forming. I picked up this trick from a professional baker friend, and it changed my cheesecake game completely.
After those 10 minutes in the cooling oven, remove the pan and place it on a wire cooling rack. Let them sit at room temperature for about 30 minutes. They’ll still be quite soft at this point, which is normal. Resist the urge to touch them or try to remove them from the tin. Patience is key here.
Once they’ve cooled to room temperature, transfer the entire muffin tin to your refrigerator. This is the best way to cool them down properly and achieve that perfect cheesecake texture. Let them chill for at least 3 hours, though overnight is even better. The cold helps them firm up beautifully and allows the flavors to meld together.
The cooling process might seem excessive, but it’s absolutely necessary. I rushed this once for a last-minute party and ended up with cheesecakes that were too soft and fell apart when I tried to remove them from the liners. Not pretty. Now I always give myself plenty of time.
During the cooling phase, you might notice a few tiny cracks. Don’t stress about it. Small surface cracks are normal and honestly, once you add toppings, nobody will even notice. If you’re really bothered by them, a thin layer of lemon curd spread on top covers any imperfections perfectly.
By the way, the refrigeration time isn’t just about texture. The flavors actually deepen and improve after sitting in the cold. The lemon becomes more pronounced, and the whole dessert tastes more cohesive. It’s similar to how some soups taste better the next day after the flavors have had time to develop.
Decorating and Serving
This is where you get to make these little bites look as amazing as they taste. The beauty of mini desserts is that even simple decorations make a big impact.
My go-to topping is fresh whipped cream topping. You can use store-bought whipped cream from a can for convenience, but homemade whipped cream takes these to another level. To make it, beat one cup of heavy cream with two tablespoons of powdered sugar and a splash of vanilla extract until stiff peaks form. It takes maybe three minutes with a hand mixer and tastes so much better than anything from a can.
Pipe the whipped cream on top using a piping bag fitted with a star tip for a professional look. If you don’t have piping equipment, just dollop a spoonful on each bite using a regular spoon. The rustic look is charming too. I actually prefer it sometimes because it feels more homemade and authentic.
A twist of fresh lemon zest on top of the whipped cream adds a pop of color and tells people immediately what flavor they’re about to enjoy. Use a vegetable peeler to create long, elegant strips of zest, or use your microplane for fine shreds that look like little yellow confetti.
Fresh berries are another fantastic option. A single blueberry, raspberry, or small strawberry slice perched on top looks beautiful and adds a complementary flavor. Berries and lemon are best friends in the dessert world. The tartness of the berries plays perfectly with the tangy lemon.
For something extra special, drizzle a little lemon curd over each bite just before serving. You can buy good quality lemon curd at most grocery stores, or make your own if you’re feeling ambitious. The glossy yellow drizzle looks gorgeous and intensifies the lemon flavor. I sometimes thin the lemon curd with a teaspoon of water to make it easier to drizzle.
Edible flowers like pansies or violas make these bites look absolutely stunning for fancy occasions. I used them for a bridal shower once and people were taking photos before they ate them. You can find edible flowers at specialty grocery stores or farmers markets. Just make sure they’re actually labeled as edible and haven’t been treated with pesticides.
A dusting of powdered sugar through a fine mesh strainer creates a beautiful, simple finish. This works especially well if you’re serving them on a dark colored plate. The contrast is striking.
Some people ask me about adding food coloring to make them more colorful. Honestly, I think the natural pale yellow color is perfect and looks elegant. But if you’re making these for a kids’ party or a themed event, a drop or two of yellow food coloring in the filling will brighten them up.
Now, about serving: How should I serve mini lemon cheesecake bites? Always serve them cold, straight from the refrigerator. The texture is best when they’re chilled. I usually take them out of the fridge about 5-10 minutes before serving so they’re not ice-cold, which allows the flavors to be more pronounced. But they should still be quite cold to the touch.
Remove them from the muffin tin carefully. If you used paper liners like I suggested, they should lift right out. You can leave the liners on for serving, which makes them easier for guests to grab, or peel the liners off for a cleaner presentation on a serving platter.
When arranging them on a platter, I like to stagger them in rows rather than lining them up in a grid. It looks more natural and appealing. A white platter really makes the yellow color pop, but any serving dish works fine.
If you’re serving these at a party where food will be sitting out for a while, keep them refrigerated and bring out small batches at a time. Cheesecake can sit at room temperature for up to two hours safely, but texture-wise, they’re better kept cold. This is especially important during warm weather or if you’re serving outdoors.
Here’s a presentation trick I love: serve them on a bed of fresh lemon slices. Cut thin lemon rounds and arrange them on your platter, then place the cheesecake bites on top. It looks professional and clearly communicates the flavor. Plus, it’s an easy way to fill space on a large platter if you don’t have enough bites.
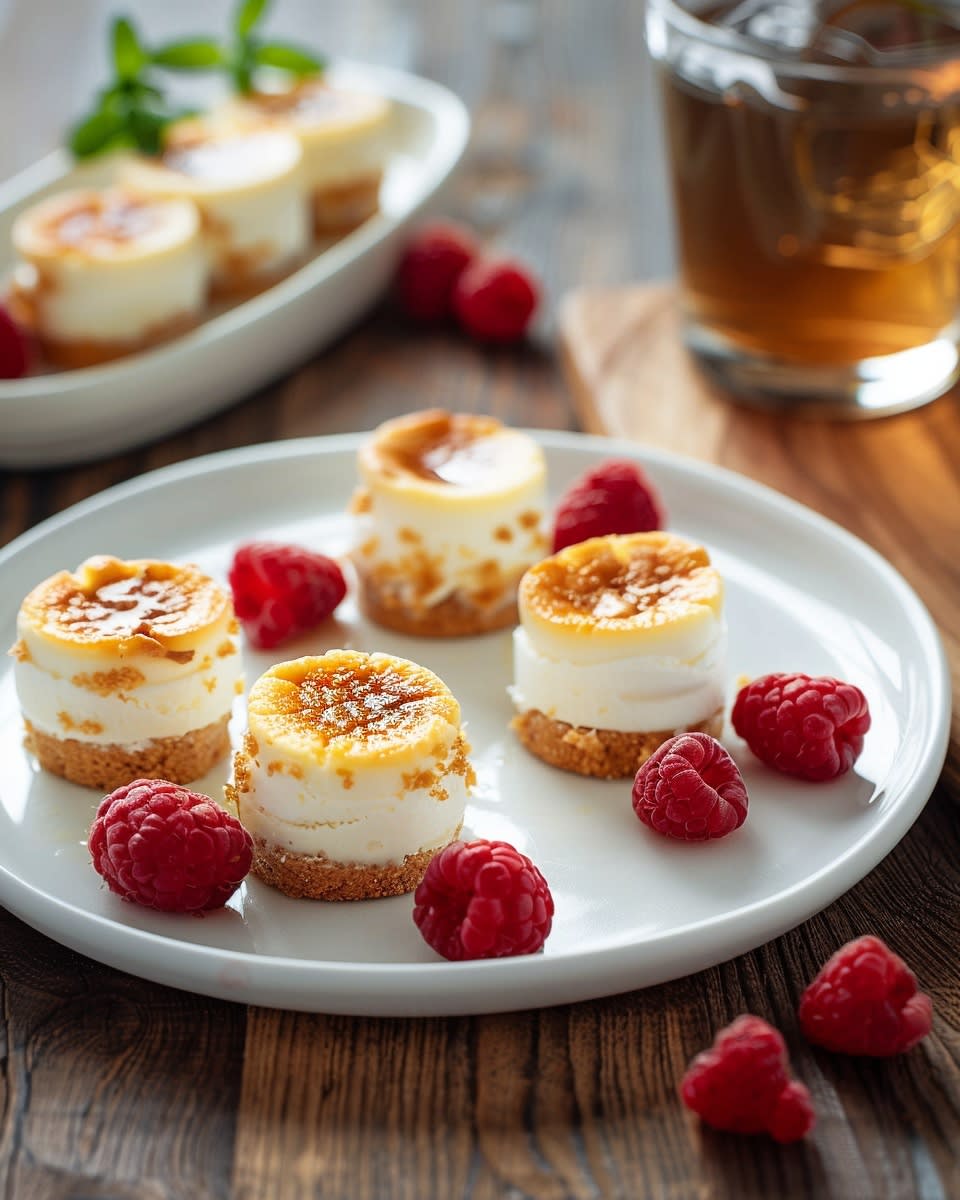
For individual plating at a sit-down dinner, I place two or three bites on each small dessert plate with a mint sprig and maybe a few fresh berries scattered around. A small fork on the side makes it feel fancy, even though these are totally finger-food appropriate.
Funny enough, I’ve noticed people eat these in two distinct ways. Some pop the whole thing in their mouth in one bite. Others take small nibbles to make them last longer. There’s no wrong way. The perfect size means both approaches work great.
If you’re bringing these to a potluck or party, transport them in the muffin tin covered with plastic wrap. Once you arrive, transfer them to your serving platter. This keeps them secure during travel and prevents any decoration mishaps.
Speaking of food safety, keeping ingredients separate and avoiding cross contamination is important when preparing any dessert, especially ones with dairy products. Always use clean utensils and keep your workspace organized to maintain the best quality.
The flavor of these bites is bright and refreshing, which makes them perfect for spring and summer events. But honestly, I serve them year-round because that burst of lemon sunshine is welcome anytime. They work beautifully after a heavy meal because they’re light enough to satisfy a sweet craving without making you feel stuffed.
One last serving suggestion: pair these with hot tea or coffee. The warmth of the beverage contrasts beautifully with the cold, creamy cheesecake. I particularly love them with Earl Grey tea because the bergamot in the tea complements the lemon flavor. But regular black coffee or even a latte works wonderfully too.
I’ve found that these cheesecake bites appeal to almost everyone. People who say they don’t like cheesecake often change their minds after trying these because they’re not heavy or overly rich. The lemon keeps everything balanced and fresh-tasting. And people who love traditional cheesecake appreciate the convenience of the bite-sized format.
If you enjoy exploring different dessert recipes like I do, you’ll find that mastering techniques like proper cooling and simple decorating applies to so many other treats you might want to try.
Whether you’re making these mini lemon cheesecake bites for a special occasion or just because it’s Tuesday and you deserve something delicious, they’re guaranteed to bring smiles. The combination of that buttery crust, creamy tangy filling, and bright lemon flavor creates something truly special. Every time I make them, I’m reminded why they’ve become such a staple in my baking rotation. They’re simple enough for any day but impressive enough for your fanciest gathering. Give them a try, and I promise you’ll be adding them to your regular dessert lineup too.
FAQs
How many mini lemon cheesecake bites does this recipe make?
This recipe makes 24 mini cheesecake bites when using a standard 24-cup mini muffin tin. If you use a regular-sized muffin tin, you’ll get about 12 larger cheesecake bites instead. The ingredient amounts stay the same either way, you’re just redistributing the portions. I find 24 minis to be perfect for parties because people can try one without commitment, then easily grab a second or third. The yield is pretty consistent as long as you don’t overfill or underfill your muffin cups.
Can I freeze the mini lemon cheesecake bites?
Absolutely! These freeze beautifully for up to three months. Once they’re completely chilled and set, place them in a single layer in an airtight container with parchment paper between layers. I recommend freezing them without toppings and adding whipped cream or garnishes after thawing. To thaw, transfer them to the refrigerator overnight. Never thaw at room temperature because the texture can get weird and watery. I actually keep a stash in my freezer for unexpected guests or random dessert emergencies.
What can I use if I don’t have a mini muffin tin?
You have several options here. Regular muffin tins work perfectly, you’ll just get fewer, larger bites and need to add about 5-7 minutes to the baking time. Silicone muffin molds are another great option and make removal super easy. You could even use small ramekins or oven-safe cups if you only have a few. Some people successfully use ice cube trays for truly tiny bites, though getting them out can be tricky. Just make sure whatever you use is oven-safe up to 325°F and ideally has a non-stick surface or can accommodate paper liners.
How far in advance can I make these?
You can make these up to three days ahead of serving, which is one of my favorite things about this recipe. Keep them covered in the refrigerator and add any toppings like whipped cream or berries just before serving. The texture and flavor actually improve after a day or two in the fridge as everything sets and melds together. If you’re making them more than three days ahead, I’d recommend freezing them instead. They stay fresh frozen for months, while refrigerated ones start losing their optimal texture after about four days.
Are there any substitutes for the graham cracker crust?
Definitely! Vanilla wafer cookies crushed up make a sweeter, more delicate crust that works wonderfully. Shortbread cookies create a buttery, rich base that some people actually prefer. Gingersnaps add a spicy kick that pairs surprisingly well with lemon. For a gluten-free version, use gluten-free graham crackers or almond flour mixed with melted butter and a bit of sugar. I’ve even made these with crushed pretzels for a sweet-and-salty twist. The ratio stays the same regardless of which cookie or cracker you choose, about one and a half cups of crumbs.
Can I make these without eggs?
Eggs are pretty essential to the structure of cheesecake, but I’ve seen people successfully use egg substitutes. Commercial egg replacer products designed for baking work okay, though the texture won’t be quite as creamy. Some vegan bakers use a combination of cornstarch and non-dairy milk. Another option is aquafaba, the liquid from canned chickpeas, using three tablespoons per egg. I haven’t personally tested an egg-free version extensively, so there might be some trial and error involved. The filling might be slightly less firm and more prone to cracking without eggs.
Why did my cheesecakes crack on top?
Cracking usually happens from temperature shock or overbaking. The most common cause is baking them at too high a temperature or for too long. Another culprit is opening the oven door repeatedly, which creates temperature fluctuations. Overmixing the batter incorporates too much air, which expands during baking and can cause cracks. Not allowing them to cool gradually is another issue, which is why I always turn off the oven and let them sit with the door cracked. Small hairline cracks are pretty normal and don’t affect taste at all, so try not to stress too much about them.
Can I use bottled lemon juice instead of fresh?
You technically can, but I really don’t recommend it. Fresh lemon juice has a bright, vibrant flavor that bottled juice just can’t match. Bottled lemon juice often has a slightly bitter, artificial taste that becomes really noticeable in a lemon-forward dessert like this. The fresh lemon zest is even more important because that’s where so much of the essential lemon oil and flavor lives. If you absolutely have to use bottled juice in a pinch, use it for the liquid portion, but still try to add fresh zest. The difference in the final flavor is honestly night and day.
Do I really need the sour cream in the filling?
The sour cream adds tanginess and creates a smoother, creamier texture, so I definitely recommend it. It also helps prevent the cheesecakes from being too dense. That said, if you don’t have sour cream, Greek yogurt makes a decent substitute, though the flavor will be slightly different. Regular yogurt is too thin and watery. Some people use an extra couple tablespoons of cream cheese instead, which works but makes the bites richer and heavier. You could also try crème fraîche if you have it, which is similar to sour cream but slightly less tangy.
What’s the best way to get smooth cream cheese without lumps?
The absolute key is starting with room temperature cream cheese. Take it out of the fridge at least an hour before you plan to bake, or even the night before. Cold cream cheese will create lumps that are nearly impossible to eliminate. Beat the cream cheese by itself for a minute or two before adding anything else, which helps break down any lumps from the start. If you forgot to soften it and need to speed things up, cut the cream cheese into small cubes and let it sit while you prepare everything else. Microwaving it works in emergencies, but be very careful because it can easily get too soft or melt unevenly.
Ingredients
Equipment
Method
- Mélangez le lait, la crème épaisse, le mélange de gâteau rouge velours, la poudre de cacao et l'extrait de vanille dans un mixeur pendant 30 à 45 secondes jusqu'à ce que le mélange soit lisse.
- Versez le mélange dans un pichet ou un bol et réfrigérez pendant au moins 30 minutes.
- Mélangez à nouveau le mélange refroidi et versez-le avec précaution dans des verres à shot, en les remplissant aux trois quarts.
- Garnissez chaque shot de crème fouettée et saupoudrez de sucre rouge ou de mini pépites de chocolat.
- Servez immédiatement et savourez!