Is There Anything Cozier?
Is there anything cozier than the smell of pumpkin and spices wafting through your kitchen? Every time I bake this Pumpkin Crisp, my family magically appears, drawn by the warm, comforting aroma. It’s become our favorite fall tradition, and I’m so excited to share it with you! This dessert is the love child of a creamy pumpkin pie and a buttery, crunchy crisp. It’s incredibly easy and always earns rave reviews.
The Story Behind Pumpkin Crisp
Pumpkin Crisp is a beloved American dessert with roots in classic pumpkin pie. I first discovered it at a church potluck years ago. A sweet lady brought it, and I just had to have the recipe. Since then, I’ve made it my own, tweaking it for countless family gatherings. It represents the best of modern, easy baking. It takes traditional fall flavors and gives them a fun, crunchy twist that everyone adores.
Why You’ll Love This Pumpkin Crisp Recipe
You will love this recipe for its sheer simplicity and amazing taste. It comes together in minutes with mostly pantry staples. The contrast between the smooth, spiced pumpkin filling and the crunchy, nutty topping is pure magic. It feels fancy but requires almost no effort. This pumpkin dessert is a guaranteed crowd-pleaser that will have people asking for seconds.
Perfect Occasions to Prepare Pumpkin Crisp
This Pumpkin Crisp shines at so many events! It’s a star at Thanksgiving dinner, either alongside or instead of pumpkin pie. It’s perfect for autumn potlucks, cozy Sunday suppers, or Halloween parties. I also love making it for casual friendsgiving gatherings. Anytime you want to spread a little warmth and sweetness, this is the recipe to turn to.
Ingredients for Your Pumpkin Crisp
Here’s what you’ll need to make this delicious dessert:
- 1 can (15 oz) pumpkin puree
- 1 cup granulated sugar
- 1/2 cup brown sugar
- 3 large eggs
- 1 cup evaporated milk
- 1 teaspoon vanilla extract
- 1 tablespoon pumpkin pie spice
- 1 box yellow cake mix
- 1 cup chopped pecans
- 1/2 cup unsalted butter, melted
Handy Substitution Options
Don’t have every ingredient? No worries! Here are some easy swaps:
- Pumpkin puree: Use homemade puree for a fresh touch.
- Evaporated milk: Half-and-half or whole milk works, but the filling may be less rich.
- Pecans: Try walnuts, almonds, or omit nuts entirely.
- Yellow cake mix: Spice cake mix adds extra warmth.
- Butter: Salted butter is fine; just skip adding extra salt.
How to Make Pumpkin Crisp: Step-by-Step
Step 1: Preheat and Prepare Your Pan
Start by preheating your oven to 350°F (175°C). Grease a 9×13-inch baking dish well. I use butter or cooking spray for this. This simple step prevents sticking and ensures easy cleanup. A well-greased pan is the secret to a crisp that slides out beautifully. It sets the stage for a perfect dessert.
Step 2: Mix the Pumpkin Filling
Grab a large mixing bowl. Combine the pumpkin puree, both sugars, eggs, evaporated milk, vanilla, and pumpkin pie spice. Whisk it all together until perfectly smooth. Watch the color turn into a deep, inviting orange. The smell of the spices will already make your kitchen feel like fall. Pro tip: Use room temperature eggs for a smoother, more blended filling.
Step 3: Pour and Layer
Pour your smooth pumpkin mixture into the prepared dish. Spread it evenly with a spatula. Now, sprinkle the entire box of dry cake mix evenly over the top. Do not stir! Let it sit like a fluffy blanket. Next, evenly scatter the chopped pecans over the cake mix layer. This creates the wonderful layers that bake into magic.
Step 4: Drizzle with Butter and Bake
Slowly drizzle the melted butter all over the top. Try to cover as much surface area as you can. This buttery shower is what creates that irresistible, golden crispy topping. Place the dish in the oven. Bake for 50 to 60 minutes. The top will become a gorgeous golden brown. The filling should be set with a slight jiggle in the center. Chef’s tip: For deeper flavor, toast your pecans in a dry pan before chopping.
Step 5: Cool and Serve
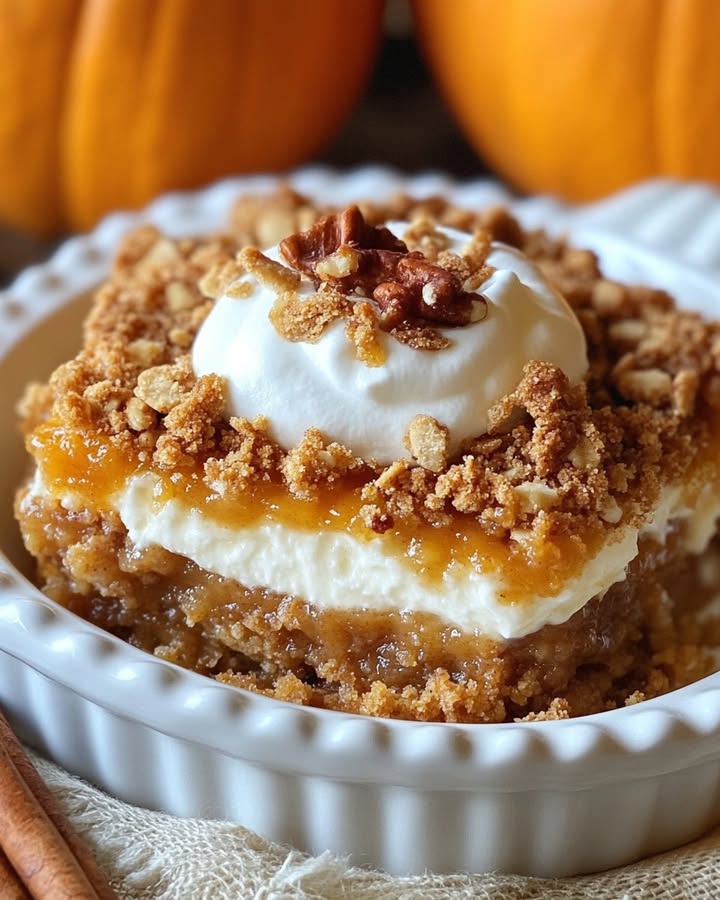
Take the crisp out of the oven. Let it cool on a rack for at least 15 minutes. This resting time lets the filling set for cleaner slices. Serve it warm for the best experience. I always add a scoop of vanilla ice cream or a dollop of whipped cream. The contrast of warm spice and cool cream is absolutely divine.
Timing Your Pumpkin Crisp Perfectly
This recipe is wonderfully quick. Here’s the breakdown:
- Prep Time: 15 minutes
- Cooking Time: 60 minutes
- Total Time: 1 hour 15 minutes
You can have a homemade dessert ready in just over an hour. Most of that time is hands-off baking. You can relax or prepare the rest of your meal while it cooks.
My Chef’s Secret for the Best Pumpkin Crisp
My secret is all in the rest. Let the baked crisp sit for 15-20 minutes before cutting. This allows the filling to firm up perfectly. It makes serving much neater. The flavors also have time to meld together beautifully. Patience here makes every bite even better.
A Fun Fact About Pumpkin Crisp
Pumpkin is a nutritional powerhouse! It’s full of vitamin A and fiber. So while this is a treat, you get a tiny health boost too. The spices like cinnamon and nutghum. The spices like cinnamon and nutmeg have been used since ancient times. They were treasured for both flavor and preservation.
Necessary Equipment for Pumpkin Crisp
You don’t need fancy tools. Here’s my simple list:
- A 9×13-inch baking dish
- Large mixing bowl
- Whisk or electric mixer
- Measuring cups and spoons
- Spatula for spreading
How to Store Your Pumpkin Crisp
Let the crisp cool completely to room temperature first. This prevents condensation from making the topping soggy. Then, cover the baking dish tightly with plastic wrap or aluminum foil. You can also transfer portions to an airtight container. This keeps it fresh and safe.
Store the covered crisp in the refrigerator. It will stay delicious for up to 4 days. The cold helps preserve the texture and prevents spoilage. The topping may soften a bit, but the flavor will still be wonderful.
To reheat, place a portion in the microwave for 20-30 seconds. For a crisper topping, use a toaster oven at 300°F for about 10 minutes. I don’t recommend freezing the baked crisp. The topping often becomes mushy when thawed.
Tips and Advice for Pumpkin Crisp Perfection
Keep these pointers in mind for the best results:
- Use pure pumpkin puree, not pumpkin pie filling. They are different products.
- Ensure your baking dish is the correct 9×13 size for even cooking.
- Check for doneness with a knife near the edge. It should come out clean.
- For a richer taste, use dark brown sugar instead of light.
Presentation Tips for a Stunning Dessert
Make your Pumpkin Crisp look amazing with these ideas:
- Serve in individual bowls or ramekins for a personal touch.
- Top with extra pecans and a light dusting of powdered sugar.
- Garnish with a cinnamon stick or a fresh mint leaf.
- Drizzle with caramel or maple syrup for extra indulgence.
Healthier Alternative Recipes for Pumpkin Crisp
Want a lighter version? Try these six tasty twists:
- Reduced-Sugar Pumpkin Crisp: Use a sugar substitute like stevia. Cut the amount by half. The filling stays sweet and satisfying.
- Gluten-Free Pumpkin Crisp: Swap the cake mix for a gluten-free blend. A mix of oats and almond flour also works well.
- Dairy-Free Pumpkin Crisp: Use coconut milk instead of evaporated milk. Choose a dairy-free butter alternative. The flavor is subtly different but great.
- Nut-Free Pumpkin Crisp: Skip the pecans. Add rolled oats or sunflower seeds for a crunchy topping.
- Whole Wheat Pumpkin Crisp: Use a whole wheat cake mix. Or make a topping with whole wheat flour, oats, and a little sugar.
- Mini Pumpkin Crisps: Bake in a muffin tin for portion control. Reduce baking time to 25-30 minutes. Perfect for kids!
Common Mistakes to Avoid When Making Pumpkin Crisp
Mistake 1: Using Pumpkin Pie Filling Instead of Puree
This mix-up happens often. Pumpkin pie filling has added sugar and spices. Pure pumpkin puree is just pumpkin. Using the filling will make your crisp too sweet and spiced. Always check the can label to get the right one. Your dessert flavor and texture depend on it.
Mistake 2: Not Greasing the Baking Dish
Skipping this step leads to a sticky disaster. The sugary pumpkin layer can fuse to the dish. This makes serving messy and cleaning hard. Take a moment to grease the dish well with butter or spray. This simple act guarantees easy release and happy serving.
Mistake 3: Stirring the Cake Mix Into the Filling
The recipe says to sprinkle the cake mix on top. Do not stir it in! Stirring mixes the layers and ruins the crisp topping. The dry mix needs to sit on top to absorb the butter and become crunchy. Trust the process and leave the layers separate.
Mistake 4: Overbaking or Underbaking
Ovens vary, so timing is key. Overbaking dries out the filling and can burn the nuts. Underbaking leaves a runny, unset center. Start checking at 50 minutes. The top should be golden brown. The filling should be set with a slight jiggle. A knife inserted near the edge should come out clean.
Mistake 5: Skipping the Cooling Time
It’s tempting to eat it right away. Serving it too hot causes it to fall apart. The filling needs time to set as it cools. Let it rest for 15-20 minutes after baking. This firms up the crisp for neat slices. The flavors also improve during this short wait.
Frequently Asked Questions About Pumpkin Crisp
Can I make Pumpkin Crisp ahead of time?
Yes, you can prepare it ahead. Assemble the crisp completely in the baking dish. Cover it tightly with plastic wrap. Refrigerate for up to 24 hours before baking. When ready, let it sit at room temperature for 20 minutes. Then bake as directed. You might need a few extra minutes in the oven since it’s cold. This is a huge time-saver for holidays.
Can I freeze Pumpkin Crisp?
Freezing the fully baked crisp is not ideal. The topping loses its crunch and becomes soggy upon thawing. You can freeze the unbaked assembled crisp. Wrap the dish very well in plastic and foil. Freeze for up to 1 month. Bake from frozen, adding 15-20 minutes to the bake time. Check for doneness as usual.
What can I use instead of evaporated milk?
You can use half-and-half or whole milk in a pinch. The filling will be slightly less rich and creamy. For a closer substitute, make your own. Simmer 2 ¼ cups of regular milk until it reduces to 1 cup. Let it cool before using. For a dairy-free option, canned coconut milk works beautifully and adds a subtle flavor.
How do I know when the Pumpkin Crisp is done baking?
The crisp is done when the topping is a deep, even golden brown. The filling should be set around the edges. The center may have a slight jiggle but should not look liquid. You can test by inserting a knife near the edge. It should come out clean. If the top browns too fast, loosely tent it with foil.
Can I use fresh pumpkin instead of canned?
Absolutely! Use about 2 cups of homemade pumpkin puree. Make sure it is thick and well-drained. Roast a sugar pumpkin, scoop the flesh, and blend until smooth. Let it cool completely before using. Fresh pumpkin has a lovely flavor. Canned puree is convenient and gives consistent results. Both are excellent choices.
Is Pumpkin Crisp served warm or cold?
Pumpkin Crisp is best served warm or at room temperature. The warmth emphasizes the spices and keeps the topping crisp. If served cold from the fridge, the topping softens. I recommend reheating leftovers gently. A quick warm-up in the microwave or oven brings back its cozy charm. Pair it with cold ice cream for contrast.
Can I omit the nuts in this recipe?
Yes, you can leave out the nuts completely. The recipe will still work perfectly. The crisp topping will come from the cake mix and butter. For added texture without nuts, try sprinkling rolled oats or shredded coconut on top. This makes the dessert safe for those with nut allergies. It remains delicious and satisfying.
What’s the difference between pumpkin crisp and pumpkin cobbler?
The terms are similar but have a small difference. A crisp usually has a streusel-like topping with oats or nuts. A cobbler has a biscuit or cake-like topping that is dropped on. This recipe uses a dry cake mix for a crunchy, crisp texture. So, it’s technically a crisp. Both are wonderful, comforting baked desserts.
How many servings does this recipe make?
This Pumpkin Crisp recipe makes about 12 generous servings. It’s ideal for feeding a crowd at a party or holiday meal. If you have a smaller group, you can easily halve the recipe. Use an 8×8-inch baking dish. Reduce the baking time to around 40-50 minutes. Keep an eye on it for doneness.
Can I use a different type of cake mix?
Yes, feel free to experiment! A spice cake mix enhances the warm fall flavors. A white cake mix keeps things classic and sweet. Even a chocolate cake mix creates a fun, decadent twist. Avoid cake mixes that include pudding in the mix. They can change the topping’s texture. The basic yellow mix is my favorite for balance.
Wrapping Up Your Pumpkin Crisp Adventure
I hope this recipe brings as much joy to your kitchen as it has to mine. Pumpkin Crisp is more than just a dessert. It’s a warm hug on a plate. It’s simple enough for weeknights and special enough for holidays. Give it a try, and don’t forget to share it with loved ones. Happy baking!
Banana Pudding Cheesecake
Ingredients
Equipment
Method
- Preheat your oven to 350°F (175°C) and grease a 9x13-inch baking dish.
- In a large mixing bowl, combine the pumpkin puree, both sugars, eggs, evaporated milk, vanilla, and pumpkin pie spice. Whisk until smooth.
- Pour the pumpkin mixture into the prepared dish and spread evenly. Sprinkle the dry cake mix evenly on top without stirring.
- Scatter the chopped pecans over the cake mix, then drizzle melted butter over the entire top.
- Bake for 50 to 60 minutes until the top is golden brown and the filling is set with a slight jiggle. Let cool for at least 15 minutes before serving.