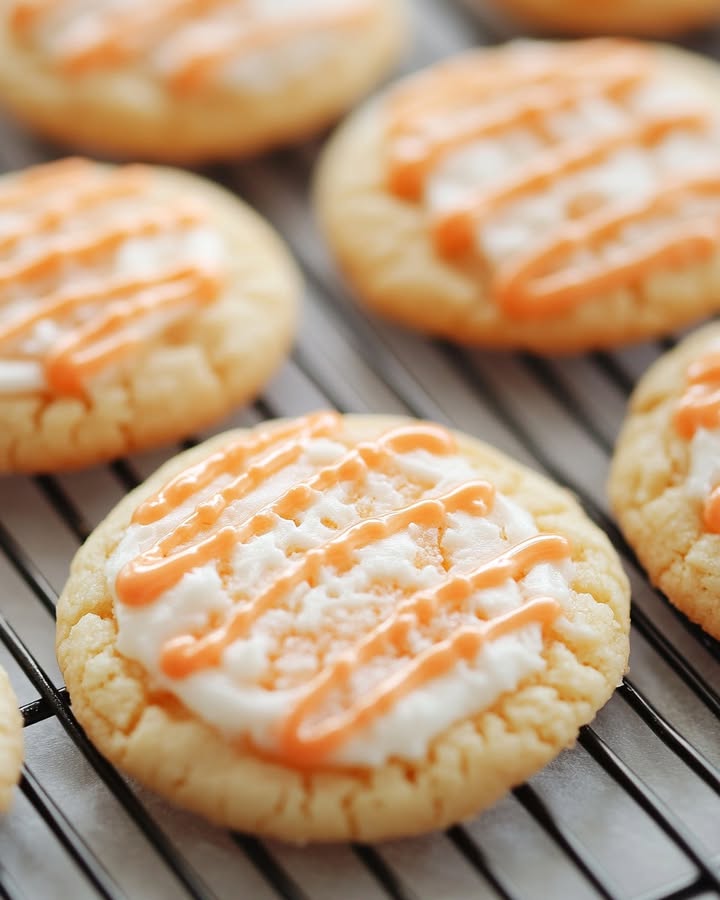
Sunshine in Every Bite: My Creamsicle Orange Cookies
You know that magical moment from childhood? The one where you’re happily licking a Creamsicle pop on a hot summer day, the sweet orange and creamy vanilla perfectly balanced. I wanted to capture that exact feeling in a cookie. After many delicious (and messy) kitchen experiments, I finally nailed it. These Creamsicle Orange Cookies are pure, edible joy. They taste like a hug from the sun and disappear faster than you can say “more, please!”
A Cookie Revolution: From Pop to Drop
The classic Creamsicle pop was invented way back in 1905. It’s been a staple of American summers for over a century. My mission was simple. I wanted to transform that frozen nostalgia into a soft, chewy, bake-sale worthy cookie. The traditional version is all about the orange shell and vanilla ice cream center. My modern, cookie-fied twist bakes those two iconic flavors right into every single bite. The secret weapons? A box of orange gelatin and a whole lot of zest. It’s a fun, foolproof recipe that honors a classic treat in a whole new way.
Why You’ll Fall in Love With This Creamsicle Cookie Recipe
Let me count the ways! First, the flavor is absolutely incredible. It’s a powerful punch of bright, sunny orange paired with sweet, mellow white chocolate. Second, it’s incredibly easy. Using a cake mix as the base keeps things simple and ensures perfect texture every single time. They are soft, slightly chewy, and have those beautifully crisp edges. Finally, they make your whole house smell like a happy memory. The aroma of baking orange and butter is downright magical. Trust me, your family will come running to the kitchen.
When to Bake a Batch of Sunshine
These cookies are the life of any party! They are perfect for:
- Summer picnics and barbecues: They’re the portable, no-melt alternative to the classic pop.
- Holiday cookie swaps, especially around Christmas (the orange color is so festive!).
- Lunchbox surprises that will make any day better.
- A simple “just because” gift for a neighbor or friend who needs cheering up.
- After-school snacks paired with a cold glass of milk.
Gathering Your Creamsicle Cookie Ingredients
Here’s what you’ll need to create this citrusy wonder:
- 1 box (15.25 ounces) white cake mix
- 1 box (3 ounces) orange jello powder (not prepared)
- 2 tablespoons fresh orange zest (from about one large orange)
- 8 tablespoons (1 stick) salted butter, softened
- 2 large eggs, at room temperature
- 1 package (11 ounces) white chocolate chips
Smart Swaps: Ingredient Substitutions
Don’t have everything on hand? No problem! Here are some easy swaps:
- Cake Mix: You can use a yellow cake mix for a slightly richer flavor. The cookies will be a bit more golden.
- Butter: If you only have unsalted butter, just add a pinch (about 1/4 teaspoon) of salt to the dry ingredients.
- White Chocolate Chips: Butterscotch or even semi-sweet chocolate chips are a delicious twist! For a citrus boost, try adding dried cranberries instead.
- Orange Jello: Sugar-free orange gelatin works just fine in this recipe.
Baking Your Dream Cookies: A Step-by-Step Guide
Step 1: Prep Your Kitchen Stage
First, let’s get our kitchen ready for the show. Preheat your oven to a nice 350°F (175°C). This gives it time to reach the perfect temperature while we make the dough. Now, line two large baking sheets with parchment paper or silicone baking mats. This little step is my best friend. It prevents sticking absolutely and makes cleanup a breeze. No more scrubbing pans! Get out your big mixing bowl and your hand mixer or stand mixer. We’re about to make some magic.
Step 2: The Dry Team Huddle
In your large bowl, combine the white cake mix, the orange jello powder, and the glorious orange zest. The zest is where the real, fresh orange flavor lives. Use your fingers to gently rub the zest into the dry mixes. This releases the fragrant orange oils. You’ll see little specks of bright orange and smell that incredible citrus aroma. This mixture will look like a cheerful, orange-dusted powder. Pro tip: Use a microplane zester for the best, finest zest without any bitter white pith.
Step 3: Bring in the Wet Ingredients
Now, add the softened butter and room-temperature eggs right into the bowl with your dry team. Why room temp? It helps everything blend together smoothly without overmixing. Use your mixer on a medium speed to beat this all together. Stop as soon as a soft, orange-colored dough forms. You might need to scrape down the sides of the bowl once. The dough will be thick and a little sticky, and the color will be a vibrant, creamy orange that promises great flavor.
Step 4: The Sweet Finale: White Chocolate
This is the “creamsicle” part! Pour the entire bag of white chocolate chips into the bowl. Put your mixer away for this step. Use a sturdy spatula or a big wooden spoon to fold the chips into the dough. Gently mix from the bottom up until the chips are evenly distributed. You’ll get beautiful pockets of creamy white speckled throughout the vibrant dough. The contrast is just gorgeous and hints at the deliciousness to come.
Step 5: Scoop and Roll for Perfection
Time to shape our cookies! I highly recommend using a 1-tablespoon sized cookie scoop. It gives you cookies that are all the same size, so they bake evenly. Scoop up the dough, then roll it quickly between your palms to form a neat ball. Place each dough ball on your prepared baking sheet, leaving about 2 inches of space between them. They need room to spread and become beautiful, puffy discs. You should get about 2 to 3 dozen cookies, depending on your scoop size.
Step 6: The Baking Transformation
Slide those trays into your preheated oven. Now, the hardest part: waiting! Bake for 10 to 13 minutes. You’re looking for set edges that are just starting to turn a light golden brown. The centers will still look soft and puffy. This is exactly what you want! They will finish setting as they cool. Chef’s tip: For the absolute best texture, take them out at the 11-minute mark and check. An extra minute can mean the difference between chewy and crisp.
Step 7: The Crucial Cool Down
When you pull the cookies out, they are still very delicate. Let them cool right on the baking sheet for a full 10 minutes. This allows them to firm up enough to move. Then, use a spatula to gently transfer them to a wire cooling rack. Let them cool completely there. This final step ensures the perfect soft and chewy texture all the way through. The smell in your kitchen will be absolutely amazing right now.
Time Commitment: From Bowl to Bliss
Let’s break down the clock for these orange creamsicle cookies:
- Prep Time: 15 minutes
- Cook Time: 12 minutes (per batch)
- Cooling Time: 30 minutes
- Total Time: About 1 hour
My Secret Weapon for the Best Orange Flavor
My number one secret is in the zest. Don’t just stop at the two tablespoons the recipe calls for. After you zest your orange, take that naked fruit and cut it in half. Right before you slide the cookies into the oven, give the baking sheets a quick, light spritz with the fresh-cut orange. The tiny mist of orange oil in the hot oven will infuse the cookies with an even brighter, more authentic citrus aroma as they bake. It’s a tiny step with a huge impact!
A Zesty Bit of Extra Info
Did you know the name “Creamsicle” is actually a brand name owned by Unilever? The generic term is “ice pop” or “popsicle,” but the creamy orange-and-vanilla combo is so iconic that “creamsicle” is often used to describe anything with that flavor profile. Our cookies are carrying on a delicious, century-old tradition of flavor pairing!
Tools You’ll Need for Creamsicle Cookie Success
- Large mixing bowl
- Hand mixer or stand mixer
- Microplane or fine grater (for zesting)
- Spatula
- 1-tablespoon cookie scoop (optional but helpful)
- 2 large baking sheets
- Parchment paper or silicone baking mats
- Wire cooling rack
Storing Your Citrusy Treasures
Once your creamsicle orange cookies are completely cool, it’s storage time. The best place for them is in an airtight container at room temperature. I like to use a cookie tin or a glass container with a tight seal. Layer them between sheets of parchment paper if you’re stacking them. Stored this way, they will stay soft and delicious for up to 5 days.
Thinking ahead? These cookies freeze like a dream! Place the cooled cookies in a single layer on a baking sheet and freeze them solid. This is called “flash freezing.” Once frozen, you can transfer them to a freezer-safe bag or container. They won’t stick together. They will keep their amazing flavor and texture for up to 3 months.
When you get a cookie craving, just take out what you need. Let them thaw at room temperature for about an hour. They’ll taste just as wonderful as the day you baked them. You can also pop a frozen cookie straight into your lunchbox – it will be thawed and perfect by your morning break.
Tips for Cookie Perfection, Every Time
- Room Temperature is Key: Seriously, let that butter and those eggs sit out! It creates a smoother dough and a better cookie texture.
- Don’t Overmix: Once the dough comes together, stop mixing. Overworking it can make cookies tough.
- Underbake Slightly: Take them out when the edges are set but the centers look soft. They continue to bake on the hot tray.
- Quality Chips Matter: A good brand of white chocolate chips will taste creamier and melt better in the cookie.
Presenting Your Creamsicle Masterpiece
Make these cookies look as amazing as they taste! Try these ideas:
- Stack them on a bright, vintage plate for a fun, retro look.
- Drizzle melted white chocolate over the cooled cookies and sprinkle with extra orange zest.
- Package them in a clear cellophane bag tied with a orange ribbon for a lovely gift.
- Serve them on a platter with a bowl of vanilla ice cream for an over-the-top dessert.
6 Fun Variations on the Creamsicle Cookie Theme
Love the base recipe? Get creative with these spins!
- Lemon Creamsicle Cookies: Swap the orange jello and zest for lemon. Use yellow cake mix for a super sunny look.
- Cranberry Orange Cookies: Replace the white chocolate chips with dried cranberries for a tangy, festive twist.
- Creamsicle Sandwich Cookies: Bake smaller cookies and sandwich vanilla frosting or ice cream between two of them.
- Gluten-Free Creamsicle Cookies: Use a certified gluten-free white cake mix. All other ingredients are typically gluten-free, but always check labels.
- Dark Chocolate Orange Cookies: Use dark chocolate chips instead of white chocolate for a richer, more grown-up flavor combo.
- Creamsicle Thumbprint Cookies: Before baking, press your thumb into each dough ball and fill the indent with a dab of orange marmalade.
Common Mistakes to Avoid With Your Creamsicle Cookies
Mistake 1: Using Cold Butter and Eggs
This is the biggest culprit for dense cookies. Cold butter won’t cream properly into the dry mix. It can create a greasy, separated dough. Cold eggs can also cause the batter to curdle slightly. Always plan ahead. Take your butter and eggs out of the fridge at least 30 minutes before you start baking. Your dough will come together quickly and smoothly, leading to a much better cookie texture.
Mistake 2: Overbaking the Cookies
We want soft, chewy centers, not crisp hockey pinks! It’s easy to think they need more time because the centers look soft. But cookies continue to bake and set from the residual heat on the baking sheet. The perfect time to take them out is when the edges are lightly golden and set, but the centers still look puffy and soft. They will firm up perfectly as they cool. Set a timer and check early.
Mistake 3: Skipping the Parchment Paper
It might seem like an extra step, but it’s non-negotiable for perfect cookies. Baking directly on a bare pan can cause the bottoms to brown too fast or even burn. It also makes cleanup a huge hassle. Parchment paper or a silicone mat guarantees even baking and easy release every single time. It’s the best insurance policy for a perfect batch.
Mistake 4: Zesting the White Pith
The bright orange part of the peel (the zest) is packed with flavorful oils. The white part underneath (the pith) is very bitter. If you grate too deep, you’ll get that bitter taste in your cookies. Use a light hand with a microplane. Gently grate just the surface of the orange. Stop as soon as you see white. Your cookies will have a pure, sweet orange flavor without any bitterness.
Your Creamsicle Orange Cookie Questions, Answered
Can I make these cookies without a mixer?
Yes, you absolutely can! It will just require a bit more elbow grease. Make sure your butter is very soft. Use a sturdy wooden spoon or a firm spatula to mash the butter into the dry ingredients first. Then, add the eggs and mix vigorously until a thick dough forms. It might take a few minutes of good stirring, but it’s totally doable. Just mix until everything is combined, and then fold in the chips by hand.
Why did my cookies come out flat?
Flat cookies are usually caused by butter that is too warm or melted. If your kitchen is very hot, your dough balls might spread too much before they set in the oven. Another cause could be using a baking sheet that is still warm from a previous batch. Always use cool baking sheets. If your dough seems overly soft, you can pop the shaped dough balls on the tray in the fridge for 15 minutes before baking. This helps them hold their shape.
Can I use sugar-free cake mix and jello?
You can experiment with sugar-free products, but the results will be different. Sugar-free cake mixes often have different textures and may require more or less liquid. The cookies might not spread the same way or have the same chewy texture. If you try it, be prepared for a slightly different, but likely still tasty, outcome. The flavor from the sugar-free orange jello should still come through nicely.
My white chocolate chips sank to the bottom. How do I prevent that?
This happens if the dough is too soft or warm. First, ensure your dough is thick, not runny. If it seems too soft after mixing, you can chill it for 20-30 minutes before scooping. Also, make sure you are using proper white chocolate chips, not vanilla baking melts. Chips are formulated to hold their shape better. Finally, when you fold them in, coat them thoroughly in the dough. This helps them stay suspended during baking.
Can I double this recipe?
Of course! This recipe doubles very easily. Just make sure you are using a bowl large enough to hold all the ingredients. You may need to mix in two batches if your mixer bowl is small. Also, remember you will need to bake in more batches, so have extra parchment paper ready. Use cool baking sheets for each batch to prevent spreading.
How do I get more intense orange flavor?
For a stronger orange punch, you have a couple of options. First, you can add 1/2 teaspoon of pure orange extract to the dough with the wet ingredients. Second, you can increase the orange zest to 3 tablespoons. Just make sure you have large, fragrant oranges to get that much zest. The fresh zest is where the magic is, so don’t be shy!
Can I use an orange cake mix instead of white?
You can, but it changes the recipe a lot. An orange cake mix already has flavoring and color. If you add the orange jello and zest to that, the cookies might become overwhelmingly orange in an artificial way. They will also be much darker in color. For the classic creamsicle balance of orange and vanilla, sticking with the white cake mix is your best bet.
Are these cookies soft or crunchy?
When baked correctly, these cookies are perfectly soft and chewy in the center with slightly crisp edges. The secret is the slight underbaking. If you prefer a crunchier cookie all the way through, you can bake them for 1-2 minutes longer. Watch them closely, as they can go from chewy to crisp very quickly. Follow the visual cues (set edges, soft center) for the chewy texture.
What can I use instead of white chocolate chips?
Feel free to get creative! Butterscotch chips are a fantastic match with orange. Semi-sweet or dark chocolate chips create a classic “chocolate orange” flavor. For a fruitier cookie, try dried cranberries, cherries, or even chopped dried apricots. You could also use a mix of white chocolate and macadamia nuts for a more decadent treat.
Can I make the dough ahead of time and bake later?
Yes, this dough is great for make-ahead baking. After you scoop the dough into balls, place them on a tray and freeze them solid. Once frozen, transfer the balls to a freezer bag. You can bake them straight from the freezer! Just add 1-2 extra minutes to the baking time. This means you can have fresh, warm cookies anytime a craving strikes with almost no effort.
The Final Scoop on These Dreamy Cookies
If you’re looking for a cookie that brings a smile to every face, this is it. These Creamsicle Orange Cookies are my go-to recipe for spreading a little sunshine. They are easy, reliable, and taste like pure happiness. That first bite, with its burst of citrus and melt-in-your-mouth white chocolate, is simply unbeatable. So preheat that oven, zest that orange, and get ready for your kitchen to smell like summer. Don’t be surprised if this becomes your most requested recipe. Now, go bake some joy!
Cajun Garlic Bowties
Ingredients
Equipment
Method
- Preheat your oven to 350°F (175°C) and line two large baking sheets with parchment paper or silicone mats.
- In a large bowl, combine the white cake mix, orange jello powder, and orange zest, gently rubbing the zest into the dry mixes.
- Add the softened butter and room-temperature eggs to the bowl, mixing on medium speed until a soft dough forms.
- Pour the white chocolate chips into the dough and fold them in using a spatula.
- Use a 1-tablespoon cookie scoop to shape the dough into balls and place them on the prepared baking sheets, leaving space between each.
- Bake the cookies for 10 to 13 minutes until the edges are lightly golden and the centers look soft.
- Let the cookies cool on the baking sheet for 10 minutes before transferring them to a wire cooling rack to cool completely.