When Fall Baking Meets Effortless Magic
Picture this: you’re standing in your kitchen on a crisp autumn afternoon, craving something warm and comforting. Your schedule is packed. You need dessert in an hour. The last thing you want is to pull out a stand mixer or measure fifteen different ingredients. This is exactly when I reach for my Caramel Apple Dump Cake recipe.
I discovered this recipe three years ago during a chaotic Thanksgiving weekend. My sister called to say she was bringing twelve extra guests. I needed a dessert that looked impressive but wouldn’t keep me in the kitchen for hours. A friend mentioned dump cakes, and I thought she was joking. The name alone sounded questionable. But I tried it anyway, and the result changed my entire approach to last-minute baking.
The beauty of this dessert lies in its simplicity. You literally dump ingredients into a pan and bake. No mixing bowls. No electric beaters. No stress. The combination of tender apples, gooey caramel, and buttery cake topping creates something that tastes like you spent all day baking. Guests always ask for the recipe, and they never believe me when I explain how easy it is.
In this guide, I’ll walk you through everything you need to know about making the perfect caramel apple dump cake. You’ll learn the basic method, discover creative variations, and pick up tips that guarantee success every time. Whether you want to make it in your oven, try a caramel apple dump cake crockpot version, or experiment with a caramel apple dump cake dutch oven for camping trips, I’ve got you covered.
What is a Caramel Apple Dump Cake?
Let me clear up any confusion right away. A dump cake is not a traditional cake. It’s a dessert that uses cake mix as a topping rather than mixing it with eggs, oil, and water. The process is ridiculously simple. You layer fruit filling in a baking dish, sprinkle dry cake mix on top, add butter, and bake. The cake mix transforms into a crispy, golden crust while the fruit below becomes hot and bubbly.
Traditional cakes require precise measurements and careful mixing. You need to cream butter and sugar, fold in flour gently, and worry about over-mixing. One mistake can ruin the whole thing. Dump cakes throw all those rules out the window. The forgiving nature of this dessert makes it perfect for beginners or anyone who wants great results without the fuss.
The name “dump cake” comes from the method, not the taste. You dump the ingredients into the pan in layers. That’s it. No stirring required. When people search for 12 tomatoes caramel apple dump cake or sassy mama caramel apple dump cake, they’re looking for these easy variations that food bloggers have made popular over the years.
The Key Ingredients That Make It Work
Every caramel apple dump cake starts with a few basic components. The foundation is apple pie filling, which provides the fruit layer. You can use canned filling for convenience or make an apple dump cake from scratch using fresh apples. I’ve done both many times, and each version has its place.
The caramel element comes next. Some recipes use caramel sauce drizzled over the apples. Others incorporate caramel bits mixed into the fruit layer. I prefer using both for maximum caramel flavor. The sweetness balances perfectly with the tart apples.
Yellow cake mix forms the topping. Spice cake also works beautifully and adds extra warmth to the flavor profile. You sprinkle the dry mix directly from the box over the apple layer. This creates a crumbly, cookie-like texture when baked.
Butter is the final crucial ingredient. You cut cold butter into thin slices and arrange them over the cake mix. As everything bakes, the butter melts down through the dry mix, creating pockets of crispy, golden deliciousness. This is what separates a good dump cake from a great one.
Why the Caramel Apple Combination Works So Well
Apples and caramel have been partners for generations. Think about caramel apples at fall festivals or caramel apple pie at holiday dinners. The pairing works because caramel’s rich sweetness enhances apple’s natural tartness. Neither flavor overpowers the other.
When you bake these ingredients together in dump cake form, something magical happens. The apples soften and release their juices. The caramel melts and mingles with those juices, creating a sauce that soaks into the cake layer above. Every bite delivers multiple textures and complementary flavors.
The warm spices typically found in apple desserts also play well with caramel. Cinnamon, nutmeg, and allspice add depth without complicating the recipe. You can add these spices to the apple layer or choose a spice cake mix for the topping.
How It Differs From Other Dump Cakes
You might wonder what makes a caramel apple dump cake different from other dump cakes. The answer lies in the ingredient combination and flavor profile. While cherry dump cake or peach dump cake focus on single fruit flavors, the caramel apple version adds an extra layer of richness.
Some bakers experiment with combinations like apple pineapple dump cake, which brings tropical sweetness to the mix. Others stick with classics. The caramel apple version stands out because it captures everything we love about fall baking in one simple dish.
The preparation method for making a fresh apple dump cake from scratch differs slightly from using canned filling. Fresh apples need to be peeled, sliced, and tossed with sugar and spices before layering. This extra step takes maybe ten minutes but delivers incredible flavor and texture. The apples maintain a slight firmness that canned versions can’t match.
If you browse caramel apple dump cake pinterest boards or check out caramel apple dump cake allrecipes, you’ll notice countless variations. Some add nuts for crunch. Others include oats in the topping. A few creative bakers drizzle cream cheese frosting over the finished cake. The basic method stays the same, but the possibilities for customization are endless.
I’ve made this dessert in different cooking vessels too. The standard oven method is foolproof. The caramel apple dump cake crockpot version works great when you need oven space for other dishes. The caramel apple dump cake dutch oven approach is my go-to for camping trips or backyard gatherings. Each method produces slightly different results, but all of them taste amazing.


Making Your First Caramel Apple Dump Cake: A Simple Step-by-Step Guide
Now that you understand what makes these desserts so special, let me walk you through making one yourself.
I still remember the first time I assembled this dessert. I kept thinking there had to be more to it. The process felt almost too easy. But that’s exactly the point. You’re about to discover that the best desserts don’t always require complicated techniques or fancy equipment.
Start by preheating your oven to 350 degrees Fahrenheit. While it heats up, grab a 9×13 inch baking dish. I don’t bother greasing mine because the butter we’ll add later prevents sticking, but you can lightly spray it if that makes you feel better.
Open two cans of apple pie filling and dump them directly into your baking dish. Spread them out evenly with a spoon. Here’s where you make your first important decision. If you’re using canned filling, look for brands that have large apple chunks rather than mushy pieces. The texture makes a huge difference in the final result.
Choosing the Right Apples for Maximum Flavor
Let’s talk about making a fresh apple dump cake from scratch because honestly, when I have the extra ten minutes, this is my preferred method. You’ll need about six to eight medium apples. The variety matters more than most people realize.
Granny Smith apples are my top choice. They hold their shape during baking and provide that tart flavor that balances the sweet caramel perfectly. Honeycrisp apples work beautifully too, though they cost more. I’ve also had great success mixing varieties. Try combining three Granny Smiths with three Galas for a flavor that’s complex and interesting.
Peel and slice your apples into quarter-inch pieces. Toss them in a bowl with half a cup of sugar, two tablespoons of flour, a teaspoon of cinnamon, and a quarter teaspoon of nutmeg. The flour helps thicken the juices that release during baking. This prevents your dump cake from turning into dump soup, which happened to me exactly once and I learned my lesson.
The Caramel Layer That Changes Everything
Once your apple layer is ready, it’s time for caramel. I use a combination approach that delivers maximum caramel flavor without overwhelming the apples. Drizzle about three-quarters of a cup of caramel sauce over the apple layer. Then scatter half a cup of caramel bits across the top.
You can find caramel bits in the baking aisle near the chocolate chips. They’re designed not to melt completely, which creates little pockets of concentrated caramel flavor throughout the dessert. If you can’t find them, chopped soft caramels work fine. Just unwrap them first. Nobody wants to bite into a piece of wrapper, trust me on this.
The quality of your caramel matters. I’ve used everything from homemade caramel sauce to store-brand squeeze bottles. Homemade tastes amazing but requires extra effort. For most occasions, a good quality jarred caramel sauce works perfectly. Ghirardelli makes an excellent one that doesn’t taste artificial.
Layering Technique That Guarantees Success
Here’s where people sometimes mess up. Take your box of yellow cake mix and sprinkle it evenly over the entire surface. Don’t dump it all in one spot. Don’t try to spread it with a spoon. Just shake it out of the box in a steady stream, moving your hand back and forth until you’ve covered every bit of the apple layer below.
The dry cake mix should completely hide the fruit. You shouldn’t see any caramel or apples peeking through. This creates a barrier that traps steam and allows the cake layer to form properly. When I first started making these, I thought leaving gaps would be fine. It wasn’t. Those gaps turned into soggy spots while the covered areas got crispy and perfect.
Now cut a stick of butter into thin slices. I’m talking about eight to ten slices per stick. Lay them across the top of the cake mix, spacing them out evenly. You want butter coverage across the whole surface. As it melts in the oven, it’ll spread and soak into the dry mix, but starting with good distribution helps tremendously.
Some recipes tell you to use melted butter and pour it over everything. I’ve tried it both ways many times, and sliced cold butter wins every single time. The melted butter method makes the topping more uniform, which sounds good in theory. But the cold butter creates varied textures as it melts unevenly, giving you crispy spots and softer spots that make each bite interesting.
Funny enough, this same technique works for other simple desserts too. The layering principle reminds me of how easy treats like chocolate peanut butter no-bake bars come together with minimal fuss but deliver maximum flavor.
Alternative Cooking Methods Worth Trying
The standard oven method takes about 45 to 50 minutes. You’ll know it’s done when the top turns golden brown and you can see the fruit bubbling around the edges. Let it cool for at least 15 minutes before serving. I know waiting is hard when your kitchen smells like a bakery, but cutting into it too soon makes a mess.
Can I use a crockpot to make a caramel apple dump cake? Absolutely, and I do this more often than you’d think. The caramel apple dump cake crockpot method is perfect for potlucks or when your oven is occupied with other dishes.
Layer everything the same way in a greased slow cooker. Use the same ingredient amounts as the oven version. Cook on high for about two and a half to three hours. The top won’t get as crispy as the oven version, but the flavors meld together beautifully and the texture stays incredibly moist. Place a kitchen towel under the lid to catch condensation. Otherwise water drips back onto your cake and makes it soggy.
I’ve also made a caramel apple dump cake dutch oven version during camping trips. My family goes camping every fall, and this dessert has become our tradition. The method differs slightly because you’re working with coals instead of controlled heat.
Prepare your dutch oven by lining it with parchment paper for easier cleanup. Layer ingredients as usual. Place the covered dutch oven on a bed of hot coals with more coals on the lid. The general rule is two-thirds of your heat should come from the top. For a 12-inch dutch oven, I use about 8 coals underneath and 16 on top. Cook for approximately 40 minutes, rotating the pot and lid every 15 minutes.
Exploring Popular Variations and Creative Twists
Once you’ve mastered the basic version, the fun really begins.
The 12 tomatoes caramel apple dump cake recipe gained popularity through their food video that went viral a couple years ago. Their version adds a cream cheese layer between the apples and cake mix. Beat eight ounces of softened cream cheese with half a cup of sugar and spread it over the caramel apple layer before adding the cake mix. This creates a cheesecake-like element that’s ridiculously good.
I tried this variation for my daughter’s birthday last year because she loves anything with cream cheese. The guests demolished it. Three people asked if I’d gone to culinary school. I didn’t mention that I’d assembled the whole thing while still in my pajamas.
The sassy mama caramel apple dump cake takes a different approach. This version incorporates chopped pecans or walnuts mixed with the cake mix layer. The nuts toast as everything bakes, adding a crunchy element that contrasts beautifully with the soft apples. Sprinkle about a cup of chopped nuts over the cake mix before adding the butter slices.
I prefer pecans because they have a buttery flavor that complements caramel. Walnuts work too, though they’re slightly more bitter. If anyone in your group has nut allergies, you can substitute with granola for that same textural contrast. Just use plain granola, not the kind loaded with dried fruit and chocolate chips.
Adding Unexpected Flavors That Work
By the way, if you’re feeling adventurous, try the apple pineapple dump cake variation. I was skeptical when a coworker first described this to me. Pineapple with apples? It sounded weird. But I tried it for a summer barbecue, and now I make it regularly during warmer months when I want something lighter.
Use one can of apple pie filling and one can of crushed pineapple, drained. Mix them together with the caramel sauce. The pineapple adds brightness and tropical notes that cut through the richness. It’s different enough to surprise people but still recognizable as comfort food.
For this version, I skip the caramel bits and use coconut flakes instead. Toast half a cup of coconut flakes and sprinkle them over the cake mix along with the butter. The coconut reinforces those tropical vibes. Serve it with coconut ice cream instead of vanilla, and people will think you’re some kind of dessert genius.
Here’s the thing about variations. You can browse caramel apple dump cake pinterest boards for hours and find hundreds of ideas. Some are brilliant. Others are unnecessarily complicated. The best variations stay true to the dump cake philosophy—they’re simple additions that create big flavor changes without requiring extra skills or equipment.
I’ve seen recipes that add multiple layers of different cake mixes, marshmallow fluff, candy bar pieces, and who knows what else. Those aren’t dump cakes anymore. They’re architectural projects. Don’t get me wrong, they probably taste great. But they defeat the whole purpose of this dessert, which is simplicity that delivers impressive results.
If you check out caramel apple dump cake allrecipes, you’ll find highly-rated versions with helpful reviews. Reading through comments teaches you what works and what doesn’t. Someone always mentions they substituted one ingredient or adjusted the baking time, and those real-world reports are incredibly valuable.
One variation I developed myself adds a streusel-style topping. Mix half a cup of flour, half a cup of brown sugar, and a teaspoon of cinnamon with the cake mix before sprinkling it over the apples. This creates an even crunchier top layer. It’s almost like combining a crumble topping with the traditional dump cake method.
For those who love combining chocolate and fruit desserts, the technique here isn’t unlike assembling simple layered treats such as peanut butter chocolate lava cake, where the magic happens as ingredients melt together during baking.
Another twist involves adding bourbon or rum to the caramel layer. Use about a quarter cup mixed into your caramel sauce. The alcohol cooks off but leaves behind a deep, complex flavor that makes people wonder what your secret ingredient is. I’ve served this version at adult gatherings where someone inevitably pulls me aside to demand the recipe.
You could also experiment with different cake mix flavors. Butter pecan cake mix brings nutty notes without needing actual nuts. Caramel cake mix doubles down on that flavor profile. I once used pumpkin spice cake mix during November, and it tasted like fall in dessert form. Sometimes simple ingredient swaps create completely new experiences.
The beauty of this dessert is how forgiving it is. Unlike delicate desserts such as mini lemon cheesecake bites that require precision, dump cakes welcome experimentation. If you want to throw in some dried cranberries with the apples, go for it. Thinking about adding a handful of oats like those soft baked oatmeal chocolate chip cookies for extra texture? Why not?
The worst that can happen is you create something that tastes slightly different than expected. And honestly, I’ve never had a dump cake failure that wasn’t still completely edible. That’s the magic of combining fruit, cake mix, butter, and heat. It’s almost impossible to truly mess it up.


Tips for Perfecting Your Caramel Apple Dump Cake
Let me share some hard-earned wisdom about getting this dessert absolutely perfect every single time.
Over the years, I’ve watched dozens of caramel apple dump cake video tutorials online, and I’ve spotted patterns in what works and what doesn’t. Some videos show finished products that look underwhelming, with pale toppings or watery fillings. Others showcase golden, bubbly perfection. The difference usually comes down to a few key techniques that nobody explicitly explains.
First, let’s talk about butter temperature. I mentioned using cold butter earlier, but here’s why it matters so much. Cold butter creates uneven melting patterns as it bakes. This sounds like a bad thing, right? Actually, those uneven spots produce varied textures across the top. Some areas get extra crispy while others stay slightly softer. This textural variety makes every forkful interesting.
If you use melted butter poured evenly over everything, you’ll get a uniform top layer. It’s fine, but it’s also boring. The whole surface has the same texture. You lose that element of surprise when you take a bite and hit a particularly crunchy spot. My neighbor once complained that her dump cake turned out too uniform, and when I asked about her method, she’d used melted butter. Problem solved.
Getting the Timing and Temperature Just Right
Temperature consistency matters more than most people realize. Set your oven to 350 degrees and let it fully preheat before you start. Putting a dump cake into a cold or insufficiently heated oven throws off the entire baking process. The butter doesn’t melt properly, and the cake mix doesn’t crisp up the way it should.
I use an oven thermometer because my oven runs about 15 degrees cooler than the dial indicates. Yours might run hot or cold too. Spending ten dollars on a thermometer saves countless mediocre desserts. Once I started using one, my baking success rate jumped dramatically.
Baking time varies based on your specific oven and the depth of your pan. The standard 45 to 50 minutes works for most 9×13 pans. But if you’re using a deeper dish, add another 10 to 15 minutes. Check for doneness by looking at the edges. You want vigorous bubbling fruit visible around the perimeter and a golden brown top that looks set rather than wet.
Here’s something I learned the hard way. Don’t open the oven door for the first 30 minutes. I know you want to peek. Everyone does. But opening the door releases heat and disrupts the baking process. The temperature drop prevents the top layer from forming properly. Wait until at least the 40-minute mark before checking on things.
Common Mistakes and How to Dodge Them
What are some common mistakes when making a caramel apple dump cake? I’ve made most of them myself, so let me save you the trouble.
The biggest mistake is not using enough butter. Some recipes call for just one stick, but I always use a stick and a half for a 9×13 pan. That extra half stick makes the difference between a slightly dry top and a perfectly moist, crispy layer. Don’t skimp here. This isn’t the place to cut calories. Save that for your salad at dinner.
Another common error is stirring or mixing the layers. I can’t stress this enough. Do not stir. The name “dump cake” means you dump ingredients in layers and leave them alone. Stirring combines everything into a weird, dense mixture that doesn’t bake correctly. Trust the process even though it feels wrong to leave dry cake mix sitting on top.
Using the wrong type of apples causes problems too. Soft varieties like Red Delicious turn to mush during baking. You end up with apple sauce instead of apple chunks. Stick with firm varieties that hold their shape. When I’m making a fresh apple dump cake from scratch, I always do the squeeze test at the store. The apple should feel rock solid, not give at all when you press it.
Funny enough, people also mess up by cutting the butter slices too thick. Those huge chunks don’t melt and distribute properly. You get butter pools in some spots and dry cake mix in others. Aim for quarter-inch thick slices, and space them out evenly. Think of it like placing tiles on a floor. You want coverage everywhere.
Serving Suggestions That Elevate the Experience
Presentation transforms this simple dessert into something special. Let the cake cool for 15 to 20 minutes after removing it from the oven. This cooling time lets everything set up slightly. Otherwise, you’re serving apple soup with cake chunks floating in it.
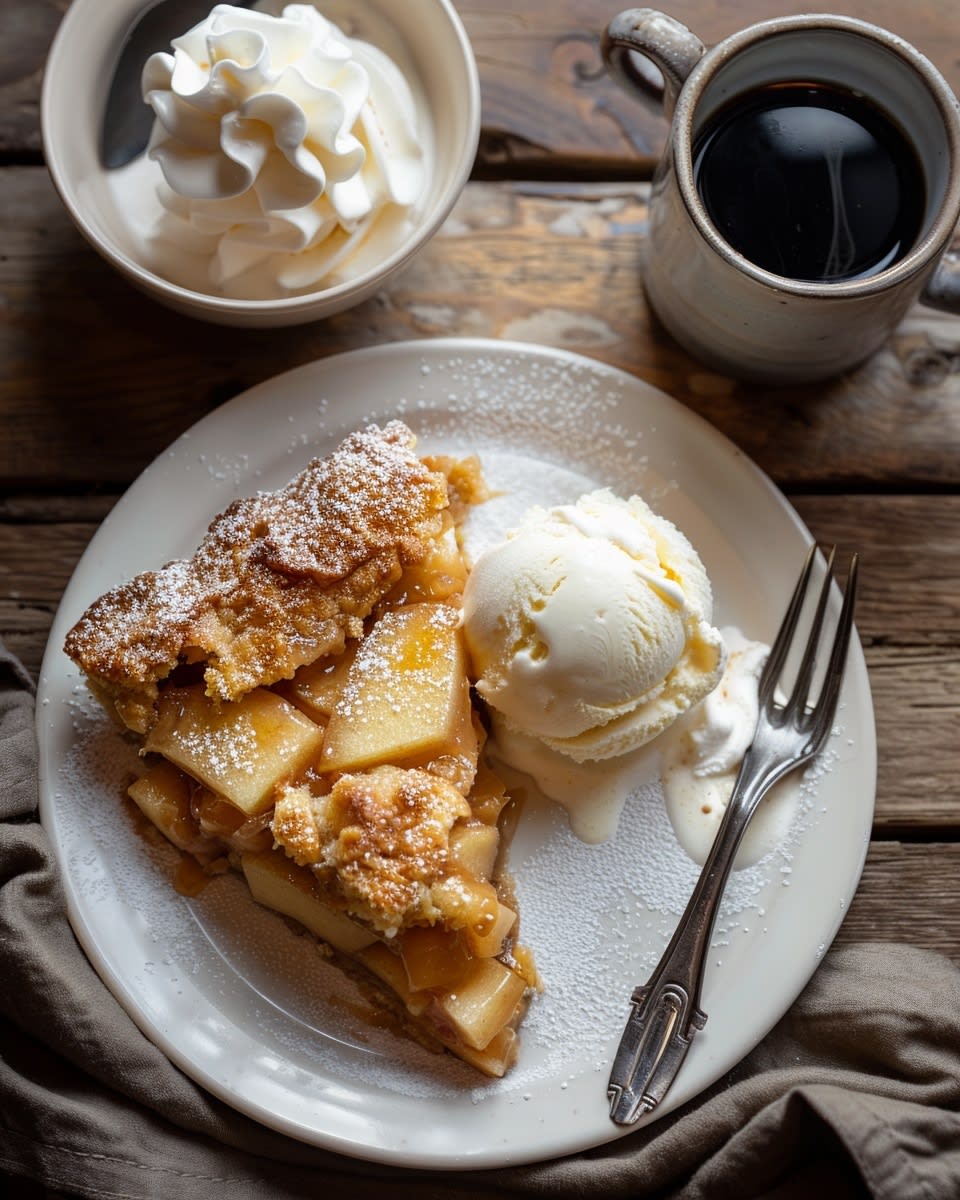
I always serve this warm with vanilla ice cream melting on top. The temperature contrast between hot cake and cold ice cream creates a wonderful sensation. The melting ice cream also adds creaminess that balances the crispy topping. Butter pecan ice cream works beautifully too, adding another layer of richness.
For a fancier presentation, drizzle extra caramel sauce over each serving. Sprinkle some sea salt on top of that caramel drizzle. The salt cuts through the sweetness and makes all the flavors pop. My father-in-law, who claims he doesn’t like dessert, always has two servings when I add the salted caramel drizzle.
Whipped cream is another excellent topping choice. Make your own if you have time. Beat heavy cream with a tablespoon of sugar and half a teaspoon of vanilla until soft peaks form. The homemade version tastes worlds better than the stuff from a can. Though honestly, at midnight when you’re stress-eating leftover dump cake straight from the pan, canned whipped cream works just fine. Not that I’ve ever done that.
By the way, this dessert reheats surprisingly well. Store leftovers covered in the refrigerator for up to four days. When you want another serving, microwave a portion for about 45 seconds. It won’t be quite as crispy as fresh from the oven, but it’s still delicious. I actually prefer cold dump cake straight from the fridge on hot summer mornings. It’s basically acceptable breakfast at that point, right?
If you’re bringing this to a gathering, transport it in the baking dish covered with foil. Bring the ice cream separately in a cooler. Some hosts worry about serving something this casual at formal events, but I’ve served dump cake at everything from backyard barbecues to graduation parties. Nobody has ever complained. Most people go back for seconds.
Storage and Make-Ahead Strategies
Can you prepare this in advance? Sort of. You can assemble all the layers in your pan, cover it tightly with plastic wrap, and refrigerate for up to 24 hours before baking. This strategy works great when you’re planning a big dinner and want to minimize last-minute kitchen time. Just remove it from the fridge while your oven preheats so it’s not ice cold going in.
Don’t try to bake it and then reheat it the next day for serving, though. The topping loses its crispness overnight. It becomes more like a soft cake layer than the crunchy crust we’re going for. If you do end up with leftovers that have lost their crunch, stick the whole pan under the broiler for two or three minutes. Watch it carefully so it doesn’t burn. This refreshes the top and brings back some of that crispy texture.
Following proper food preservation guidelines means refrigerating any leftovers within two hours of baking. Fruit desserts can develop bacteria if left at room temperature too long, especially in warm weather. I learned this lesson after a summer picnic where I left the dessert table out for five hours. Let’s just say nobody felt great the next day.
Freezing works okay for this dessert, though I rarely bother since it’s so quick to make fresh. If you do freeze it, let it cool completely first. Cut it into portions, wrap each piece individually in plastic wrap, then place them all in a freezer bag. They’ll keep for about two months. Thaw in the refrigerator overnight and reheat in the microwave or oven.
Adapting for Different Crowd Sizes
Need to feed a huge crowd? Double the recipe and use a large roasting pan. I did this for a church potluck that had over a hundred people. Made two full roasting pans. Both were empty within twenty minutes. For smaller gatherings, you can halve the recipe and use an 8×8 pan. Reduce the baking time to about 35 to 40 minutes.
Individual servings work great too. Divide the ingredients among six or eight ramekins. Layer everything the same way you would in a big pan. These mini versions bake in about 30 minutes and look adorable on a dessert table. Plus, everyone gets their own perfect ratio of topping to filling.
When I’m really trying to impress people, I serve the individual portions in small cast iron skillets. They retain heat beautifully and look rustic and charming. Top each one with a scoop of ice cream right before serving. Guests feel like they’re eating at a fancy restaurant, and you barely did anything more complicated than portioning ingredients.
Here’s the thing about perfecting this dessert. The baseline version is already so good that small improvements make dramatic differences. Adding that pinch of salt. Using high-quality caramel. Selecting the right apples. These details elevate something simple into something memorable.
I’ve been making variations of this cake for years now, and I’m still discovering little tweaks that improve it. That’s part of the fun. There’s no pressure to get it absolutely perfect because even a slightly imperfect dump cake tastes fantastic. But when you do nail all the details, you create something that people remember and request again and again.
If you enjoy exploring more simple yet impressive treats that bring joy to any gathering, browsing through other desserts might inspire your next baking adventure. Sometimes the most beloved recipes are the ones that don’t require culinary expertise, just a willingness to try something new.
The beauty of mastering these techniques is that they apply to all your future baking projects. Understanding how butter creates texture, why oven temperature matters, and which ingredients work together transfers to countless other recipes. You’re not just learning to make one dessert. You’re developing instincts that make you a better baker overall.
So go ahead and make your caramel apple dump cake with confidence. Trust the simple process. Enjoy the amazing results. And when someone asks for your secret, just smile and tell them it’s all about the dump.
Sharing the Joy of Simple, Delicious Baking
Making this dessert connects you to a tradition of home bakers who value flavor over fuss and results over complexity. Every time you serve this to someone, you’re sharing more than just a sweet treat. You’re offering comfort, creating memories, and proving that the best things in life don’t have to be complicated. Don’t wait for a special occasion. Make one this weekend and see how something this simple can bring so much happiness to your table.
Frequently Asked Questions
What makes a caramel apple dump cake different from other dump cakes?
The caramel element sets it apart from standard fruit dump cakes. While other versions focus on single fruit flavors like cherry or peach, the caramel apple combination brings extra richness and complexity. The caramel sauce and bits create pockets of intense sweetness throughout the dessert. This version also captures classic fall flavors that feel nostalgic and comforting. The combination of tart apples with sweet caramel has been a beloved pairing for generations, making this variation particularly popular during autumn months.
Can I use a crockpot to make a caramel apple dump cake?
Yes, the crockpot method works wonderfully and is perfect when your oven is busy. Layer ingredients the same way you would for oven baking in a greased slow cooker. Cook on high for two and a half to three hours until the edges bubble and the top looks set. Place a kitchen towel under the lid to absorb condensation that would otherwise drip back onto your cake. The texture won’t be quite as crispy as the oven version, but the flavors meld beautifully and the result stays incredibly moist. This method is ideal for potlucks and gatherings.
How can I add a twist to my caramel apple dump cake?
Try adding a cream cheese layer between the apples and cake mix for a cheesecake element. Mix chopped pecans or walnuts into the cake mix layer for extra crunch. Sprinkle coconut flakes over the top before adding butter for tropical notes. Use spice cake mix instead of yellow cake for deeper autumn flavors. Add a quarter cup of bourbon or rum to your caramel sauce for complex, grown-up flavor. You can also incorporate dried cranberries with the apples or use different apple varieties for varied sweetness levels.
What are some common mistakes when making a caramel apple dump cake?
Not using enough butter is the biggest mistake, leading to dry, uneven topping. Stirring the layers together ruins the distinct texture you’re trying to achieve. Using soft apple varieties results in mushy filling instead of distinct chunks. Opening the oven door too early releases heat and prevents proper crust formation. Cutting butter slices too thick creates uneven distribution and butter pools. Also, failing to fully preheat your oven throws off the entire baking process and affects texture development.
Can I make this with fresh apples instead of canned filling?
Absolutely, and the fresh version often tastes even better. Peel and slice six to eight firm apples like Granny Smith or Honeycrisp. Toss them with half a cup of sugar, two tablespoons of flour, and warm spices. The flour helps thicken the juices released during baking. Fresh apples maintain better texture than canned versions and allow you to control sweetness levels. This method adds about ten minutes to your prep time but delivers superior flavor and texture that’s worth the extra effort.
How do I know when my dump cake is done baking?
Look for vigorous bubbling around the edges where the fruit is visible. The top should be golden brown and look set rather than wet or doughy. The standard baking time is 45 to 50 minutes at 350 degrees, but ovens vary. Insert a knife into the cake layer, it should come out mostly clean with just fruit residue. The top should feel firm when gently pressed, not squishy. Let it cool for 15 to 20 minutes before serving so everything sets properly and doesn’t fall apart when scooped.
What’s the best way to store and reheat leftovers?
Cover the pan tightly and refrigerate leftovers for up to four days. Reheat individual portions in the microwave for 45 seconds to a minute. For larger amounts, reheat covered in a 350-degree oven for about 15 minutes. The topping won’t be as crispy as when freshly baked, but the flavor remains excellent. You can refresh the crispness by placing servings under the broiler for two minutes, watching carefully to prevent burning. Cold dump cake straight from the fridge is also delicious if you enjoy that texture.
Can I make this dessert in a dutch oven while camping?
Yes, the dutch oven method works great for outdoor cooking. Line your dutch oven with parchment paper for easier cleanup. Layer ingredients as you would for regular oven baking. Use about eight hot coals underneath and sixteen on top for a 12-inch dutch oven. Cook for approximately 40 minutes, rotating the pot and lid every 15 minutes for even heating. The outdoor version develops wonderful smoky notes and always impresses fellow campers. This has become my family’s traditional camping dessert every fall.
What should I serve with caramel apple dump cake?
Vanilla ice cream is the classic pairing, melting into the warm cake perfectly. Butter pecan ice cream adds extra richness that complements the caramel. Freshly whipped cream provides a lighter option that doesn’t compete with the flavors. Drizzle extra caramel sauce over individual servings and add a pinch of sea salt. Some people enjoy it with a dollop of mascarpone or Greek yogurt for tangy contrast. Coffee or hot apple cider make excellent beverage pairings that enhance the autumn flavors.
Can I prepare this dessert in advance?
You can assemble all the layers up to 24 hours before baking. Cover the pan tightly with plastic wrap and refrigerate until ready to bake. Remove it from the fridge while your oven preheats so it’s not ice cold going in. Don’t bake it a day ahead and try to reheat it for serving, as the topping loses its desirable crispness overnight. The make-ahead assembly method works perfectly for holiday dinners when you want to minimize last-minute kitchen work while still serving a fresh, warm dessert.
Ingredients
Equipment
Method
- Préchauffez votre four à 350°F (175°C).
- Ouvrez deux boîtes de garniture de tarte aux pommes et versez-les dans un plat de cuisson 9x13 pouces.
- (Si vous utilisez des pommes fraîches) Épluchez et tranchez 6 à 8 pommes Granny Smith, mélangez avec du sucre, de la farine, de la cannelle et de la muscade, puis étalez sur le plat de cuisson.
- Versez ¾ de tasse de sauce caramel sur la couche de pommes.
- Éparpillez ½ tasse de morceaux de caramel sur le mélange de pommes.
- Parsemez uniformément le mélange à gâteau jaune sec sur les pommes et le caramel sans remuer.
- Coupez le beurre froid en fines tranches et disposez-les sur le mélange à gâteau.
- Faites cuire dans le four préchauffé pendant 45 à 50 minutes jusqu'à ce que le dessus soit doré et que les fruits bouillonnent.
- Laissez refroidir pendant au moins 15 minutes avant de servir.