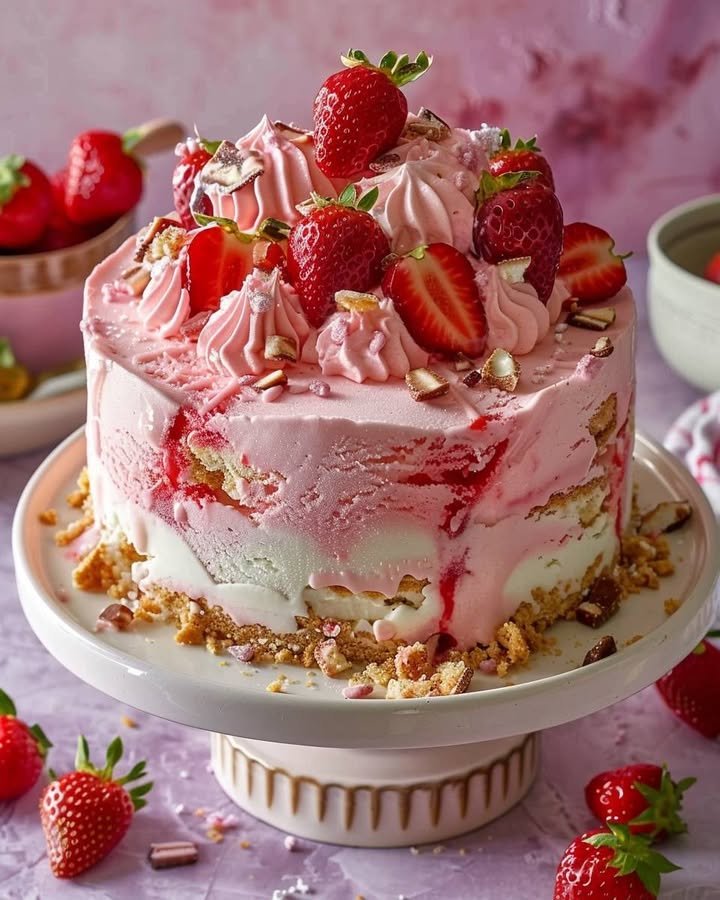
A Slice of Summer Bliss: The Strawberry Shortcake Ice Cream Cake
Is there anything better than the first juicy strawberry of the season? That sweet, sun-warmed flavor just screams summer. Now, imagine capturing that perfect taste in a stunning, frozen dessert that’s part cake, part ice cream, and all celebration. This Strawberry Shortcake Ice Cream Cake is my ultimate crowd-pleaser. It looks like you spent all day in the kitchen, but secretly, it’s a joyful assembly of simple, delicious layers. Every time I bring it out, the “oohs” and “aahs” make me smile. It’s the dessert I turn to for birthdays, barbecues, or when I just need a little pink-hued happiness on a plate.
From Picnics to Freezers: A Sweet History
The classic strawberry shortcake is an American icon, dating back to early colonists who adapted their biscuit-like “short cakes” with fresh local berries. Traditionally a simple, warm biscuit split and filled with macerated strawberries and cream, it was the star of summer socials and church suppers. My version is a playful, modern twist born from necessity—and a hot kitchen! One sweltering Fourth of July, I wanted that iconic flavor without heating the oven. I layered store-bought pound cake with buckets of strawberry ice cream and vanilla ice cream, stacked it high, and froze it solid. The result was an instant legend in our family. It honors the spirit of the original—sweet berries, tender cake, luscious cream—but delivers it in a cool, sliceable, make-ahead masterpiece perfect for today’s gatherings.
Why You’ll Fall in Love With This Ice Cream Cake
This cake is a dream for so many reasons! First, it’s incredibly forgiving. No fancy baking skills are needed. It’s an assemble-and-freeze project, perfect for involving little helpers. Second, it’s a make-ahead marvel. You can create this beauty days before your event, freeing up your time. Finally, it’s the perfect balance of textures and flavors. You get the soft, buttery crumb of pound cake, the bright berry burst of strawberries and strawberry ice cream, the smooth richness of vanilla ice cream, and a cloud of homemade whipped cream. It’s nostalgic, refreshing, and utterly impressive.
When to Serve This Showstopper
This cake isn’t just for birthdays! It’s the star of any warm-weather celebration. Picture it at a backyard barbecue, a baby or wedding shower (it’s so pretty in pink!), Mother’s Day brunch, or as the grand finale for a graduation party. I’ve even made a smaller version for a cozy girls’ night in. It brings a festive, cheerful vibe wherever it goes. Any occasion that calls for a touch of sweet, homemade magic is the right occasion for this cake.
What You’ll Need: The Ingredients List
- For the Cake Layers: 1 (about 16 oz) pound cake, prepared from a mix and cooled OR a store-bought loaf.
- For the Fruit Layer: 2 cups of fresh strawberries, sliced.
- For the Ice Cream Layers: 1.5 quarts of strawberry ice cream, softened. 1.5 quarts of vanilla ice cream, softened.
- For the Whipped Cream Frosting: 2 cups heavy cream, 1/4 cup powdered sugar, 1 teaspoon vanilla extract.
- For Garnish: More fresh strawberries and crumbled pound cake or shortbread cookies.
No Stress Substitutions
Don’t have exactly these ingredients? No problem! This recipe is wonderfully flexible.
- Pound Cake: Use a classic yellow cake, angel food cake, or even thick slices of sponge cake.
- Ice Cream: Swap vanilla for cheesecake or French vanilla ice cream. Try different berry ice creams like raspberry.
- Berries: Frozen and thawed strawberries work in a pinch. Blueberries or a mixed berry medley are delicious too.
- Garnish: Use store-bought whipped topping instead of making your own, or sprinkle with toasted almonds for crunch.
Crafting Your Masterpiece: The Step-by-Step Guide
Step 1: Preparing Your Stage
First, let’s get your pan ready. Take a 9-inch springform pan—the kind with a latch on the side—and line it with plastic wrap. Leave plenty of overhang on the sides; this will be your lifeline when it’s time to unmold the frozen cake. The plastic wrap prevents sticking and makes cleanup a breeze. If your pound cake is homemade or a single loaf, slice it horizontally into three even layers. This creates the perfect, uniform foundation for our ice cream strata.
Step 2: Building the First Frosty Tier
Place one layer of pound cake snugly in the bottom of your prepared pan. Now, grab your softened strawberry ice cream. “Softened” means spreadable, like thick frosting, not melted. Use a spatula to spread half of it evenly over the cake. The vibrant pink against the golden cake is gorgeous. Next, artfully arrange half of your fresh strawberry slices on top of the strawberry ice cream. They’ll add a fresh, juicy bite in every slice. Gently press them down just a touch so they stick.
Pro tip: To quickly soften ice cream, let it sit on the counter for 15-20 minutes. You can also microwave it in 10-second bursts, stirring between each.
Step 3: Adding the Center Layer
Carefully place the second layer of pound cake right on top of the strawberry-studded ice cream. Press down lightly to make sure everything is level. Now, it’s time for the vanilla ice cream. Spread all of the softened vanilla ice cream over this new cake layer, creating a smooth, creamy middle. This classic vanilla layer is the calm in the storm of berry flavors and makes the strawberry layers pop even more.
Step 4: The Final Freeze
Top the vanilla ice cream with your final layer of pound cake. Press down gently one more time. Now, spread the remaining softened strawberry ice cream over this top cake layer, sealing the deal. Your cake is now fully assembled! Fold the overhanging plastic wrap over the top to cover it. Pop the whole pan into the freezer. Let it freeze for at least 4 hours, but overnight is best. This long freeze is crucial—it transforms your layers from soft to sliceably firm.
Chef’s secret: For super-clean slices, run your knife under hot water and wipe it dry between each cut.
Step 5: The Grand Finale of Whipped Cream
When you’re ready to serve, make the whipped cream frosting. Chill a metal bowl and beaters for 10 minutes first—this helps the cream whip up faster and higher. Pour in the cold heavy cream and whip until it just starts to thicken. Add the powdered sugar and vanilla, then continue whipping until you have beautiful, soft peaks. Unlatch your springform pan, lift it off, and carefully peel away the plastic wrap. Place the cake on a serving plate. Use a spatula to swoop and swirl the whipped cream all over the top and sides. Finish by garnishing with more fresh strawberry slices and a sprinkle of crumbled cake or cookies for texture.
Your Time Investment
- Prep Time: 30 minutes (active assembly)
- Bake Time (if making cake): As per package instructions
- Chilling/Freezing Time: 4 hours minimum (overnight recommended)
- Total Time: About 5 hours (including freeze time)
- Servings: 10-12 happy people
Chef’s Secret for Perfect Layers
For absolutely pristine layers that don’t smush together, do a quick freeze between steps. After spreading the first strawberry ice cream layer, pop the pan in the freezer for 20 minutes to let it set firm before adding the strawberries and next cake layer. Repeat after the vanilla ice cream layer. This little bit of extra patience gives you razor-sharp definition when you slice into it.
A Few Fun Facts
Did you know the “short” in shortcake refers to the high fat content (like shortening) that makes the cake tender? Also, while we think of strawberries as the classic, early recipes often used whatever berry was in season. My grandmother used to make a version with peaches! Using ice cream is a very mid-20th century innovation, coinciding with the rise of home freezers. This cake is a delicious snapshot of culinary history meeting modern convenience.
Gathering Your Tools
You don’t need fancy equipment! The essentials are:
A 9-inch springform pan, plastic wrap, a sharp serrated knife for slicing cake, a rubber spatula for spreading ice cream, a mixing bowl and electric mixer (or a whisk and strong arm) for whipped cream, and a serving platter.
Keeping Your Cake Happy: Storage Tips
This cake is meant to live in the freezer. Once frosted, it can stay in the freezer, well-wrapped or in an airtight container, for up to 1-2 weeks. The whipped cream frosting will hold up beautifully.
To prevent ice crystals, press a piece of parchment paper directly onto any cut surfaces before wrapping the whole cake. This keeps it tasting fresh and creamy.
Leftover slices can be individually wrapped in plastic wrap and foil and stored in a freezer bag for a quick, delicious treat anytime a craving strikes.
Tips & Tricks for Success
- Use full-fat ice cream for the creamiest texture and best flavor.
- Cool your pound cake completely before assembling. A warm cake will melt the ice cream.
- If the ice cream gets too soft while you’re working, just put the whole pan back in the freezer for 10 minutes to firm up.
- For a boozy twist, sprinkle the cake layers with a little strawberry liqueur or vanilla extract before adding the ice cream.
Making It Your Own: 6 Delicious Variations
- Chocolate-Berry Dream: Use chocolate pound cake and chocolate ice cream for the middle layer.
- Tropical Escape: Swap strawberries for diced mango and pineapple, and use coconut or mango ice cream.
- Cookies & Cream Shortcake: Crush Oreo cookies into the vanilla ice cream layer and use crumbled cookies as garnish.
- Lemon-Berry Bliss: Use lemon pound cake and lemon sorbet or ice cream for a tangy, refreshing twist.
- Neapolitan Style: Create three distinct layers: strawberry ice cream, vanilla ice cream, and chocolate ice cream.
- Individual Servings: Layer the ingredients in clear plastic cups or mason jars for adorable personal desserts.
Common Mistakes to Avoid
Mistake 1: Using Rock-Hard Ice Cream
Trying to spread ice cream straight from the freezer is a recipe for frustration and broken cake layers. It won’t spread evenly and you’ll tear the soft pound cake. Always plan ahead to let your ice cream soften on the counter until it’s malleable, like thick frosting. This makes assembly smooth and quick.
Mistake 2: Skipping the Springform Pan Liner
Attempting to unmold a frozen ice cream cake without plastic wrap lining the pan is a disaster waiting to happen. The cake will stick terribly. Always line your springform pan with enough plastic wrap that it hangs over the edges. This creates “handles” that let you lift the cake out seamlessly once it’s frozen.
Mistake 3: Not Freezing Long Enough
Impatience is the enemy here. If you try to slice the cake before it’s completely firm, the layers will squish together into a soupy mess. Respect the full 4-hour freeze, but ideally freeze it overnight. A fully set cake yields clean, beautiful slices that show off all your hard work.
Mistake 4: Over-Whipping the Cream
Whipping the heavy cream too long turns it from billowy and soft to grainy and buttery. Stop as soon as the beaters leave firm marks and the peaks hold their shape when you lift the beaters. If you accidentally go too far, stir in a few more tablespoons of cream to smooth it back out.
Your Questions, Answered
Can I make this completely ahead of time?
Absolutely! That’s one of its best features. You can assemble and freeze the un-frosted cake up to two weeks in advance. Wrap it tightly. Make the whipped cream frosting and garnish on the day you plan to serve it for the freshest taste and prettiest presentation. The frosted cake also freezes beautifully for several days.
What’s the best way to slice a frozen ice cream cake?
Use a sharp, thin-bladed knife. Run the blade under very hot water for 10 seconds, wipe it completely dry with a towel, and make your slice in one smooth, confident motion. Repeat the hot water wipe for each slice. The heat helps the knife glide through the frozen layers without cracking or dragging.
Can I use frozen strawberries instead of fresh?
You can, but you must thaw and drain them thoroughly first. Frozen berries release a lot of water as they thaw. If you don’t drain that excess liquid, it will form icy crystals in your cake and make the layers soggy. Pat them very dry with paper towels before using.
My ice cream is melting too fast while I assemble. Help!
Work quickly and keep things cold. Have all your ingredients prepped and ready before you take the ice cream out. If your kitchen is very warm, only soften one ice cream container at a time. You can also chill your cake layers and even your spreading spatula. If the ice cream does get too runny, just stop and put the whole pan in the freezer for 15 minutes to firm up.
Can I use a different type of pan?
A springform pan is highly recommended because the removable sides make unmolding foolproof. If you don’t have one, you can use a regular 9-inch cake pan lined with enough plastic wrap to overhang all sides, creating a sling. Be prepared to dip the bottom of the pan in warm water to help release the cake.
Why did my whipped cream frosting get weepy or soft?
This usually happens if the cream, bowl, or beaters weren’t cold enough, or if the cake was too warm when frosted. Ensure everything is well-chilled. Also, stabilize your whipped cream by adding a tablespoon of instant pudding powder (vanilla or cheesecake flavor) when you add the sugar. It helps it hold for days.
Is there a non-dairy or sugar-free version?
Yes! Many great non-dairy ice creams and whipped toppings are available. Look for a vegan pound cake or make your own. For a sugar-free option, use sugar-free cake, ice cream, and a sugar-free whipped topping sweetened with a alternative like monk fruit or stevia. The method remains exactly the same.
How long can leftovers last in the freezer?
Properly stored with a parchment barrier on the cut side and wrapped tightly, leftover slices will keep for 1-2 weeks. After that, they might start to develop freezer burn or lose their optimal texture, but they’ll still be safe to eat.
Can I add other fruits or mix-ins?
Please do! This recipe is a canvas for your creativity. Try adding a layer of lemon curd, sprinkling toasted nuts between layers, or folding crushed cookies into the ice cream. Just keep any add-ins dry (pat fruit dry) and avoid overly wet ingredients that can make the cake icy.
Do I have to use homemade whipped cream?
You don’t have to, but I highly recommend it. The flavor is far superior to most canned or tub whipped toppings. It’s simple to make and tastes light and fresh. If you are in a pinch, a high-quality store-bought whipped topping will work—just be sure to thaw it according to the package directions first.
The Perfect Ending to Any Day
This Strawberry Shortcake Ice Cream Cake is more than just a dessert. It’s a centerpiece, a conversation starter, and a bite of pure summer joy. It combines the comfort of a classic with the excitement of a frozen treat, all in one stunning package. Whether you’re celebrating a special day or just celebrating the weekend, this cake is sure to create sweet memories. So grab your springform pan, pick the reddest strawberries you can find, and get ready for the compliments to roll in. Happy baking—and freezing!
Cheesy Fry Sauce
Ingredients
Equipment
Method
- Line a 9-inch springform pan with plastic wrap, leaving overhang.
- Slice pound cake horizontally into three even layers.
- Place one layer of pound cake in the prepared pan.
- Spread half of the softened strawberry ice cream over the cake layer.
- Arrange half of the fresh strawberry slices on top of the strawberry ice cream and gently press down.
- Place the second layer of pound cake on top and press down lightly.
- Spread all of the softened vanilla ice cream over the second cake layer.
- Top with the final layer of pound cake and press down.
- Spread the remaining softened strawberry ice cream over the top layer of cake.
- Cover the cake with the overhanging plastic wrap and freeze for at least 4 hours, preferably overnight.
- After freezing, make the whipped cream frosting by chilling a metal bowl and beaters.
- Whip the cold heavy cream until it thickens, then add powdered sugar and vanilla and whip to soft peaks.
- Unlatch the springform pan, lift it off, and carefully peel away the plastic wrap.
- Place the cake on a serving plate and cover with whipped cream frosting.
- Garnish with more fresh strawberry slices and crumbled cake or cookies.