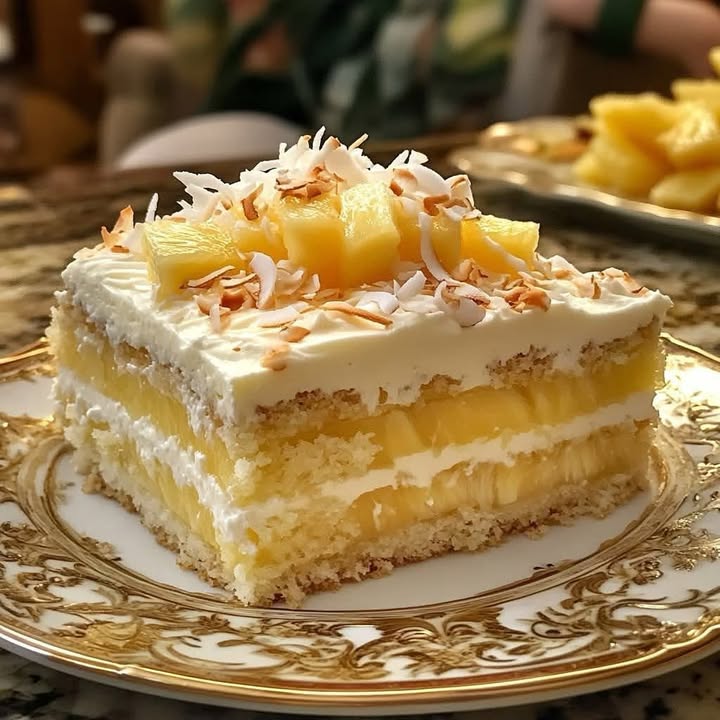

Your New Favorite Sunny Day Dessert
Have you ever wanted a dessert that tastes like a tropical vacation but requires zero oven time? That was me last summer. I was hosting a big family barbecue, and my kitchen was already hot enough. I needed something cool, creamy, and guaranteed to make everyone smile. I started playing with flavors I love—toasty coconut, sweet pineapple, and velvety cream cheese. After a few tasty experiments, this No Bake Pineapple Coconut Cream Cake was born. It was an instant hit! Now, it’s my go-to recipe whenever I need a little sunshine on a plate.
A Slice of Tropical History
This cake is a loving nod to classic American potluck desserts. Think of those famous pineapple and coconut “sunshine” cakes that grandmas have been making for decades. Those often used boxed cake mixes and whipped topping. My version is a homemade, from-scratch twist on that beloved flavor combo. It captures the spirit of a lazy Sunday afternoon in the islands, with its creamy texture and bright fruit flavors. It’s traditional comfort food made just a bit fresher and more luxurious.
Why You’ll Love This Pineapple Coconut Dream
If you’re looking for reasons to try this, I have a few. First, it’s incredibly easy! No baking means no fuss. You just mix, layer, and chill. Second, the flavor is pure magic. It’s sweet, tangy, rich, and refreshing all at once. The graham cracker crust adds a lovely crunch against the cloud-like filling. Third, it’s a total crowd-pleaser. I’ve served it to kids and grown-ups alike, and plates are always cleaned. It’s the kind of dessert that has people asking, “Can I get the recipe?” before they’ve even finished their slice.
Perfect Occasions for This Creamy Cake
This cake shines at so many events. Here are my favorites:
- Summer BBQs & Picnics: It’s cool and refreshing on a hot day.
- Potlucks: It travels beautifully and serves a crowd.
- Birthday Parties: A fun and fruity alternative to traditional birthday cake.
- Holidays like Easter or Mother’s Day: It feels special and festive.
- Just Because: Sometimes you just need a sweet, tropical treat on a Tuesday.
Gathering Your Ingredients
Here’s everything you’ll need to make this tropical masterpiece:
- 2 cups crushed graham crackers – This forms our buttery, toasty crust.
- 1/2 cup unsalted butter, melted – It binds the crust together.
- 1 cup sweetened shredded coconut – For that essential tropical flavor and texture.
- 1 can (20 oz) crushed pineapple, drained – The star of the show! Sweet and tangy.
- 1 package (8 oz) cream cheese, softened – The base of our rich, creamy filling.
- 1/2 cup powdered sugar – Sweetens the filling smoothly without graininess.
- 1 teaspoon vanilla extract – A flavor booster.
- 1 can (14 oz) sweetened condensed milk – Adds sweetness and a luscious, thick texture.
- 1 cup heavy cream – Whipped up to give the filling its airy, light body.
- Whipped cream and additional shredded coconut for garnish – For the perfect finishing touch.
Handy Substitution Options
No worries if you’re missing something! Baking is about improvisation.
- Graham Crackers: Use digestive biscuits, vanilla wafers, or even crushed pretzels for a sweet & salty twist.
- Shredded Coconut: Toasted coconut adds a deeper flavor. Unsweetened coconut works if you prefer less sweetness.
- Cream Cheese: Full-fat is best for texture, but Neufchâtel can work in a pinch.
- Heavy Cream: For a lighter version, you can use an 8-oz tub of frozen whipped topping (thawed). Fold it in at the end instead of the whipped cream.
- Pineapple: Fresh pineapple, finely chopped, can be used. Just make sure it’s very ripe and sweet.
Let’s Make This No-Bake Wonder!
Here’s the fun part, step by step.
Step 1: Build the Crust
Grab a medium bowl and combine your crushed graham crackers, melted butter, and that cup of sweetened shredded coconut. The smell is already amazing—toasty and buttery. Mix it all together until it looks like wet sand. Pour this mixture into a 9-inch springform pan. Using your fingers or the bottom of a glass, press it firmly and evenly into the bottom of the pan. You want a solid, compact layer that will hold our creamy filling. This crust is the foundation of our cake! Pop the pan in the fridge for 10 minutes while you make the filling to let it set up a bit.
Pro tip: A springform pan is key here! The removable sides make it so easy to get a perfect, clean slice later.
Step 2: Create the Creamy Base
Now, take your softened cream cheese and add it to a large mixing bowl. Beat it with an electric mixer on medium speed until it’s completely smooth and lump-free. This should take about 2 minutes. Then, add the powdered sugar and vanilla extract. Beat again until everything is beautifully combined. The mixture will be thick and pale. Next, slowly pour in the sweetened condensed milk while mixing on low speed. Scrape down the sides of the bowl and mix until the filling is silky smooth and uniform in color.
Step 3: Whip and Fold for Fluffiness
In a separate, clean bowl, pour in your cold heavy cream. Using clean beaters, whip the cream on medium-high speed until stiff peaks form. This means when you lift the beaters, the cream stands straight up in peaks and doesn’t fall over. Be careful not to overwhip, or it will become grainy. Now, take about a third of this whipped cream and gently fold it into the cream cheese mixture. This “lightens” the base and makes it easier to combine. Then, fold in the remaining whipped cream with a gentle, sweeping motion until no white streaks remain. You want to keep as much air in the mixture as possible.
Step 4: Add the Pineapple and Assemble
It’s time for the star ingredient! Take your well-drained crushed pineapple and gently stir it into the fluffy cream mixture. Make sure the pineapple is evenly distributed throughout. Retrieve your pan with the chilled crust from the fridge. Pour the luscious pineapple-coconut cream filling over the crust. Use a spatula to smooth the top into an even, beautiful layer.
Step 5: The Most Important Step: Chill
This is the step that requires patience, but it’s worth it. Cover the cake loosely with plastic wrap and place it in the refrigerator. Let it chill for at least 4 hours, but overnight is even better. This long rest allows the cake to firm up perfectly, making it sliceable and allowing all the wonderful flavors to meld together.
Step 6: Garnish and Serve with Joy
When you’re ready to serve, carefully run a thin knife around the edge of the springform pan before releasing the clasp. This ensures a clean release. Transfer the cake to a serving plate. Right before serving, top it with fresh whipped cream and a generous sprinkle of toasted or untoasted shredded coconut. Slice, serve, and get ready for the compliments!
Chef’s tip: For extra flair, garnish with a few thin slices of fresh pineapple or a maraschino cherry on each slice.
Timing is Everything
While the active work is quick, patience is your secret ingredient.
- Prep Time: 20 minutes
- Chill Time: 4 hours (minimum)
- Total Time: 4 hours 20 minutes
- Servings: 8-10 happy people
My Chef’s Secret
For an incredible flavor boost, toast your shredded coconut before adding it to the crust and using it as garnish. Simply spread it on a baking sheet and bake at 350°F for 5-7 minutes, stirring often, until golden brown. It adds a deep, nutty flavor that contrasts beautifully with the sweet pineapple. It takes this cake from great to absolutely unforgettable!
A Little Extra Info
Did you know the combination of pineapple and coconut is often called “pina colada” flavor, named after the famous cocktail? That drink originated in Puerto Rico. This cake captures all those vacation vibes without needing a blender or a tiny umbrella—though feel free to add one to the plate for fun!
Necessary Equipment
You don’t need fancy tools for this recipe.
- 9-inch springform pan
- Large mixing bowl
- Medium mixing bowl
- Electric hand mixer or stand mixer
- Spatula
- Measuring cups and spoons
Storing Your Tropical Masterpiece
This cake stores wonderfully, making it perfect for make-ahead plans.
Keep the cake covered tightly with plastic wrap or in an airtight container in the refrigerator. It will stay fresh and delicious for 3 to 4 days. The crust may soften slightly over time, but the flavor will remain fantastic.
For longer storage, you can freeze this cake. Wrap the whole cake or individual slices tightly in plastic wrap and then in foil. Freeze for up to 2 months. Thaw overnight in the refrigerator before serving and adding fresh garnishes.
Remember to always store it chilled. Because of the dairy content, it should not be left out at room temperature for more than 2 hours.
Tips and Advice for Success
- Drain that Pineapple! This is crucial. Use a fine-mesh strainer and press down on the pineapple with a spoon to remove as much liquid as possible. Too much juice will make your filling runny.
- Softened Cream Cheese: Take your cream cheese out of the fridge at least 30 minutes before starting. Soft cream cheese blends smoothly and prevents lumps.
- Cold Tools for Whipping Cream: Chill your mixing bowl and beaters in the freezer for 10 minutes before whipping the heavy cream. Cold tools help the cream whip up faster and stiffer.
Presentation Tips to Wow Your Guests
- Serve on a vibrant, colorful platter to enhance the tropical theme.
- Garnish each slice with a tiny paper umbrella or a fresh mint leaf.
- For a party, make individual mini cakes in small mason jars or dessert cups. Simply layer the crust and filling for a portable treat.
- Drizzle a little caramel sauce over the plate before placing the slice for an extra decadent touch.
Healthier and Fun Variations
Want to mix it up? Here are some delicious twists on the original recipe:
- Lighter Pineapple Delight: Use light cream cheese, fat-free sweetened condensed milk, and light whipped topping. The flavors stay bright and delicious.
- Tropical Mango Twist: Swap the crushed pineapple for pureed mango. Garnish with fresh mango chunks and a lime zest for a different island flavor.
- Chocolate-Covered Island: Add 1/2 cup of mini chocolate chips to the filling. Use a chocolate graham cracker crust for a decadent twist.
- Berry Bliss Cake: Replace pineapple with well-drained, crushed strawberries or a mix of berries. Perfect for a Fourth of July celebration.
- Pina Colada Cheesecake Bars: Press the crust into a 9×13 pan. Double the filling recipe. Chill and cut into squares for easy, shareable bars.
- Nutty Crunch Version: Add 1/2 cup of finely chopped macadamia nuts or pecans to the graham cracker crust for added texture and richness.
Common Mistakes to Avoid
Avoid these simple pitfalls for a perfect cake every time.
Mistake 1: Not Draining the Pineapple Enough
This is the number one reason for a runny, soupy filling. Canned crushed pineapple holds a lot of juice. If you just dump it in, all that extra liquid will thin out your creamy mixture and prevent it from setting properly. Always drain it thoroughly in a fine-mesh strainer. For an even drier result, you can gently press the pineapple in the strainer with the back of a spoon or even pat it with a paper towel.
Mistake 2: Using Cold Cream Cheese
Cold cream cheese straight from the fridge is firm and lumpy. No matter how long you beat it, you’ll likely end up with tiny little bits of unmixed cheese throughout your filling. It affects both texture and taste. Always plan ahead. Let your cream cheese sit on the counter for 30-60 minutes until it’s soft to the touch. It should blend seamlessly with the other ingredients.
Mistake 3: Not Chilling Long Enough
Impatience is the enemy of no-bake desserts! After 4 hours, the cake might look set on top, but the center might still be too soft to slice neatly. It needs that full chilling time, or even longer, for the filling to firm up completely. The waiting allows the ingredients to bond and the structure to stabilize. For the best results, I always make mine the night before I need it.
Mistake 4: Overmixing or Undermixing the Whipped Cream
When you whip the heavy cream, stop when you see stiff peaks. Overwhipping will turn your lovely cream into grainy, lumpy butter. On the flip side, if you don’t whip it enough (soft peaks), it won’t have the structure to hold up the heavy filling, leading to a denser cake. Also, when folding the whipped cream into the cheese mixture, be gentle! Aggressive stirring will deflate all the air you just whipped in, making the filling heavy.
Frequently Asked Questions
Can I make this cake ahead of time?
Absolutely! This cake is an ideal make-ahead dessert. In fact, I strongly recommend making it at least one day before you plan to serve it. This gives it plenty of time to set up firmly in the refrigerator. The flavors also have more time to meld together, making it even more delicious. Just wait to add the final whipped cream and coconut garnish until right before you serve it to keep them looking fresh.
What can I use instead of a springform pan?
If you don’t have a springform pan, you can use a regular 9-inch pie plate or a square 9×9 baking dish. The presentation will be different—more like a creamy pie or dessert squares—but the taste will be just as wonderful. Just remember that without the removable sides, it will be a bit trickier to get the first slice out neatly. Running a knife around the edge and using a good pie server helps.
My filling seems too runny after mixing. What did I do wrong?
Don’t panic! The most common reasons are not draining the pineapple enough or the heavy cream wasn’t whipped to stiff peaks. If you haven’t poured it over the crust yet, you can try chilling the filling mixture in the bowl for 20-30 minutes, then giving it another gentle fold. Sometimes this helps it thicken. If it’s already in the pan, just give it more chill time, preferably overnight. It will likely firm up just fine.
Can I use frozen whipped topping instead of whipping my own cream?
Yes, you can! This is a great shortcut. Use one 8-ounce tub of frozen whipped topping (like Cool Whip), thawed. Simply skip the step of whipping the heavy cream. Gently fold the thawed whipped topping into the cream cheese and condensed milk mixture at the end, just before adding the pineapple. The texture will be slightly different but still light and tasty.
How do I know when the heavy cream is whipped to “stiff peaks”?
It’s easier than it sounds. Start whipping your cold cream on medium-high speed. After a few minutes, stop the mixer and lift the beaters straight up out of the bowl. If the cream forms a peak on the end of the beater that stands up straight and doesn’t droop or curl over, you’ve reached stiff peaks. If the peak folds over, it’s just at “soft peaks” and needs a little more whipping. Be careful not to go past stiff peaks.
Can I use fresh pineapple instead of canned?
You can, but there are a few things to consider. Fresh pineapple contains an enzyme called bromelain that can prevent the dairy-based filling from setting properly and can make it taste slightly bitter. If you want to use fresh, I recommend lightly cooking it first. Simply chop it finely and simmer in a small saucepan for about 5 minutes, then let it cool and drain very well. This deactivates the enzyme.
How long will leftovers keep in the fridge?
Properly stored in the refrigerator and covered tightly, your No Bake Pineapple Coconut Cream Cake will stay delicious for 3 to 4 days. The crust will gradually get softer the longer it sits, but the flavor remains wonderful. Always use a clean utensil to serve slices to keep it fresh longer.
Is it possible to freeze this cake?
Yes, it freezes quite well! Wrap the whole chilled cake (or individual slices) tightly in plastic wrap, then again in aluminum foil. Freeze for up to 2 months. To serve, thaw it overnight in the refrigerator. The texture may be a tiny bit different after thawing, but it’s a great way to have a sweet treat ready for unexpected guests.
Can I add other fruits to this recipe?
Definitely! This is a very forgiving recipe. Just make sure any fruit you add is well-drained and not too watery. Drained mandarin oranges, crushed strawberries, or finely chopped peaches would all be lovely additions. I’d recommend keeping the total volume of added fruit to about 1 ½ cups so you don’t overwhelm the creamy base.
My family doesn’t like coconut. Can I leave it out?
Of course! Simply omit the shredded coconut from the crust. You might want to add an extra 1/4 cup of graham cracker crumbs to make up the volume. The cake will still be delicious with the pineapple and cream cheese flavors shining through. You could also consider substituting the coconut with another crunchy element like finely chopped nuts.
Ready for a Taste of Paradise?
So there you have it! My foolproof recipe for a wonderfully creamy, delightfully fruity, and refreshingly easy No Bake Pineapple Coconut Cream Cake. It’s more than just a dessert; it’s a little edible vacation. I hope this recipe becomes a favorite in your home, just like it is in mine. It brings smiles to every table. So grab your mixing bowl, imagine the sound of ocean waves, and whip up some happiness. Don’t forget to share your creation with friends—they’ll thank you for it! Happy no-baking!
Cheesy Garlic Bread
Ingredients
Equipment
Method
- Combine crushed graham crackers, melted butter, and shredded coconut in a bowl until resembling wet sand.
- Press the mixture into a 9-inch springform pan to form the crust and refrigerate for 10 minutes.
- In a large mixing bowl, beat softened cream cheese until smooth.
- Add powdered sugar and vanilla extract to the cream cheese, mixing until well combined.
- Gradually pour in sweetened condensed milk while mixing on low speed until smooth.
- In a separate bowl, whip cold heavy cream to stiff peaks.
- Gently fold one-third of the whipped cream into the cream cheese mixture, then fold in the remaining whipped cream until fully combined.
- Stir the drained crushed pineapple into the creamy mixture until evenly distributed.
- Pour the filling over the chilled crust and smooth the top.
- Cover and refrigerate for at least 4 hours or overnight to set.
- Before serving, garnish with whipped cream and toasted or untoasted shredded coconut.