Sunshine on a Plate: Your New Favorite Pineapple Juice Cake
Have you ever wanted a taste of the tropics without the fuss? I’ve tried so many complicated cakes that left me with a sink full of dishes and a frown. Then, I found this one. It’s my secret weapon for last-minute potlucks, rainy-day pick-me-ups, and whenever my family begs for “something sweet.” This isn’t just a cake; it’s a burst of sunny, pineapple flavor that’s as easy as it is delicious. No layers, no fancy techniques—just simple, wet, and uncomplicated joy.
From a Happy Accident to a Family Staple
This recipe was born from a “baking emergency.” I was making a simple vanilla cake for a friend’s visit and realized I was out of milk. Panic set in! The only liquid in my fridge was a big carton of pineapple juice. I took a chance, swapped it in, and crossed my fingers. What came out of the oven was a revelation—incredibly moist, subtly fruity, and with a tender crumb that had everyone asking for the recipe. That happy accident is now a cherished tradition in my home. It’s a modern twist on the classic “poke cake,” where flavor is poured right into the warm cake, making every single bite irresistibly juicy.
Why You’ll Love This Pineapple Juice Cake
You will adore this cake because it forgives rookie mistakes and rewards you with spectacular flavor. The pineapple juice does double duty: it sweetens the batter naturally *and* creates an unbelievably moist texture. You don’t need a stand mixer or special tools. It comes together in one bowl (almost!), and the glaze soaks in to create this luscious, sticky-sweet top. It’s a guaranteed crowd-pleaser that looks like you spent all day in the kitchen, when really, you spent most of that time sipping coffee and dreaming of the beach.
Perfect Occasions for This Tropical Treat
This cake is your go-to for any event that needs a touch of sunshine. It’s perfect for summer barbecues, baby showers (it’s a great “gender-neutral” yellow!), or a bright end to a weeknight family dinner. I love bringing it to new neighbors—it’s a friendly, welcoming gesture. It’s also a lifesaver for school bake sales; just cut it into squares and watch it disappear first. Honestly, any day that feels a little gray is the right day for this cake.
Gathering Your Sunshine Ingredients
Let’s gather what you need. The beauty is in its simplicity!
- For the cake: All-purpose flour, granulated sugar, baking soda, large eggs, pineapple juice (the star!), vanilla extract, and vegetable oil.
- For the glaze: Powdered sugar, more pineapple juice, and a bit of melted butter for richness.
- To decorate (optional but fun!): Fresh pineapple wedges, toasted coconut flakes, and a dollop of whipped cream.
No Pineapple Juice? No Problem!
Out of something? Don’t run to the store. Here are easy swaps:
- Pineapple Juice: Use orange juice or apricot nectar for a different tropical twist. In a real pinch, you can use canned pineapple syrup (drained from crushed pineapple), but thin it with a little water.
- Vegetable Oil: Any neutral oil like canola or melted coconut oil works beautifully. Coconut oil will add a lovely hint of extra tropics.
- Decoration: No fresh pineapple? Use well-drained canned pineapple rings or even maraschino cherries for a classic touch.
Let’s Bake Some Sunshine Together!
Preheat your oven to 350°F (175°C). Grease and flour a 9×13 inch baking pan. This is our sunshine vessel!
Step 1: The Dry Hug
In a large bowl, whisk together your flour, sugar, and baking soda. See the fluffy cloud form? This “dry hug” ensures every grain of sugar and speck of baking soda is evenly distributed. No one wants a bite of plain flour or a pocket of baking soda. Whisking is a quiet, peaceful start to the baking process.
Step 2: The Wet Team
In another bowl or a large measuring cup, crack in your eggs. Pour in the golden pineapple juice, the glug of vegetable oil, and that fragrant splash of vanilla. Whisk it all until it’s a smooth, sunny-yellow liquid. The oil will try to separate, but keep whisking – you’re the boss here.
Step 3: The Grand Union
Now, pour your beautiful wet ingredients right into the center of the dry mix. Use a spatula or wooden spoon to gently fold everything together. Pro tip: Stop mixing the very second you see no more dry flour streaks. A few small lumps are perfect! Overmixing is the enemy of a tender cake. The batter will be thin and pourable – that’s exactly right.
Step 4: Bake to Golden Perfection
Carefully pour the batter into your prepared pan. It will spread out evenly on its own. Slide it into the oven and bake for 30-35 minutes. You’ll know it’s done when the top is a light golden brown, the edges pull away from the pan, and a toothpick poked in the center comes out clean. Your kitchen will smell like a tropical paradise.
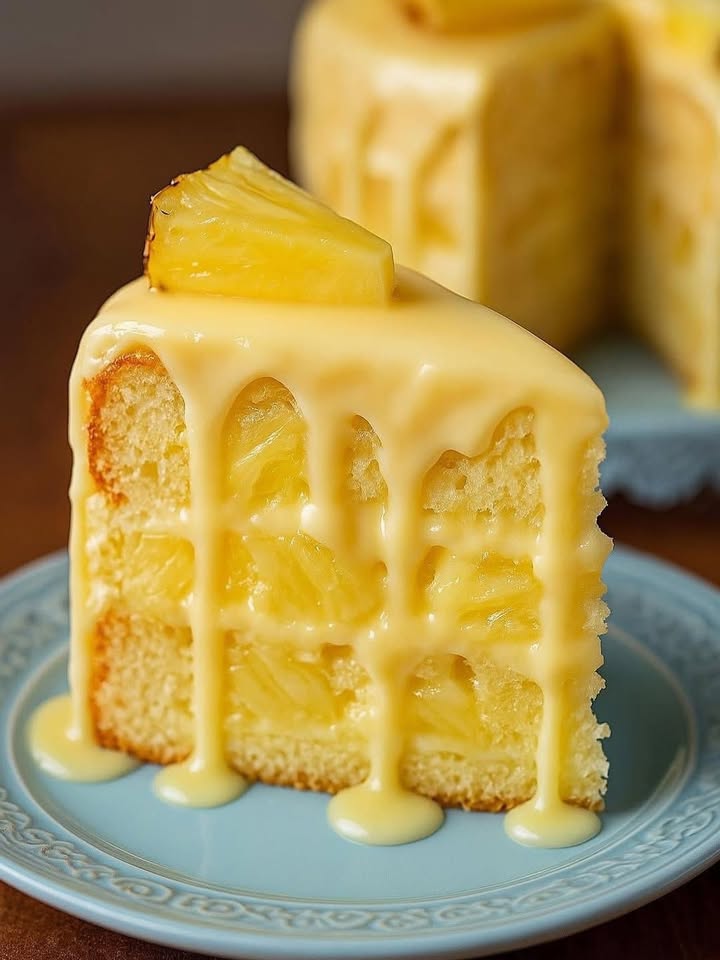
Step 5: The Juicy Soak (The Best Part!)
As soon as the cake comes out of the oven, take a fork and poke holes all over the top. Don’t be shy! Go right to the bottom. This is your flavor highway. Immediately, slowly pour your prepared glaze over the hot cake. Watch with delight as it bubbles and seeps into every single hole, creating a moist, sticky, irresistible crust. This step is magic.
Step 6: The Final Flourish
Let the cake cool completely in the pan. This is the hardest part—waiting! Once cool, slice it into squares. For a party, I arrange fresh pineapple wedges on top and sprinkle with toasted coconut. A little whipped cream on the side never hurt anybody! The bright, fresh fruit against the golden cake is a feast for the eyes.
Chef’s tip: For professional-looking clean slices, dip your knife in hot water and wipe it dry between each cut.
Your Baking Timeline
- Prep Time: 15 minutes
- Cook Time: 35 minutes
- Cooling Time: 1 hour
- Total Time: 1 hour 50 minutes
Chef’s Secret: The Warm Glaze
The secret is all in the timing of the glaze. The cake must be piping hot, and your glaze should be warm and thin. This allows the liquid to be fully absorbed, making the entire cake moist and flavorful. If you wait for the cake to cool, the glaze will just sit on top like a frosting (still tasty, but you’ll miss the magical soak!).
A Pinch of History
The “poke cake” became a huge trend in the 1970s, often using boxed cake mix and Jell-O. This recipe is a delicious, from-scratch homage to that idea. Using fruit juice instead of gelatin powder was a common Great Depression-era trick to add moisture and sweetness when other ingredients were scarce. We’re just carrying on a smart, thrifty, and absolutely delicious tradition!
What You’ll Need to Make It
- One 9×13 inch baking pan
- Two mixing bowls
- Whisk and spatula
- Measuring cups and spoons
- A fork for poking!
Keeping Your Sunshine Fresh
Because this cake is so moist, it stores wonderfully. Cover the pan tightly with plastic wrap or foil and keep it at room temperature for up to 2 days. For longer storage, you can refrigerate it for up to 4 days. The flavor actually gets better on the second day as it continues to moisten. You can also freeze individual squares wrapped in plastic and foil for up to 3 months. Thaw at room temperature for a taste of summer anytime.
My Best Tips for You
- Use room temperature eggs for a better-emulsified batter.
- For a deeper flavor, try using brown sugar for half of the granulated sugar in the cake.
- Toast your coconut flakes in a dry pan over medium heat until golden. It adds a nutty, amazing crunch.
- If you want a clearer glaze, use only pineapple juice and powdered sugar, skipping the butter.
Dressing Up Your Cake
Presentation is half the fun! Serve it on a bright platter. For a luau theme, add little paper umbrellas to each slice. For a kids’ party, cut into shapes with cookie cutters. A dusting of powdered sugar over the fresh fruit looks like a light snowfall on the tropics. Get creative!
Mix It Up! Recipe Variations
Love this base? Try these spins:
- Coconut-Pineapple Dream: Add 1 cup of shredded coconut to the batter and use coconut milk in the glaze instead of juice.
- Pina Colada Cake: Add a teaspoon of rum extract to the batter and use cream of coconut in the glaze.
- Pineapple Upside-Down Twist: Before pouring batter, layer brown sugar, butter, and pineapple rings in the pan for a classic upside-down cake.
- Citrus Sparkle: Substitute the pineapple juice with lemon or orange juice for a bright, tangy flavor.
- Ginger Zing: Add 2 tablespoons of finely grated fresh ginger to the batter for a spicy kick.
- Nutty Crunch: Fold ½ cup of chopped macadamia nuts or pecans into the batter for wonderful texture.
Common Mistakes to Avoid
Mistake 1: Overmixing the Batter
This is the biggest cake wrecker. When you mix flour and liquid too much, you develop gluten. That makes your cake tough and chewy, not tender and soft. Mix just until the last streak of flour disappears. A few small lumps are perfectly fine—they’ll bake out.
Mistake 2: Using Cold Ingredients
Using eggs and juice straight from the fridge can cause your batter not to blend smoothly. The oil might separate, leading to a denser cake. Let your eggs and juice sit on the counter for about 20-30 minutes before you start. Room temperature ingredients create a smoother, more homogenous batter for a better rise.
Mistake 3: Skipping the “Poke” While Hot
If you let the cake cool before poking holes and adding glaze, the cake’s structure sets. The glaze will just pool on top and won’t soak in. You’ll miss that wonderful, moist quality throughout every bite. Have your glaze ready, and be brave with that fork the moment the cake is out of the oven.
Mistake 4: Not Measuring Flour Correctly
Scooping flour directly with your measuring cup packs it in, giving you way too much flour. This leads to a dry, crumbly cake. The right way is to spoon flour lightly into your measuring cup, then level it off with a knife. For real accuracy, a kitchen scale is your best friend.
Your Questions, Answered
Can I use canned pineapple juice for this cake?
Absolutely! Canned, bottled, or fresh-pressed pineapple juice all work great in this recipe. Just make sure it’s 100% juice without added sugar if possible, as the cake is already quite sweet. The tiny bit of pulp in some canned juices is totally fine and can add a nice texture.
Why do you poke holes in the cake before glazing?
Poking holes creates little tunnels for the warm glaze to travel deep into the cake. This technique, called a “poke cake,” ensures every single bite from top to bottom is infused with that sweet pineapple flavor and incredible moisture. It transforms a simple cake into something exceptionally juicy and delicious.
My cake is very dense. What went wrong?
A dense cake usually points to two issues. First, you may have overmixed the batter after adding the wet ingredients. Remember, mix only until combined. Second, old or inactive baking soda can fail to give the cake its proper lift. Always check the expiration date on your leavening agents!
Can I make this into a layer cake or cupcakes?
You can, but the method changes slightly. For a layer cake, divide the batter between two greased 9-inch round pans. Bake for 25-30 minutes. For cupcakes, fill liners 2/3 full and bake for 18-22 minutes. You would frost them instead of using the soak method, perhaps with a pineapple cream cheese frosting.
How do I know exactly when the cake is done baking?
Use the trusted toothpick test. Insert a toothpick or a thin skewer into the center of the cake. If it comes out with a few moist crumbs clinging to it, it’s done. If it comes out with wet batter, it needs more time. Also, look for the edges pulling slightly away from the pan and the top springing back when lightly touched.
Can I reduce the sugar in this recipe?
You can, but be cautious. Sugar doesn’t just sweeten; it adds moisture and tenderness. Reducing it by more than 1/4 cup can affect the cake’s texture. For a less sweet option, I recommend reducing the sugar in the glaze instead, or using a less-sweet juice like a pineapple-coconut water blend.
What’s the best way to store leftovers?
Because of the glaze, this cake stores best covered right in the pan at room temperature for 1-2 days. For longer storage, cover it well and refrigerate. The cold will firm up the texture, so let a slice sit at room temperature for 10 minutes before eating to get that soft, moist quality back.
Can I add crushed pineapple to the batter?
Yes, you can! If you add crushed pineapple, make sure to drain it very, very well. Press it in a mesh strainer to remove excess liquid. Add about 1 cup of drained crushed pineapple to the batter. You may need to bake it a few minutes longer. This will make an even more intensely pineapple-flavored and moist cake.
My glaze is too thick/too thin. How do I fix it?
Glaze consistency is easy to fix. Too thick? Add more pineapple juice, just a teaspoon at a time, until it’s pourable. Too thin? Add more powdered sugar, a tablespoon at a time, until it thickens to a honey-like consistency. It should ribbon off your whisk.
Can I freeze this pineapple juice cake?
You can! Cool the cake completely after glazing. Cut it into squares, wrap each square tightly in plastic wrap, and then place them in a freezer bag or airtight container. Freeze for up to 3 months. Thaw wrapped at room temperature to prevent condensation from making it soggy.
A Simple Slice of Happiness
This pineapple juice cake proves that the best things don’t have to be complicated. It’s a humble, joyful recipe that brings a big smile to anyone who tries it. It’s the cake you make when you want to share a little bit of sunshine, when you need a comforting treat, or when you just don’t want to fuss. I hope it becomes a beloved, easy-bake favorite in your home, just like it is in mine. Now, go preheat that oven—your tropical escape is waiting!
Chorizo Shakshuka Delight
Ingredients
Equipment
Method
- Preheat your oven to 350°F (175°C). Grease and flour a 9x13 inch baking pan.
- In a large bowl, whisk together flour, sugar, and baking soda.
- In a separate bowl or large measuring cup, whisk together eggs, pineapple juice, vegetable oil, and vanilla until smooth.
- Pour wet ingredients into the dry ingredients and gently fold until just combined; a few lumps are okay.
- Pour the batter into the prepared baking pan and bake for 30-35 minutes, until golden brown and a toothpick comes out clean.
- Poke holes all over the top of the hot cake with a fork, then slowly pour the glaze over it.
- Allow the cake to cool completely in the pan, then slice and serve with optional toppings.