Coconut and Chocolate Heaven: The Mounds Poke Cake
Have you ever had a dessert so good it makes you close your eyes and sigh? That’s what happened the first time I took a bite of this Mounds Poke Cake. I was looking for a show-stopper to bring to my niece’s birthday party, something that felt fancy but was secretly simple. This cake was it. The rich chocolate, the creamy coconut soak, and that fluffy shredded coconut topping… let’s just say I had to make a second one because we all “sampled” the first one a little too much before the party! It’s a coconut lover’s dream that always gets requests for the recipe.
The Sweet Story Behind Poke Cakes
The humble poke cake is a classic American dessert born from convenience and creativity. It became wildly popular in the 1970s, thanks to recipes on boxes of Jell-O and cake mix. The genius is in the “poke.” By poking holes in a warm cake, you create little channels for delicious liquids—like pudding, sweetened condensed milk, or in this case, coconut cream—to seep down into every single bite. The Mounds Bar version is a newer twist, taking that nostalgic method and combining it with the beloved flavors of the candy bar: dark chocolate and sweet coconut. It’s a perfect blend of retro baking and modern taste.
Why You’ll Fall in Love With This Recipe
You’ll adore this cake because it’s incredibly moist, bursting with flavor, and deceptively easy. It looks like you spent all day in the kitchen, but the boxed mix is your secret helper. The combination of the cool, soaked cake with the sweet coconut and rich chocolate frosting is pure bliss. It’s the kind of dessert that makes people think you’re a professional baker, and I will never tell them otherwise! Plus, it’s a make-ahead dream. Chilling it only makes it better.
The Perfect Times to Make This Cake
This cake is your new go-to for any gathering. It’s a superstar at potlucks and family reunions. It’s a must-have for birthday parties where you want to please both kids and adults. Bring it to a summer barbecue for a cool, sweet finish. Honestly, it’s even perfect for a quiet Tuesday when you just need a slice of something special with your coffee. Any occasion becomes a little sweeter with this cake on the table.
What You’ll Need: The Ingredients List
- 1 box chocolate cake mix (plus the ingredients listed on the box, usually eggs, oil, and water)
- 1 can (14 oz) sweetened condensed milk
- 1 can (15 oz) coconut cream
- 1 package (7 oz) sweetened shredded coconut
- 1 container (12 oz) chocolate frosting
- Toasted coconut or almond slivers for garnish (optional, but pretty!)
No Problem! Easy Ingredient Swaps
Out of something? Don’t worry!
- Coconut Cream: You can use a full-fat canned coconut milk. Just don’t shake the can—scoop out the thick cream from the top.
- Sweetened Condensed Milk: For a dairy-free version, look for canned coconut sweetened condensed milk at most grocery stores.
- Chocolate Frosting: Homemade ganache (heated cream poured over chocolate chips) is a fantastic, richer option.
- Garnish: Try crushed toasted pecans or a sprinkle of sea salt on the frosting for a fancy touch.
Let’s Get Baking: Your Step-by-Step Guide
Step 1: Bake Your Chocolate Base
First, preheat your oven. Grease your trusty 9×13-inch pan really well. I like to use butter or a baking spray with flour. Mix your chocolate cake batter exactly as the box tells you. As you pour that dark, glossy batter into the pan, your kitchen will start to smell amazing. Bake it until a toothpick poked in the middle comes out clean. The sound of the timer is your cue for deliciousness!
Pro tip: Let the cake cool in the pan for just about 10-15 minutes after baking. You want it warm for the next step, not piping hot.
Step 2: Time to Poke Those Holes!
Here comes the fun part! Take the round end of a wooden spoon or a chopstick. Poke holes all over the top of your warm cake. Space them about an inch apart. Don’t be shy—push it down almost to the bottom. You’re creating little wells for all that coconutty goodness to dive into. The cake might look a little funny now, but trust me, this is the magic.
Step 3: Whisk Up the Coconut Soak
While the cake is warm, make the soak. In a medium bowl, pour in the sweetened condensed milk and the coconut cream. The condensed milk is thick and sweet, and the coconut cream is luxuriously rich. Whisk them together until they become one smooth, creamy, dreamy liquid. It will smell like a tropical vacation.
Step 4: Soak That Cake Good
Slowly and carefully, pour your coconut milk mixture right over the warm, hole-y cake. Try to pour evenly so every area gets love. Watch as it instantly starts to disappear into the holes. Use a spatula to gently spread it around if needed. This step transforms a simple cake into an unbelievably moist masterpiece.
Step 5: Let It Cool and Absorb
Now, patience is key. Let the cake sit on your counter until it cools completely. This takes about 1 to 2 hours. As it cools, the cake drinks up every last drop of the soak. The top will look a little glossy and set. This waiting time is the perfect moment to clean up or put your feet up!
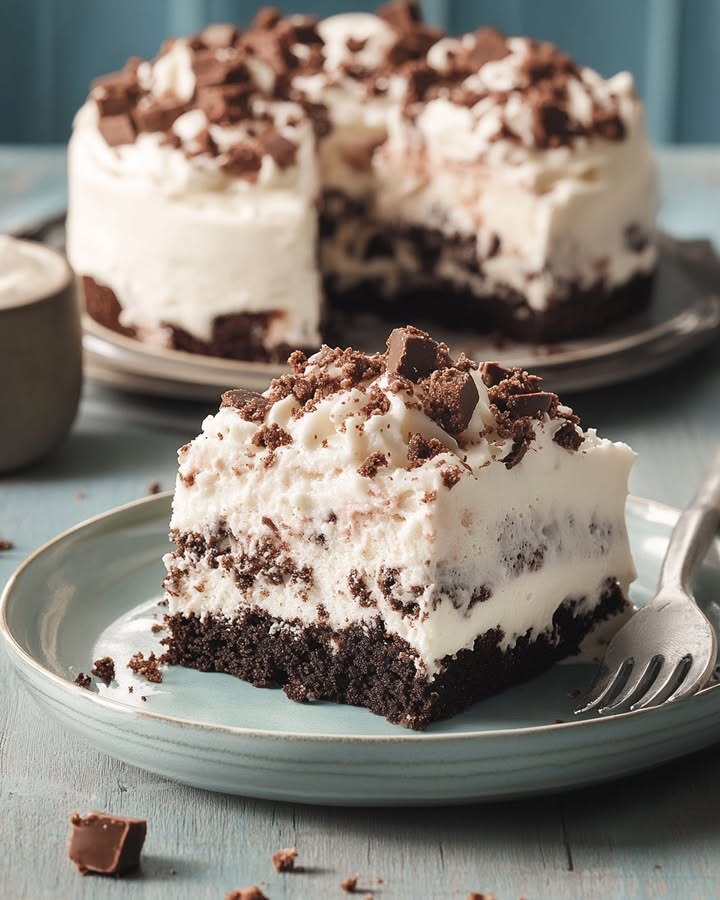
Step 6: Add the Fluffy Coconut Layer
Once your cake is completely cool, grab your bag of sweetened shredded coconut. Sprinkle it generously and evenly over the entire surface. You’ll get a beautiful, snowy white layer that adds wonderful texture and sweet coconut flavor in every bite. Press it down lightly so it sticks.
Step 7: The Chocolate Frosting Finish
Take the lid off your container of chocolate frosting. Microwave it for 20-30 seconds, just until it’s pourable. Stir it well. Then, pour it right over the coconut layer. Use a spatula to gently spread it to the edges. The contrast of the dark chocolate against the white coconut is just gorgeous.
Chef’s tip: For a super smooth finish, dip your spatula in warm water before spreading the frosting.
Step 8: Garnish, Chill, and Get Ready
If you’re using a garnish, now’s the time. A sprinkle of toasted coconut adds a nutty flavor and crunch. Pop the whole pan into the refrigerator for at least one hour. This chills the cake and lets the frosting set, making it much easier to slice cleanly. The anticipation makes it taste even better!
Your Baking Timeline
Here’s a quick breakdown of how your time will be spent:
- Prep Time: 20 minutes
- Bake Time: 25-35 minutes (as per your cake mix box)
- Cooling Time: 2 hours
- Chilling Time: 1 hour (minimum)
- Total Time: About 4 hours (mostly hands-off!)
My Chef’s Secret for You
My secret is all in the toasted coconut garnish. It takes two extra minutes but makes a world of difference. Just spread some shredded coconut on a baking sheet and toast it in a 350°F oven for 5-7 minutes, watching closely until it’s golden. Sprinkling this on top adds an incredible aroma and a subtle crunch that elevates the whole cake.
A Little Coconut Extra
Did you know the “Mounds” candy bar was introduced in 1920? It was advertised with the famous tagline, “Sometimes you feel like a nut, sometimes you don’t.” This cake is definitely for the times you DO feel like a nut (or coconut!)—and even when you don’t, you’ll still love it.
Gather Your Kitchen Tools
- 9×13 inch baking pan
- Mixing bowls
- Whisk
- Wooden spoon or chopstick (for poking)
- Spatula
- Measuring cups and spoons
Keeping Your Cake Fresh and Delicious
Because this cake is so moist, it stores beautifully. Always keep it covered in the refrigerator. The cool temperature helps the frosting stay set and keeps everything fresh.
You can simply cover the pan tightly with plastic wrap or aluminum foil. If you’ve already sliced into it, press the wrap directly onto the cut edges of the cake to keep them from drying out.
Properly stored, your Mounds Poke Cake will stay delicious for 4 to 5 days in the fridge. The flavors actually meld and get even better after a day or two!
My Best Tips for Your Success
- For extra chocolate flavor, use a devil’s food cake mix.
- Make sure your holes go deep! Shallow holes mean the soak sits on top instead of sinking in.
- If your frosting is too runny after microwaving, let it sit for a minute to thicken slightly before pouring.
- For a cleaner cut, run your knife under hot water and wipe it dry between slices.
Make It Look Like a Million Bucks
- Serve each square on a simple white plate with a dollop of whipped cream.
- Drizzle a little extra melted chocolate or caramel sauce on the plate under the slice.
- Top each piece with a whole maraschino cherry for a retro “tropical” look.
- Cut the cake into smaller “brownie-sized” pieces for a party buffet.
Want to Mix It Up? Try These Healthier Twists!
Love the idea but want to lighten it up? Try these fun variations.
- Gluten-Free Bliss: Use your favorite gluten-free chocolate cake mix. All the other ingredients are naturally gluten-free, so you’re good to go!
- Dairy-Free Dream: Swap the sweetened condensed milk for a canned coconut milk version. Use a dairy-free chocolate frosting or a homemade avocado chocolate frosting.
- Sugar-Conscious Slice: Look for a “no sugar added” cake mix and use an unsweetened coconut milk blend for the soak. Top with unsweetened shredded coconut and a sugar-free chocolate glaze.
- Protein-Powered Poke: Bake a protein-packed black bean brownie base (yes, really!). The soak and toppings will make it taste like an indulgent treat.
- Mini Cake Cups: Bake the cake mix in a muffin tin to make individual portions. Poke, soak, and top each one. Perfect for portion control!
- Fruit-Infused Fun: Add a layer of sliced strawberries or bananas between the cake and the coconut layer for a fresh twist.
Common Mistakes to Avoid
Mistake 1: Poking the Cake When It’s Cold
This is the biggest mistake! If you let the cake cool completely before poking holes, it will be too firm. The holes won’t form well, and the delicious coconut soak will just pool on the surface instead of soaking in. You need those holes to be open channels, and a warm cake is much more receptive. Always poke while the cake is still warm from the oven, about 10-15 minutes after it comes out.
Mistake 2: Using Cream of Coconut Instead of Coconut Cream
These two cans look alike but are very different! Cream of Coconut (like Coco Lopez) is pre-sweetened and used for piña coladas. Coconut cream is unsweetened and much thicker. Using cream of coconut will make your soak unbelievably, tooth-achingly sweet. Always double-check the label to make sure you have plain coconut cream.
Mistake 3: Skipping the Chill Time
I know it’s hard to wait, but cutting into this cake right after frosting is a messy mistake. The frosting will be soft and squish out, and the cake won’t have fully set. It will be difficult to get neat slices. The hour in the fridge is non-negotiable. It firms up the frosting and allows all the layers to settle together, giving you that perfect, clean slice of heaven.
Mistake 4: Under-mixing the Soak
If you don’t whisk the sweetened condensed milk and coconut cream together thoroughly, you might get streaks of thick, sweet milk in some bites and plain cream in others. You want a completely homogeneous, smooth liquid. Take an extra 30 seconds to whisk it really well until it’s one uniform, creamy color. This ensures every single bite is perfectly sweet and coconutty.
Your Mounds Poke Cake Questions, Answered
Can I make this cake a day ahead?
Absolutely, and I highly recommend it! This cake is actually better the next day. The flavors have more time to meld, and the texture becomes even more perfectly moist. Just bake and assemble it completely, cover it tightly, and store it in the refrigerator overnight. Take it out about 15-20 minutes before you plan to serve it to take the deep chill off.
My coconut soak isn’t soaking in. What did I do wrong?
This usually means one of two things. First, your holes might not be deep enough. Make sure you’re poking all the way down to almost touch the bottom of the pan. Second, the cake might have cooled too much before you poured the soak. The soak absorbs best into a warm cake. If it’s already cold, the cake structure has tightened up. Try poking a few more deep holes and gently warming the soak for a few seconds before pouring.
Can I use homemade cake instead of a mix?
You sure can! Use your favorite homemade chocolate cake recipe baked in a 9×13 pan. The key is to make sure it’s a sturdier, denser cake, like a devil’s food, rather than a very light and airy sponge. A denser cake will hold up to the soaking process better and won’t get soggy. The rest of the steps are exactly the same.
How do I toast coconut for the garnish?
It’s so easy! Spread sweetened shredded coconut in a thin layer on a dry baking sheet. Put it in an oven preheated to 325°F. Bake for 5 to 10 minutes, but you must watch it like a hawk and stir it every 2 minutes. Coconut can go from perfectly golden to burnt in seconds. It’s done when it’s fragrant and a light golden brown. Let it cool completely before sprinkling on the cake.
Is there a way to make this less sweet?
Yes, there are a few tweaks. You can use an unsweetened or lightly sweetened shredded coconut for the middle layer. For the soak, you could replace half of the sweetened condensed milk with regular whole milk or more coconut cream. You can also use a dark chocolate or bittersweet chocolate frosting, which is less sweet than milk chocolate frosting.
Can I freeze Mounds Poke Cake?
You can, but with a few notes. Freezing can slightly alter the texture of the soaked cake, making it a bit more dense. It’s best to freeze it without the final chocolate frosting. Wrap the cooled, soaked, and coconut-sprinkled cake tightly in plastic wrap and then foil. Freeze for up to a month. Thaw overnight in the fridge, then add the warmed frosting and garnish just before serving.
What can I use if I can’t find coconut cream?
Don’t worry! Grab two cans of full-fat coconut milk. Do not shake them. Open them and carefully scoop out the thick, solid cream that has risen to the top. You’ll need about 1 ½ to 2 cups of this solid cream. The thin coconut water at the bottom can be saved for smoothies. Whisk this solid cream with the sweetened condensed milk as usual.
My frosting is too thick to pour. What now?
Just microwave it a little more! Heat it in 10-second intervals, stirring well after each, until it reaches a pourable but not watery consistency. If you accidentally make it too thin, let it sit at room temperature for a few minutes. It will thicken back up as it cools. You can always spread it with a spatula if needed.
How long can it sit out at a party?
Because of the dairy in the soak and frosting, you shouldn’t leave it out for more than 2 hours at room temperature. For longer parties, I keep it in the fridge and bring out a few slices at a time on a serving plate. It’s so rich and satisfying that a small slice is often plenty, so it goes quickly!
Can I turn this into cupcakes?
Yes, “Poke Cupcakes” are a fantastic idea! Bake the cake batter in a lined muffin tin. While the cupcakes are still warm, poke 3-4 holes in the top of each one with a chopstick. Carefully spoon the coconut soak over each one, letting it sink in. Cool completely, then top with the shredded coconut and a dollop or drizzle of frosting. They’re adorable and portion-perfect.
Ready for Your Baking Triumph
There you have it—everything you need to make the most incredible, crowd-pleasing Mounds Poke Cake. This recipe has never let me down. It brings smiles every single time. The best part is hearing that happy silence that falls over the table when everyone takes their first bite. So grab your spoon, get poking, and get ready for the compliments to roll in. You’ve got this! Now go make some delicious memories.
Cookie Butter Bliss
Ingredients
Equipment
Method
- Preheat your oven and grease a 9x13-inch baking pan well.
- Mix your chocolate cake batter according to the box instructions and pour it into the pan.
- Bake until a toothpick inserted in the middle comes out clean (about 25-35 minutes).
- Let the cake cool in the pan for 10-15 minutes.
- Poke holes in the warm cake using the round end of a wooden spoon or chopstick, spacing holes about an inch apart.
- In a medium bowl, whisk together the sweetened condensed milk and coconut cream until smooth.
- Pour the coconut milk mixture over the warm cake evenly, ensuring it seeps into the holes.
- Let the cake cool completely, about 1-2 hours, to allow it to absorb the soak.
- Once cooled, sprinkle sweetened shredded coconut evenly over the cake's surface and press lightly to adhere.
- Microwave the chocolate frosting for 20-30 seconds until pourable, then spread it over the coconut layer.
- Garnish with toasted coconut if desired and chill the cake in the refrigerator for at least one hour before serving.