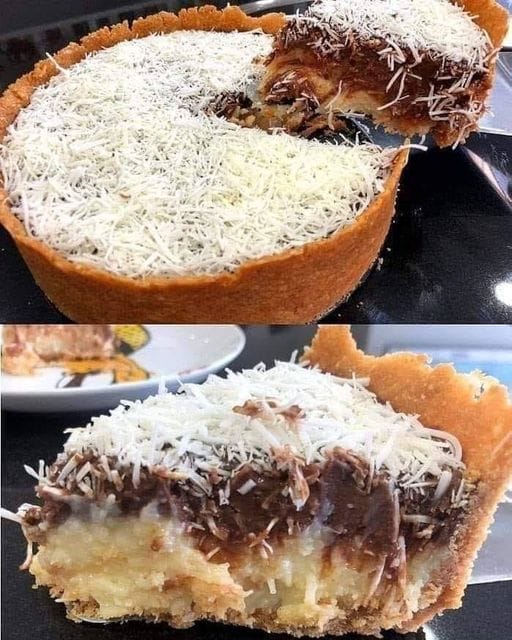
A Slice of Pure Joy: The Tasty Prestige Pie
You know that magical feeling when dessert is so good, everyone just goes quiet for a second? That’s the magic of this Tasty Prestige Pie. I first made it for my son’s birthday potluck, and let me tell you—it was gone before the main course! This isn’t just a pie; it’s a crowd-pleasing legend in a pie dish, with layers of creamy coconut and dreamy chocolate that will have your family begging for the recipe.
From Humble Kitchens to Celebratory Tables
The “Prestige” pie is a classic in many home kitchens across the globe. It whispers of tradition, a no-bake wonder often passed down through scribbled notes and happy memories. My version builds on that legacy. It takes simple, affordable ingredients—like those cornstarch biscuits we all know—and transforms them into something truly spectacular. It’s the perfect blend of old-school comfort and modern, irresistible flavor. Think of it as grandma’s best dessert, with a little extra sparkle.
Why This Pie Will Steal Your Heart
You will love this recipe because it is deliciously simple. No oven drama, no fancy skills required. The texture is pure bliss: a crunchy biscuit base, a velvety coconut cream layer, and a glossy chocolate cap that cracks just right. It’s sweet, but not too sweet, and the contrast between the coconut and the dark chocolate is simply divine. It’s the kind of dessert that looks like you fussed for hours, but your secret is safe with me!
When to Whip Up Your Prestige Pie
This pie is your new best friend for any gathering. It’s a star at summer barbecues because it’s cool and refreshing. It’s a must-have for holiday dinners, sitting proudly next to the pumpkin pie. Need a guaranteed win for a school bake sale or a book club meeting? This is it. I even make it “just because” on a Tuesday—because why not turn an ordinary day into a sweet celebration?
Gathering Your Ingredients
- 1 package of cornstarch biscuits (like Maria biscuits)
- 50 grams of margarine (or butter), softened
- 1 can of sweetened condensed milk
- 2 tablespoons of cornstarch
- 1 1/2 cups of milk
- 1 egg yolk
- 50 grams of grated coconut (medium or fine)
- 200 grams of chopped semi-sweet chocolate (good quality makes a difference!)
No Problem! Handy Substitutions
Don’t have every item? No panic! Use graham crackers instead of cornstarch biscuits. Swap margarine for unsalted butter for a richer flavor. Out of semi-sweet chocolate? A mix of milk and dark chocolate works beautifully. For a coconut-free version, you can replace the grated coconut with an extra tablespoon of cornstarch for thickness and a drop of vanilla for flavor.
Let’s Create Some Magic: The Full Recipe
Step 1: Building the Buttery Base
First, let’s make the crust. Crush the cornstarch biscuits into fine crumbs. You can use a food processor or put them in a bag and roll with a rolling pin—great for stress relief! Mix the crumbs thoroughly with the soft margarine until it looks like wet sand. Press this mixture firmly into the bottom of a pie dish. Use a glass to press it down evenly. This base needs to be compact so it holds our lush fillings. Pop it in the fridge to set while you work on the next layer.
Step 2: Crafting the Coconut Cream Dream
Now for the creamy heart of the pie. In a saucepan, whisk together the condensed milk, cornstarch, milk, and egg yolk. Make sure there are no lumps! Turn the heat to medium and cook, stirring constantly. You’ll see it start to thicken and bubble gently. Keep stirring for about 2-3 minutes until it’s a thick, pudding-like consistency. Remove from heat and stir in the grated coconut. The kitchen will smell amazing! Let this mixture cool for about 10 minutes. Pro tip: Stirring non-stop prevents any lumps from forming and ensures a silky-smooth cream.
Step 3: The Luscious Layering
Take your chilled base from the fridge. Pour the warm (but not hot) coconut cream over the biscuit layer. Smooth the top with a spatula. Now, here’s a key step: let this layer cool down to room temperature before adding the chocolate. If the cream is too hot, the chocolate will melt right in instead of forming a separate, distinct layer. Patience is your friend here! I usually do the dishes while I wait—multitasking at its finest.
Step 4: The Glossy Chocolate Finale
Time for the grand finish! Place the chopped chocolate in a heatproof bowl. Melt it gently over a pot of simmering water (a double boiler) or in the microwave in short bursts, stirring often. Once it’s completely smooth and glossy, pour it over the completely cooled coconut layer. Tilt the pie dish gently to help the chocolate spread into a beautiful, even coat. Work quickly but carefully for that professional look.
Step 5: The Final Chill
Your masterpiece is almost ready. Very carefully, place the pie in the refrigerator. It needs to chill for at least 4 hours, but honestly, overnight is best. This long rest allows all the layers to firm up perfectly. The chocolate will set with a satisfying snap, and the cream will become delightfully firm. The waiting is the hardest part, I know! Chef’s tip: For a super clean slice, dip your knife in hot water and wipe it dry between each cut.
Your Pie Timeline
- Prep Time: 25 minutes
- Cooking Time: 10 minutes
- Chilling Time: 4 hours (or overnight)
- Total Time: 4 hours 35 minutes
- Servings: 8-10 happy people
My Secret for the Best Chocolate Layer
Here’s my little secret: add a tiny teaspoon of coconut oil or neutral oil to the chocolate just after melting. This makes it more fluid for pouring and gives the final chocolate layer a gorgeous, professional shine and a slightly softer bite.
A Sweet Little Fact
Did you know the cornstarch biscuit, a key ingredient here, is known in many parts of the world as a “Maria” biscuit? It was created in London in 1874 to commemorate the marriage of a Russian duke to the daughter of Queen Victoria. So you’re not just making a pie; you’re baking a bit of sweet history!
Tools You’ll Need
- 9-inch pie dish or springform pan
- Food processor or plastic bag + rolling pin
- Medium saucepan
- Whisk and spatula
- Mixing bowls
- Measuring cups and spoons
How to Keep Your Prestige Pie Perfect
Once set, this pie loves the cold. Keep it covered in the refrigerator. You can use plastic wrap or a dome lid. The cold ensures the chocolate stays firm and the creamy layer stays perfectly set.
For short-term storage, it will be at its absolute best for 3 to 4 days. The flavors actually meld together beautifully the day after making it. I think it tastes even better on day two!
I do not recommend freezing this pie. Freezing can cause the creamy layer to separate and become watery when thawed, ruining that perfect silky texture we worked so hard for. It’s a make-and-enjoy kind of treat!
Tips for a Flawless Pie Every Time
- Press the crust very firmly. This is the foundation of your pie!
- When cooking the cream, low and slow with constant stirring beats high heat every time.
- Let the coconut cream cool before adding chocolate. This is the trick to perfect layers.
- Use a hot knife to cut clean slices. Wipe the knife clean between cuts.
- Garnish with extra toasted coconut flakes or sea salt on top for a fancy touch.
Make It a Showstopper: Presentation Ideas
- Serve each slice with a dollop of lightly sweetened whipped cream.
- Drizzle a little extra melted chocolate on the plate in a zig-zag pattern.
- Add a few fresh berries like raspberries on the side for a pop of color and tang.
- Sprinkle the top with flaky sea salt right after pouring the chocolate for a trendy sweet-salty vibe.
- For a party, cut into small squares or rectangles for easy, elegant finger food.
5 Delicious Recipe Twists to Try
Love this recipe? Try these fun variations!
1. Nutty Prestige Pie
Add a half-cup of finely chopped toasted hazelnuts or almonds to the biscuit base. It adds a wonderful crunch and nutty flavor that pairs perfectly with chocolate.
2. Coffee-Kissed Prestige Pie
Dissolve a tablespoon of instant coffee granules into the milk for the coconut cream layer. It creates a subtle mocha flavor that adults adore.
3. Tropical Prestige Pie
Fold in some finely chopped dried mango or pineapple into the coconut cream. It brings a bright, tropical twist that’s perfect for summer.
4. Chocolate Mint Prestige
Add a few drops of pure peppermint extract to the chocolate layer as you melt it. It’s refreshing and festive, especially for the holidays.
5. Berry Swirl Prestige
Before adding the chocolate, swirl a few tablespoons of seedless raspberry jam over the coconut layer. The tart berry swirl cuts through the sweetness beautifully.
Common Mistakes to Avoid
Mistake 1: A Crumbly, Falling-Apart Crust
This happens when you don’t use enough margarine or don’t press the mixture firmly enough. The crust needs to be compact to act as a solid base. Make sure your margarine is soft so it mixes evenly with the crumbs. Press it down with the bottom of a glass or measuring cup until it is very firm and even. A good test is to gently poke it with a finger—it shouldn’t shift or crack easily.
Mistake 2: Lumpy Coconut Cream
Lumps usually form if you add the cornstarch directly to the hot liquid, or if you stop stirring while it’s cooking. Always whisk the cornstarch with cold milk first to make a slurry. Then mix it with the other cold ingredients before heating. Once on the stove, stir constantly until it thickens. If you do get a small lump, you can strain the cream through a sieve before adding the coconut.
Mistake 3: Chocolate Melting Into the Cream
Pouring hot chocolate over a warm coconut layer is a recipe for a muddy blend, not defined layers. The coconut cream layer must be completely cool to the touch before you add the melted chocolate. I let mine sit on the counter for 30-45 minutes. The chocolate should spread over a firm, cool surface. This guarantees that beautiful, sharp separation between the white and brown layers.
Mistake 4: Rushing the Chill Time
Cutting into the pie too soon is a heartbreaker. The pie needs those full 4 hours (or more) in the fridge for the layers to set properly. If you cut it early, the cream will be runny and the slices will collapse. Be patient! Make it the day before your event for the best, cleanest results and maximum flavor.
Your Pie Questions, Answered
Can I use butter instead of margarine?
Absolutely! Butter works perfectly and adds a richer, more flavorful base. Use the same amount (50 grams) of softened, unsalted butter. The process is exactly the same. Your crust might have a slightly more golden color and a delicious buttery taste that pairs wonderfully with the sweet fillings.
What can I use if I can’t find cornstarch biscuits?
Graham crackers are the best substitute and are widely available. You’ll need about 1 ½ cups of graham cracker crumbs. Digestive biscuits or even vanilla wafers will also work in a pinch. The goal is a plain, slightly sweet biscuit that crumbles well. The flavor will change a little, but it will still be delicious.
How do I know when the coconut cream is cooked enough?
The cream is ready when it thickly coats the back of a spoon. If you run your finger through the coating on the spoon, the line should hold its shape and not run back together. It should also have bubbled slowly for a minute or two. Remember, it will continue to thicken as it cools, so a pudding-like consistency in the pot is perfect.
Can I make this pie dairy-free?
You can try! Use a vegan margarine for the base. For the cream, look for a dairy-free sweetened condensed coconut milk and use a plant-based milk like oat or almond milk. Choose a dairy-free chocolate for the topping. The texture might vary slightly, but you can achieve a lovely vegan-friendly version.
Why did my chocolate layer turn out dull or blotchy?
This is called “bloom” and happens when chocolate is heated or cooled too quickly. To avoid it, melt your chocolate gently over low, indirect heat (like a double boiler). Don’t let any steam or water get into the chocolate. Adding that teaspoon of coconut oil I mentioned also helps keep it glossy and smooth as it sets.
How far in advance can I make this pie?
This pie is a fantastic make-ahead dessert. You can prepare it fully 1 to 2 days before you need to serve it. Just keep it tightly covered in the refrigerator. The flavors improve, and it slices even more cleanly. I wouldn’t go beyond 3 days for the best texture and freshness.
My cream layer is too runny. What did I do wrong?
A runny cream usually means it wasn’t cooked long enough. The cornstarch needs to reach a full boil to activate its thickening power. Make sure you cook it, stirring constantly, until you see those slow, thick bubbles for a full 2 minutes. Also, double-check your cornstarch measurement. If it’s still runny after cooling, you can try re-heating it with an extra teaspoon of cornstarch mixed with a little cold milk.
Can I add fruit to this recipe?
You can, but be careful. Fresh fruit releases water and can make the cream layer soggy. If you want a fruit flavor, it’s better to use a thick fruit jam or curd. You could spread a thin layer of strawberry or raspberry jam on the biscuit base before adding the coconut cream, or swirl it into the cream itself before adding the chocolate.
Is it safe to eat with a raw egg yolk?
The egg yolk in the cream is fully cooked during the heating process. You cook the mixture until it boils and thickens, which brings it to a temperature high enough to make the egg safe to eat. There is no raw egg in the finished pie.
Can I use milk chocolate instead of semi-sweet?
You can, but the pie will be much sweeter. The semi-sweet chocolate provides a nice bitter contrast to the very sweet coconut and condensed milk layer. If you use milk chocolate, I recommend reducing the chocolate to about 150 grams and maybe sprinkling a tiny bit of sea salt on top to balance the sweetness.
Ready to Impress Your Favorite People?
And there you have it! My beloved Tasty Prestige Pie recipe, with all its tips and secrets laid bare. This pie is more than a dessert. It’s a conversation starter, a memory maker, and a guaranteed smile on a plate. It proves that the most stunning treats can come from the simplest kitchens. So gather your ingredients, put on some good music, and get ready for the compliments to roll in. Happy baking, my friend! Don’t forget to save a slice for yourself—you’ve earned it.
Creamy Cheddar Chicken
Ingredients
Equipment
Method
- Crush the cornstarch biscuits into fine crumbs and mix with softened margarine until it resembles wet sand. Press mixture firmly into the bottom of a pie dish.
- In a saucepan, whisk together condensed milk, cornstarch, milk, and egg yolk until smooth. Cook on medium heat, stirring constantly until thickened (about 2-3 minutes).
- Remove from heat and stir in grated coconut. Let the mixture cool for about 10 minutes.
- Pour the warm coconut cream over the biscuit layer and smooth the top. Allow it to cool to room temperature.
- Melt the chopped chocolate in a heatproof bowl over simmering water or in the microwave until smooth. Pour over the cooled coconut layer.
- Chill the pie in the refrigerator for at least 4 hours, preferably overnight.