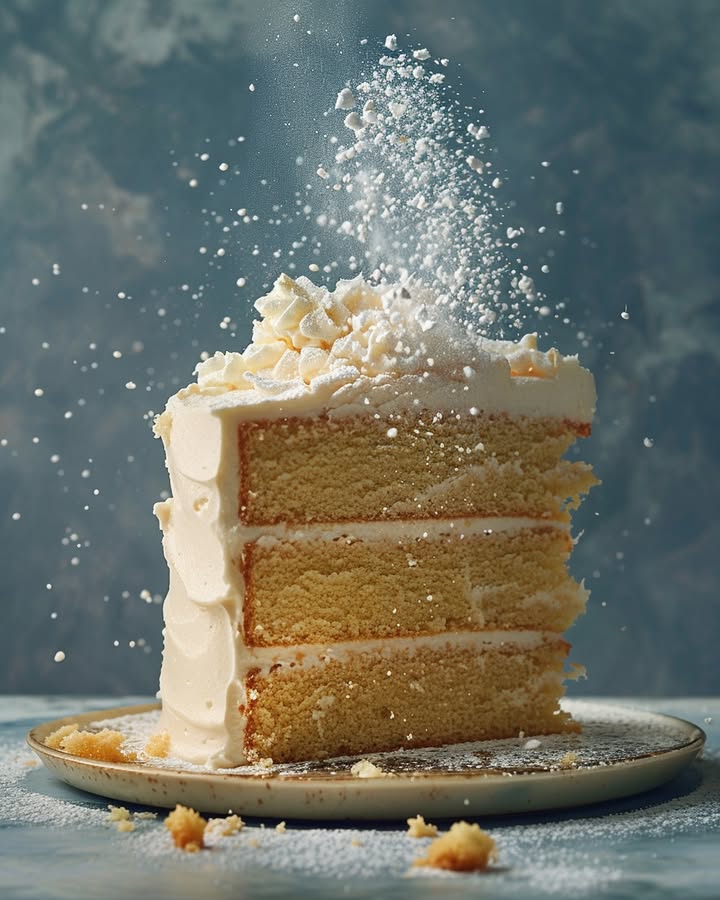
The Ultimate Moist Vanilla Layer Cake: A Classic Reimagined
Have you ever baked a cake, held your breath, and prayed it would be moist? We’ve all been there. Let me tell you, my journey to the perfect vanilla cake was a series of dry disappointments until this recipe came along. It’s the cake that finally got my husband to admit a homemade cake can be better than a bakery’s! This isn’t just any vanilla layer cake; it’s a Moist Vanilla Layer Cake so tender and flavorful, it’s become the star of every family gathering.
A Slice of Cake History
Vanilla cake is the little black dress of the dessert world. It’s classic, adaptable, and always in style. While its origins are humble, linked to simple pound and butter cakes, our modern version is a testament to baking science. The addition of oil alongside butter is my modern secret weapon. It gives you that rich, buttery flavor with an unbeatable, velvety crumb that stays soft for days. In my kitchen, this recipe has become a tradition, passed on to my daughter when she turned sixteen. Now, it’s my gift to you!
Why You’ll Fall in Love with This Vanilla Cake
You’ll love this because it works! No more dense or dry layers. This cake is consistently soft, cloud-like, and packed with real vanilla flavor. It’s also incredibly versatile. Dress it up with fancy buttercream roses, or keep it simple for a Tuesday treat. The recipe is straightforward, using common pantry ingredients to create something truly extraordinary. The best part? The joy on people’s faces when they take that first, perfect bite.
Perfect Occasions for This Celebration Cake
This cake is your go-to for life’s sweetest moments. It’s perfect for birthday parties, baby showers, and anniversary dinners. I love baking it for my book club—it’s always a better conversation starter than the book! Bring it to a potluck and watch it disappear first. It’s also my “welcome to the neighborhood” cake. A simple, gorgeous homemade cake says “I’m glad you’re here” better than anything else.
Gathering Your Ingredients
Here’s what you’ll need to create this masterpiece. Having everything at room temperature is the first secret to success!
For the Vanilla Cake:
- 2 1/2 cups (325g) all-purpose flour
- 2 1/2 tsp baking powder
- 1/2 tsp salt
- 1 cup (224g) unsalted butter, room temperature
- 1 1/2 cups (300g) granulated sugar
- 3 tbsp vegetable oil
- 1 tbsp vanilla extract
- 4 large eggs, room temperature
- 1 1/4 cups (300ml) milk, room temperature
For the Vanilla Buttercream:
- 1 1/4 cups (280g) unsalted butter, room temperature
- 9 cups (1035g) powdered sugar
- 3/4 tsp salt
- 1 tbsp vanilla extract
- 6-8 tbsp milk
Handy Substitution Options
Out of something? Don’t worry! Here are some easy swaps.
- Milk: Buttermilk is a fantastic swap for regular milk. It adds a slight tang and makes the cake even more tender. Any dairy or non-dairy milk like whole milk, almond, or oat milk will work.
- Vegetable Oil: Canola oil or even a light olive oil are fine alternatives.
- All-purpose flour: For a lighter cake, you can use cake flour. Replace each cup of all-purpose flour with 1 cup plus 2 tablespoons of cake flour.
- Vanilla: The seeds from one vanilla bean paste can replace the extract. It gives gorgeous little specks!
How to Bake Your Perfect Moist Vanilla Layer Cake
Follow these steps for a foolproof, beautiful cake. Let’s get baking!
Step 1: Preheat and Prepare Your Pans
Start by getting your oven hot and ready. Preheat it to 350°F (176°C). Take your three 8-inch cake pans and line the bottoms with parchment paper circles. Grease the sides lightly with butter or baking spray. This little step is your insurance policy for perfect cake release later. The smell of warming butter and paper will start to smell like promise.
Step 2: Whisk the Dry Ingredients
Grab a medium bowl. Measure your flour carefully by spooning it into the cup, then leveling it off. Add the baking powder and salt. Use a whisk to combine them thoroughly. This aerates the flour and ensures the leavening is evenly distributed. You’ll see a fluffy, pale mixture. Set this bowl aside for now. Pro tip: A quick whisk here prevents dense spots in your final cake.
Step 3: Cream the Butter, Sugar, and Oil
In a large mixing bowl, combine the room-temperature butter, granulated sugar, and vegetable oil. Beat them together on medium-high speed. Watch the magic happen! The mixture will go from yellow and gritty to pale, fluffy, and almost white. This takes a full 3 to 4 minutes. Do not rush this step! This creaming process creates tiny air pockets that give your cake its lift and light texture.
Step 4: Add Vanilla and Eggs
Pour in that glorious tablespoon of vanilla extract. The aroma is instant happiness. Mix until it’s blended in. Now, add your eggs one at a time. Crack an egg into the bowl, mix on medium until it’s fully incorporated, then add the next. Scrape down the sides of the bowl with a spatula after each addition. The batter will become beautifully smooth, creamy, and slightly glossy.
Step 5: Combine Wet and Dry Ingredients
Time to bring it all together. Add half of your flour mixture to the butter and egg batter. Mix on low speed until just barely combined—a few flour streaks are okay. Now, pour in all of the milk. The batter might look a bit curdled or split, but don’t panic! This is completely normal. Mix it until it comes together. Finally, add the last half of the flour and mix on low until the batter is smooth and uniform. Chef’s tip: Stop mixing as soon as you see no dry flour. Over-mixing develops gluten and leads to a tough cake.
Step 6: Bake to Golden Perfection
Divide the batter evenly among your three prepared pans. I use a kitchen scale for precision, but eyeballing it works too. Smooth the tops with your spatula. Place them in the center of your preheated oven. Bake for 25-30 minutes. You’ll know they’re done when the tops are springy to the touch and a toothpick inserted into the center comes out with just a few moist crumbs, not wet batter. Your kitchen will smell like a dream.
Step 7: Cool the Cake Layers
When the cakes are done, pull them from the oven. Let them cool in the pans on a wire rack for just 2-3 minutes. This lets them firm up a bit. Then, run a knife around the edge of each pan, invert the cakes onto your hand or a rack, peel off the parchment paper, and flip them right-side-up to cool completely. Patience is key here—frosting a warm cake is a recipe for a melting mess!
Step 8: Make the Vanilla Buttercream
While the cakes cool, make the frosting. In a clean mixing bowl, beat the room-temperature butter until it’s completely smooth and creamy. Add about half of the powdered sugar and mix on low at first, then increase the speed. The mixture will be thick. Add the salt and vanilla extract. Next, add the remaining powdered sugar. Finally, add the milk, one tablespoon at a time, until you reach a spreadable, fluffy consistency. Beat for a final minute on medium-high to make it super light.
Step 9: Assemble and Frost Your Masterpiece
The fun part! Use a serrated knife to carefully slice the slight dome off the top of each cooled cake layer to make them perfectly flat. Place your first layer on a cake plate or stand. Dollop about 1 cup of frosting in the center. Use an offset spatula to spread it into an even layer all the way to the edges. Repeat with the second layer. Top with the third layer. Now, apply a thin “crumb coat” of frosting over the entire cake, chill for 15 minutes, then apply your final, beautiful layer of frosting. Smooth it out or create decorative swirls.
Timing is Everything
Here’s a quick timeline to help you plan your baking:
- Prep Time: 30 minutes
- Bake Time: 30 minutes
- Cooling Time: 1.5 hours (crucial!)
- Frosting & Assembly: 30 minutes
- Total Time: About 3 hours (mostly hands-off cooling)
My Secret Weapon for Ultimate Moistness
The vegetable oil is the secret hero! Butter gives incredible flavor, but oil retains moisture better. Using both gives you the best of both worlds: rich, buttery taste with a crumb that stays soft and moist for days. Never skip it.
A Sweet Little Fact
Did you know vanilla is the second most expensive spice in the world, after saffron? It comes from the orchid vine, and each flower must be hand-pollinated. That tablespoon of pure extract you’re using is a tiny luxury. It’s worth investing in a good quality pure vanilla for this cake—you can truly taste the difference.
Necessary Equipment
- Three 8-inch round cake pans
- Parchment paper
- Stand mixer or hand mixer
- Medium and large mixing bowls
- Whisk and rubber spatula
- Kitchen scale (highly recommended for accuracy)
- Cooling racks
- Offset spatula for frosting
- Serrated knife or cake leveler
Storing Your Beautiful Cake
Once assembled, your cake can sit at room temperature for a day if your kitchen isn’t too hot. I usually leave it out for the first day of serving so the frosting stays soft.
For longer storage, place the cake in an airtight container or cake carrier and refrigerate it. It will stay fresh and delicious for up to a week. The cold will firm up the frosting, so let it sit out for about an hour before serving to soften up.
You can also freeze this cake beautifully. Wrap unfrosted cake layers individually in plastic wrap, then in aluminum foil. Pop them into a freezer bag for up to 3 months. Thaw in the refrigerator overnight before frosting. You can also freeze the fully frosted cake—just let the frosting set hard first, then wrap it well.
Foolproof Tips and Advice
- Room temperature is not a suggestion: It’s a rule. Cold ingredients don’t blend as well and can cause a dense cake.
- Measure your flour correctly to avoid a dry cake. Fluff it, spoon it into the cup, and level it off.
- Don’t open the oven door before the 25-minute mark! The rush of cold air can make cakes fall.
- When in doubt, under-bake slightly. A few crumbs on the toothpick are better than a clean one, which can mean it’s overdone.
Presentation Ideas to Impress
- Keep it classic with a perfectly smooth “naked” cake, where the layers peek through a thin coat of frosting.
- Use the back of a spoon to create pretty, swoopy swirls all over the cake.
- Press sprinkles or chopped nuts onto the sides of the frosted cake for a fun crunch.
- Top with fresh berries, like strawberries or raspberries, just before serving.
- Pipe simple buttercream rosettes or shells around the top edge for an elegant finish.
6 Delicious Variations to Try
Once you master the base, the sky’s the limit! Here are some favorite twists.
1. Lemon Blueberry Bliss: Add the zest of two lemons to the batter. Toss 1 cup of fresh blueberries in a tablespoon of flour and fold them in gently before baking. Use a lemon buttercream.
2. Chocolate Chip Vanilla Cake: Fold 1 cup of mini chocolate chips into the batter at the end. The chips stay suspended and create little pockets of melted chocolate.
3. Strawberry Shortcake Layer Cake: Split the layers and spread sliced, sweetened strawberries and whipped cream between them instead of buttercream. It’s heavenly.
4. Funfetti Celebration Cake: Fold 1/2 cup of rainbow sprinkles (jimmies, not nonpareils) into the batter just before dividing into pans. Pure party vibes!
5. Coconut Dream Cake: Replace the milk with canned coconut milk and add 1 tsp coconut extract with the vanilla. Frost with coconut buttercream and top with toasted coconut flakes.
6. Salted Caramel Toffee Cake: Add 1 cup of chopped toffee bits (like Heath) to the batter. Frost with vanilla buttercream, then drizzle with salted caramel sauce over the top.
Common Mistakes to Avoid
Mistake 1: Using Cold Ingredients
This is the biggest culprit for a dense, heavy cake. Cold butter and eggs don’t blend into the batter smoothly. They trap less air during creaming. Your cake won’t rise properly. Always take your butter, eggs, and milk out of the fridge at least an hour before you start. Your butter should be slightly soft to the touch but not greasy or melted.
Mistake 2: Rushing the Creaming Process
It’s tempting to beat the butter and sugar for just a minute and move on. Don’t! This step is vital for building the cake’s structure. You need a full 3-4 minutes of beating on medium-high speed. The mixture should become noticeably paler, fluffy, and almost look like whipped cream. This incorporates air, which acts as a leavening agent in the oven.
Mistake 3: Over-Mixing After Adding Flour
The moment you add flour, you risk developing gluten. Gluten is great for bread but makes cakes tough. Once you add the dry ingredients, mix on the lowest speed and stop as soon as you can no longer see dry flour streaks. A few small lumps are okay; they will work themselves out. Over-mixing is a sure path to a rubbery texture.
Mistake 4: Incorrect Oven Temperature
An oven that runs too hot will bake the cake too quickly on the outside while the inside stays raw. An oven that’s too cool will make it dense and greasy. Invest in a simple oven thermometer to check your oven’s true temperature. Place it in the center of the oven while it preheats. This simple tool is a game-changer for all your baking.
Mistake 5: Frosting a Warm Cake
Impatience leads to a melting, sliding mess of frosting. Warm cakes release steam, which melts buttercream and makes your layers slide apart. You must let the cakes cool completely in the pans, then on a rack. I know it’s hard to wait, but it’s the difference between a tidy cake and a cake-fail picture. If you’re in a hurry, pop the cooled layers in the freezer for 20 minutes before frosting.
Your Moist Vanilla Cake Questions, Answered
Can I make this cake in different pan sizes?
Absolutely! For two 9-inch rounds, bake for 28-32 minutes. For a 9×13 sheet cake, bake for 35-40 minutes. For cupcakes, fill liners 2/3 full and bake for 18-22 minutes. Always check for doneness with a toothpick. The baking time will change, so start checking a few minutes before the recipe suggests.
Why did my cake sink in the middle?
A sinking cake usually means it’s under-baked, there was too much leavening (baking powder), or the oven door was opened too early. Make sure your baking powder is fresh. Don’t open the oven door during the first 25 minutes of baking. The cake needs that steady heat to set its structure. If it sinks, just level it and cover the dip with extra frosting—it will still taste amazing.
Can I use cake flour instead of all-purpose?
Yes, you can! Cake flour will give you an even lighter, more tender crumb. To substitute, use 2 3/4 cups plus 2 tablespoons of cake flour for the 2 1/2 cups of all-purpose flour. No other changes are needed. Sift it first for the best results, as cake flour can be clumpier.
My buttercream is too runny/thick. How do I fix it?
Buttercream is very forgiving. If it’s too runny, your butter might have been too soft, or you added too much milk. Just beat in more powdered sugar, a half cup at a time, until it thickens up. If it’s too thick and stiff, add more milk, one teaspoon at a time, until it reaches a smooth, spreadable consistency. The perfect frosting should hold a peak but still be easy to spread.
How can I make sure my cake layers are even?
The best tool for even layers is a kitchen scale. Weigh your mixing bowl before adding batter, then weigh it again with the batter. Divide that weight by three and portion the batter accordingly. If you don’t have a scale, use a large cookie scoop or a measuring cup to dollop similar amounts into each pan, then gently shake and tap the pans to level the batter.
Can I make this cake a day ahead?
You sure can! In fact, I often do. Bake and cool the layers completely. Wrap each one tightly in plastic wrap, then foil. Store them at room temperature overnight. You can even make the frosting and store it covered in the fridge overnight. Let it come to room temperature and re-whip it before using. Assemble the cake the day you plan to serve it for the freshest look and texture.
What kind of vanilla extract is best?
Always use pure vanilla extract, not imitation. The flavor is richer and more complex. For a special treat, try vanilla bean paste. It gives you those lovely little black specks and an intense vanilla flavor. You can use the same amount—one tablespoon. The paste is a bit thicker, so make sure you mix it in well.
Why do you add oil to a butter-based cake?
Butter gives fantastic flavor, but oil keeps cakes moist for longer. Butter solidifies when cold, while oil stays liquid. This recipe uses both to get the rich taste of butter and the supremely moist, tender texture that oil provides. It’s the key to a cake that stays soft for days. Don’t skip it!
How do I get my frosting super smooth?
A “crumb coat” is your best friend. First, apply a very thin layer of frosting all over the cake. This seals in crumbs. Then, chill the cake for 15-20 minutes to set that layer. After that, apply your final, thick layer of frosting. The crumbs will be trapped underneath, giving you a perfectly clean, smooth finish. Use a bench scraper or offset spatula dipped in hot water for the final smoothing.
Can I use salted butter?
You can, but you should adjust the salt in the recipe. If you use salted butter in the cake, reduce the added salt to just a pinch (about 1/8 tsp). For the frosting, omit the added salt entirely. I prefer unsalted butter because it lets you control the exact amount of salt, which is a flavor enhancer, not just for taste.
Time to Bake and Celebrate!
There you have it—everything you need to create a stunning, crowd-pleasing Moist Vanilla Layer Cake. This recipe is my pride and joy, a true testament to the power of a perfectly baked classic. It’s more than just a dessert; it’s a centerpiece for memories. So preheat your oven, pull out your mixer, and get ready for the compliments. You’ve got this. Happy baking!
Creamy Chicken Linguine
Ingredients
Equipment
Method
- Preheat the oven to 350°F (176°C) and prepare three 8-inch cake pans with parchment paper and greasing.
- In a medium bowl, whisk together flour, baking powder, and salt; set aside.
- In a large mixing bowl, cream the butter, granulated sugar, and vegetable oil until fluffy and pale (about 3-4 minutes).
- Add vanilla extract and eggs one at a time, mixing until fully incorporated after each addition.
- Alternate adding the flour mixture and milk to the batter, mixing until just combined.
- Divide the batter evenly among the prepared pans and smooth the tops.
- Bake for 25-30 minutes until the tops are springy and a toothpick comes out with moist crumbs.
- Cool cakes in pans for 2-3 minutes, then transfer to a wire rack to cool completely.
- For the frosting, beat room-temperature butter until smooth, add powdered sugar and mix, then add salt, vanilla, and milk until desired consistency is reached.
- Level each cake layer and spread frosting between layers and around the cake.
Nutrition
Notes
You can substitute milk with buttermilk or any non-dairy option.
Keep cakes at room temperature for a day; refrigerate for up to a week; can be frozen for up to 3 months.
If the buttercream is too thick, add more milk; if too thin, add more powdered sugar.
Feel free to experiment with variations, such as adding lemon zest, chocolate chips, or fresh fruit between layers!