Let’s Make Mouthwatering Crispy Buttermilk Chicken Tenders!
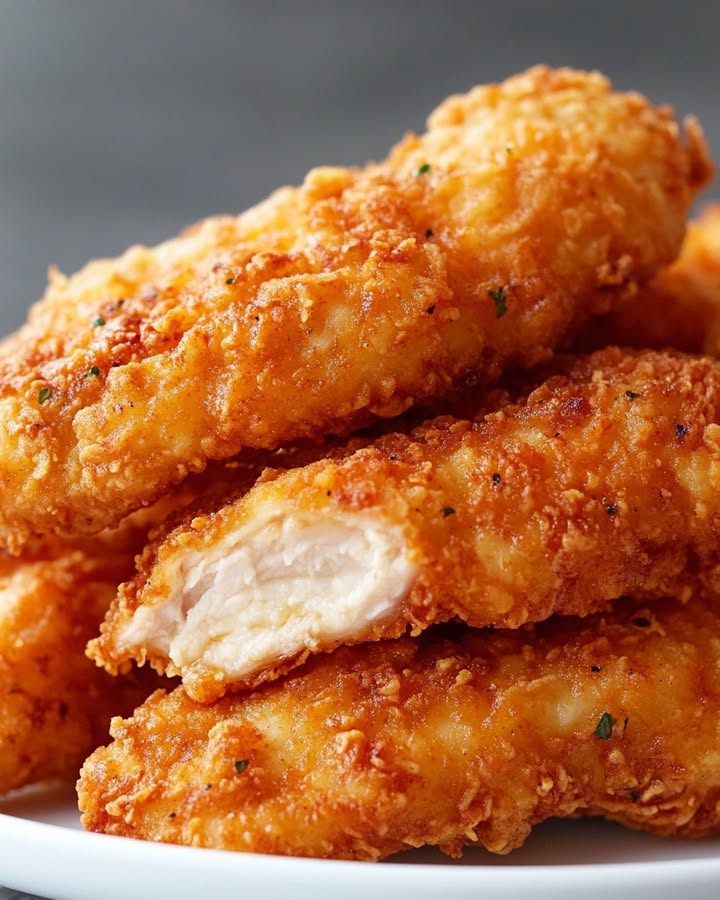
There’s nothing quite like the satisfying crunch of a perfectly fried crispy buttermilk chicken tender. It’s a dish that brings everyone to the table, and it’s a favorite in our household. Whether it’s for a casual family dinner or a special gathering, these tenders are always a hit. So, get ready to roll up your sleeves and dive into this delicious recipe!
A Little Bit About the History of Buttermilk Chicken Tenders
Buttermilk chicken tenders have a rich history, tracing back to Southern American cuisine. The use of buttermilk as a marinade not only adds a tangy flavor but also helps to tenderize the chicken, making it incredibly juicy and flavorful. Over the years, this classic recipe has seen many variations, from adding different spices to experimenting with cooking methods. But no matter how you tweak it, the result is always a crowd-pleaser.
Why You’ll Love This Recipe
One of the best things about these crispy buttermilk chicken tenders is their simplicity. The buttermilk marinade makes the chicken super tender, and the seasoned breading gives it a perfect, crispy exterior. Plus, the combination of paprika and parsley flakes adds a delightful burst of flavor. It’s a dish that’s easy to make, yet impressive enough to serve to guests.
Perfect Occasions to Prepare This Recipe
These buttermilk chicken tenders are versatile and can be the star of any meal. They’re perfect for a quick weeknight dinner, a lazy Sunday brunch, or even a backyard barbecue. Kids love them as a fun, finger-friendly food, and adults appreciate their crispy, savory goodness. Trust me, once you try them, they’ll become a regular on your menu.
Ingredients
- 2 boneless, skinless chicken breasts (4 oz each)
- 1 cup buttermilk
- 1 tbsp paprika
- 1 tbsp parsley flakes
- 2 cups all-purpose flour
- 2 eggs
- 2 cups vegetable oil
- 1 tbsp seasoning salt
Substitution Options
If you don’t have some of the ingredients, no worries! Here are some alternatives:
- Buttermilk: You can use plain yogurt or milk mixed with a tablespoon of lemon juice or white vinegar.
- Paprika: Substitute with cayenne pepper for a spicy kick or smoked paprika for a smoky flavor.
- Parsley flakes: Fresh parsley or thyme can work well too.
Preparation Section
Step 1: Prepare the Chicken
Pound the chicken breasts to a 1/2 inch thickness using a meat mallet. This step ensures that the chicken cooks evenly and quickly. Then, slice the chicken into strips. This is the first step in creating those irresistible crispy buttermilk chicken tenders.
Step 2: Marinate the Chicken
Place the chicken strips in a bowl and pour the buttermilk over them. Make sure each piece is fully coated. Let the chicken marinate in the fridge for at least an hour. This step is crucial as the buttermilk will tenderize the chicken and infuse it with a tangy flavor.
Step 3: Prepare the Breading Mixture
In a shallow dish, mix the flour, paprika, parsley, and seasoning salt. In another bowl, beat the eggs. This setup will help you create a nice, even coating on the chicken. The smell of the spices blending together is simply divine.
Step 4: Coat the Chicken
Remove the chicken from the buttermilk, allowing any excess to drip off. Dredge the chicken in the flour mixture, then dip it in the beaten eggs, and finally coat it again in the flour. This double-coating technique ensures a crispy, golden exterior.
Step 5: Fry the Chicken Tenders
Heat the vegetable oil in a large skillet over medium heat. Once the oil is hot, carefully place the coated chicken strips in the skillet. Fry for 3-4 minutes per side, or until the chicken is golden brown and cooked through. Use a slotted spoon to flip the pieces and ensure even cooking.
Step 6: Drain and Serve
Once the crispy buttermilk chicken tenders are cooked, remove them from the oil and place them on a plate lined with paper towels to drain any excess oil. This step keeps the tenders from getting soggy. Serve them hot, and watch them disappear!
Chef’s Tip: Add a Pinch of Garlic Powder
For an extra layer of flavor, add a pinch of garlic powder to the flour mixture. This small addition will give your tenders a subtle, savory taste that complements the buttermilk and spices perfectly.
Timing
Here’s a breakdown of the time needed for this recipe:
- Prep time: 15 minutes
- Cook time: 10 minutes
- Total time: 25 minutes
Chef’s Secret
The key to achieving that perfect, crispy texture is to make sure the oil is at the right temperature. Too hot, and the outside will burn before the inside is cooked; too cold, and the tenders will absorb too much oil. A good rule of thumb is to heat the oil to around 350°F (175°C).
Extra Info
Did you know that buttermilk is not just great for marinating chicken? It’s also a fantastic ingredient in baked goods like pancakes and biscuits. Its acidity helps to activate baking soda, creating a light and fluffy texture. So, don’t throw away that leftover buttermilk; use it in your next batch of homemade bread!
Necessary Equipment
To make these crispy buttermilk chicken tenders, you’ll need the following tools:
- Meat mallet or rolling pin
- Shallow dishes for breading
- Whisk or fork for beating eggs
- Large skillet or deep fryer
- Tongs or slotted spoon for flipping the chicken
- Plate lined with paper towels
Storage
Storing your crispy buttermilk chicken tenders is easy. First, let them cool completely. Then, place them in an airtight container and store them in the refrigerator for up to 3 days. When you’re ready to reheat, you can either pop them in the oven at 350°F (175°C) for about 10 minutes or use a toaster oven. This method will help them regain their crispy texture. If you want to freeze them, wrap them tightly in plastic wrap and then in foil. They can last in the freezer for up to 3 months. To reheat, bake them from frozen at 350°F (175°C) for about 20 minutes, or until heated through and crispy.
Tips and Advice
For the best results, make sure your oil is at the right temperature. A thermometer is a handy tool, but if you don’t have one, a simple test is to drop a small piece of bread into the oil. If it sizzles and turns golden within 30 seconds, your oil is ready. Also, don’t overcrowd the pan; fry the chicken in batches to ensure even cooking and crispy results.
Presentation Tips
When it comes to presenting your crispy buttermilk chicken tenders, get creative! You can serve them on a platter with a variety of dipping sauces, such as honey mustard, ranch, or BBQ. Garnish with a sprinkle of fresh parsley or a slice of lemon for a pop of color. For a more rustic look, serve them on a wooden board with a side of coleslaw and pickles. The presentation can make the dish even more appetizing.
Healthier Alternative Recipes
While our crispy buttermilk chicken tenders are a treat, there are healthier versions you can try:
- Baked Version: Follow the same steps for breading, but instead of frying, bake the chicken tenders in the oven at 400°F (200°C) for about 20 minutes, or until golden and crispy.
- Grilled Version: Marinade the chicken in buttermilk and grill it over medium heat. This method gives a smoky flavor and reduces the fat content.
- Air-Fried Version: Use an air fryer to cook the breaded chicken tenders. Preheat the air fryer to 400°F (200°C) and cook for about 10-12 minutes, or until crispy and golden.
- Lightly Battered Version: Use panko breadcrumbs instead of all-purpose flour for a lighter, crispier coating. This option is a bit healthier and still delicious.
- Keto Version: Substitute the all-purpose flour with almond flour and use a low-carb breading. This version is perfect for those on a keto diet.
- Gluten-Free Version: Use gluten-free flour and breadcrumbs to make the recipe suitable for those with gluten sensitivities.
Common Mistakes to Avoid
Mistake 1: Over-Marinating the Chicken
While marinating the chicken in buttermilk is crucial for tenderness, over-marinating can make the chicken mushy. Stick to the 1-hour mark for the best results. If you need to marinate longer, up to 4 hours is fine, but avoid going beyond that.
Mistake 2: Not Using the Right Oil Temperature
Frying the chicken at the wrong temperature can lead to either greasy or burnt tenders. Keep the oil at around 350°F (175°C). A thermometer is your best friend here, but if you don’t have one, use the bread test mentioned earlier.
Mistake 3: Overcrowding the Pan
Overcrowding the pan can lower the oil temperature and lead to unevenly cooked chicken. Fry the chicken in batches, and make sure there’s enough space between each piece. This will help them cook evenly and stay crispy.
Mistake 4: Not Draining the Chicken Properly
Skipping the draining step can result in soggy, greasy chicken. Place the fried chicken on a plate lined with paper towels and let them drain for a couple of minutes. This step is crucial for maintaining the perfect crispy texture.
Mistake 5: Not Seasoning the Flour Mixture Well
The flour mixture should be well-seasoned to ensure the chicken is flavorful. Taste the breading mixture before you start, and adjust the seasoning if needed. A pinch of essential nutrients from the spices can make a big difference in the overall flavor.
FAQ
Can I use bone-in chicken for this recipe?
Yes, you can use bone-in chicken, but it will take longer to cook and may not be as tender. Boneless, skinless chicken breasts work best for this recipe, as they cook quickly and evenly.
What if I don’t have buttermilk?
No problem! You can make a buttermilk substitute by mixing 1 cup of milk with 1 tablespoon of lemon juice or white vinegar. Let it sit for 5 minutes before using it in the recipe.
How do I know when the oil is at the right temperature?
You can use a kitchen thermometer to check the oil temperature, which should be around 350°F (175°C). If you don’t have a thermometer, drop a small piece of bread into the oil. If it sizzles and turns golden within 30 seconds, the oil is ready.
Can I bake the chicken instead of frying?
Absolutely! To bake the chicken tenders, preheat your oven to 400°F (200°C). Place the breaded chicken on a baking sheet and bake for about 20 minutes, or until golden and crispy.
What kind of dipping sauces go well with these chicken tenders?
You can serve these crispy buttermilk chicken tenders with a variety of dipping sauces. Some popular options include honey mustard, ranch, BBQ, or a homemade aioli. Get creative and find your favorite!
Can I use whole wheat flour instead of all-purpose flour?
Yes, you can use whole wheat flour, but the texture will be slightly different. Whole wheat flour will make the breading a bit denser and nuttier. If you prefer a lighter, crispier coating, stick with all-purpose flour.
How long can I store the leftovers?
You can store the leftover crispy buttermilk chicken tenders in an airtight container in the refrigerator for up to 3 days. For longer storage, you can freeze them for up to 3 months. Just make sure to let them cool completely before storing.
What’s the best way to reheat the chicken tenders?
For the best results, reheat the chicken tenders in the oven at 350°F (175°C) for about 10-15 minutes, or until they are heated through and crispy. Avoid using the microwave, as it can make the chicken soggy.
Can I use other types of oil for frying?
Yes, you can use other oils like peanut oil, sunflower oil, or canola oil. These oils have high smoke points and are great for frying. Just make sure the oil is at the right temperature before adding the chicken.
What can I serve with these chicken tenders?
These crispy buttermilk chicken tenders pair well with a variety of sides. Some great options include coleslaw, potato wedges, a green salad, or a side of mac and cheese. For a more filling meal, you can serve them with mashed potatoes or a vegetable stir-fry.
Final Thoughts
I hope you enjoy making and eating these crispy buttermilk chicken tenders as much as we do. They’re a true crowd-pleaser and a joy to prepare. For more delicious chicken recipes, check out our main dish section where you’ll find a variety of options, from crispy fried chicken to chicken curry and baked chicken drumsticks. Happy cooking!
Crispy Buttermilk Tenders
Ingredients
Equipment
Method
- Pound the chicken breasts to a 1/2 inch thickness and slice into strips.
- Place the chicken strips in a bowl and pour the buttermilk over them, ensuring full coating. Marinate in the fridge for at least an hour.
- In a shallow dish, mix the flour, paprika, parsley, and seasoning salt. In another bowl, beat the eggs.
- Remove the chicken from the buttermilk, letting excess drip off. Dredge in the flour mixture, dip in eggs, and coat again in flour.
- Heat vegetable oil in a large skillet over medium heat. Fry the coated chicken strips for 3-4 minutes per side, or until golden brown and cooked through.
- Remove the cooked chicken from the oil and place on paper towels to drain excess oil. Serve hot.