Marshmallow Whip Cheesecake: Your New Favorite No-Bake Dream
Let me tell you a secret. I used to be scared of making cheesecake. All that fuss with a water bath and the fear of cracks! Then, I discovered this magical no-bake version. It’s like a cloud and a cheesecake had a delicious, fluffy baby. This Marshmallow Whip Cheesecake is my go-to for wowing guests without stress. It’s impossibly light, sweet, and pure joy on a plate.
A Sweet Slice of Nostalgia
This recipe feels like a happy accident from a 1950s kitchen. It takes the classic, dense New York-style cheesecake and gives it a delightful twist. By folding in marshmallow whip and fresh whipped cream, we create something airy and dreamy. Think of the creamy center of a s’more, but in elegant cheesecake form. It’s a modern no-bake treat with a heart full of nostalgic, comforting flavor.
Why You’ll Fall in Love With This Cheesecake
You’ll love this recipe for so many reasons! First, there’s no oven required beyond a quick bake for the crust. That means no cracks and no summer kitchen heat. The texture is amazingly light and mousse-like, not heavy. It’s also incredibly forgiving and quick to put together. Even beginners look like pastry pros. The flavor is a perfect balance of creamy cheesecake and sweet, vanilla-kissed marshmallow.
Perfect Occasions for This Fluffy Dessert
This cheesecake is a superstar for any event! Its creamy white top is a blank canvas for decorations. I love it for summer potlucks, baby showers, and birthday parties. It’s light enough after a big BBQ meal. Top it with red berries for the Fourth of July or chocolate shavings for a winter gathering. It’s also the perfect “just because” treat to make a Tuesday feel special.
Gathering Your Ingredients
This recipe uses simple, easy-to-find items. Let’s break them down.
For the Crust:
- 1 1/2 cups graham cracker crumbs
- 1/4 cup granulated sugar
- 1/2 cup unsalted butter, melted
For the Cheesecake Filling:
- 8 ounces cream cheese, softened
- 1 cup marshmallow whip (like Marshmallow Fluff)
- 1/2 cup granulated sugar
- 1 teaspoon vanilla extract
- 1 cup heavy whipping cream
For the Topping:
- 1/2 cup heavy whipping cream
- 2 tablespoons powdered sugar
- 1/2 teaspoon vanilla extract
- Mini marshmallows or chocolate shavings (optional, for garnish)
Easy Ingredient Swaps
Out of something? No worries! Here are some simple swaps:
- Graham Cracker Crumbs: Use digestive biscuits, vanilla wafers, or even crushed pretzels for a sweet-and-salty twist.
- Marshmallow Whip: If you can’t find the jarred stuff, you can make a version by melting 2 cups of mini marshmallows with 2 tbsp of corn syrup. Let it cool slightly before using.
- Heavy Cream: For a lighter option, you can use well-chilled full-fat coconut cream. Whip it just like heavy cream.
- Cream Cheese: Use the block-style, full-fat kind for best results. Low-fat versions can make the filling too soft.
Crafting Your Marshmallow Whip Cheesecake
Follow these steps for a perfect, fluffy cheesecake every single time.
Step 1: Building the Buttery Base
First, preheat your oven to 350°F (175°C). Grab a medium bowl and combine the graham cracker crumbs and sugar. Now, pour in that glorious melted butter. The smell is already heavenly! Mix it with a fork until every last crumb is shiny and coated. It should feel like wet sand. Pour this into your springform pan and press it down firmly and evenly. I use the bottom of a measuring cup to get it nice and compact. Bake this for 8-10 minutes until it’s just lightly golden and fragrant. Let it cool completely on a rack. Pro tip: A completely cool crust is key! A warm crust will melt your creamy filling.
Step 2: Creating the Cloud-Like Filling
This is where the magic happens. In a large bowl, beat your softened cream cheese until it’s perfectly smooth. No lumps allowed! Then, add in the marshmallow whip, sugar, and vanilla. Beat it all together until it’s one creamy, dreamy mixture. Now, in a separate, clean bowl, whip that cup of heavy cream. Whip it until stiff peaks form—this means when you lift the beaters, the cream stands straight up. Now, gently fold the whipped cream into the cream cheese mixture. Use a big spatula and a light hand. You want to keep all that air you just whipped in. The filling will transform into a light, airy, and voluminous cloud.
Step 3: Assembling and Chilling to Perfection
Spoon all that beautiful fluffy filling onto your cooled crust. Smooth the top with your spatula. Now, the hard part: patience. Carefully place the pan in the refrigerator. Let it chill for at least 4 hours, but overnight is even better. This wait is what allows the cheesecake to set up firm and sliceable. It gives the flavors time to mingle and become friends. Trust me, it’s worth the wait. Chef’s tip: For super clean slices, dip your sharp knife in hot water and wipe it dry between each cut.
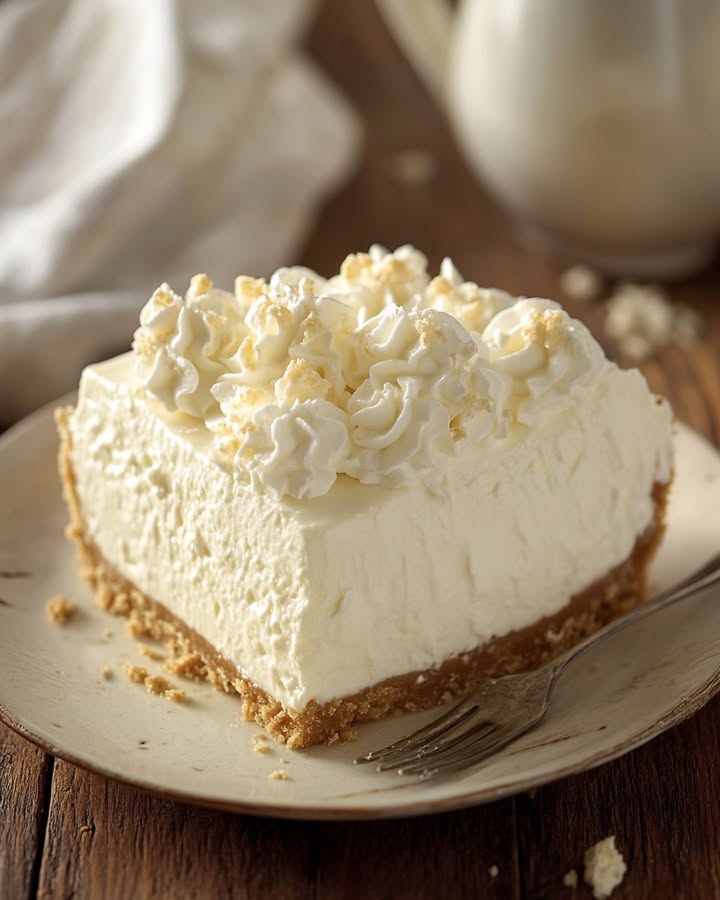
Step 4: Adding the Final Fluffy Touches
Just before serving, make the fresh whipped cream topping. Whip the 1/2 cup of heavy cream with the powdered sugar and vanilla until you get soft peaks. This is a little softer than the filling cream. You can spread it over the whole cheesecake or pipe pretty dollops around the edge. Now for the fun part—garnish! Scatter a handful of mini marshmallows or a shower of chocolate shavings over the top. This adds texture and makes it look irresistible.
Your Cheesecake Timeline
Here’s a quick look at how your time is spent making this dessert.
- Prep Time: 20 minutes (active, fun work)
- Cooking Time: 10 minutes (for the crust only)
- Chilling Time: 4 hours (the essential “set” time)
- Total Time: 4 hours 30 minutes
- Servings: Makes 8 generous slices
A Chef’s Little Secret
For an extra layer of flavor that will have people guessing, add a tiny pinch of salt to the graham cracker crust. Just about 1/8 of a teaspoon. It balances the sweetness of the marshmallow and makes the vanilla and cream cheese flavors pop in the most wonderful way.
Fun Fact: The Fluff Factor
Marshmallow whip, often sold as “Marshmallow Fluff,” has a fun history. It was invented in Massachusetts in 1917! Before that, making marshmallow cream was a tedious, stovetop process. This invention made adding that sweet, airy texture to recipes like this cheesecake incredibly easy for home cooks everywhere.
What You’ll Need to Make It
- 9-inch springform pan (the MVP for easy release)
- Mixing bowls (two medium, one large)
- Electric hand mixer or stand mixer
- Rubber spatula
- Measuring cups and spoons
Storing Your Masterpiece
This cheesecake needs to live in the refrigerator. Once served, cover any leftovers tightly with plastic wrap or place them in an airtight container. The crust may get slightly softer over time, but it will still taste amazing.
You can store it this way for up to 5 days. For the freshest taste and texture, try to enjoy it within 3 days.
I do not recommend freezing this cheesecake. The whipped cream and marshmallow filling can become grainy and separate when thawed. It’s best enjoyed fresh and chilled.
Tips and Advice for Success
- Softened Cream Cheese is a Must: Take the cream cheese out of the fridge at least an hour before you start. Room-temperature cheese blends smoothly without lumps.
- Chill Your Bowl: For the best whipped cream, chill your mixing bowl and beaters in the freezer for 10-15 minutes before whipping.
- Fold, Don’t Stir: When combining the whipped cream with the filling, use a folding motion. Cut through the center and sweep up the sides. This keeps the filling light.
- Patience Pays: Don’t rush the chilling time. Four hours is the minimum. Overnight chilling gives you the cleanest, firmest slices.
Presentation Pointers
- Place the whole cheesecake on a cake stand for a party.
- Drizzle individual slices with a little caramel or chocolate sauce just before serving.
- Create a seasonal look with fresh fruit: strawberries in summer, pomegranate seeds in winter.
- For a “campfire” feel, lightly toast the mini marshmallow garnish with a kitchen torch.
Delicious Variations to Try
Once you master the basic recipe, get creative! Here are six tasty twists.
- Chocolate Swirl: Melt 1/2 cup of chocolate chips with a splash of cream. Cool slightly, then dollop over the filled cheesecake and swirl with a knife.
- Fruity Delight: Fold 1 cup of very finely chopped strawberries or raspberries into the filling. The berries add a bright, tart flavor.
- Cookie Dough Bliss: Add 1/2 cup of mini chocolate chips and 2 tablespoons of brown sugar to the filling. It tastes like edible cookie dough!
- Peanut Butter Cup: Swirl 1/3 cup of creamy peanut butter into the filling. Top with chopped peanut butter cups.
- Mocha Magic: Dissolve 1 tablespoon of instant espresso powder into the vanilla before adding it to the cream cheese mixture.
- S’mores Spectacular: Use a crushed chocolate graham cracker crust. Top the finished cheesecake with whipped cream, mini marshmallows, and a drizzle of chocolate ganache.
Common Mistakes to Avoid
Avoid these simple pitfalls for a perfect cheesecake every time.
Mistake 1: Using Cold Cream Cheese
This is the number one reason for a lumpy filling. Cold cream cheese will not blend smoothly with the other ingredients. No matter how long you beat it, little lumps will remain. Always plan ahead. Take the cream cheese out of the fridge and let it sit on the counter for at least 60 minutes. It should feel soft to the touch but not greasy or melted.
Mistake 2: Not Whipping the Cream Enough
Undervhizzed cream will make your filling runny and sad. You need stiff peaks for structure. Whip the heavy cream until it is thick and holds its shape firmly. When you lift the beaters, the peak should stand straight up without flopping over. If you stop too soon, the cream will weep into the filling, and your cheesecake might not set properly.
Mistake 3: Rushing the Chill Time
It’s tempting to slice into your creation after just an hour or two. Don’t do it! The chilling time is not just to make it cold. It’s when the cheesecake actually sets and firms up. Cutting it too early will result in a messy, soup-like slice. Set a timer for a full 4 hours, but honestly, letting it chill overnight is the true secret to perfect slices.
Mistake 4: Overmixing the Filling
When you fold in the whipped cream, be gentle. If you use the mixer or stir aggressively, you will deflate all the air you just whipped into the cream. A deflated filling will be dense instead of light and airy. Use a large spatula and a slow, patient folding motion. Stop as soon as no white streaks remain.
Your Cheesecake Questions, Answered
Can I make this cheesecake ahead of time?
Absolutely! This cheesecake is actually better when made ahead. You can prepare it completely, including the topping, up to two days in advance. Just keep it covered in the refrigerator until you’re ready to serve. The flavors have more time to develop, and it sets up perfectly firm. It’s the ultimate make-ahead dessert for any party or holiday gathering.
What is marshmallow whip, and where do I find it?
Marshmallow whip is a spreadable, fluffy marshmallow cream. The most common brand is called Marshmallow Fluff. It’s usually found in the baking aisle of your grocery store, near the syrups or sometimes near the ice cream toppings. It comes in a plastic jar or a glass jar. If you can’t find it, some stores have their own store brand version, simply called marshmallow cream.
Can I use a different type of crust?
You sure can! The graham cracker crust is classic, but feel free to get creative. Crushed Oreos (with the filling) make a delicious chocolate crust. Just omit the added sugar from the crust recipe. Gingersnaps would give a wonderful spice flavor. You could even use crushed pretzels for a fantastic sweet and salty combination. The process is the same: mix crumbs with melted butter and press into the pan.
My filling seems too soft. What did I do wrong?
If your filling is soft, the most likely culprit is under-whipped heavy cream or not enough chilling time. Make sure your cream is whipped to truly stiff peaks. Also, ensure your cream cheese was at room temperature for smooth blending. Finally, the cheesecake must chill for the full 4 hours, minimum. If it’s still soft, just let it chill longer. Overnight is always best for a firm set.
Can I freeze this no-bake cheesecake?
I do not recommend freezing this particular recipe. The whipped cream and marshmallow filling can separate and become grainy when thawed. The texture will change and become less pleasant. This dessert is meant to be enjoyed fresh from the fridge. For best results, store it in the refrigerator and eat it within 3-5 days.
Can I use Cool Whip instead of homemade whipped cream?
You can, but it will change the flavor and texture. For the filling, using an 8-ounce tub of thawed Cool Whip folded into the cream cheese mixture will work and is quicker. However, the taste will be sweeter and less fresh. For the topping, you can certainly use it. I recommend making the homemade whipped cream topping if you can—it tastes far superior and is less sweet.
How do I get a clean slice of cheesecake?
Clean slices are all about the right tool and technique. Use a long, thin, sharp knife. Run the knife under very hot water for a few seconds, wipe it completely dry with a towel, and then make your cut. The heat helps the knife glide through the creamy filling without sticking. Wipe the knife clean and re-heat it between every single slice for the prettiest results.
Is it okay to use low-fat cream cheese?
It’s not ideal. Full-fat, brick-style cream cheese provides the necessary structure and rich flavor for this cheesecake. Low-fat or whipped cream cheese contains more water and additives. This can prevent the cheesecake from setting properly, leaving you with a softer, sometimes runny, filling. For guaranteed success, stick with the regular, full-fat Philadelphia-style cream cheese.
What can I use instead of a springform pan?
If you don’t have a springform pan, a deep 9-inch pie dish will work in a pinch. The only downside is you won’t be able to remove the slices as neatly. You’ll have to serve it directly from the dish. You could also use a regular 9-inch cake pan lined with plastic wrap with overhanging edges. Once set, you can use the plastic to lift the whole cheesecake out of the pan.
My crust stuck to the pan! How do I prevent that?
To prevent sticking, make sure you press the crust firmly and evenly into the bottom of the pan. You can also put a small circle of parchment paper on the bottom of the springform pan before adding the crust. When it’s time to serve, run a thin knife or offset spatula around the very edge of the crust before unclasping the springform ring. This should help it release cleanly.
Time to Dig In!
And there you have it! Your guide to making the most delightful, fluffy, no-fuss Marshmallow Whip Cheesecake. This recipe has saved me from so many last-minute dessert panics. It’s the kind of treat that looks fancy but is secretly simple. The light texture means people always go back for a second slice. I hope this cheesecake brings as much joy to your table as it has to mine. Now, go whip up some magic—and don’t forget to lick the spatula!
Garlic Parmesan Pasta
Ingredients
Equipment
Method
- Preheat your oven to 350°F (175°C).
- In a medium bowl, combine graham cracker crumbs and 1/4 cup sugar, then mix in melted butter until crumbs are shiny and coated.
- Press the crumb mixture into a springform pan and bake for 8-10 minutes until lightly golden. Let cool completely.
- In a large bowl, beat the softened cream cheese until smooth.
- Add marshmallow whip, 1/2 cup sugar, and 1 teaspoon vanilla to the cream cheese; mix until creamy.
- In a separate bowl, whip 1 cup heavy cream to stiff peaks.
- Gently fold the whipped cream into the cream cheese mixture.
- Spoon the fluffy filling onto the cooled crust and smooth the top.
- Refrigerate for at least 4 hours or overnight to set.
- Before serving, whip 1/2 cup heavy cream with 2 tablespoons powdered sugar and 1/2 teaspoon vanilla until soft peaks form.
- Spread or pipe the whipped cream topping over the cheesecake, then garnish with mini marshmallows or chocolate shavings.