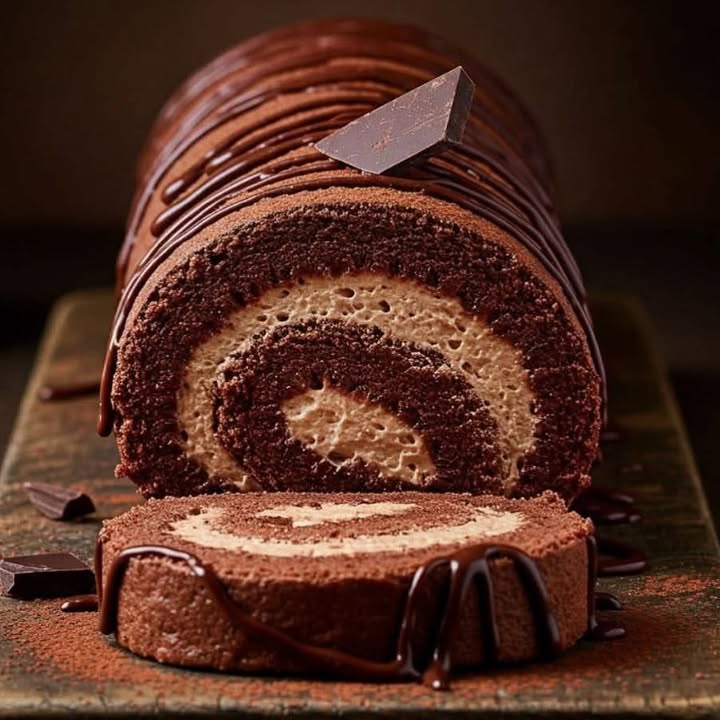
The Joy of a Perfect Chocolate Cake Roll
I’ll never forget the first time I made this cake. My son called it a “chocolate log” and giggled as I unrolled it. That moment of shared laughter is why I cook. This Decadent Chocolate Cake Roll isn’t just dessert. It’s a fun, impressive project that ends with a gorgeous, swoon-worthy slice. Let’s make some magic together.
A Sweet Slice of History
This cake has elegant roots. Known as a Swiss roll or jelly roll, it became popular in the 1800s. It was a clever way to showcase delicate sponge cake and preserves. My version leans into pure chocolate indulgence. It’s a world away from savory classics like a hearty German Kale Delight, but it holds the same charm of being a cherished, shareable centerpiece.
Why You’ll Fall in Love With This Recipe
You get a huge payoff for modest effort. The cake is light as air. The filling is rich and creamy. It looks like it came from a fancy bakery. But it uses simple pantry staples. It’s the perfect recipe to build your confidence. You’ll feel like a baking superstar when you serve it.
Perfect Occasions for This Showstopper
This cake roll is your secret weapon. Bring it to potlucks, birthdays, or holiday dinners. It’s a wonderful finish to a festive meal. I love making it for weekend guests. It says “I care” without you being stuck in the kitchen all day. It’s also a delightful project for a rainy afternoon bake session.
Ingredients for Your Decadent Chocolate Cake Roll
Gather these simple ingredients. Having everything at room temperature is a game-changer.
For the Cake:
- 4 large eggs, room temperature
- 3/4 cup granulated sugar
- 1 tsp vanilla extract
- 1/3 cup cocoa powder
- 1/3 cup all-purpose flour
- 1 tsp baking powder
- 1/4 tsp salt
- Powdered sugar for dusting
For the Filling:
- 1 cup heavy cream
- 1/4 cup powdered sugar
- 1 tsp vanilla extract
- 50 gr dark melted chocolate
Optional Garnish:
- Chocolate shavings or berries for garnish
Easy Ingredient Swaps
Out of something? No worries! Here are my tested substitutions.
- No all-purpose flour? Use a gluten-free 1:1 baking blend.
- Dairy-free needed? Coconut cream whips up beautifully for the filling.
- Out of dark chocolate? Use semi-sweet chips. The filling will be a tad sweeter.
- Want a lighter touch? Reduce cake sugar by 2 tablespoons. It will still be delightful.
Step-by-Step Baking Instructions
Follow these steps closely. Take a deep breath and enjoy the process. You’ve got this!
Step 1: Preheat and Prep
Start by heating your oven to 350°F (175°C). Line a 10×15-inch jelly roll pan with parchment paper. Let the paper hang over the edges a bit. This gives you “handles” to lift the cake later. The scent of warming cocoa will soon fill your kitchen. It’s the best kind of aromatherapy.
Step 2: Whip Eggs and Sugar
Grab a large bowl. Beat the eggs and granulated sugar on high speed. Do this for a full 5 minutes. The mixture will turn pale yellow and become very thick. It should form ribbons when you lift the beaters. This air is what makes the cake light. Gently mix in the vanilla extract.
Step 3: Fold in Dry Ingredients
Sift the cocoa powder, flour, baking powder, and salt together. This removes lumps and adds air. Gently fold this into the egg mixture. Use a big spatula and a light hand. Fold just until no white streaks remain. Overmixing deflates all that lovely air you whipped in.
Step 4: Bake the Cake
Pour the dark, glossy batter into your prepared pan. Spread it evenly to all corners. Bake for 12 to 15 minutes. The cake is done when the top springs back at a gentle touch. A toothpick inserted should come out clean. The kitchen will smell incredible. Pro tip: Set a timer! Overbaking leads to cracks.
Step 5: Roll to Set the Shape
While the cake bakes, lay a clean kitchen towel flat. Dust it liberally with powdered sugar. As soon as the cake comes out, invert it onto the towel. Carefully peel off the parchment paper. Now, roll the cake up from a short end, towel and all. Let it cool completely rolled up. This sets the shape.
Step 5: Make the Chocolate Filling
While the cake cools, make the filling. Whip the heavy cream, powdered sugar, and vanilla until stiff peaks form. Melt the dark chocolate and let it cool slightly. Fold the melted chocolate into the whipped cream. The filling will look marbled and dreamy. Chill it until you’re ready to use it.
Step 6: Fill and Re-roll
Gently unroll the cooled cake. It will hold a slight curl. Spread the chocolate whipped cream evenly over the surface. Leave a small border at the edges. Using the towel to guide you, re-roll the cake tightly, but gently. Place it seam-side down on a serving plate.
Step 7: Chill and Slice
Pop the cake roll into the fridge for at least 1 hour. This helps it set and makes slicing clean. Before serving, dust with powdered sugar or add your garnishes. Use a sharp knife to slice. Admire those beautiful swirls you created!
Pro tip: If the cake develops a small crack, don’t panic. The filling will glue it back together. It will still taste amazing.
Chef’s tip: Add a pinch of instant espresso powder to the dry ingredients. It makes the chocolate flavor sing without a coffee taste.
How Long This Takes
Here’s a realistic timeline so you can plan your day.
- Prep time: 20 minutes
- Cooking time: 15 minutes
- Cooling time: 1 hour
- Chilling time: 1 hour
- Total time: About 2 hours 35 minutes
Most of this is unattended cooling time. Perfect for tidying up or relaxing.
My Chef’s Secret
The absolute key is rolling the cake while it’s still warm. This seems scary but it’s essential. The heat makes the cake pliable. It trains the cake to hold its rolled shape without cracking. Trust the process. Roll it up right out of the oven. You’ll be glad you did.
A Little Chocolate Trivia
Here’s a fun fact to share while you eat. The word “chocolate” comes from the Aztec word “xocolātl.” It meant “bitter water.” I think they’d approve of our much sweeter, rolled-up version. Every culture has its treasured foods, from this cake to a comforting German Kale Delight.
Kitchen Tools You’ll Need
You don’t need fancy gear. Just these basics:
- 10×15-inch jelly roll pan (a baking sheet with sides)
- Parchment paper
- Electric mixer (hand or stand)
- Large mixing bowls
- Spatula
- Sifter or fine mesh strainer
- Clean, lint-free kitchen towel
Storing Your Masterpiece
To keep your cake roll fresh, cover it tightly with plastic wrap. You can also use an airtight container. Store it in the refrigerator. It will stay delicious for up to 3 days. The filling is dairy-based, so it must stay cold. The cake actually gets more moist as it sits.
This cake freezes wonderfully for longer storage. Wrap the whole roll or individual slices in plastic wrap. Then, place them in a freezer bag or wrap in foil. It can be frozen for up to 1 month. This is perfect for making ahead for a special event.
When ready to eat frozen cake, thaw it overnight in the refrigerator. Avoid thawing at room temperature. This prevents the filling from becoming too soft. Once thawed, add your garnishes and serve. It tastes wonderfully fresh.
My Best Tips and Advice
A few extra thoughts from my many kitchen trials.
- Measure flour by spooning it into the cup and leveling it off.
- Use fresh baking powder for a good rise.
- Let the melted chocolate cool before folding into cream.
- Dust the towel generously with powdered sugar to prevent sticking.
- Slice with a warm, clean knife for perfect pieces.
Presentation Ideas to Shine
Make your cake roll look extra special with these easy touches.
- Dust with cocoa powder for a dramatic dark finish.
- Arrange fresh raspberries and mint leaves on top.
- Drizzle with a simple chocolate ganache.
- Serve with a scoop of vanilla bean ice cream.
- Pipe extra whipped cream rosettes on each slice.
Healthier Recipe Variations
Want to lighten things up? Try one of these tasty twists.
- Flourless Chocolate Roll: Use almond flour instead of all-purpose. It’s naturally gluten-free and adds a nutty richness.
- Sugar-Free Version: Swap granulated sugar for a monk fruit blend. Use sugar-free chocolate in the filling for a diabetic-friendly treat.
- Vegan Chocolate Roll: Flax eggs and coconut cream work wonders here. It’s completely plant-based and still decadent.
- Protein Boost Roll: Add a scoop of chocolate protein powder to the dry ingredients. Reduce the flour slightly to compensate.
- Berry Swirl Roll: Replace the chocolate filling with a light, sweetened whipped cream and a layer of mashed berries.
- Zesty Orange Roll: Add the zest of one orange to the cake batter. Pair it with an orange-infused whipped cream filling.
Common Mistakes to Avoid
Learn from my early mistakes. Avoid these for a perfect roll every time.
Mistake 1: Overbaking the Cake
This is the biggest culprit for a cracked cake. Overbaked cake becomes dry and brittle. It loses its flexibility. Set your timer for the minimum bake time. Check for springiness. The cake is done when it just springs back. It will continue to cook a bit out of the oven.
Mistake 2: Adding Filling to a Warm Cake
If you unroll the cake and it’s still warm, wait. A warm cake will melt the whipped cream filling. This creates a soggy, messy roll. Be patient. Let the cake cool completely in its rolled-up towel. The filling will stay fluffy and the roll will hold its shape.
Mistake 3: Under-whipping the Eggs and Sugar
Don’t rush the whipping step. Those five full minutes are non-negotiable. Under-whipped eggs mean a flat, dense cake. It won’t have the lift needed to roll properly. The mixture should be very thick and pale. When you lift the beater, the ribbon should sit on top for a few seconds.
Mistake 4: Using a Terry Cloth Towel
A fluffy bath towel is a disaster waiting to happen. The cake will stick to the loops and tear. Always use a thin, smooth kitchen towel. A flour sack towel or a plain cotton tea towel works perfectly. The powdered sugar dusting helps, but the right towel is key.
Mistake 5: Skipping the Sifting
It’s tempting to just dump the dry ingredients in. Resist! Sifting does two important things. It breaks up lumps in the cocoa and flour. It also aerates the mixture for a lighter batter. This one-minute step makes a noticeable difference in texture.
Your Questions, Answered
Can I make this cake roll a day ahead?
Absolutely! This cake roll is an excellent make-ahead dessert. Prepare it completely, including the chilling step. Keep it covered in the refrigerator overnight. The flavors have time to meld, and the cake becomes even more moist. Before serving, let it sit out for about 15 minutes to take the chill off. This makes slicing easier. It’s my go-to strategy for stress-free entertaining. Knowing your dessert is ready lets you enjoy your guests.
My cake cracked when rolling. What did I do wrong?
Cracking usually means the cake was a bit overbaked or rolled too tightly. Overbaking dries it out. Rolling too aggressively can stress the structure. To fix future bakes, be diligent with your timer. Roll the cake gently and confidently, but don’t squeeze it. If a crack happens, don’t despair. The filling will hide it when you re-roll. Dust with a little extra powdered sugar or cocoa. It will still be delicious, and it adds homemade charm.
Can I use a different size baking pan?
The 10×15-inch jelly roll pan is ideal for the right thickness. Using a different size will change the baking time and texture. A larger pan makes a thinner cake that can bake too fast and dry out. A smaller pan makes a thicker cake that’s hard to roll without cracking. If you must substitute, a similar sized rimmed baking sheet is your best bet. Adjust the bake time by checking for springiness a few minutes earlier.
How do I cleanly slice the cake roll?
A sharp, thin-bladed knife is essential. I run my knife under very hot water, wipe it dry, and then slice. I repeat this for each cut. The heat helps the knife glide through the filling and cake without dragging. Also, make sure the cake is fully chilled. A firm cake roll is much easier to slice neatly. Wipe the blade between slices for picture-perfect presentation on every plate.
Can I freeze the assembled cake roll?
Yes, freezing works beautifully. Wrap the chilled cake roll tightly in plastic wrap. Then, wrap it again in aluminum foil or place it in a heavy-duty freezer bag. Freeze for up to one month. To serve, transfer it to the refrigerator to thaw overnight. Do not thaw at room temperature, as condensation can make the cake soggy. Once thawed, garnish and enjoy. It’s a fantastic way to always have a special dessert on hand.
What can I use instead of heavy cream?
For a dairy-free version, full-fat coconut cream is a great substitute. Chill a can overnight, scoop out the solid cream, and whip it with sugar. For a stabilized option, you can use a whipped topping. If you want a lighter filling, you can blend softened cream cheese with a little milk and sugar. The texture will be different, but still tasty. The key is a spreadable, firm filling that holds the roll together.
Why is my cake spongy and tough?
A tough cake often comes from overmixing. After adding the dry ingredients, fold gently just until combined. Overmixing develops the gluten in the flour, leading to a chewy texture. Also, ensure your baking powder is fresh. Old leavening agents won’t provide enough lift. Finally, don’t open the oven door during the first 10 minutes of baking. A sudden temperature drop can cause the cake to fall or become dense.
Can I add other flavors to the filling?
Get creative! You can infuse the filling with so many flavors. Add a tablespoon of your favorite liqueur, like Grand Marnier or Bailey’s. Mix in a spoonful of instant coffee granules for a mocha twist. Fold in some finely chopped toasted nuts or mini chocolate chips for texture. A swirl of fruit puree like raspberry is also lovely. Just keep the total volume similar so the roll isn’t overstuffed.
How do I prevent the towel from sticking?
Generously dust the entire surface of the towel with powdered sugar. This creates a non-stick layer. Make sure the towel is clean, dry, and lint-free. As soon as the cake comes out of the oven, invert it onto the sugar-dusted towel. The residual heat will slightly melt the sugar, creating a light barrier. Peel the parchment off slowly and carefully to avoid taking any cake with it.
Is this cake very rich and heavy?
Not at all! That’s the beauty of a roll cake. The cake itself is a light sponge, so it’s not dense like a brownie. The whipped cream filling is airy and not overly sweet, especially with dark chocolate. Each slice feels indulgent but not weighty. It’s a dessert that satisfies your chocolate craving without leaving you feeling stuffed. It’s much lighter than a frosted layer cake, in my opinion.
Ready for Your Baking Triumph
There you have it. Your guide to a stunning Decadent Chocolate Cake Roll. Remember, baking is about joy, not perfection. Even a slightly cracked roll tastes incredible. Share it with people you love. Celebrate the small victories. Now, preheat that oven and get ready for the compliments. You are about to create something wonderful.
German Kale Delight
Ingredients
Equipment
Method
- Preheat your oven to 350°F (175°C) and line a 10x15-inch jelly roll pan with parchment paper.
- Beat eggs and granulated sugar on high speed for 5 minutes until thick and pale yellow.
- Sift cocoa powder, flour, baking powder, and salt together, then fold into the egg mixture gently.
- Pour the batter into the prepared pan and bake for 12 to 15 minutes until the top springs back.
- While the cake bakes, lay a clean kitchen towel flat and dust it with powdered sugar.
- Invert the baked cake onto the towel, remove the parchment paper, and roll it up with the towel.
- Whip heavy cream, powdered sugar, and vanilla until stiff peaks form; fold in the melted chocolate.
- Unroll the cooled cake and spread the chocolate filling evenly over it, leaving a small border.
- Re-roll the cake tightly and place it seam-side down on a serving plate.
- Chill in the fridge for at least 1 hour before slicing and serving.