White Chocolate and Raspberry Cake: A Love Story in Layers
You know that feeling when something tastes so good it makes you pause? That’s this cake. The first time I made it for my book club, a hush fell over the room. All you could hear was the gentle clink of forks. It’s more than a dessert; it’s a Decadent Raspberry and White Chocolate Symphony. Let’s bake some magic!
From Simple Treats to Showstopping Cakes
The pairing of raspberry and white chocolate feels fancy, but its roots are humble. It’s a classic flavor combination born from the contrast of sweet, creamy chocolate and bright, tart berries. My version mixes a simple, tender vanilla cake studded with fresh raspberries with a luxurious white chocolate buttercream. It’s my go-to for turning an ordinary Tuesday into a celebration. It’s the cake I make when I want to say “I’m proud of you,” “I love you,” or simply “Let’s have a great afternoon.”
Why You’ll Fall in Love With This Raspberry Dream
This isn’t a fussy, difficult recipe. It’s wonderfully reliable! The cake is moist and sturdy enough to hold the filling, yet incredibly light. The raspberry filling gives a gorgeous pop of color and flavor right in the center. And the frosting? It’s so silky and rich, you’ll want to eat it with a spoon (no judgment here!). It’s the perfect balance of elegant and utterly comforting.
When to Whip Up This Beautiful Cake
This cake dresses up for any occasion. Think birthdays, baby showers, Mother’s Day brunches, or a fancy dinner party dessert. It’s also secretly fabulous for a “just because” treat. I’ve been known to bake one on a rainy Sunday just to make the house smell incredible. It’s a guaranteed crowd-pleaser.
Gathering Your Ingredients
Here’s your shopping list for this delightful white chocolate and raspberry cake.
For the Cake:
- 2 cups all-purpose flour
- 2 teaspoons baking powder
- 1/2 teaspoon salt
- 1/2 cup unsalted butter, room temperature
- 1 cup granulated sugar
- 2 large eggs
- 1 teaspoon vanilla extract
- 1 cup whole milk
- 1 cup raspberries (fresh or frozen, don’t thaw)
For the Raspberry Filling:
- 1 cup raspberries (fresh or frozen)
- 1/4 cup granulated sugar
- 2 tablespoons water
- 1 teaspoon cornstarch, mixed with 2 tablespoons cold water
For the White Chocolate Glaze:
- 1 cup unsalted butter, softened
- 2 cups powdered sugar, sifted
- 6 oz high-quality white chocolate, melted and cooled
- 2 tablespoons heavy cream
- 1 teaspoon vanilla extract
Clever Substitutions for Your Pantry
No worries if you’re missing something! Here are some easy swaps:
- Raspberries: Frozen work perfectly! Use them straight from the freezer for the cake and filling. Blueberries or blackberries make a lovely twist.
- Milk: Any milk you have—2%, almond, or oat—will work just fine.
- White Chocolate: Use a baking bar, not chips. Chips often contain stabilizers that can make the frosting grainy.
- Heavy Cream: Whole milk or even full-fat coconut milk can be used in a pinch.
Let’s Bake! Step-by-Step Guide
Follow these steps for a flawless white chocolate and raspberry cake.
Step 1: Prep and Mix Dry Ingredients
First, preheat your oven to 350°F (175°C). Grease and flour two 9-inch round cake pans. I also like to line the bottoms with parchment paper for guaranteed easy release. In a medium bowl, whisk together the flour, baking powder, and salt. This aerates the flour and makes sure your leavening is evenly distributed. Set this bowl aside for now.
Step 2: Cream the Butter and Sugar
In a large mixing bowl, beat the room-temperature butter and sugar together. Use an electric mixer on medium speed. Keep going until the mixture is pale, fluffy, and almost looks like whipped cream. This usually takes about 3-4 minutes. This step is crucial for a light cake texture! Pro tip: Room temperature butter should yield slightly to a gentle press. If it’s too soft, your cake might be dense.
Step 3: Add Eggs and Vanilla
Add the eggs one at a time to the creamed butter mixture. Beat well after each egg until it’s fully incorporated. Then, mix in the vanilla extract. Your mixture should be smooth and glossy now. If it looks a little curdled, don’t panic—it will come together when you add the dry ingredients.
Step 4: Alternate Wet and Dry Ingredients
With your mixer on low speed, add about one-third of your flour mixture. Mix until just combined. Then, pour in half of the milk. Mix again. Repeat, ending with the final third of the flour. Stop mixing as soon as you no longer see dry flour streaks. Over-mixing leads to a tough cake. The batter will be thick and beautiful.
Step 5: Fold in the Raspberries
This is the fun part! Gently toss your raspberries in a tablespoon of the reserved flour mixture. This helps prevent them from sinking. Using a spatula, carefully fold them into the cake batter. Watch as the bright red berries create lovely marbled streaks. Divide the batter evenly between your two prepared pans.
Step 6: Bake and Cool the Cakes
Slide the pans into your preheated oven. Bake for 25-30 minutes. You’ll know they’re done when the tops are golden, the edges pull away from the pan, and a toothpick inserted in the center comes out clean. Let the cakes cool in their pans for 10 minutes. Then, run a knife around the edges and invert them onto a wire rack to cool completely. Chef’s tip: Patience is key! Frosting a warm cake is a recipe for melted, runny disaster.
Step 7: Make the Raspberry Filling
While the cakes cool, make the filling. In a small saucepan, combine raspberries, sugar, and water. Cook over medium heat, stirring often, until the berries break down and become saucy. Stir the cornstarch slurry (cornstarch mixed with cold water) into the berry mixture. Keep cooking for another minute or two until it thickens nicely into a glossy jam. Let it cool completely.
Step 8: Whip Up the White Chocolate Glaze
Beat the softened butter in a clean bowl until it’s very creamy. Gradually add the sifted powdered sugar, beating on low at first to avoid a sugar cloud! Once incorporated, pour in the cooled, melted white chocolate, heavy cream, and vanilla. Beat on medium-high until the frosting is incredibly smooth, fluffy, and spreadable. Taste it—you deserve it!
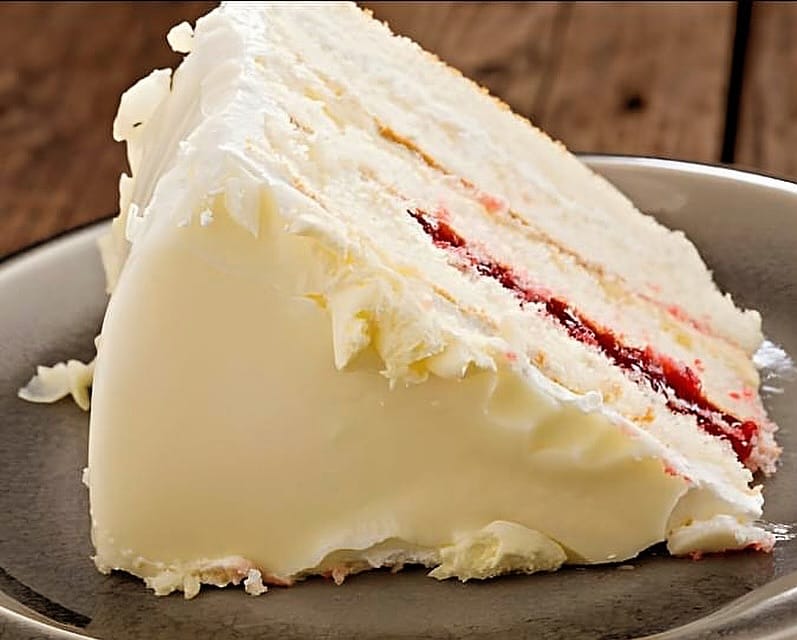
Step 9: Assemble Your Masterpiece
Place one cooled cake layer on your serving plate. Spread the cooled raspberry filling evenly over the top, leaving a small border to prevent oozing. Carefully place the second cake layer on top. Now, use an offset spatula to cover the entire cake with the glorious white chocolate glaze. Swirl it, smooth it, make it yours. Finish by decorating the top with a handful of fresh raspberries.
Timing Your Baking Session
Here’s a quick look at the time investment for this white chocolate and raspberry cake.
- Prep Time: 30 minutes
- Cooking Time: 30 minutes
- Cooling Time: 1 hour (very important!)
- Total Time: About 2 hours
- Servings: 12 happy slices
Chef’s Secret for the Perfect Slice
For fantastically clean slices, pop the fully assembled and frosted cake into the freezer for about 20 minutes before cutting. This firms up the frosting and filling just enough for your knife to glide through without smearing. Run the knife under hot water and dry it between each cut for perfect, photo-ready slices every time.
A Sweet Bit of Extra Info
Did you know white chocolate isn’t technically chocolate? It contains cocoa butter but no cocoa solids. That’s what gives it that uniquely rich, creamy mouthfeel that pairs so magically with fruit. The high cocoa butter content is also why it’s crucial to use high-quality baking bars and melt them gently to keep the frosting silky.
Your Baking Toolbox
You likely have everything you need:
- Two 9-inch round cake pans
- Mixing bowls (large and medium)
- Electric hand mixer or stand mixer
- Whisk and spatula
- Saucepan
- Wire cooling racks
- Offset spatula for frosting (a butter knife works too!)
Storing Your Raspberry and White Chocolate Cake
Short-Term Storage: This cake can sit covered at room temperature for a day, especially if your kitchen is cool. The frosting is stable thanks to the butter.
Refrigerating: For longer storage, cover it well and keep it in the fridge for up to 4 days. Let it sit at room temperature for about 30 minutes before serving to soften the frosting and bring out the flavors.
Freezing: You can freeze the unfrosted cake layers tightly wrapped for up to 3 months. Thaw overnight in the fridge. The frosted cake can also be frozen whole; thaw it slowly in the refrigerator.
Pro Tips for Baking Success
- Always use room temperature ingredients (eggs, butter, milk) for a smooth, even batter.
- Don’t skip sifting the powdered sugar for the frosting. It prevents lumps.
- Melt the white chocolate slowly, either in a double boiler or in short bursts in the microwave, stirring frequently.
- If your raspberry filling seems too runny, cook it a bit longer. It will thicken more as it cools.
Presentation Ideas to Wow Your Guests
- Top with fresh raspberries, a drizzle of melted dark chocolate, and edible flowers.
- Add a sprinkle of freeze-dried raspberry powder on the plate for a pop of color.
- Serve each slice with a small dollop of softly whipped cream.
- For a casual look, do a “naked” cake with less frosting, letting the layers peek through.
Healthier Twists on the Classic
Love the flavors but want a lighter option? Here are some ideas:
- Greek Yogurt Swap: Replace half the butter in the cake with an equal amount of plain Greek yogurt for added protein and moisture.
- Whole Wheat Blend: Use half all-purpose and half whole wheat pastry flour for more fiber.
- Reduced Sugar: You can often reduce the sugar in the cake by 1/4 cup without major texture changes.
- Fruit-Only Filling: Skip the cooked filling and simply use a layer of fresh, lightly mashed raspberries between the cakes.
- Lighter Frosting: Make a glaze by mixing melted white chocolate with a little Greek yogurt and powdered sugar instead of a full buttercream.
- Mini Cakes: Bake the batter in a muffin tin for portion-controlled cupcakes.
Common Mistakes to Avoid
Steer clear of these pitfalls for a perfect cake every time.
Mistake 1: Using Cold Ingredients
Cold butter and eggs don’t incorporate well into the batter. This can lead to a dense, heavy cake instead of a light and fluffy one. Your butter should be soft enough to leave an indent when pressed. Take your eggs and butter out of the fridge at least an hour before you start baking.
Mistake 2: Over-mixing the Batter
Once you add the flour, mixing too much develops the gluten in the flour. This turns your tender cake into a tough, chewy one. Mix just until you no longer see dry streaks of flour. A few small lumps are perfectly fine. They will bake out.
Mistake 3: Frosting a Warm Cake
This is the biggest frosting disaster waiting to happen. A warm cake will melt the butter in your frosting. This creates a greasy, sliding mess. Always let your cake layers cool completely on a wire rack. If you’re in a hurry, pop them in the fridge to speed up the process.
Mistake 4: Not Tossing Berries in Flour
If you just stir fresh or frozen berries into the batter, they will likely all sink to the bottom during baking. Tossing them lightly in a spoonful of flour coats them. This helps them stay suspended throughout the cake layer for an even distribution.
Frequently Asked Questions
Can I use frozen raspberries directly in the cake batter?
Yes, you absolutely can! Do not thaw them first. In fact, frozen berries often work better because they hold their shape during folding. Just toss them in that bit of flour straight from the freezer and fold them in gently. This helps prevent them from bleeding too much color into the batter and from sinking.
My white chocolate frosting is too runny. How can I fix it?
This usually happens if the melted white chocolate or the butter was too warm when added. Don’t worry. First, pop the whole bowl of frosting into the refrigerator for 15-20 minutes to let it firm up. Then, beat it again. If it’s still too soft, you can gradually beat in a little more sifted powdered sugar until it reaches a spreadable consistency.
Can I make this cake a day ahead?
You certainly can. In fact, it often tastes even better the next day as the flavors meld. Bake and cool the layers, wrap them tightly in plastic wrap, and store at room temperature. Make the frosting and filling, store them separately in the fridge. Assemble and frost the cake the day you plan to serve it for the freshest look and texture.
What’s the best way to melt white chocolate?
White chocolate is delicate and can seize (become clumpy) easily. The gentlest method is a double boiler. Place chopped chocolate in a heatproof bowl over a pot of simmering water, making sure the bowl doesn’t touch the water. Stir until smooth. Microwaving works too: use 50% power in 30-second bursts, stirring well between each.
Can I use a different fruit instead of raspberries?
Of course! This recipe is very versatile. Blackberries, blueberries, or chopped strawberries would be wonderful. For a different twist, try a layer of passionfruit curd or lemon curd instead of the raspberry filling. The sweet white chocolate pairs beautifully with almost any tart fruit.
Why did my cake layers turn out dense?
Dense cake is usually a sign of over-mixing or incorrect ingredient temperature. Remember to mix only until combined after adding flour. Also, ensure your baking powder is fresh (test it by dropping a bit in hot water—it should bubble). Properly creaming the room-temperature butter and sugar is also essential for that light, airy crumb.
How do I get my cakes to bake evenly?
For even baking, make sure your oven rack is in the center. Rotate your cake pans halfway through the baking time. Also, avoid overcrowding the oven. If you’re baking on multiple racks, the airflow can be affected. Using light-colored metal pans (not dark non-stick) also helps prevent over-browned edges.
Can I turn this into a layer cake?
You are already making a lovely two-layer cake! If you want more layers, you can slice each baked cake layer horizontally in half to create four thin layers. Just be very gentle and use a long serrated knife. You would need to increase the amount of raspberry filling and frosting to accommodate the extra layers.
My raspberry filling is too thin. What went wrong?
The cornstarch needs to come to a full simmer to activate its thickening power. If your filling is runny, simply return it to the stove and cook it a bit longer over medium heat, stirring constantly. It will continue to thicken as it cools, so let it cool completely before judging its final consistency.
Is there a dairy-free alternative for this cake?
You can experiment with dairy-free swaps. Use plant-based butter and milk in the cake. For the frosting, use a high-quality dairy-free white chocolate bar and plant-based butter. The texture will be slightly different, but the delicious flavor combo will still shine through.
The Final Slice
Baking this white chocolate and raspberry cake is an act of love. It’s about creating something beautiful and sharing it. The look on someone’s face when they take that first bite is worth every minute. So, gather your ingredients, put on some good music, and bake a little joy. I promise, this Decadent Raspberry and White Chocolate Symphony will become a recipe you return to again and again. Happy baking!
Loaded Beef Nacho Skillet
Ingredients
Equipment
Method
- Preheat oven to 350°F (175°C). Grease and flour two 9-inch round cake pans.
- In a medium bowl, whisk together flour, baking powder, and salt, then set aside.
- In a large mixing bowl, beat butter and sugar together until pale and fluffy.
- Add eggs one at a time to the creamed butter, beating well after each addition, then mix in vanilla extract.
- Add one-third of the flour mixture, then half the milk, mixing until just combined. Repeat, ending with flour.
- Toss raspberries in a tablespoon of reserved flour, then fold into cake batter gently.
- Divide batter evenly between prepared pans and bake for 25-30 minutes until golden and a toothpick comes out clean.
- Let cakes cool in pans for 10 minutes, then invert onto a wire rack to cool completely.
- For the raspberry filling, combine raspberries, sugar, and water in a saucepan and cook until saucy. Add cornstarch slurry and thicken on heat.
- Beat softened butter for the glaze until creamy, then gradually add sifted powdered sugar, followed by melted white chocolate, heavy cream, and vanilla until smooth.
- Assemble the cake by placing one layer on a plate, spreading the cooled raspberry filling, and topping with the second layer. Frost with white chocolate glaze.