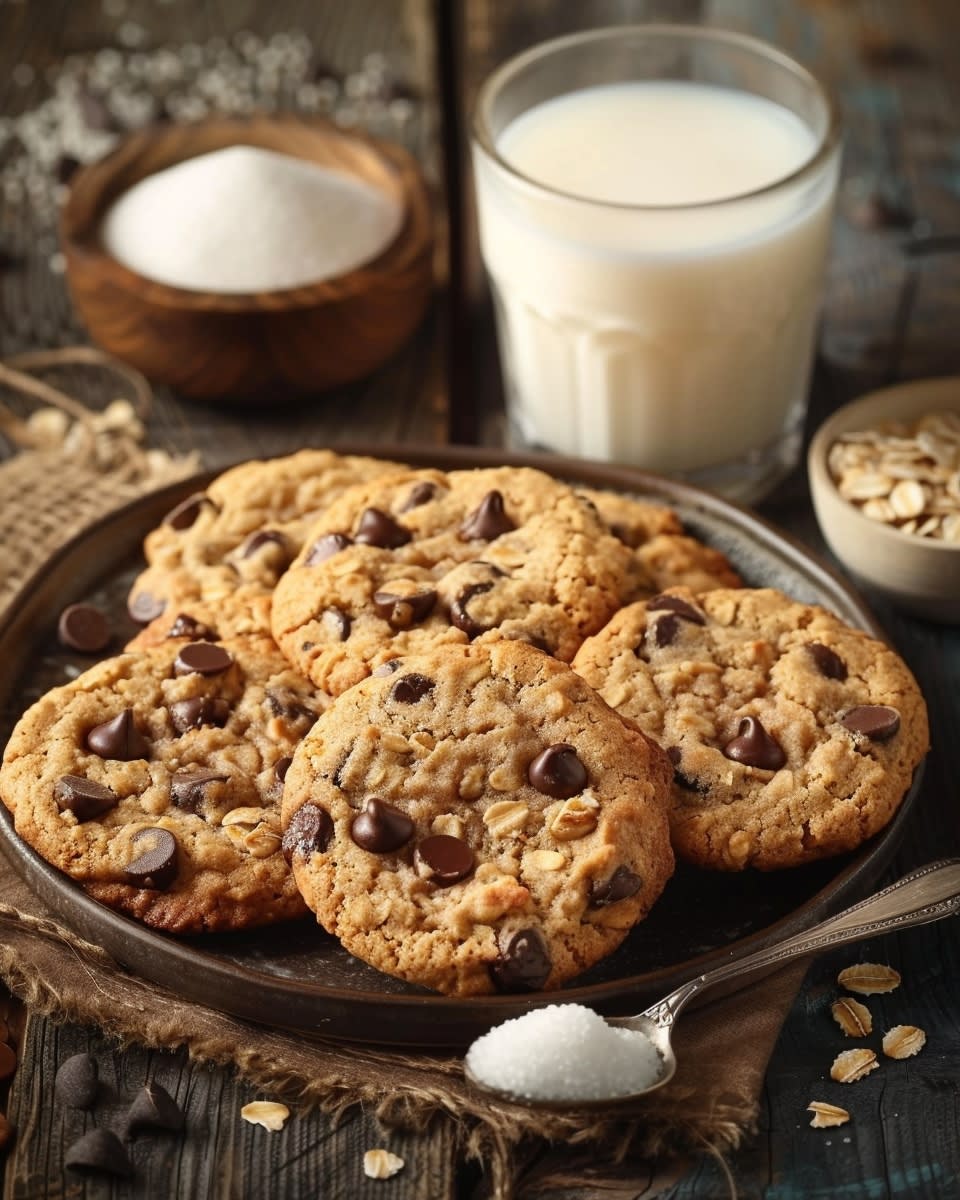
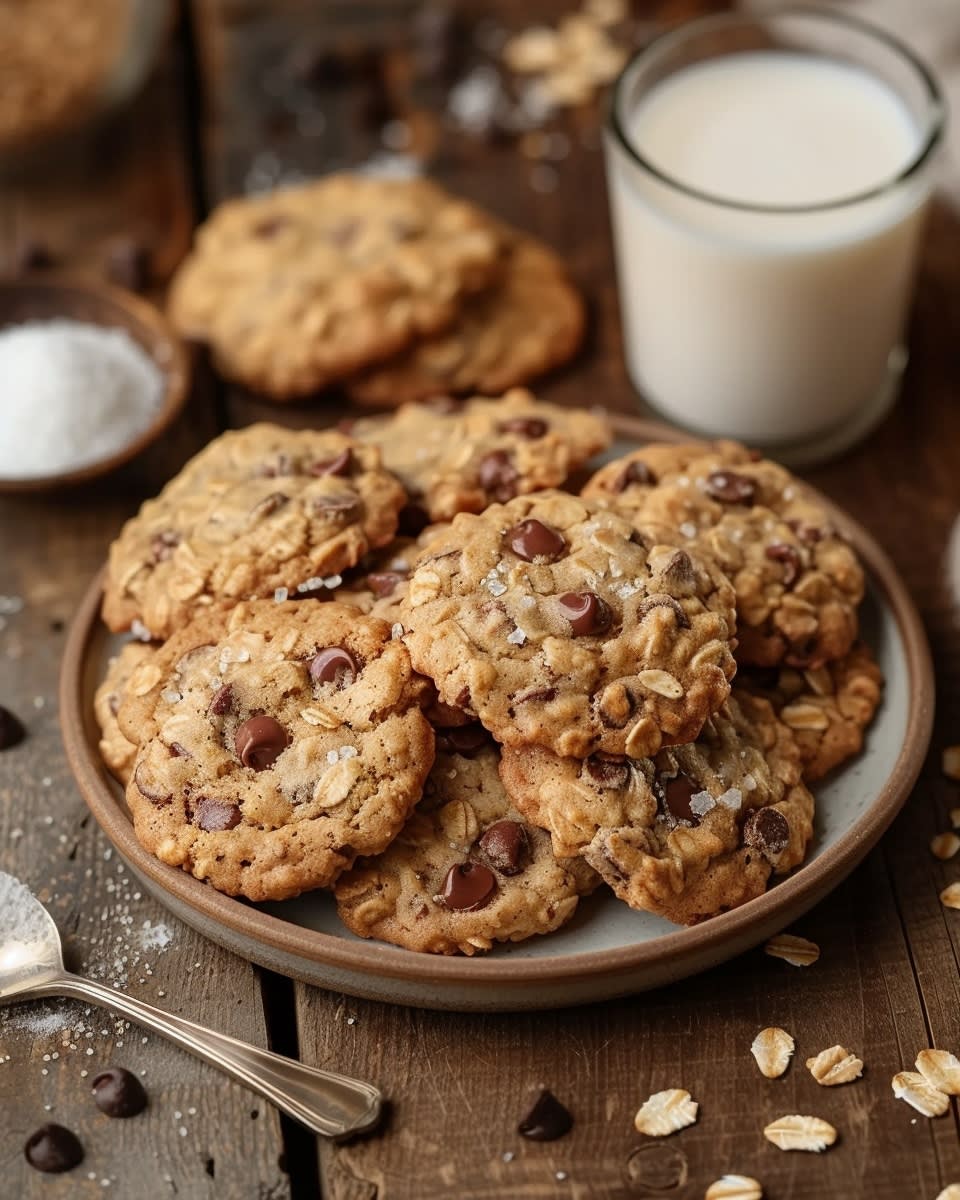
The Perfect Soft Baked Oatmeal Chocolate Chip Cookies
I’ll never forget the first time I bit into a truly perfect oatmeal chocolate chip cookie. It was soft, chewy, and warm from the oven. The chocolate melted on my tongue while the oats added just the right amount of hearty texture. That moment changed everything I thought I knew about cookie baking.
Most people think oatmeal cookies have to be hard and crunchy. They imagine those flat, crispy disks that grandma kept in a tin. But soft baked oatmeal chocolate chip cookies are a completely different experience. These cookies stay tender and chewy for days. They’re thick, loaded with chocolate, and have a melt-in-your-mouth quality that keeps you reaching for just one more.
What makes these cookies so special? The texture is everything. Unlike traditional crispy oatmeal cookies, these stay incredibly soft thanks to a carefully balanced recipe. The oats provide substance without making them dense. The chocolate chips create pockets of melty sweetness throughout. And the edges get just slightly golden while the centers remain perfectly chewy.
I’ve been baking cookies for over ten years now. I’ve tried hundreds of recipes and tested countless variations. This recipe for soft baked oatmeal chocolate chip cookies is hands down my favorite. It’s the one I make when I need to impress guests or cheer up a friend. It’s the recipe my family requests for every holiday gathering.
The beauty of this recipe lies in its reliability. Once you understand the key techniques, you’ll get perfect results every single time. No more flat cookies. No more dry, crumbly disasters. Just thick, soft, bakery-style cookies that taste like they came from an expensive cookie shop.
Baking soft cookies requires attention to detail. You can’t just throw ingredients together and hope for the best. The ratio of wet to dry ingredients matters. The type of sugar you use affects texture. Even how long you mix the dough makes a difference. But don’t worry, I’ll walk you through every step.
Ingredients You’ll Need for Soft Baked Oatmeal Chocolate Chip Cookies
Let’s talk about what goes into these amazing cookies. Every ingredient plays a specific role in creating that perfect soft texture.
Here’s what you’ll need:
- 1 cup unsalted butter, softened to room temperature
- 1 cup packed brown sugar
- 1/2 cup granulated white sugar
- 2 large eggs
- 2 teaspoons vanilla extract
- 1 and 1/2 cups all-purpose flour
- 1 teaspoon baking soda
- 1/2 teaspoon salt
- 1 teaspoon ground cinnamon
- 3 cups old-fashioned rolled oats
- 2 cups chocolate chips (semi-sweet or dark)
The quality of your ingredients directly affects the final result. I learned this lesson the hard way after several batches of disappointing cookies.
For the oats: Always use old-fashioned rolled oats. Quick oats turn mushy and instant oats completely disappear into the dough. You want those distinct oat pieces that give the cookies their signature texture. I buy mine in bulk from health food stores where they’re fresher than the ones that sit on grocery store shelves for months.
For the chocolate chips: Don’t skimp here. Good quality chocolate makes a noticeable difference. I prefer semi-sweet or dark chocolate chips with at least 60% cacao content. The richer chocolate balances the sweetness of the dough. Some people like milk chocolate, but I find it too sweet. You can also chop up a chocolate bar instead of using chips for more irregular chunks.
For the butter: Real butter is non-negotiable. Margarine or shortening won’t give you the same flavor or texture. The butter needs to be softened but not melted. It should be cool to the touch but soft enough that your finger leaves an indent when you press it.
For the sugars: Notice we use both brown and white sugar. This combination is important. Brown sugar contains molasses which adds moisture and creates chewiness. White sugar helps the cookies spread slightly and adds crispness to the edges. The ratio of brown to white sugar affects how thick and soft your cookies turn out.
The flour should be all-purpose, measured correctly by spooning it into your measuring cup and leveling it off. Scooping directly from the bag packs in too much flour, which leads to dry cookies. This single mistake ruins more batches than anything else.
Fresh baking soda is important too. If yours has been sitting in the pantry for years, buy a new box. Old baking soda loses its power and your cookies won’t rise properly. I replace mine every six months to be safe.
The cinnamon is optional but highly recommended. It adds warmth and depth without making the cookies taste like cinnamon cookies. You just get a subtle background flavor that makes people wonder what your secret ingredient is.
What is the Secret to Baking Soft Cookies?
This is the question everyone asks me. The secret isn’t just one thing but a combination of factors working together.
The key is in the ratio of ingredients and the baking time. More brown sugar than white keeps cookies soft and chewy. Under-baking slightly means the centers stay tender even after cooling. Using enough fat (butter in this case) prevents dryness.
Temperature matters too. Room temperature butter and eggs mix more evenly into the dough. This creates a better texture throughout. Cold ingredients lead to uneven mixing and tough cookies.
The thickness of your dough balls affects the final result. Bigger dough balls create thicker cookies that stay soft in the middle. Flat, thin cookies dry out faster and get crispy all the way through.
Chilling the dough before baking helps tremendously. Cold dough spreads less in the oven. This means taller, thicker cookies. It also allows the flour to fully hydrate, which improves texture. I always chill my dough for at least 30 minutes, though overnight is even better.
Baking time is where most people go wrong. These cookies should come out of the oven looking slightly under-baked. The edges should be set and lightly golden, but the centers should still look soft and even a bit shiny. They’ll continue cooking on the hot baking sheet after you remove them from the oven. If you wait until they look completely done, they’ll be over-baked once they cool.
I usually bake these soft baked oatmeal chocolate chip cookies for 10-12 minutes at 350°F. Every oven is different though. Start checking at 10 minutes and watch them carefully. You want that barely-set center that will firm up to the perfect chewy texture as they cool.


Steps to Bake Soft Baked Oatmeal Chocolate Chip Cookies
Now that you know the secrets behind perfect texture, let’s get our hands into some dough and actually make these cookies.
First things first, take your butter and eggs out of the refrigerator about an hour before you plan to start baking. Room temperature ingredients are crucial. I usually set them on the counter after breakfast if I’m planning to bake in the afternoon. The butter should be soft enough to blend smoothly but still hold its shape.
Preheat your oven to 350°F and line two baking sheets with parchment paper. Don’t skip the parchment paper. It prevents sticking and makes cleanup so much easier. Plus, cookies baked on parchment have more evenly browned bottoms.
In a large mixing bowl, cream together your softened butter with both sugars. I use an electric mixer for this step because it really does make a difference. Beat them together for about three to four minutes until the mixture looks light and fluffy. It should be pale and have visible air bubbles throughout. This process incorporates air into the dough, which helps create a tender cookie.
Here’s the thing about creaming butter and sugar: most people don’t do it long enough. They mix for maybe a minute and call it done. But proper creaming takes time. You want the sugar crystals to cut into the butter and create thousands of tiny air pockets. This is what gives cookies their structure and lift.
Add your eggs one at a time, beating well after each addition. Then mix in the vanilla extract. The mixture might look slightly curdled at this point, and that’s perfectly normal. Don’t panic if it doesn’t look smooth and glossy like it did before.
In a separate bowl, whisk together your flour, baking soda, salt, and cinnamon. This step distributes the leavening agent evenly throughout the flour so you don’t get pockets of baking soda in your dough. I once skipped this step when I was in a hurry, and ended up with some cookies that had bitter spots from undissolved baking soda. Never again.
Add the flour mixture to your butter mixture gradually. Mix on low speed just until the flour disappears. Stop mixing the moment you don’t see any white streaks. Overmixing at this stage develops gluten, which creates tough cookies instead of tender ones.
Fold in your oats and chocolate chips by hand using a wooden spoon or sturdy spatula. This is where many people make a critical error by continuing to use their electric mixer. The mixer overworks the dough and breaks down the oats. Gentle folding keeps everything light and maintains those distinct oat pieces we want in our soft baked oatmeal chocolate chip cookies.
By the way, if you’re a chocolate lover like me, feel free to throw in some extra chocolate chips. I sometimes add an additional half cup because, well, there’s no such thing as too much chocolate. The same philosophy applies when I make my triple chocolate brownies, where chocolate is basically the star of the show.
Now comes the patience part. Cover your bowl with plastic wrap and refrigerate the dough for at least 30 minutes. I know it’s tempting to skip this step, but chilled dough is the difference between flat pancake cookies and thick bakery-style ones. The cold dough spreads less in the oven, giving you taller cookies with softer centers.
When your dough is chilled and you’re ready to bake, use a cookie scoop to portion out the dough. I use a three-tablespoon scoop for large, generous cookies. Roll each portion between your palms to create a smooth ball. This might seem fussy, but smooth balls bake more evenly than rough, irregular shapes.
Place your dough balls on the prepared baking sheets, leaving about three inches between each one. They will spread, trust me. I learned this lesson when I squeezed too many onto one sheet and ended up with one giant mega-cookie instead of individual ones. Funny enough, it still tasted amazing, just looked ridiculous.
If you want picture-perfect cookies with lots of visible chocolate chips on top, press a few extra chips onto the top of each dough ball before baking. This trick makes them look like they came from a professional bakery. It’s the same technique that makes desserts like peanut butter chocolate lava cake look so appealing with their melty chocolate centers on display.
Bake for 10 to 12 minutes, rotating your baking sheet halfway through for even browning. Watch them carefully during the last few minutes. The edges should be lightly golden and set, but the centers should still look soft and slightly puffy. They might even look a bit underdone, and that’s exactly what you want.
Remove the baking sheet from the oven and let the cookies sit on the hot pan for five minutes. This resting time allows them to finish cooking without drying out. After five minutes, transfer them to a wire cooling rack. They’ll be incredibly soft and fragile at first, but they’ll firm up as they cool.
What is the Trick to Making Soft Chewy Chocolate Chip Cookies?
The single most important trick is pulling them from the oven when they still look slightly under-baked. Seriously, this is the game-changer. Your instinct will tell you to leave them in longer, but resist that urge.
The higher ratio of brown sugar to white sugar is your second secret weapon. Brown sugar’s molasses content retains moisture, keeping cookies chewy for days. White sugar creates crispness. More brown equals softer cookies every time.
Thickness matters tremendously too. Thicker dough balls mean thicker cookies with gooey centers that stay soft. Thin cookies dry out quickly and turn crunchy. Always aim for cookies that are at least half an inch thick before baking.
Common Mistakes and How to Avoid Them
Let me save you from the heartbreak I’ve experienced over the years. I’ve made every possible mistake with these cookies, so you don’t have to.
The biggest mistake is overbaking. I cannot stress this enough. Oatmeal cookies continue cooking after they leave the oven. What looks perfectly done in the oven will be over-baked once cooled. Those few extra minutes turn soft cookies into crunchy ones. Set a timer and check your cookies at the earliest recommended time.
Measuring flour incorrectly ranks as the second most common problem. When you scoop your measuring cup directly into the flour bag, you pack way too much flour into the cup. This creates dry, crumbly cookies that fall apart. Always spoon flour into your measuring cup and level it off with a knife. This simple change transformed my baking.
Overmixing the dough after adding flour develops gluten, which makes cookies tough and dense rather than tender. Mix just until you can’t see flour anymore, then stop. The dough doesn’t need to be perfectly smooth. A few flour streaks are fine because they’ll incorporate as you fold in the oats.
Using melted butter instead of softened butter changes everything. Melted butter creates flat, greasy cookies. Softened butter holds air and creates structure. Your butter should be cool to the touch but soft enough to press your finger into easily.
Skipping the dough chilling step seems like a time-saver but creates disappointing results. Warm dough spreads too quickly in the oven before the structure sets. You end up with thin, crispy cookies instead of thick, chewy ones. Even 30 minutes in the fridge makes a huge difference.
Another mistake people make is using old baking soda. Baking soda loses potency over time. If yours has been lurking in your pantry for years, it won’t give your cookies the lift they need. Fresh baking soda creates better texture and helps cookies maintain their soft centers.
Not leaving enough space between cookies on the baking sheet causes them to merge into each other as they spread. I give mine at least three inches of space. It might mean baking in more batches, but individual cookies are worth the extra time. The same spacing consideration applies when making treats like strawberry shortcake dessert cups, where presentation really matters.
What are the Most Common Mistakes When Making Oatmeal Cookies?
Overmixing tops the list. People get excited with their stand mixers and just let them run too long. This develops gluten strands that make cookies tough instead of tender. Mix your dough gently and only as much as necessary.
Using too much flour is probably right behind overmixing. This happens when flour is measured incorrectly or when people add extra flour because the dough seems too sticky. Cookie dough should be slightly sticky. Adding more flour dries out your cookies and makes them crumbly.
Overbaking remains the ultimate cookie killer. Those extra two or three minutes turn perfectly soft cookies into hard disks. Trust the recipe timing and pull cookies when they still look slightly underdone in the center.
Using quick oats instead of old-fashioned rolled oats changes the texture completely. Quick oats are too fine and absorb moisture differently. They turn mushy and disappear into the dough. You want those distinct oat pieces that give character to your cookies, similar to how layers create texture in desserts like banana pudding icebox cake.
Honestly, once you master these common pitfalls, your soft baked oatmeal chocolate chip cookies will turn out perfectly every single time. The difference between good cookies and amazing cookies often comes down to avoiding just one or two of these mistakes.


Healthier Variations and Substitutions for Oatmeal Chocolate Chip Cookies
Look, I get it. We all want to enjoy delicious cookies without the guilt that sometimes comes with them. The good news is that you can absolutely make healthier versions of these soft baked oatmeal chocolate chip cookies without sacrificing too much of that amazing texture and flavor we’ve been talking about.
Over the years, I’ve experimented with countless substitutions after my sister was diagnosed with prediabetes and asked me to create something she could enjoy without worrying about her blood sugar spiking. What I learned through all that testing is that some substitutions work beautifully while others just don’t cut it.
Let’s start with flour options. You can replace up to half of the all-purpose flour with whole wheat flour or white whole wheat flour. I prefer white whole wheat because it’s milder and doesn’t make the cookies taste too hearty or dense. Going beyond half whole wheat tends to create a heavier, drier cookie that loses that soft, tender quality we’re after. The extra fiber from whole wheat flour does help slow down sugar absorption, which is beneficial if you’re watching your blood sugar levels.
For the sugar reduction, you can cut the total sugar by about a quarter without dramatically affecting texture. So instead of 1.5 cups total sugar, use just over 1 cup. I won’t lie to you though—reducing sugar does change things slightly. The cookies won’t spread quite as much and they’ll be a bit less sweet, obviously. But they’re still delicious, especially if you use really good quality chocolate chips that provide enough sweetness on their own.
Here’s something that surprised me: coconut sugar works wonderfully as a brown sugar replacement. It has a lower glycemic index and adds a subtle caramel flavor that’s actually really nice. The texture stays soft and chewy. You can do a one-to-one swap, though coconut sugar is a bit less sweet than regular brown sugar, so keep that in mind.
Butter substitutions are trickier. I’ve tried coconut oil with mixed results. It works, but the cookies spread more and have a slightly different texture. If you go this route, make sure you’re using solid coconut oil at room temperature, not melted. Applesauce can replace half the butter to reduce fat content, but honestly, those cookies end up more cake-like than cookie-like. They’re still good, just different.
The chocolate chips are where you have some flexibility. Dark chocolate chips with 70% cacao or higher contain less sugar and more beneficial antioxidants. Sugar-free chocolate chips sweetened with stevia or erythritol work surprisingly well too. I was skeptical about sugar-free chocolate for years, but the quality has really improved. Some brands taste almost identical to regular chocolate chips.
Adding extra nutritional value is easier than you might think. I sometimes throw in a quarter cup of ground flaxseed or chia seeds for omega-3s and fiber. You won’t even taste them, but they add nutrition and help with the cookie structure. Chopped nuts like walnuts or almonds add protein, healthy fats, and a nice crunch that complements the chewy oats.
By the way, if you’re concerned about food safety while experimenting with ingredients, especially when it comes to proper storage and handling of ingredients like eggs and butter, the CDC’s guidelines on preventing foodborne illness offer practical advice that every home baker should know. Fresh, properly stored ingredients always make better cookies anyway.
One substitution I absolutely don’t recommend is replacing the eggs with commercial egg replacers in this recipe. I’ve tried it multiple times and the texture just isn’t the same. However, flax eggs (one tablespoon ground flaxseed mixed with three tablespoons water per egg) work reasonably well if you need an egg-free version. Let the mixture sit for five minutes to thicken before using it.
Which Cookies are Good for Diabetics?
This question comes up constantly, and for good reason. More people than ever are managing diabetes or prediabetes and don’t want to give up treats entirely. The truth is, any cookie can fit into a diabetic meal plan if you’re mindful about portions and timing, but some choices are definitely smarter than others.
Cookies made with whole grains are your best bet because the fiber slows down how quickly the sugar enters your bloodstream. That’s why oatmeal cookies, when made with modifications, can actually be a reasonable choice. The oats provide soluble fiber that helps regulate blood sugar levels.
Lower sugar options matter too. Reducing the total sugar content or using natural sweeteners like stevia, monk fruit sweetener, or erythritol creates cookies that won’t cause the same blood sugar spikes. These sweeteners have minimal impact on blood glucose levels. Some people find them slightly less satisfying than regular sugar, but when combined with rich ingredients like dark chocolate and butter, the overall taste is still really satisfying.
Smaller portion sizes go a long way. Instead of making huge bakery-style cookies, try making them half the size. You still get the enjoyment and flavor experience without consuming as many carbohydrates in one sitting. Sometimes it’s not about completely avoiding something you love but finding a way to enjoy it more moderately.
Adding protein and healthy fats helps too. Cookies that include nuts, nut butters, or seeds digest more slowly and have less impact on blood sugar than cookies made with just flour and sugar. The protein and fat slow down digestion and provide more sustained energy without the crash that comes from eating pure carbs.
Tips for Storing and Keeping Your Cookies Soft
You’ve put all this effort into making perfectly soft cookies, so let’s make sure they stay that way. Nothing’s more disappointing than biting into a cookie the next day only to find it’s turned into a hockey puck.
The storage container matters more than you’d think. I use airtight containers, and I always throw in a slice of bread with the cookies. I know it sounds weird, but the bread releases moisture that the cookies absorb, keeping them soft for days. Replace the bread slice every couple of days as it dries out. My grandma taught me this trick and it’s never failed me.
For short-term storage, room temperature in an airtight container works perfectly. These cookies stay soft for about five days this way. Don’t refrigerate them unless you absolutely have to—the cold air dries them out faster. If you live somewhere really humid, though, refrigeration might be necessary to prevent them from getting too soft or developing mold.
Freezing is your friend for long-term storage. These cookies freeze beautifully for up to three months. I layer them between sheets of parchment paper in a freezer-safe container or bag. When you want one, just let it thaw at room temperature for about 20 minutes, or warm it in the microwave for 10-15 seconds. It’ll taste like you just baked it.
Here’s something most people don’t think about: you can also freeze the dough balls before baking. Shape your dough into balls, freeze them on a baking sheet until solid, then transfer to a freezer bag. When you want fresh cookies, bake them straight from frozen, adding just a minute or two to the baking time. Fresh cookies whenever you want them without having to make a whole batch.
Making Your Cookies Extra Special
Once you’ve mastered the basic recipe, there’s so much room for creativity and customization. I love taking these soft baked oatmeal chocolate chip cookies in different flavor directions depending on my mood or what I have on hand.
Try adding a tablespoon of espresso powder to the dough. It doesn’t make them taste like coffee, but it deepens the chocolate flavor in an almost magical way. The same principle works in chocolate cakes and brownies—coffee enhances chocolate rather than competing with it.
Dried fruit additions work wonderfully. Chopped dried cherries, cranberries, or raisins add chewy sweetness and make the cookies feel a bit more sophisticated. I usually reduce the chocolate chips by half a cup if I’m adding dried fruit so the cookies don’t become overwhelmingly sweet.
Spice variations can completely transform the flavor profile. Try adding a quarter teaspoon of cardamom for a slightly exotic twist, or use chai spice blend instead of just cinnamon. Nutmeg, ginger, and allspice all work beautifully with oatmeal cookies. Start with small amounts and adjust to your preference.
Different mix-ins keep things interesting. White chocolate chips and macadamia nuts create a tropical vibe. Peanut butter chips and chopped peanuts make them taste almost like candy bars. Butterscotch chips and pecans give them a praline-like quality. The base recipe is forgiving enough that you can experiment freely.
If you’re feeling adventurous and want to explore more creative cookie variations alongside other sweet treats, you’ll find plenty of inspiration in the desserts category where countless flavor combinations and techniques come together.
Sea salt sprinkled on top before baking is one of those simple touches that makes cookies taste gourmet. Just a small pinch on each cookie creates a sweet-salty contrast that’s incredibly addictive. It’s the same reason salted caramel became so popular—our taste buds love that flavor combination.
Drizzling melted chocolate over cooled cookies takes them from homemade to bakery-worthy. I melt some extra chocolate chips in the microwave, transfer to a zip-top bag, snip off a tiny corner, and drizzle away. It looks impressive with minimal effort.
These cookies work beautifully as ice cream sandwiches too. Let them cool completely, sandwich your favorite ice cream between two cookies, and roll the edges in mini chocolate chips or sprinkles. Wrap individually in plastic wrap and freeze. They’re perfect for hot summer days or whenever you need an extra-special treat.
The real joy of baking comes from making something with your own hands and sharing it with people you care about. Every time I pull a batch of these cookies from the oven, I remember why I fell in love with baking in the first place. There’s something deeply satisfying about creating something delicious from simple ingredients. It’s a small act of love, whether you’re making them for family, friends, or just yourself after a long day.
So grab your mixing bowl and give these soft baked oatmeal chocolate chip cookies a try. Trust the process, follow the techniques we’ve covered, and don’t be afraid to make them your own with whatever variations speak to you. Happy baking!
Frequently Asked Questions
How long do soft baked oatmeal chocolate chip cookies stay fresh?
When stored properly in an airtight container at room temperature, these cookies stay soft and delicious for about five to seven days. The key is keeping them sealed so moisture doesn’t escape. Adding a slice of bread to the container helps them stay even softer. For longer storage, freeze them for up to three months. They thaw quickly and taste just as fresh as the day you baked them.
Can I make the cookie dough ahead of time?
Absolutely! Cookie dough actually improves with time in the refrigerator. You can make the dough up to three days ahead and keep it covered in the fridge. The longer chill time allows the flavors to develop and the flour to fully hydrate, creating even better texture. You can also freeze scooped dough balls for up to three months and bake them directly from frozen, adding just a minute or two to the baking time.
Why did my cookies turn out flat instead of thick?
Flat cookies usually happen because of warm dough, too much white sugar, or not enough flour. Make sure your dough is properly chilled before baking—at least 30 minutes in the refrigerator. Check that you measured your flour correctly by spooning it into the cup rather than scooping directly from the bag. Also ensure your butter was softened but not melted when you started mixing.
Can I use quick oats instead of old-fashioned oats?
I really don’t recommend it. Quick oats are cut into smaller pieces and absorb liquid differently than old-fashioned rolled oats. They create a mushier texture and you lose those distinct oat pieces that give these cookies their character. Stick with old-fashioned rolled oats for the best results. Instant oats are even worse and should definitely be avoided.
What’s the best way to reheat leftover cookies?
For that fresh-from-the-oven experience, microwave individual cookies for 10-15 seconds. They’ll warm up and the chocolate chips will get melty again. You can also warm several cookies in a 300°F oven for about five minutes. Don’t overheat them or they’ll dry out. Room temperature cookies are delicious too, so reheating isn’t absolutely necessary.
Can I substitute the butter with oil?
You can, but the texture will change. Butter provides flavor and structure that oil doesn’t. If you need to use oil, coconut oil works best because it’s solid at room temperature like butter. Use about three-quarters of the amount called for in butter. The cookies will spread more and have a slightly different texture, but they’ll still taste good.
How do I know when the cookies are done baking?
The edges should be set and lightly golden brown, while the centers still look slightly soft and even a bit shiny or underdone. They should puff up in the oven and look like they need another minute, but resist that urge. They’ll continue cooking on the hot baking sheet after you remove them from the oven. Better to underbake slightly than overbake.
Can I make these cookies gluten-free?
Yes, but you need to use a good quality gluten-free flour blend that includes xanthan gum. Bob’s Red Mill 1-to-1 Baking Flour works well. The texture will be slightly different—maybe a bit more crumbly—but still delicious. Make sure your oats are certified gluten-free if you’re baking for someone with celiac disease, since regular oats are often processed in facilities that handle wheat.
Why do my cookies spread too much during baking?
Excessive spreading usually means your dough was too warm, your butter was too soft or melted, or you didn’t use enough flour. Always chill your dough before baking. Make sure your butter is softened but still cool to the touch, not greasy or shiny. Check your oven temperature with an oven thermometer—if your oven runs hot, the butter melts too quickly before the structure sets.
Can I reduce the sugar even more to make them healthier?
You can reduce the sugar by up to one-third without completely compromising texture, but beyond that, you’ll notice significant changes. The cookies won’t spread as much, won’t brown as nicely, and will be less tender. Sugar does more than just sweeten—it affects texture, moisture, and browning. If you want to go lower on sugar, consider using sugar substitutes like erythritol or monk fruit sweetener that provide bulk and sweetness without the carbohydrates.