The Crispy, Cheesy, Sweet & Savory Tart That Will Steal the Show
Okay, I have a confession. I used to be terrified of endives. They looked so… serious. But then, at a dear friend’s dinner party in the countryside, I tasted this magic. A golden, flaky base piled with meltingly sweet pears, tender endives, and a creamy, tangy blue cheese sauce, all topped with crunchy walnuts. One bite and I was hooked! I begged for the recipe and have been making my own version ever since. This Crispy Tart with Caramelized Pears, Endive, and Roquefort Cream is my go-to when I want to impress without stress. It looks like you spent hours, but trust me, it’s simpler than it seems.
A Dish Born from French Countryside Ingenuity
This recipe feels like a beautiful love letter to French pantry staples. While not a centuries-old classic, it perfectly captures the spirit of French home cooking: using what’s in season and creating incredible contrasts. The bitter edge of endive, a classic winter vegetable, is tamed by slow cooking. It meets the lush sweetness of caramelized pears. Then, the mighty Roquefort—a cheese with a legend of its own, aged in caves—brings its bold, salty punch. The walnut adds the final note of earthy crunch. It’s a modern, elegant assembly of humble ingredients that tells a delicious story on one plate.
Why This Caramelized Pear Tart is Your New Best Friend
You will absolutely adore this recipe. First, the flavor is unreal—sweet, salty, tangy, bitter, and crunchy all in one forkful. It’s a total party in your mouth. Second, it’s incredibly versatile. Serve it as a stunning vegetarian main course, cut it into small pieces for a fancy appetizer, or even bring it to a potluck. Finally, it uses store-bought puff pastry! That’s your secret weapon for a “wow” factor with minimal effort. It’s the kind of dish that makes everyone ask, “You made this?!”
When to Whip Up This Roquefort and Pear Masterpiece
This tart is perfect for so many occasions! It’s my top pick for a cozy but impressive date night at home. Light some candles, and you’re in a French bistro. It’s also a star at holiday gatherings, like Thanksgiving or Christmas, offering a sophisticated vegetarian centerpiece. For a girls’ lunch or book club meeting, it feels special without being too heavy. Honestly, any Tuesday that needs a little upgrade is a good reason to make this.
What You’ll Need: The Cast of Characters
Gather these simple ingredients. Their magic happens when they come together!
- 1 sheet of puff pastry (store-bought is perfect!)
- 4 endives
- 2 ripe but firm pears (like Bosc or Anjou)
- 50g (about 1/4 cup) sugar
- 100g (about 3.5 oz) Roquefort cheese
- 30cl (about 1 1/4 cups) heavy cream
- 50g (about 1/2 cup) walnut halves
- Salt and pepper to taste
No Stress Substitutions
Don’t have exactly these items? No problem! Cooking is about improvisation.
- Roquefort: Any other crumbly blue cheese works, like Gorgonzola or Stilton.
- Pears: Firm apples are a great stand-in.
- Walnuts: Try pecans or hazelnuts for a different crunch.
- Heavy Cream: For a lighter version, half-and-half or even whole milk can work, though the sauce will be thinner.
- Endive: In a pinch, thinly sliced kale or chard, well-sautéed, can provide a different kind of green.
Let’s Get Cooking: Building Your Crispy Tart
Follow these steps for a foolproof, delicious result. Put on some music and enjoy the process!
Step 1: Wake Up the Oven and the Pastry
First things first, preheat your oven to 180°C (350°F). Take your puff pastry sheet and let it sit out for about 10 minutes if it was frozen—it’s easier to work with. Roll it out slightly on a piece of parchment paper, then place the paper and pastry directly on a baking sheet. Take a fork and prick the pastry all over. This is called “docking” and it stops the pastry from puffing up too much. We want a crisp base, not a giant pillow!
Step 2: Create the Golden, Crispy Base
Slide that baking sheet into your preheated oven. You’ll bake it for about 15 minutes. Keep an eye on it! You want it to be puffed and a beautiful golden brown all over. The smell will be amazing—buttery and warm. Once it’s out, you can gently press down the center if it puffed a lot, just to make a slight “nest” for our fillings. Let it cool slightly.
Pro tip: If the center puffs up a lot, just gently press it down with the back of a spoon when it comes out of the oven.
Step 3: Work Some Sweet Magic on the Pears
While the pastry bakes, let’s caramelize the pears. Peel them, cut them into quarters, and remove the core. Heat a non-stick pan over medium heat and add the sugar. Let it melt and turn a light amber color—this is the caramel. Carefully add your pear quarters. They will sizzle! Cook them for about 5-7 minutes, turning occasionally, until they are coated in that glossy, golden caramel and starting to soften.
Step 4: Tame the Endive to Sweet Tenderness
Now for the endives. Cut them in half lengthwise, then slice them into thin half-moons. In another pan, heat a little butter or oil over medium heat. Add the endive slices with a pinch of salt. Sauté them for 5-8 minutes, stirring often. You’ll see them wilt and turn a deeper, translucent color. Their natural bitterness mellows into a wonderful, gentle sweetness. Season with a little pepper.
Step 5: Whip Up the Dreamy Roquefort Cream
This sauce is the heart of the dish! In a medium bowl, crumble your Roquefort cheese. Pour in the heavy cream. Now, mix and mash with a fork until you get a mostly smooth, luscious, pale blue sauce. A few small lumps of cheese are totally fine—they promise little bursts of flavor. Taste it! It will be bold and salty. That’s perfect because it’s going to balance the sweet pears.
Chef’s tip: For an extra-smooth sauce, you can briefly warm the cream before mixing, but it’s not necessary. Room temperature cheese mixes easier too!
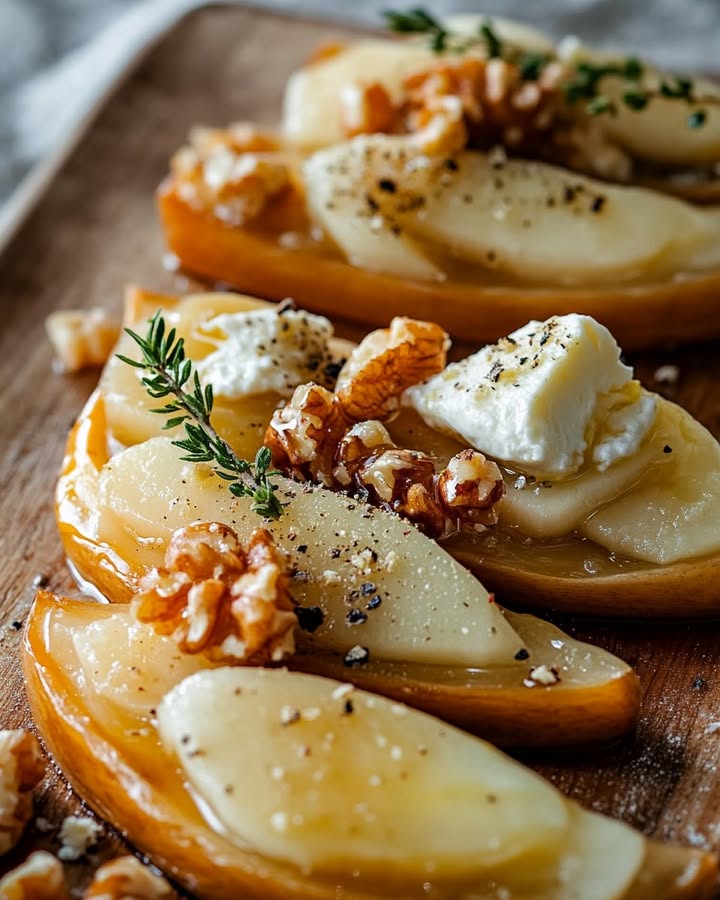
Step 6: The Grand Assembly
Time to build our masterpiece on the baked pastry crust. First, spread the softened endives evenly over the base. Next, artfully arrange your glistening caramelized pear quarters on top. Then, take your bowl of Roquefort cream and drizzle or spoon it generously over everything. Don’t be shy! Finally, scatter the walnut halves over the top, breaking some with your hands for a rustic look.
Step 7: The Final Melt and Meld
Carefully place your assembled tart back into the oven for about 8-10 minutes. This final bake warms everything through, lets the flavors hug each other, and slightly sets the creamy sauce. The walnuts will toast a bit more, and the whole tart will become piping hot and irresistible.
Step 8: The Best Part—Serve and Savor!
Take the tart out of the oven. Let it sit for just 2-3 minutes—this makes it easier to slice. Then, cut it into portions and serve immediately. The pastry should be shatteringly crisp, the pears tender and sweet, the sauce rich and tangy. Watch the happy faces around your table. You did it!
Timing is Everything
Don’t worry, this recipe is faster than it looks!
Prep Time: 20 minutes of active work.
Cook Time: 25 minutes total (pastry + final bake).
Total Time: About 45 minutes from start to delicious finish.
A Little Secret for the Best Flavor
My secret weapon? A tiny drizzle of good honey over the tart just before the final bake. It amplifies the caramel notes on the pears and creates a beautiful glaze. Just a teaspoon, zig-zagged over the top, makes a world of difference.
Did You Know? A Fun Cheese Fact
Roquefort is known as the “King of Cheeses” and it’s one of the world’s oldest known cheeses! Legend says it was discovered by a young shepherd who left his lunch of bread and sheep’s milk cheese in a cave. When he returned, the cheese was moldy but he was hungry… and the rest is delicious history. The specific blue mold (Penicillium roqueforti) is what gives it its unique, spicy flavor.
Tools You’ll Need
- Baking sheet
- Parchment paper
- Rolling pin (optional, for the pastry)
- Two frying pans
- Mixing bowl and fork
- Sharp knife and cutting board
Keeping the Leftovers (If You Have Any!)
This tart is absolute best served fresh from the oven when the pastry is perfectly crisp. However, if you have leftovers, you can store them in an airtight container in the refrigerator for up to 2 days.
To reheat, place a portion on a baking sheet in a 160°C (325°F) oven for about 8-10 minutes. This will help crisp up the pastry again better than a microwave, which will make it soggy.
I do not recommend freezing the assembled tart, as the creamy sauce and vegetables may separate and become watery upon thawing and reheating.
My Best Tips for Guaranteed Success
- Use cold puff pastry straight from the fridge for the best puff.
- Don’t walk away from the sugar when making caramel! It can burn in seconds.
- If your pears are very juicy, pat them dry a bit after caramelizing so they don’t make the pastry soggy.
- Let the tart rest for a few minutes after baking. This makes it easier to cut clean slices.
Make It Look Like It Came from a Fancy Bakery
- Drizzle a balsamic glaze reduction in a pretty pattern on the plate before placing the slice.
- Add a small handful of fresh, peppery arugula on the side for a pop of color and freshness.
- Serve each slice with a little extra crumble of Roquefort and a walnut half on top.
- Use a pizza cutter for super clean, easy slices right on the baking sheet.
Want to Mix It Up? Try These Tasty Variations
This recipe is a wonderful template. Get creative with these ideas:
- Fig & Goat Cheese Twist: Swap pears for fresh figs and Roquefort for creamy goat cheese. A drizzle of honey is a must.
- Apple and Cheddar Comfort: Use sharp cheddar instead of blue cheese and apples instead of pears. A sprinkle of fresh thyme works beautifully.
- Mushroom and Gruyère Umami Bomb: Replace the endives and pears with a mix of sautéed wild mushrooms and use Gruyère cheese in the cream.
- Lighter Phyllo Version: For a lighter, flakier base, use layers of butter-brushed phyllo dough instead of puff pastry.
- Caramelized Onion Delight: Use slowly caramelized onions instead of endives and pair with a strong blue cheese.
- Sweet & Spicy Kick: Add a pinch of red pepper flakes to the caramel when cooking the pears for a sweet heat.
Common Mistakes to Avoid
Mistake 1: Soggy Pastry Bottom
This happens if the fillings are too wet or the pastry isn’t pre-baked properly. Always pre-bake (or “blind bake”) your puff pastry until it’s fully golden and crisp. Also, make sure your cooked endives and caramelized pears aren’t holding excess liquid. Let them sit in the pan off the heat for a minute after cooking to let any juices evaporate.
Mistake 2: Burnt, Bitter Caramel
Caramel goes from perfect to ruined very fast. Use medium heat and watch it closely. The sugar will melt, then form clumps, and finally turn into a smooth, amber liquid. The moment it’s a uniform light brown color, add your pears. If you see smoke, it’s too late—start over to avoid a bitter taste.
Mistake 3: Overcooking the Endives into Mush
Endives should be tender but still have a tiny bit of texture. If you cook them until they completely fall apart, they can become watery and lose their shape on the tart. Sauté them just until they’re wilted and softened, about 5-8 minutes. They will cook a tiny bit more in the final bake.
Mistake 4: A Sauce That’s Too Thick or Too Thin
The Roquefort cream should be pourable but still coat the back of a spoon. If your sauce is too thick, simply stir in a splash more cream. If it’s too thin, you can add a little more crumbled cheese. Remember, it will thicken slightly as it bakes and cools.
Your Questions, Answered
Can I make this tart ahead of time?
You can definitely do some prep ahead! You can caramelize the pears and sauté the endives earlier in the day. Keep them separate in the fridge. Pre-bake the pastry crust and let it cool. Store it at room temperature. When ready to serve, assemble everything, add the fresh sauce and nuts, and do the final 10-minute bake. This way, you get a fresh, hot, and crispy result with less last-minute work.
I’m not a fan of strong blue cheese. What can I use instead?
No problem at all! The recipe is very forgiving. You can use a milder blue cheese like Gorgonzola Dolce. For a completely different but delicious angle, try a creamy, melted cheese like Brie (rind removed) or Camembert mixed with the cream. Even a sharp white cheddar would create a wonderful savory version.
What type of pear works best?
You want a pear that holds its shape when cooked. Bosc pears are my favorite for this—they have a denser texture and beautiful, honeyed flavor that caramelizes beautifully. Anjou pears are another excellent, sturdy choice. Very soft pears like Bartlett might turn to mush, so avoid those for this recipe.
Is this recipe suitable for vegetarians?
Yes, this is a fantastic vegetarian main dish! However, you must check one thing: not all cheeses are vegetarian. Some cheeses, including traditional Roquefort, use animal rennet in production. If you’re catering to strict vegetarians, look for a blue cheese specifically labeled as containing “vegetarian rennet” or “microbial rennet.” Many supermarkets carry vegetarian-friendly options.
Can I use frozen puff pastry?
Absolutely! In fact, I almost always do. High-quality store-bought frozen puff pastry is a fantastic time-saver and works perfectly. Just follow the package instructions for thawing—usually, you’ll need to let it sit in the fridge overnight or on the counter for 30-40 minutes before unrolling and using.
My pastry puffed up too much in the middle during pre-baking. What do I do?
This is very common and an easy fix. As soon as you pull the pastry out of the oven from its first bake, take the back of a large spoon or a flat measuring cup and gently press down the puffed-up center. You’re creating a flatter “bed” for the fillings. Be gentle so you don’t tear it, but firm enough to deflate the big bubbles.
What should I serve with this tart?
It’s quite rich and satisfying on its own. For a light meal, a simple green salad with a sharp vinaigrette is the perfect partner to cut through the richness. For a heartier dinner, a bowl of tomato soup or a lentil salad would be lovely. A glass of chilled white wine, like a Sauternes or a Riesling, pairs magically with the sweet and salty flavors.
How do I know when the tart is done with the final bake?
You’re mainly heating everything through and letting the flavors meld. Look for the edges of the pastry to be a deep golden brown, the sauce to be bubbling gently around the edges, and the walnuts to look slightly toasted. It should take about 8-10 minutes in a hot (350°F/180°C) oven.
Can I add meat to this recipe?
You can, though it’s wonderful as is. For a non-vegetarian version, crispy chopped bacon or pancetta sprinkled over the top before the final bake is incredible. You could also add thin slices of prosciutto or serrano ham draped over the finished tart. Just be mindful of adding extra salt if your meat is already salty.
My family has a nut allergy. Can I leave out the walnuts?
Of course! The walnuts add a nice crunch, but the tart will still be delicious without them. For a bit of texture, you could sprinkle on some toasted pumpkin seeds (if those are safe) or even some crunchy homemade croutons made from the leftover puff pastry scraps. Or, just enjoy the wonderful contrast of creamy, sweet, and savory without the nuts.
Go Ahead, Create Some Delicious Magic
There you have it, my dear friend! My tried-and-true recipe for a tart that never fails to delight. It’s a celebration of simple ingredients done right. Don’t let the fancy name fool you—it’s just honest, flavorful food that makes people happy. So roll up your sleeves, preheat that oven, and get ready for the compliments to roll in. I can’t wait for you to taste it. Bon appétit, and be sure to let me know how it turns out in your kitchen!
Butterscotch Cheesecake Bars
Ingredients
Equipment
Method
- Preheat your oven to 180°C (350°F) and let the puff pastry sit for about 10 minutes if frozen.
- Roll out the pastry slightly on parchment paper and dock it with a fork.
- Bake the pastry for about 15 minutes until golden brown.
- While the pastry bakes, peel and quarter the pears, then caramelize them in a non-stick pan with sugar over medium heat for 5-7 minutes.
- Cut the endives in half lengthwise and sauté them in another pan with a little butter or oil for 5-8 minutes.
- Crumble the Roquefort cheese into a bowl, add heavy cream, mix until smooth with a few lumps for flavor.
- Spread the sautéed endives evenly on the baked pastry base then arrange the caramelized pears on top.
- Drizzle the Roquefort cream over the tart and scatter walnut halves on top.
- Bake the assembled tart in the oven for 8-10 minutes.
- Let it sit for 2-3 minutes before slicing and serving.