Loaded Bacon Cheese Fries: The Ultimate Comfort Food
Can we all agree that the best food ideas are often the simplest? I was craving something seriously indulgent last Friday night. My family was gathered for a movie, and plain potato chips just weren’t going to cut it. I looked at the bag of fries in my freezer, the block of cheddar on my counter, and the bacon waiting in my fridge. A glorious, cheesy, bacon-y lightbulb went off. What I created was pure magic—a heaping platter of Loaded Bacon Cheese Fries that disappeared in under five minutes. Let me show you how easy it is to make this crowd-pleaser your new secret weapon.
A Bite of History: From Diner Classic to Game Day Hero
Loaded fries feel like they’ve been with us forever, don’t they? Their story really starts with the classic Canadian dish, poutine. That genius combo of fries, cheese curds, and gravy paved the way. In the US, we took that concept and ran with it, swapping gravy for rivers of melted cheese and all our favorite toppings. I remember my first taste at a local diner as a teenager. It was a mountain of flavor I never forgot. Today, this dish has won its place as the star of sports bars, family gatherings, and my very own kitchen. It’s a modern comfort food icon that’s endlessly customizable.
Why You’ll Fall in Love With This Recipe
You will love this because it checks every box. It’s incredibly fast to make with minimal prep. The flavor combination is a guaranteed winner—crispy fries, savory bacon, and gooey cheese is a trio that never fails. It’s also the perfect “clean out the fridge” recipe. Got some leftover chili, jalapeños, or green onions? Toss them on! Most importantly, it brings people together. There’s something about digging into a shared platter of loaded fries that creates instant joy and conversation.
When to Whip Up These Loaded Fries
This recipe is your ace for any casual get-together. It’s the perfect game day snack for watching football with friends. It makes for a fun and easy Friday night family dinner when paired with a simple salad. Need a hit for a potluck or party? Just double the batch! I also love making a smaller version as a special movie night treat or a late-night study snack for my kids. It turns any ordinary moment into a mini celebration.
What You’ll Need: The Ingredients List
Here’s your shopping list for cheesy, bacon-y perfection:
- Fries: 1 large bag (about 32 oz) of frozen crinkle-cut or shoestring fries. For the best result, choose ones meant for baking or frying until extra crispy.
- Cheddar Cheese: 2 cups shredded. I like sharp cheddar for its bold flavor.
- Mozzarella Cheese: 1 cup shredded. This adds that fantastic, stretchy melt.
- Bacon: 1 pound, cooked until very crisp and then chopped into small bits.
- Fresh Parsley: 2 tablespoons, finely chopped, for a pop of color and freshness.
No Problem! Handy Ingredient Swaps
Out of something? Don’t worry! This recipe is very forgiving.
- Cheese: Use Monterey Jack, Colby, or a pre-shredded “Mexican blend” instead of cheddar. You can even use cheese sauce for a different vibe.
- Bacon: Substitute with cooked breakfast sausage, diced ham, or even chopped pepperoni for a pizza-style twist.
- Fries: Sweet potato fries, tater tots, or waffle fries work wonderfully as the base.
- Parsley: Green onions (scallions) or chives make a great fresh garnish.
Crafting Your Loaded Bacon Cheese Fries Masterpiece
Now for the fun part! Let’s build those beautiful, loaded fries together.
Step 1: Crisp Up Those Fries
First, we need a sturdy, golden foundation. Cook your fries according to the package directions. Whether you’re baking or air-frying, aim for a deep golden brown and a satisfying crunch. Spread them out in a single layer on a baking sheet. This ensures they cook evenly and don’t steam, which makes them soggy. You should hear a faint crackle when you shake the pan. Pro tip: For ultimate crispiness, sprinkle the hot fries with a tiny pinch of salt right when they come out of the oven.
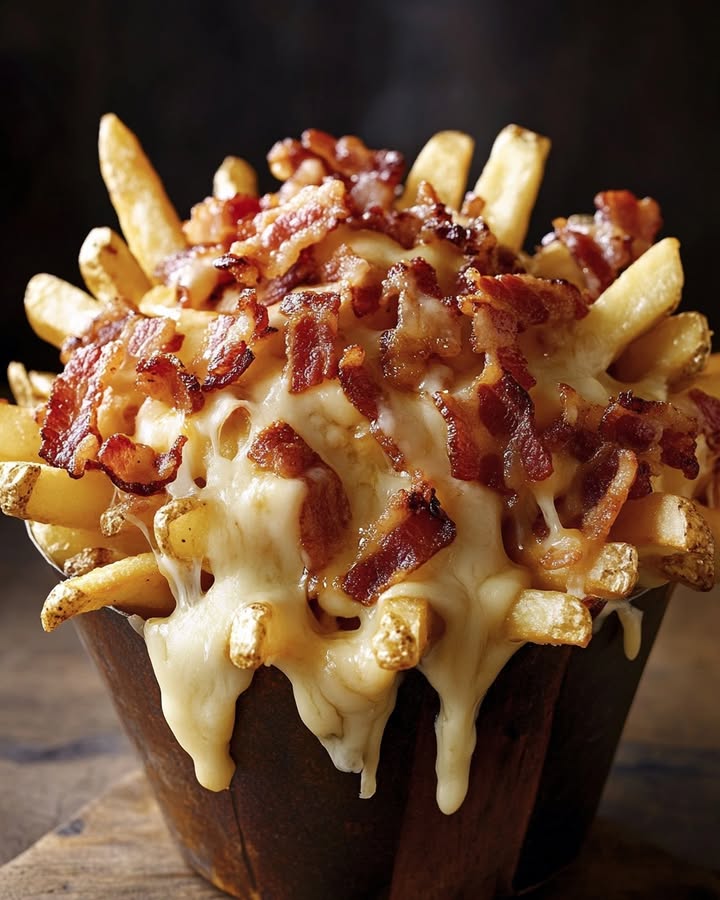
Step 2: The Cheesy, Bacon-y Blanket
This is where the magic happens! Take your hot, crispy fries and pile them into an oven-safe dish or keep them on the baking sheet. Now, shower them with both kinds of shredded cheese. Watch as the cheddar and mozzarella create a confetti of white and orange over the golden fries. Next, evenly scatter all those wonderful, crispy bacon bits over the cheese layer. The heat from the fries will start to soften the cheese immediately, which is exactly what we want.
Step 3: Melt Everything to Gooey Perfection
Time for the final melt. Preheat your oven’s broiler on high. Place your loaded fries under the broiler, but watch them like a hawk! You only need 1-3 minutes. We want the cheese to be completely melted, bubbly, and just starting to brown in spots. The bacon will warm through and its smoky flavor will seep into the cheese. The aroma at this point is absolutely heavenly. Chef’s tip: Place the rack in the upper third of the oven, not directly at the top, to prevent the bacon from burning.
Step 4: Garnish and Serve Immediately
The final touch! Carefully remove the hot pan from the oven. Immediately sprinkle the finely chopped parsley over the top. The green adds a fresh contrast to all that rich, golden deliciousness. Serve the loaded fries right away, while the cheese is still gloriously molten and stretchy. I like to put the whole platter in the middle of the table with small plates and lots of napkins. Dig in and enjoy the happy silence that follows!
Your Game Plan: Timing is Everything
This recipe moves quickly, so it’s good to have a plan.
- Prep Time: 5 minutes (for chopping bacon and cheese)
- Cooking Time: 15-20 minutes (for the fries plus broiling)
- Total Time: About 25 minutes from freezer to table.
- Servings: 4 happy people as a main snack.
The Chef’s Secret for the Best Loaded Fries
My biggest secret is all about the texture contrast. To keep your fries from getting soggy under the cheese, make sure they are extra crispy to begin with. I often cook them a minute or two longer than the package says. A super-crispy base can stand up to the moisture from the melting cheese, giving you that perfect bite with a crunch followed by a creamy, cheesy finish.
A Little Extra Info: The Science of Melty Cheese
Ever wonder why some cheeses melt into a smooth pool and others turn oily? It’s all about moisture and acidity. Cheeses like mozzarella and cheddar have the perfect balance, melting smoothly. Pre-shredded cheeses often have anti-caking agents (like potato starch) that can sometimes make the melt less smooth. That’s why I always recommend shredding your own cheese from a block for the silkiest, most luxurious melt on your loaded fries.
Tools You’ll Need in Your Kitchen
- Large Baking Sheet
- Parchment Paper or Aluminum Foil (for easy cleanup)
- Chef’s Knife and Cutting Board
- Box Grater (if shredding your own cheese)
- Mixing Bowls (for bacon and cheese)
- Oven Mitts
- Serving Platter
Storing Your Loaded Creation (If There’s Any Left!)
Let’s be honest, leftovers are rare. But if you do have some, let the fries cool completely to room temperature first. Do not leave them sitting out for more than two hours. Transfer any leftovers to an airtight container. They can be refrigerated for up to 2 days.
Reheating is a bit tricky. The microwave will make the fries very soft. For a better result, reheat them in a toaster oven or a regular oven at 375°F (190°C) for about 10 minutes. This will help re-crisp the fries and re-melt the cheese. They won’t be quite as perfect as fresh, but they’ll still be tasty.
I do not recommend freezing loaded fries after they are assembled. The fries will become very soggy and watery when thawed and reheated. It’s best to enjoy this dish fresh.
My Best Tips and Advice for You
- Cook the bacon until it’s very crisp. Soft bacon can become chewy when broiled with the cheese.
- For a flavor boost, toss your hot fries with a sprinkle of garlic powder or smoked paprika before adding the cheese.
- If serving a crowd, set up a “loaded fries bar” with bowls of extra toppings like sour cream, jalapeños, diced tomatoes, and guacamole.
- Use two types of cheese for a more complex flavor and better melting texture.
Make it Look Great: Presentation Ideas
- Serve on a large wooden board or a colorful ceramic platter.
- Place small bowls of dipping sauces like ranch, blue cheese, or spicy ketchup in the center.
- Garnish with a final extra sprinkle of bacon and parsley right before serving.
- For individual servings, use small cast iron skillets or metal pie tins.
Want a Lighter Bite? Healthier Variations
You can easily tweak this recipe for a lighter option.
- Oven-Baked Everything: Use frozen oven-baked fries and turkey bacon. Bake the turkey bacon on a rack for crispiness.
- Sweet Potato Base: Swap regular fries for baked sweet potato fries. They’re rich in vitamin A and fiber.
- Veggie-Powered: After adding cheese, top with a handful of fresh diced tomatoes, red onion, and black olives.
- Lighter Cheese: Use a reduced-fat cheddar or mozzarella. Part-skim mozzarella melts beautifully.
- Greek Yogurt Swap: Instead of sour cream for dipping, use plain Greek yogurt. It’s high in protein and tangy.
- Zucchini Fry Twist: Make “fries” from sliced zucchini or carrot sticks, bake until tender, and load them up for a veggie-forward dish.
Common Mistakes to Avoid for Perfect Fries
Mistake 1: Starting with Soggy Fries
This is the biggest pitfall. If your fries aren’t crispy enough before loading, they’ll turn into a soft, mushy mess under the cheese. This happens when fries are overcrowded on the pan or not cooked long enough. Always spread fries in a single layer and cook until deeply golden. Giving them a little shake halfway through cooking helps too.
Mistake 2: Using Cheese That Won’t Melt Well
Not all cheeses are created equal for melting. Hard cheeses like Parmesan or aged cheddar can get oily when broiled alone. Using only a non-melting cheese will leave you with a greasy, separated topping. Always include a good melting cheese like mozzarella, Monterey Jack, or young cheddar. A blend works best for both flavor and that perfect, stretchy melt.
Mistake 3: Burning the Toppings Under the Broiler
The broiler is incredibly powerful and things can burn in seconds. Walking away during this step is a recipe for disaster. You’ll come back to blackened cheese and bitter bacon. Stay put! Keep the oven door slightly ajar and watch continuously. It only takes 1-3 minutes for the cheese to melt into a bubbly, lightly spotted perfection.
Mistake 4: Adding Cold or Wet Toppings Too Early
Toppings like fresh diced tomatoes, sour cream, or guacamole are delicious, but adding them before the broiling step is a error. The cold toppings will cool the dish down and the wet ones (like tomatoes) will make everything soggy. These fresh, cold items should always be added as a final garnish after the fries come out of the broiler, just before serving.
Your Loaded Fries Questions, Answered
Can I make loaded fries in an air fryer?
Absolutely! You totally can. Cook the fries in the air fryer first until extra crispy. Then, pile them into a smaller, air fryer-safe dish or basket. Top with cheese and bacon. Air fry at 350°F (175°C) for just 2-4 minutes, checking often, until the cheese is melted. It works wonderfully and is even faster than using the oven. Just be careful not to overload the basket so the heat can circulate and melt everything evenly.
What are the best cheeses to use for melting?
The best cheeses melt smoothly and evenly without breaking. My top picks are mozzarella (for its famous stretch), young or medium cheddar (for sharp flavor), Monterey Jack (buttery and mild), and Colby (soft and creamy). A combination of two, like cheddar and mozzarella, gives you the best of both worlds. Avoid pre-grated cheese if you can, as it has additives that can hinder melting. Shredding your own from a block always gives a superior, gooier result.
How can I keep the fries crispy for a party?
Keeping fries crispy for a crowd is all about timing and method. First, cook your fries in batches so they aren’t steamed in the oven. Keep them warm and crisp on a wire rack set over a baking sheet in a low oven (about 200°F or 95°C). When guests arrive, quickly load the hot fries with cheese and bacon and broil. You can also prepare the bacon and shred the cheese ahead of time. This way, final assembly is super fast and the base stays perfectly crunchy.
Can I prepare any parts of this recipe ahead of time?
Yes, you can do a lot of prep to save time. You can cook the bacon ahead and store it chopped in the fridge for 2-3 days. You can shred all the cheese and keep it in a bag in the fridge. You can even pre-chop your parsley. The one thing you shouldn’t do ahead is cook the fries and let them sit. Fries are best cooked fresh and loaded immediately. With your other ingredients ready, you can go from zero to loaded in just the time it takes to bake one batch of fries.
What other toppings work well on loaded fries?
The topping possibilities are endless! Think of your favorite baked potato or nacho toppings. Some classics include diced red onion, sliced jalapeños (pickled or fresh), black olives, a dollop of sour cream, or a sprinkle of green onions. For a heartier meal, try adding leftover chili or taco meat to make “chili cheese fries.” For a brunch twist, add a fried egg on top. Get creative with what you have in your kitchen.
Are there any good vegetarian alternatives for the bacon?
For sure! You can make delicious vegetarian loaded fries. Instead of bacon, try using meatless bacon bits from the store. They add a similar smoky flavor. You could also use sautéed mushrooms for a savory, umami punch. Another great option is to add seasoned black beans or crispy chickpeas for protein. A sprinkle of smoked paprika over the cheese can also give that smoky depth of flavor that bacon usually provides.
My cheese isn’t melting smoothly. What did I do wrong?
If your cheese is clumping or getting oily, a few things might have happened. The oven might not have been hot enough, causing the cheese to sweat its fat out before melting. Broiling on high heat is key. The cheese might have been old or a type that doesn’t melt well. As mentioned, shredding your own from a block helps. Also, piling the cheese too high in one spot can cause it to cook unevenly. Try to sprinkle it in a light, even layer over all the fries.
How do I calculate the calories for this recipe?
Calculating calories can be simple. Find the nutrition facts for each ingredient you use (check the package). Weigh or measure each item. For example, note the calories for 100g of fries, 50g of cheddar, etc. Add the totals for all ingredients together. Then, divide that number by the number of servings you make. A basic estimate for this recipe is about 350-400 calories per serving, but this can change based on your specific brands, cheese amounts, and how much bacon you use. For precise tracking, using a calorie-counting app is very helpful.
Can I use frozen pre-cooked bacon?
You can use frozen pre-cooked bacon. It’s a great time-saver. Just make sure to heat it according to the package directions first. You want it to be warm and crispy before you chop it and add it to the fries. If you add it cold and straight from the freezer, it might not warm through properly in the short broiling time. Thawing it in the fridge first or giving it a quick zap in the microwave will ensure it’s ready to go.
What’s the best way to reheat leftover loaded fries?
Reheating leftovers is tricky but doable. The microwave will make them very soggy. The best method is the oven or toaster oven. Preheat to 375°F (190°C). Spread the leftover fries in a single layer on a baking sheet. Heat for about 10-15 minutes, until the cheese is melted again and the fries have re-crisped a bit. You won’t get the exact same texture as fresh, but it’s the best way to revive them. Adding a tiny bit of fresh cheese on top before reheating can help too.
Go Forth and Load Those Fries!
There you have it—your complete guide to making the most irresistible Loaded Bacon Cheese Fries. This recipe is more than just a snack; it’s a tool for creating fun, delicious memories around your table. It’s simple, forgiving, and always a hit. So next time you need the perfect comfort food that feels like a hug, remember this recipe. Grab those fries, cheese, and bacon, and get ready for the compliments to roll in. Happy cooking, and enjoy every last gooey, crispy, savory bite!
Raspberry Chocolate Delight
Ingredients
Equipment
Method
- Cook the fries according to the package directions until golden brown and crispy.
- Pile the hot fries into an oven-safe dish.
- Sprinkle both kinds of shredded cheese evenly over the fries.
- Scatter the crispy bacon bits over the cheese layer.
- Preheat the oven’s broiler on high and place the loaded fries under it for 1-3 minutes until the cheese is melted and bubbly.
- Remove from the oven and sprinkle fresh parsley over the top.
- Serve immediately while the cheese is still melted and gooey.