The Crunchy, Golden Bite of Home: Homemade Hush Puppies
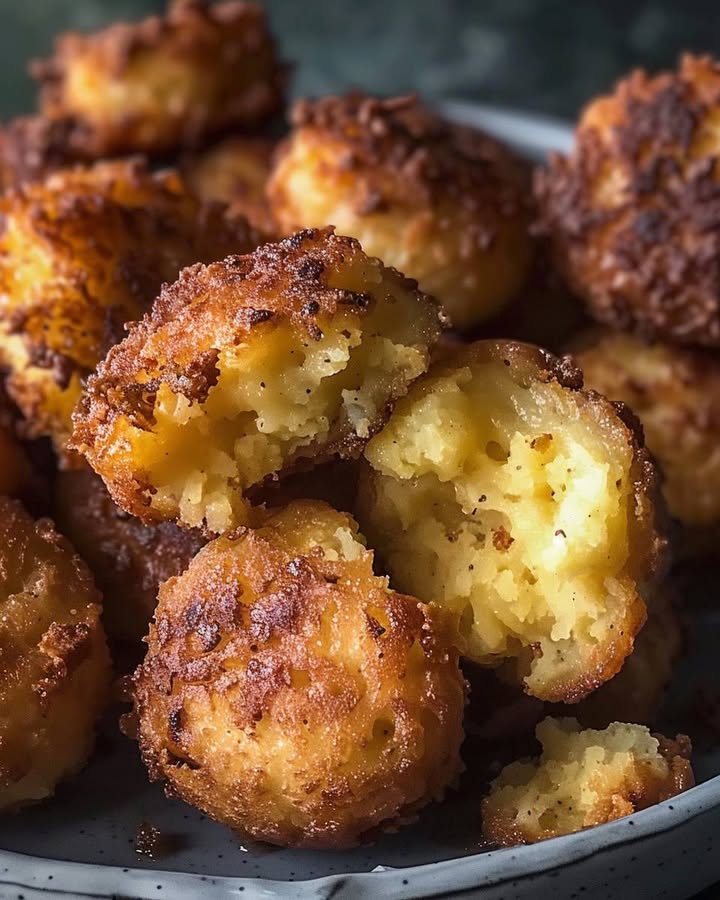
There’s something magical about that moment at a fish fry or family barbecue. The main event is sizzling, but my eyes are always on the little golden-brown orbs bobbing in the fryer. That first bite into a perfect hush puppy—crisp on the outside, tender and fluffy within, with just a hint of sweet onion—is pure comfort. Today, I’m sharing the simple, fail-proof recipe that’s won over my crowd every single time.
A Southern Tale of Fried Goodness
So, where did hush puppies come from? Folklore says resourceful cooks would fry up bits of cornmeal batter to toss to the “puppies” by the fire, telling them to “hush!” so they wouldn’t beg. While the true story might be fuzzier than a puppy’s ear, one thing is clear: these little fried cornbread bites are a cornerstone of Southern and soul food tradition. They’ve moved from campfire sidekick to a beloved side dish at picnics, fish camps, and kitchen tables everywhere. My version stays true to the classic with a few personal tweaks I’ve perfected after many, many happy (and tasty) trials.
Why You’ll Love This Hush Puppy Recipe
This recipe is a keeper for so many reasons! It’s incredibly fast, taking just 20 minutes from bowl to table. The ingredients are simple pantry staples you likely already have. The real magic is in the irresistible texture contrast and that savory-sweet flavor. Plus, kids absolutely adore them. They’re a fun, hands-off dish that lets you feel like a fry master without any fuss. Once you taste a homemade one, the boxed mixes will be a distant memory.
Perfect Occasions for Your Hush Puppies
These little golden bites are the life of the party! They’re perfect for:
- Summer cookouts and barbecues alongside ribs and slaw.
- Friday night fish fries (the classic pairing!).
- Game day spreads as an addictive finger food with dipping sauces.
- Potlucks and family gatherings where everyone asks for the recipe.
- A cozy, fun side for a simple weeknight supper of Honey Garlic Pasta for a sweet and savory combo meal.
What You’ll Need: Hush Puppy Ingredients
Let’s gather your simple lineup. The beauty is in the blend of cornmeal and flour!
- 1 cup yellow cornmeal
- 1/2 cup all-purpose flour
- 2 tablespoons sugar
- 1 teaspoon baking powder
- 1/2 teaspoon baking soda
- 1/2 teaspoon salt
- 1/2 teaspoon onion powder
- 1/4 teaspoon garlic powder
- 1/4 teaspoon cayenne pepper (optional, for a kick)
- 1/2 cup buttermilk
- 1 large egg
- 1/2 cup finely chopped onion
- Vegetable oil, for frying
Easy Swaps: Substitution Options
Out of something? No worries! Here are some easy fixes:
- No buttermilk? Make your own! Mix 1/2 cup regular milk with 1 1/2 teaspoons lemon juice or white vinegar. Let it sit for 5 minutes.
- Allergic to wheat? Use a 1-to-1 gluten-free all-purpose flour blend.
- Don’t have fresh onion? Use 2 tablespoons of dried minced onion instead. Soak it in the buttermilk for 5 minutes first to rehydrate.
- Feel free to add a pinch of Old Bay seasoning or some chopped jalapeño for a different twist.
Crafting Your Perfect Batch: Step-by-Step Instructions
Step 1: Mixing the Dry Team
Grab a large mixing bowl. It’s time to combine your dry ingredients. Whisk together the cornmeal, flour, sugar, baking powder, baking soda, salt, onion powder, garlic powder, and that optional cayenne. Watch as the pale yellow cornmeal mixes with the white flour, creating little clouds of flavor. This step ensures every single biting gets a perfect balance of seasoning. Pro tip: Give your whisk a good go to break up any clumps in the baking powder or soda. This guarantees an even rise later.
Step 2: Uniting the Wet Crew
In a smaller bowl, crack in your egg and pour the buttermilk. Whisk them together until they become one smooth, creamy, pale yellow liquid. You’ll see little bubbles form from the vigorous whisking—that’s a good sign! This mixture is what will bind our dry ingredients and create that signature tender crumb.
Step 3: Bringing It All Together
Now for the fun part! Pour your buttermilk mixture into the bowl of dry ingredients. Use a sturdy spoon or spatula to gently stir. Mix until the batter is just combined and no big dry streaks remain. A few small lumps are absolutely fine—overmixing makes tough hush puppies. Finally, fold in your finely chopped onion. The batter will be thick, scoopable, and speckled with those lovely onion bits.
Step 4: Heating the Oil
Pour vegetable oil into a deep, heavy-bottomed skillet, Dutch oven, or fryer until it’s about 2 inches deep. Turn the heat to medium-high. To test if it’s ready, the oil should reach 350°F (175°C) on a thermometer. If you don’t have one, drop a tiny bit of batter in. If it sizzles and floats to the top immediately, you’re good to go. This temperature is key for a crispy exterior that isn’t greasy.
Step 5: Frying to Golden Perfection
Using a small cookie scoop or two spoons, carefully drop tablespoon-sized mounds of batter into the hot oil. Don’t overcrowd the pan—give them room to swim and bob. They will sink at first, then rise to the surface. Fry for 2-3 minutes, turning occasionally with a slotted spoon, until they are a deep, uniform golden brown all over. The smell is absolutely heavenly at this point.
Step 6: Draining and Serving
Once perfectly golden, use your slotted spoon to transfer the hush puppies to a plate lined with paper towels. Let the excess oil drain away for a minute. This keeps them crispy. Serve them immediately while they are hot and irresistible! I love to serve them in a big basket lined with a checkered napkin for that down-home feel. Pro tip: Hold a spoonful of batter close to the oil’s surface when dropping it in to prevent splashing.
Time Commitment: Quick and Simple
This is a wonderfully fast recipe. The prep work takes about 10 minutes of measuring and mixing. The frying itself goes quickly, about 10 minutes total if you do a couple of batches. From start to finish, you’ll have hot, homemade hush puppies on the table in just 20 minutes.
Chef’s Secret: The Resting Trick
Here’s my little secret: after you mix the batter, let it rest for 5-10 minutes on the counter. This allows the cornmeal to soak up the liquid, which results in a more tender interior and prevents a gritty texture. It also gives you time to get your oil to the perfect temperature without rushing.
A Little Extra Info
Did you know cornmeal, the star of this show, was a staple for Native Americans long before European settlers arrived? They introduced the concept of cornbread to the colonists. Our humble hush puppy is a direct, delicious descendant of that history. Every bite connects us to centuries of simple, good cooking.
Necessary Equipment
You don’t need any fancy gadgets! Just gather:
- A large mixing bowl and a smaller bowl
- Whisk and a mixing spoon/spatula
- Deep skillet, Dutch oven, or deep fryer
- Slotted spoon or a spider strainer
- Paper towels (for draining)
- Candy/deep-fry thermometer (highly recommended)
- Small cookie scoop or two tablespoons
Storing Your Leftover Hush Puppies
Let your leftover hush puppies cool completely to room temperature. Do not store them while they are still warm, as this creates steam and makes them soggy. Once cool, transfer them to an airtight container. They can be kept on the counter for up to one day for best texture.
For longer storage, place them in the refrigerator for up to 3 days. While they lose some of their initial crispness in the fridge, they are still perfectly tasty. You can also freeze them for up to 2 months. Lay them in a single layer on a baking sheet to freeze solid first, then transfer to a freezer bag. This prevents them from sticking together.
The best way to reheat them is in the oven or air fryer. Preheat your oven to 375°F and bake for 5-10 minutes, or until re-crisped and heated through. The microwave will make them soft and chewy, so I don’t recommend it unless you’re in a big hurry.
Tips and Advice for Hush Puppy Success
- Keep your oil temperature steady. If it drops too low, they’ll soak up oil and be greasy. If it’s too high, they’ll burn outside before cooking inside.
- Finely chop the onion. Big chunks can fall out during frying.
- Test one hush puppy first! Fry a single one to check your oil temp and seasoning before committing the whole batch.
- Serve with a variety of dips: remoulade, spicy mayo, tartar sauce, or even warmed honey.
Presentation Tips for Maximum Appeal
Make your hush puppies look as good as they taste!
- Serve in a rustic wire basket or a wooden bowl lined with a cloth napkin.
- Skewer two or three on small sticks for a fun, easy-to-grab appetizer.
- Create a dipping sauce bar with 3-4 different options in small bowls.
- For a Southern-style plate, serve them alongside fried catfish, coleslaw, and pickles on a checkered plate.
Healthier Alternative Recipes
- Oven-Baked Hush Puppies: For a lighter take, drop the batter onto a parchment-lined baking sheet lightly sprayed with oil. Bake at 400°F for 15-20 minutes, flipping halfway. They’ll be less crunchy but still delicious.
- Whole-Grain Version: Substitute the all-purpose flour with whole wheat flour and use a coarser, stone-ground cornmeal for added fiber and a nuttier flavor.
- Vegan Hush Puppies: Replace the buttermilk with non-dairy milk mixed with lemon juice. Use a flax egg (1 tbsp ground flax + 3 tbsp water) instead of the regular egg.
- Air Fryer Hush Puppies: Spray your formed batter balls lightly with oil and cook in a single layer in your air fryer at 375°F for 8-10 minutes, shaking halfway through.
- Add Veggies: Fold in 1/4 cup of finely grated zucchini or carrot into the batter for a hidden veggie boost. Just squeeze out excess moisture first.
- Sweet Hush Puppies: Turn them into a dessert! Omit the onion, garlic, and cayenne. Add an extra tablespoon of sugar and a dash of cinnamon. Serve dusted with powdered sugar and a caramel dip.
Common Mistakes to Avoid
Mistake 1: Overmixing the Batter
This is the biggest culprit behind tough, dense hush puppies. When you mix the wet and dry ingredients, gluten in the flour begins to develop. Too much mixing means too much gluten, leading to a chewy texture instead of a light, tender one. Stir until the ingredients are just combined. It’s perfectly fine to see a few small, dry-looking streaks in the batter. They will hydrate as the batter rests. A lumpy batter is a happy batter here.
Mistake 2: Incorrect Oil Temperature
Frying at the wrong oil temperature causes real problems. If the oil is not hot enough (below 350°F), the hush puppies will act like sponges, soaking up oil and becoming soggy and greasy inside. If the oil is too hot, the outside will burn quickly while the inside remains raw. I highly recommend using a simple kitchen thermometer. It takes the guesswork out and is the single best tool for perfect frying. If you don’t have one, do the “crumb test” with a tiny bit of batter first.
Mistake 3: Crowding the Pan
It’s tempting to fry them all at once, but don’t do it! Adding too many hush puppies at once makes the oil temperature plummet dramatically. This leads to uneven cooking and greasy results. Fry in small batches of 5-6 at a time, depending on the size of your pot. This gives each one plenty of room to cook evenly and keeps the oil temperature stable. It’s faster in the long run because each batch cooks perfectly the first time.
Mistake 4: Using Coarsely Chopped Onion
Big pieces of onion can create weak spots in the batter, causing the hush puppy to break apart in the oil. They can also burn before the inside is cooked. Take the extra minute to finely chop your onion. You want small, uniform pieces that will distribute flavor in every bite without compromising the structure. If you’re short on time, a fine grate on a box grater also works wonderfully.
Frequently Asked Questions (FAQ)
Can I make hush puppy batter ahead of time?
You can mix the dry ingredients and chop the onion ahead of time, but I don’t recommend mixing the full batter more than 10-20 minutes before frying. The baking powder and soda begin to activate once they hit the buttermilk. If the batter sits too long, it can become flat and lose its lift, resulting in denser hush puppies. For the best results, mix your wet and dry ingredients just before you are ready to heat your oil and fry.
What’s the best oil for frying hush puppies?
You want an oil with a high smoke point and a neutral flavor. Vegetable oil, canola oil, and peanut oil are all excellent choices. They can handle the 350°F temperature without burning and won’t impart their own flavor onto your hush puppies. Avoid olive oil (except maybe light olive oil) as it has a lower smoke point and a stronger taste that doesn’t suit the classic flavor profile.
Why are my hush puppies raw in the middle?
This usually happens for one of two reasons. First, the oil temperature was too high. The outside browned so fast that the heat didn’t have time to travel to the center. Second, the hush puppies might have been formed too large. Try making them a bit smaller, about a heaping tablespoon each. Also, ensure you’re frying them long enough. A perfect golden brown color on the outside is your visual cue that the inside is done.
Can I bake hush puppies instead of frying them?
Absolutely! While they won’t have the exact same crisp, fried crust, baked hush puppies are still delicious and a great lighter option. Preheat your oven to 400°F. Drop tablespoon-sized balls of batter onto a baking sheet lined with parchment paper. Lightly spray or brush them with oil. Bake for 15-20 minutes, flipping halfway, until they are golden and firm to the touch.
What can I serve with hush puppies?
They are the ultimate versatile side! Classically, they are served with fried seafood like fish, shrimp, or oysters. They’re also fantastic with barbecue, chili, or pulled pork. For a fun twist, serve them as an appetizer with a zesty remoulade, creamy ranch, or spicy comeback sauce for dipping. They even make a great side for a creamy bowl of Honey Garlic Pasta to balance the sweetness with a savory crunch.
How do I get my hush puppies to be perfectly round?
The key tool is a small cookie scoop (like a #40 or #50 scoop). It portions the batter evenly and cleanly. When you release the batter into the oil, hold the scoop close to the surface to prevent a big splash and to help it keep its shape. If you’re using two spoons, use one to scoop and the other to gently push the batter into the oil. They might not be perfect spheres, but that homemade look is part of the charm!
Can I add other ingredients to the batter?
Of course! Get creative. Try adding 1/4 cup of shredded cheddar cheese, a few tablespoons of chopped jalapeño, some crumbled cooked bacon, or even a handful of fresh corn kernels. Just make sure any add-ins are finely chopped or shredded so they don’t weigh down the batter or cause it to fall apart. Keep the total volume of add-ins to about 1/2 cup so you don’t alter the batter consistency too much.
Are hush puppies gluten-free?
This specific recipe is not, as it uses all-purpose flour. However, you can easily make gluten-free hush puppies! Simply substitute the all-purpose flour with a good 1-to-1 gluten-free baking blend (like those from Bob’s Red Mill or King Arthur). Ensure your cornmeal is certified gluten-free as well. The rest of the recipe and method stays exactly the same.
What’s the purpose of buttermilk in the recipe?
Buttermilk does two wonderful things. First, its acidity reacts with the baking soda, creating bubbles of carbon dioxide. This makes the hush puppies light and fluffy. Second, it adds a lovely, subtle tangy flavor that balances the sweetness of the cornmeal and sugar. If you only have regular milk, the “milk + vinegar” substitute works because it recreates that acidity. Don’t skip it!
How do I know when the oil is ready without a thermometer?
The traditional test is the “wooden spoon” or “bread crumb” test. Stick the handle of a wooden spoon into the oil. If small bubbles form around it immediately, the oil is ready. Alternatively, drop a tiny pinch of the dry batter or a bread crumb into the oil. If it sizzles vigorously and floats to the top right away, your oil is hot enough. Start frying, but keep an eye on the first one to confirm the timing.
Your New Go-To Side Dish Awaits
Making homemade hush puppies is easier than you think, and the payoff is huge. That first crunchy bite, followed by the soft, savory center, is pure joy. This recipe is a little piece of Southern hospitality you can bring to your own table. Whether you’re pairing them with fried fish or just enjoying a basket on their own, I hope they bring as many smiles to your home as they have to mine. Now, go heat up that oil and get ready for some seriously delicious golden bites of happiness!
Honey Garlic Pasta
Ingredients
Equipment
Method
- In a large mixing bowl, whisk together the cornmeal, flour, sugar, baking powder, baking soda, salt, onion powder, garlic powder, and cayenne pepper.
- In a smaller bowl, whisk together the egg and buttermilk until combined.
- Pour the buttermilk mixture into the bowl of dry ingredients and gently stir until just combined. Fold in the finely chopped onion.
- Heat vegetable oil in a deep skillet or fryer until it reaches 350°F (175°C).
- Using a small cookie scoop or two spoons, drop tablespoon-sized mounds of batter into the hot oil, ensuring not to overcrowd the pan.
- Fry the hush puppies for 2-3 minutes, turning occasionally, until they are golden brown all over.
- Transfer the hush puppies to a plate lined with paper towels to drain excess oil and serve hot.