The Coziest Secret in Your Kitchen: Why This Pumpkin Bread Beats All
Is there anything better than the smell of warm spices and baking bread filling your house on a crisp fall morning? I don’t think so. For years, I chased the perfect pumpkin bread recipe, trying ones that were too dense, too dry, or just tasted blandly of spice. It felt like a mission! Then, after a happy accident during a hectic bake sale prep, I landed on this version. This isn’t just pumpkin bread; this is what I call The Most Perfect Pumpkin Bread. It’s moist, deeply spiced, and has this incredible tender crumb that makes you want to eat the whole loaf. Let me share this little piece of autumn perfection with you.
A Slice of History: From Humble Loaf to Seasonal Star
Pumpkin bread is a uniquely American treat, born from practicality. Early colonists, without easy access to the fruits and spices of their homelands, turned to native ingredients like pumpkin. They’d hollow out pumpkins, fill them with sweetened milk and spices, and roast them in the ashes of a fire—a kind of early, edible baking dish! Over time, this evolved into the quick breads we know today. While traditional versions were simpler, our modern “Most Perfect Pumpkin Bread” embraces the best of both worlds. It honors those humble beginnings with pure pumpkin flavor and warm spices, but achieves a bakery-worthy texture that makes every slice feel like a special occasion.
Why You’ll Absolutely Adore This Pumpkin Bread
You will love this recipe because it just works. Every single time. It’s the bread I get asked for when friends come over for coffee, and the one my family sneaks slices of before it’s even cool. The magic is in the balance. The blend of white and brown sugar gives it a complex sweetness. The mix of oil and a touch of milk ensures it stays unbelievably moist for days. And the quartet of cinnamon, nutmeg, cloves, and ginger sings with cozy flavor without being overpowering. It’s ridiculously easy to mix by hand, making it a stress-free baking project that delivers huge rewards.
When to Bake Your Perfect Pumpkin Bread
This bread is your ultimate edible hug for any autumn moment. It’s the star of a lazy Sunday breakfast, sliced thick and maybe even lightly toasted. Pack a slice in lunchboxes for a sweet surprise. It’s a guaranteed hit at harvest parties, Halloween potlucks, or as a thoughtful hostess gift during Thanksgiving week. Honestly, a rainy Tuesday is also a perfect occasion—it turns a gloomy day into something warm and wonderful. The smell alone is therapy!
Gathering Your Ingredients for Success
Here’s everything you’ll need for one glorious loaf. I find measuring everything out before I start (mise en place, the chefs call it!) makes the process so smooth and relaxing.
- 1 3/4 cups all-purpose flour
- 1 1/2 cups granulated sugar
- 1/2 cup brown sugar, packed
- 1 15 oz can pumpkin puree (not pumpkin pie filling!)
- 2 large eggs, at room temperature
- 1/2 cup vegetable oil or canola oil
- 1/4 cup milk (any kind works)
- 1 teaspoon vanilla extract
- 1 teaspoon baking soda
- 1/2 teaspoon baking powder
- 1/2 teaspoon salt
- 1/2 teaspoon ground cinnamon
- 1/4 teaspoon ground nutmeg
- 1/4 teaspoon ground cloves
- 1/4 teaspoon ground ginger
No Worries! Handy Ingredient Substitutions
Don’t have something? No panic! Here’s how to swap:
Flour: You can use a 1-to-1 gluten-free all-purpose blend for a GF version.
Oil: Melted butter or even applesauce can replace the oil. Butter adds richness, applesauce makes it slightly denser but lower in fat.
Milk: Any milk works—dairy, almond, oat, soy. Even water will do in a pinch.
Spices: If you’re missing one of the spices, use 1 1/2 teaspoons of pre-mixed pumpkin pie spice instead of the individual ones.
Crafting Your Most Perfect Pumpkin Bread: Step-by-Step
Step 1: Preheat and Prep Your Pan
First things first, get your oven humming with warmth. Turn it on to 350°F (175°C). This gives it plenty of time to reach the perfect, even temperature. While it heats, grab your 9×5-inch loaf pan. Grease it generously with butter or non-stick spray, or for the easiest release ever, line it with a sling of parchment paper. I’m a parchment paper convert—it guarantees your beautiful bread comes out in one piece, no sticking!
Step 2: Whisk the Dry Team Together
Take a medium bowl and add your flour. To that, add the magical leaveners: baking soda and baking powder. Now, welcome the flavor crew—salt, cinnamon, nutmeg, cloves, and ginger. Grab your whisk and give them a really good mix. You want to see one uniform, lightly speckled beige mixture. This ensures every single bit of batter gets its fair share of spice and rise. Pro tip: Whisking now prevents little bitter pockets of baking soda later. Set this fragrant bowl aside.
Step 3: Unite the Wet Ingredients
Now for the fun, messy part! In a large mixing bowl, combine both sugars. Then, crack in the eggs and pour in the oil, milk, and vanilla. Open that can of pumpkin puree—smell that beautiful orange goodness!—and plop it all in. Use your whisk again and stir, stir, stir until the mixture is completely smooth, thick, and a vibrant orange-brown. It should look like a creamy, dreamy pumpkin soup. This is the liquid foundation of your bread’s incredible moisture.
Step 4: The Grand Marriage of Wet and Dry
This is the crucial moment. Take your bowl of dry ingredients and gently sprinkle it over your wet pumpkin mixture. I like to add it in about three batches. Use a spatula or wooden spoon to fold the flour in gently. Stop mixing the very second you see no more dry white streaks of flour. A few small lumps are totally fine! Overmixing is the enemy of tender bread, as it develops gluten and can make it tough. Chef’s tip: This is also the perfect time to fold in any extras, like chocolate chips or nuts.
Step 5: Bake Until Perfected
Pour your beautiful, thick batter into your waiting prepared pan. Use your spatula to spread it evenly into the corners. Slide the pan into the center of your preheated oven. Now, the hardest part: wait! Bake for 60 to 70 minutes. To test for doneness, insert a toothpick or thin knife into the very center of the loaf. It should come out with just a few moist crumbs clinging to it, not wet batter. Your kitchen will smell absolutely divine.
Step 6: The Art of Patience (Cooling!)
When the bread is perfectly baked, pull it from the oven. Let it cool right in the pan on a wire rack for a full 10 minutes. This allows it to firm up a bit. Then, run a knife around the edges and carefully lift it out (using the parchment paper if you used it). Place the loaf directly on the rack to cool completely. I know it’s torture, but slicing into a warm loaf can make it gummy. Trust me, the wait is worth it for that perfect, sliceable texture.
Your Baking Timeline
Prep Time: A quick and easy 15 minutes.
Baking Time: 60 to 70 minutes of heavenly aroma.
Cooling Time: About 1-2 hours for best results.
Total Time: From start to first slice, plan for about 1 hour 45 minutes.
Servings: This makes about 10 generous slices.
My Chef’s Secret: The Temperature of Eggs
Here’s my little secret for the most cohesive, smooth batter: use room-temperature eggs. If I forget to take them out ahead of time, I just place the whole eggs in a bowl of warm (not hot) water for 5-10 minutes. Room-temperature eggs blend into the batter much more easily and evenly than cold ones, resulting in a better rise and a more uniform crumb in your final loaf.
A Fun Pumpkin Puree Fact
Did you know that most canned pumpkin puree isn’t actually made from the big, jack-o’-lantern style pumpkins? Those are too watery and stringy! It’s made from smaller, denser, sweeter varieties like Dickinson pumpkins. So when you use that can, you’re getting the best, most concentrated pumpkin flavor possible without all the work of roasting and pureeing your own.
Equipment You’ll Need
- One 9×5-inch loaf pan
- Large mixing bowl
- Medium mixing bowl
- Whisk
- Spatula or wooden spoon
- Measuring cups and spoons
- Wire cooling rack
- Toothpick or thin knife for testing
Keeping Your Pumpkin Bread Fresh
Once your bread is completely cool, the best way to store it is in an airtight container. A plastic storage container with a lid or a large zip-top bag works perfectly. Keep it at room temperature, and it will stay moist and delicious for up to 3 days.
For longer storage, you can freeze this bread beautifully. Wrap the whole loaf (or individual slices) tightly in plastic wrap, then again in aluminum foil or place in a freezer bag. It will keep well for up to 3 months. When you’re ready for a slice, just thaw it at room temperature or pop a frozen slice straight into the toaster!
Do not store this bread in the refrigerator. The cold air will actually dry it out faster and change the lovely texture. Room temp is the way to go for short-term enjoyment.
Tips and Advice for Total Success
- Use pure pumpkin puree, not pie filling. The pie mix already has sugar and spices added, which will throw off our recipe.
- Don’t skip the step of letting the bread cool in the pan for 10 minutes. It finishes cooking from residual heat and firms up.
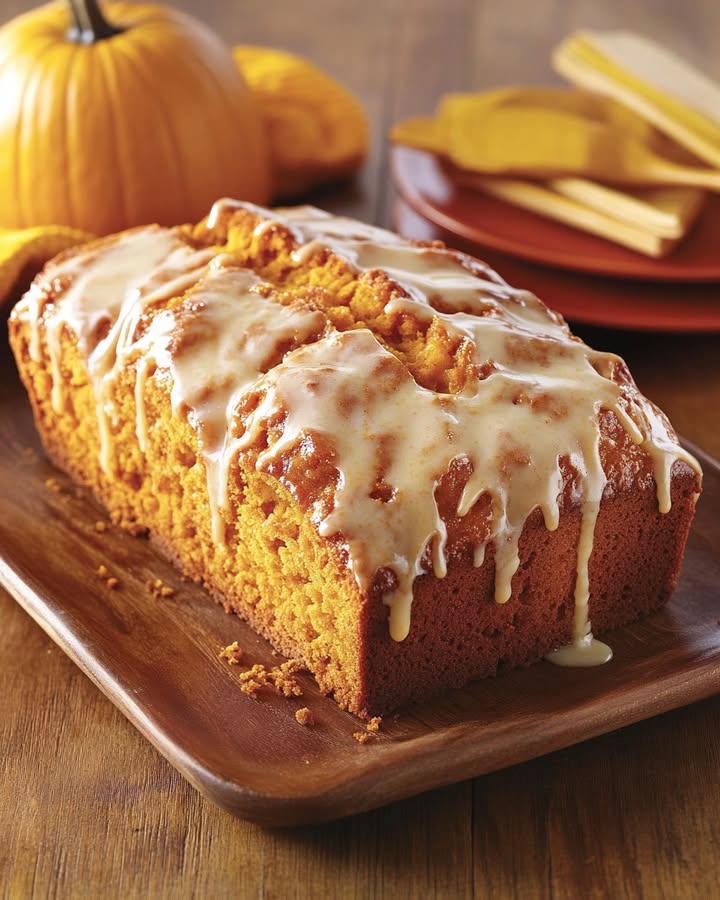
- For an extra special touch, you can make a simple glaze with 1 cup powdered sugar, 2 tablespoons milk, and a dash of vanilla. Drizzle it over the cooled loaf.
Pretty Presentation Ideas
- Dust the top with a light snowfall of powdered sugar right before serving.
- Serve slices on a rustic wooden board alongside a pot of softened butter and a jar of honey.
- For a party, cut the loaf into thick slices and then into smaller fingers or squares for easy grabbing.
- Add a dollop of freshly whipped cream or a scoop of vanilla ice cream for a decadent dessert.
6 Twists on Your Pumpkin Bread
1. Chocolate Chip Pumpkin Bread: Fold 3/4 cup of semi-sweet or dark chocolate chips into the batter before baking. A classic crowd-pleaser!
2. Nutty Crunch Pumpkin Bread: Add 1/2 cup of chopped walnuts or pecans to the batter. You can also sprinkle some on top before baking for extra crunch.
3. Streusel-Topped Pumpkin Bread: Make a quick streusel by mixing 1/4 cup flour, 1/4 cup brown sugar, 2 tbsp cold butter, and 1/2 tsp cinnamon until crumbly. Sprinkle over the batter before baking.
4. Cream Cheese Swirl Pumpkin Bread: Swirl 4 oz of softened cream cheese mixed with 1/4 cup sugar and 1 egg yolk through the batter for a marbled, tangy surprise.
5. Whole Wheat Pumpkin Bread: Substitute half of the all-purpose flour with whole wheat flour for a heartier, nuttier flavor and extra fiber.
6. Maple Pumpkin Bread: Replace the brown sugar with pure maple syrup. Reduce the milk by 2 tablespoons to account for the extra liquid.
Common Mistakes to Avoid
Mistake 1: Using Pumpkin Pie Filling
This is the most common mix-up! Pumpkin pie filling is pre-sweetened and pre-spiced. If you use it by accident, your bread will be way too sweet and the spice balance will be off. Always double-check the can label. You want the ingredient list to say just “pumpkin.” That’s your guarantee of pure pumpkin puree.
Mistake 2: Overmixing the Batter
It’s so tempting to keep stirring until it’s perfectly smooth. Resist! Overmixing develops the gluten in the flour, which makes bread chewy and tough—great for a baguette, bad for a tender quick bread. Mix just until the last streaks of flour disappear. A few small lumps are your friends. They promise a soft, delicate crumb.
Mistake 3: Skipping the Toothpick Test
Relying solely on time or color can lead to a sunken, underbaked center or a dry, overbaked loaf. Ovens vary. The absolute best way to know if your bread is done is the toothpick test. Insert it into the very center. If it comes out with wet batter, it needs more time. If it comes out clean or with a few dry crumbs, it’s perfect. This simple step is your foolproof guide to bakery-quality results.
Mistake 4: Slicing While It’s Hot
I know the warm, fragrant bread is calling your name. But if you cut into it too soon, the steam inside hasn’t fully set. This can cause the loaf to collapse a bit in the middle and makes the texture gummy rather than light and springy. Let it cool in the pan, then on the rack. Your patience will reward you with perfect, neat slices.
Your Pumpkin Bread Questions, Answered
Can I make this recipe into muffins?
Absolutely! This batter makes fantastic pumpkin muffins. Just divide the batter into a lined muffin tin, filling each cup about 3/4 full. The baking time will be much shorter—start checking at 18-22 minutes. Use the same toothpick test in the center of a muffin. They’re perfect for on-the-go breakfasts or lunchbox treats.
Why is my pumpkin bread dense and gummy in the middle?
A dense, gummy center usually points to two things: underbaking or overmixing. First, ensure you’re baking it long enough using the toothpick test. Second, check your mixing technique. Remember, stir wet and dry together just until combined. Also, make sure your baking soda and baking powder are fresh. Old leaveners lose their power and won’t give your bread the proper lift it needs.
Can I reduce the sugar in this recipe?
You can, but it will change the texture. Sugar doesn’t just add sweetness; it also contributes to moisture, tenderness, and browning. If you reduce it by more than 1/4 cup total, the bread may be drier, less tender, and pale. For a less sweet version, I’d suggest trying a reduction of 1/4 cup of the granulated sugar first and see how you like it.
How can I tell if my baking soda is still good?
It’s easy to test! Pour a small amount of vinegar or lemon juice into a bowl. Sprinkle about 1/4 teaspoon of your baking soda on top. If it fizzes and bubbles vigorously immediately, it’s still active and good to use. If the reaction is slow or non-existent, it’s time for a new box. Fresh leaveners are key for a good rise.
My bread sunk in the middle after baking. What went wrong?
A sunken center often means the bread wasn’t baked all the way through. The structure hadn’t fully set before you took it out of the oven. Other causes could be too much baking soda or powder, or opening the oven door too early in the baking process (before it’s set). Next time, be patient, use the toothpick test, and avoid peeking for at least the first 45 minutes.
Can I use fresh pumpkin puree instead of canned?
Yes, you can! You’ll need about 1 3/4 cups of homemade puree. Make sure it’s very well-drained and thick, similar to the canned consistency. If your puree is too watery, your bread will be soggy. To drain it, you can spread it in a thin layer on a baking sheet lined with paper towels for an hour or so before using.
What’s the difference between baking soda and baking powder here?
They work as a team! Baking soda needs an acid to activate. The pumpkin puree provides some of that acidity. Baking powder contains its own acid and activates with liquid and heat. Using both gives our bread a nice, even rise and a beautiful, rounded top. It’s the one-two punch for perfect lift.
Is it okay to use all brown sugar or all white sugar?
You can, but the flavor profile will change. Using all white sugar will give a cleaner, sweeter taste. Using all brown sugar will make it richer, with more molasses flavor and potentially a denser, moister texture. I love the blend because the white sugar gives sweetness and the brown sugar adds moisture and depth. It’s the best of both worlds.
Can I add raisins or dried fruit?
Of course! About 1/2 to 3/4 cup of raisins, dried cranberries, or even chopped dates would be lovely. To prevent them from sinking or drying out, you can toss them in a tiny bit of flour from your measured amount before folding them into the batter. This helps them stay suspended throughout the loaf.
How do I get that beautiful crack down the top of the loaf?
That classic crack is a hallmark of a good quick bread! It happens naturally due to the way the top sets and expands in the oven’s heat. To encourage it, make sure your oven is fully preheated and you place your pan in the center rack. Don’t smooth the top of the batter too perfectly when you put it in the pan; a slightly uneven surface promotes cracking.
Go Bake Some Cozy Memories
And there you have it—everything you need to bake what I truly believe is The Most Perfect Pumpkin Bread. This recipe is more than just a list of ingredients; it’s a warm invitation to slow down, to fill your home with the scents of autumn, and to share something made with your own hands. It’s been my go-to for years, and I’m so thrilled to pass it to you. So grab your mixing bowl, preheat that oven, and get ready for the best pumpkin bread you’ve ever tasted. Happy baking!
Heavenly Bowl Cake
Ingredients
Equipment
Method
- Preheat the oven to 350°F (175°C) and grease a 9x5-inch loaf pan or line it with parchment paper.
- In a medium bowl, whisk together the flour, baking soda, baking powder, salt, cinnamon, nutmeg, cloves, and ginger until evenly mixed.
- In a large mixing bowl, combine both sugars, eggs, oil, milk, vanilla, and pumpkin puree. Whisk until smooth.
- Gradually add the dry ingredients to the wet mixture in batches, folding gently until just combined with a few small lumps remaining.
- Pour the batter into the prepared pan and spread evenly. Bake for 60 to 70 minutes, testing for doneness with a toothpick.
- Let the bread cool in the pan for 10 minutes, then remove and cool completely on a wire rack.