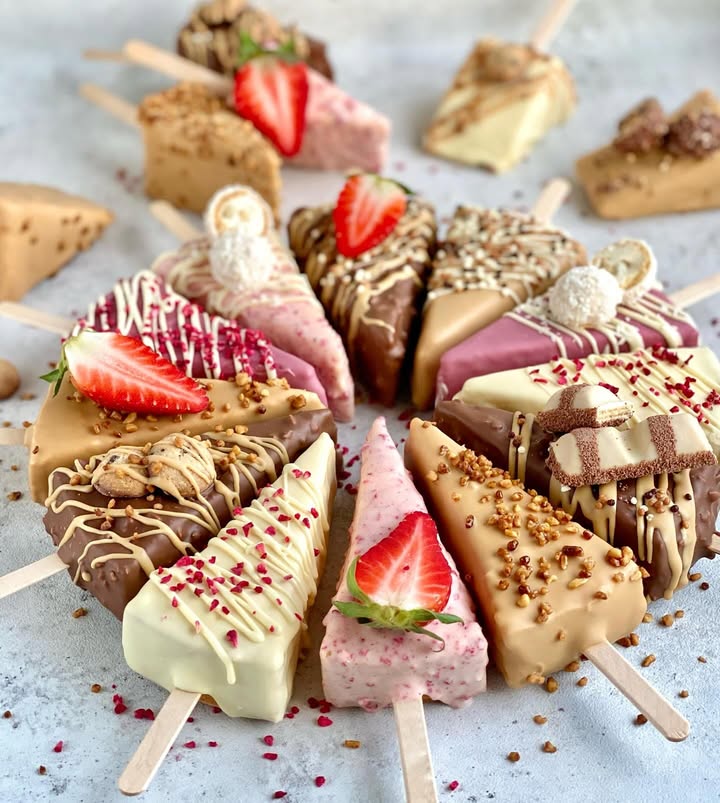
My Go-To Party Trick: Cheesecakes on a Stick!
You know that moment at a party when you see a dessert and your inner child just squeals with delight? That’s the exact reaction I was going for when I first made these Cheesecakes on a Stick. Picture this: all the creamy, tangy goodness of a perfect cheesecake, but portable, dippable, and completely mess-free. I tested this recipe for my niece’s birthday, and let me tell you, watching a dozen kids (and adults!) happily munching on their own personal cheesecake lollipops was pure kitchen magic. It’s a fun twist that turns a classic dessert into the life of the party.
A Playful History of Portable Desserts
Cheesecake itself is ancient, with roots going back to Greece. But the idea of putting it on a stick? That’s pure, modern fun. It taps into our love for fair food and anything-on-a-stick, from caramel apples to corn dogs. I like to think of it as cheesecake’s most playful incarnation. While the traditional version is elegant and served in slices, this one is all about convenience and shareable joy. It’s a dessert that doesn’t take itself too seriously, and that’s exactly why everyone loves it. I first saw the idea at a summer fair and knew I had to create a reliable, no-fail version for home.
Why You’ll Absolutely Adore This Recipe
First, it’s incredibly easy. No water bath, no worrying about cracks! The shortbread-style crust is pressed into pans, then topped and frozen. Second, it’s a make-ahead dream. You do all the work ahead of time, so when guests arrive, you’re just pulling a tray of gorgeous treats from the freezer. Finally, it’s endlessly customizable. Dip them in chocolate, roll them in nuts or sprinkles—it’s your canvas. This recipe is special to me because it’s my guaranteed crowd-pleaser. It never fails to bring smiles and requests for the recipe.
Perfect Occasions for Cheesecake Pops
This is your secret weapon for so many events! They’re perfect for kids’ birthday parties (think colorful sprinkles!), elegant for baby showers (dipped in pastel chocolate), a hit at summer barbecues, and a fantastic addition to any holay dessert table. I’ve even made mini versions as cute favors for a wedding shower. Any gathering where you want a dessert that’s both impressive and easy to serve is the right occasion for these pops.
What You’ll Need: Ingredients
Gather these simple ingredients. The beauty is in their simplicity!
For the Base:
- 150g all-purpose flour
- 60g granulated sugar
- 60g unsalted butter, chilled and cubed
- 1 small egg
For the Filling:
- 500g cream cheese, full-fat and at room temperature
- 150g powdered sugar
- 1 teaspoon pure vanilla extract
- 200ml heavy whipping cream
- 12-15 lollipop sticks or paper straws
For Coating (Optional):
- 200g melting chocolate or candy melts
- Sprinkles, chopped nuts, or crushed cookies for decoration
No Stress Substitutions
Out of something? No problem! Here are some easy swaps:
Flour: You can use a gluten-free 1:1 baking blend for the crust.
Sugar: For the filling, you can use a granulated sugar substitute that measures like sugar for baking.
Butter: Margarine can work, but real butter gives the best flavor.
Cream Cheese: Always use full-fat, block-style for the best texture. Low-fat versions can make the filling too soft.
Heavy Cream: There’s no direct substitute for whipping, but for a different twist, you could use full-fat coconut cream (chilled).
Crafting Your Cheesecake Pops: Step-by-Step
Step 1: Making the Buttery Base
Start by combining the flour, sugar, and cold butter cubes in a bowl. Use your fingertips to rub the butter into the dry ingredients until the mixture looks like coarse, sandy breadcrumbs. It should feel cool and crumbly. Now, add the small egg and mix until a soft dough forms. Don’t overwork it! The dough will come together nicely. Press this dough evenly into the bottom of your prepared 24cm springform pan. Use the bottom of a glass to get it really smooth and compact. This crust bakes into a lovely, sturdy shortbread that holds the pop together.
Step 2: Baking the Foundation
Preheat your oven to 180°C (350°F). Place your pan with the pressed crust on the middle rack. Bake for about 15-20 minutes, or until the edges are just turning a very light, golden color. Your kitchen will smell wonderfully buttery. Let this base cool completely in the pan on a wire rack. This cooling step is crucial—if you add the creamy filling to a warm base, it will melt and separate. Patience here makes for perfect pops later.
Step 3: Whipping Up the Dreamy Filling
In a large bowl, beat the room-temperature cream cheese until it’s completely smooth and creamy, with no lumps. This might take 2-3 minutes. Scrape down the sides of the bowl. Now, sift in the powdered sugar and add the vanilla extract. Beat again until everything is perfectly combined and silky. In a separate, clean bowl, whip the heavy cream until it forms stiff peaks. It should look fluffy and hold its shape. Gently fold the whipped cream into the cream cheese mixture. You’ll see it transform into a cloud-like, light filling. Pro tip: Be gentle when folding to keep all that lovely air in the mixture.
Step 4: Assembling and Freezing
Spread the creamy filling over your completely cooled base. Smooth the top with a spatula. Now, gently insert the lollipop sticks at even intervals, pushing them about halfway into the filling. Cover the pan tightly with plastic wrap and freeze for at least 4-6 hours, but overnight is best. You want the entire thing to be rock solid. This makes cutting clean and easy. Imagine a frozen, creamy cheesecake ice cream bar—that’s your goal texture.
Step 5: The Grand Finale: Cutting and Dipping
Remove the pan from the freezer. Carefully run a warm knife around the edge of the springform pan to loosen it. Pop the side off. Now, using a large, sharp knife dipped in hot water (and dried quickly), cut between the sticks to create individual cheesecake squares or rectangles. Work quickly so they don’t thaw. If you’re decorating, melt your chocolate or candy melts according to package directions. Dip each cheesecake pop into the melted coating, let the excess drip off, and immediately roll in or sprinkle with your toppings. Place them on a parchment-lined tray. Chef’s tip: For a super clean dip, tap the stick gently on the edge of the bowl to shake off extra chocolate.
Your Time Investment
- Prep Time: 30 minutes
- Cooking Time: 20 minutes
- Cooling Time: 1 hour
- Freezing Time: 6 hours (or overnight)
- Total Time: About 8 hours (mostly hands-off freezing)
My Secret Chef’s Trick
For an extra flavor boost in the crust, add the zest of one lemon to the flour and sugar mixture before you rub in the butter. That little hit of citrus brightens the whole dessert and complements the creamy filling beautifully. It’s a small step that makes people ask, “What is that amazing taste?”
A Fun Dessert Fact
The largest cheesecake ever made weighed over 6,900 pounds! It was created in 2018. While we’re not making anything that monumental, our little pops carry on the tradition of celebrating with this beloved dessert, just in a much more personal (and portable) size.
Equipment You’ll Need
- 24cm springform pan
- Mixing bowls (large and medium)
- Electric hand mixer or stand mixer
- Spatula
- Measuring cups and spoons/kitchen scale
- Wire cooling rack
- Sharp knife
- Lollipop sticks or sturdy paper straws
How to Store Your Cheesecake Pops
Once decorated, these pops need to live in the freezer. Place them in a single layer on a baking sheet until the coating is fully set, then you can transfer them to an airtight container. Separate layers with parchment paper to prevent sticking.
They will keep perfectly for up to 2 weeks in the freezer. This makes them the ultimate make-ahead dessert. Just pull them out about 5-10 minutes before serving to let the filling soften slightly for that perfect creamy texture.
I do not recommend refrigerating them for more than a few hours, as the filling can become too soft and they might lose their shape on the stick. The freezer is absolutely your friend for this recipe!
Tips and Advice for Success
- Room Temp is Key: Let your cream cheese sit out for a good hour. This prevents a lumpy filling.
- Cold Bowl for Whipping: Chill your bowl and beaters before whipping the cream. It whips faster and holds better.
- Easy Release: Lining the bottom of the springform pan with baking paper is non-negotiable for easy removal.
- Serve Cold: Have napkins ready! They are meant to be eaten cold, straight from the freezer.
Presentation Ideas to Wow Your Guests
- Stick them upright in a vase filled with sugar or coffee beans for a stunning centerpiece.
- Arrange them on a cake stand lined with parchment for a dessert table display.
- For a party, wrap each one in clear cellophane bags and tie with a ribbon for a cute take-home favor.
- Create a “dipping station” with bowls of different melted chocolates and toppings so guests can customize their own.
Healthier & Fun Variations
Want to mix it up? Here are six delicious twists:
- Lemon Berry Bliss: Add 2 tablespoons of lemon juice and zest to the filling. After dipping in white chocolate, sprinkle with freeze-dried raspberry powder.
- Cookies & Cream: Replace 50g of the flour in the base with crushed Oreo cookies. Roll the dipped pops in extra Oreo crumbs.
- Peanut Butter Cup: Swirl 4 tablespoons of smooth peanut butter into the cream cheese filling. Dip in milk chocolate and sprinkle with chopped peanuts.
- Tropical Escape: Use a gluten-free crust with coconut flour. Add 3 tablespoons of crushed pineapple (well-drained) to the filling. Dip in dark chocolate and roll in toasted coconut.
- Mini Cheesecake Bites: Skip the sticks! Press the base and filling into mini muffin tins. Pop out and dip for a one-bite wonder.
- No-Bake Version: For the base, mix 150g of crushed graham crackers with 75g melted butter. Press and chill. Continue with the no-bake filling as written. Perfect for summer when you don’t want to turn on the oven.
Common Mistakes to Avoid
Mistake 1: Using Cold Cream Cheese
This is the biggest culprit for a lumpy, un-spreadable filling. Cold cream cheese will never beat smoothly, leaving you with little bits throughout your mixture. Always plan ahead and let your cream cheese sit on the counter for at least an hour, until it’s soft to the touch. If you’re in a pinch, you can microwave it on a low-power setting for 10-second intervals, but be very careful not to melt it.
Mistake 2: Not Freezing Solid Before Cutting
If you try to cut and dip your cheesecake before it’s fully frozen, you’ll have a messy disaster. The filling will squish, the sticks will pull out, and you won’t get clean shapes. Patience is vital. Freeze for the full 6 hours, or better yet, overnight. The block should feel completely hard when you press it. This ensures every pop is neat and tidy.
Mistake 3: Dipping with Wet Chocolate
If you get even a tiny drop of water or steam into your melting chocolate, it can “seize,” turning it into a grainy, solid lump. Always make sure your bowls and tools are completely dry before starting to melt. Use a dry, clean knife to cut the frozen block. It’s also best to melt your chocolate in short bursts in the microwave or over a double boiler, stirring frequently.
Mistake 4: Overworking the Crust Dough
When making the shortbread base, mixing it just until it comes together is key. If you knead it too much, you’ll develop the gluten in the flour, which can make the crust tough and hard after baking. Use a light touch, and stop as soon as the dough forms a ball. It’s okay if it’s a little crumbly; it will press together perfectly in the pan.
Frequently Asked Questions
Can I make these without a springform pan?
You can, but a springform pan makes removal so much easier. If you don’t have one, a regular cake pan with a removable bottom works. Or, you can line a standard cake pan with parchment paper with long “handles” over the sides to help you lift the whole block out after freezing. Just be very careful when trying to remove a solid frozen block from a fixed pan.
What kind of sticks work best?
Proper lollipop sticks or craft sticks from the baking aisle are ideal. They’re strong and food-safe. Sturdy paper straws can also work for a cute look, but they might get a little soft if the pop thaws. Avoid flimsy sticks or toothpicks, as they won’t support the weight of the cheesecake square, especially once dipped.
Can I use dark, milk, or white chocolate for dipping?
Absolutely! Any type of chocolate you enjoy will work. For best results, use good-quality baking chocolate or chocolate chips made for melting (they contain stabilizers). Candy melts or compound coating chocolate are also great options—they come in many colors and set very firmly without tempering. Just follow the melting directions on the package.
How long before serving should I take them out of the freezer?
Just 5 to 10 minutes is perfect. You want them cold and firm but not so frozen that they’re difficult to bite into. The filling should have a creamy, dense ice cream texture. If you leave them out too long, especially in warm weather, the coating can start to sweat and the filling can get too soft and risk falling off the stick.
My coating cracked after dipping. What did I do wrong?
Cracking happens when there’s a big temperature difference. If your frozen cheesecake pop is extremely cold and your coating is very hot, the chocolate will set and contract quickly, causing cracks. Let your melted chocolate cool slightly so it’s warm, not hot. You can also try dipping in two thin layers, letting the first set before adding the second.
Can I make these gluten-free?
Yes, very easily! Simply replace the all-purpose flour in the base with a 1:1 gluten-free baking blend (one that contains a binder like xanthan gum). All other ingredients are naturally gluten-free, but always double-check labels on items like vanilla extract and sprinkles to be safe.
Are these kid-friendly to make?
They are fantastic for involving kids! They can help press the crust into the pan, stir the filling (with supervision on the mixer), and of course, the best part: decorating with sprinkles. The steps are simple and visual, making it a fun family baking project. Just handle the hot oven and sharp knife parts yourself.
Why did my filling turn out runny?
A runny filling usually points to two issues: the cream cheese wasn’t full-fat/block style (low-fat versions have more water), or the heavy cream was under-whipped. Make sure you whip the cream until it forms stiff peaks that hold their shape. Also, ensure your base was completely cool before adding the filling, as heat will melt it.
What’s the best way to melt chocolate for dipping?
The gentlest method is a double boiler: place a heatproof bowl over a pot of simmering water (make sure the bowl doesn’t touch the water). Stir until melted. For the microwave, use short 30-second bursts at 50% power, stirring well between each burst. Never microwave on high, as chocolate burns easily.
Can I add fruit to the filling?
You can, but you must be careful. Fresh fruit contains a lot of water, which can make the filling watery and prevent it from setting firmly. If you want fruit flavor, use high-quality preserves or jam swirled in, or a small amount of freeze-dried fruit powder. Alternatively, serve the pops with a fruit sauce on the side for dipping.
Ready to Be the Dessert Hero?
So there you have it—my foolproof path to Cheesecakes on a Stick. This recipe has never let me down, and I know it won’t let you down either. It’s the perfect blend of simple technique and wow-factor results. Whether you’re prepping for a big party or just want a fun weekend project with a delicious reward, these pops are the answer. Go ahead, grab your springform pan and get ready for the compliments to roll in. Happy baking (and dipping)!
Cajun Garlic Chicken
Ingredients
Equipment
Method
- Combine flour, sugar, and cold butter in a bowl until crumbly; add the egg and mix to form dough.
- Press the dough evenly into the bottom of a prepared 24cm springform pan.
- Preheat oven to 180°C (350°F) and bake crust for 15-20 minutes until lightly golden; cool completely.
- Beat room-temperature cream cheese until smooth, then sift in powdered sugar and add vanilla; mix until combined.
- Whip the heavy cream in a separate bowl until stiff peaks form; fold into the cream cheese mixture gently.
- Spread the filling over the cooled crust and insert lollipop sticks; freeze for 4-6 hours or overnight.
- Run a warm knife around the edge of the pan to loosen, then cut between sticks into squares or rectangles.
- Dip each cheesecake pop into melted chocolate, letting excess drip off, and decorate with toppings; place on a parchment-lined tray.