The Ultimate Vegan Chocolate Cake: Your New Guilt-Free Obsession
Let me tell you a secret. The first time I served this cake, my most skeptical, cheese-and-butter-loving friend asked for a third slice. He had no idea it was vegan. That’s the magic of this recipe. It’s not a “good for vegan” cake. It’s a spectacular, decadent, show-stopping chocolate cake that just happens to be plant-based. If you’ve ever thought vegan baking was complicated or lacked flavor, this rich, fudgy masterpiece is here to change your mind forever.
A Sweet Slice of History: From Famine Cake to Fancy Dessert
Funny enough, this cake has ancestors that were born out of necessity, not trend. During wartime rationing when eggs and dairy were scarce, bakers got creative with “wacky cakes” or “depression cakes” using vinegar, oil, and water. My modern spin honors that clever spirit but elevates it with a silky espresso-laced ganache and fresh berries. It connects us to resourceful home bakers of the past while celebrating the amazing vegan products we have today, like rich plant-based cream. It’s a beautiful blend of tradition and delicious innovation.
Why You’ll Fall Head Over Heels for This Chocolate Cake
This recipe is a total crowd-pleaser for so many reasons. First, it’s incredibly easy and uses simple pantry staples you probably already have. No fancy egg replacers needed. The taste is deep, dark, and luxurious. The bubbly mineral water gives it an airy crumb, while the oil ensures it stays moist for days. Plus, it’s naturally dairy-free and egg-free, making it perfect for sharing with friends who have dietary restrictions. Everyone gets to enjoy a giant slice of chocolate heaven.
When to Whip Up This Show-Stopping Dessert
This cake isn’t just for special occasions, though it certainly shines at them. I love baking it for birthday parties where kids have allergies. It’s a superstar at potlucks – you’ll always go home with an empty plate. A simple Wednesday night also deserves a treat, and this cake comes together so quickly. It’s my go-to for “just because” moments, like celebrating a promotion or comforting a friend. Any day becomes sweeter with this cake on the table.
What You’ll Need: The Ingredients List
Gathering your ingredients is the first step to chocolate bliss. Here’s your shopping list:
For the Cake:
- 250 g all-purpose flour (spelt flour works too!)
- 50 g high-quality cocoa powder
- 3 tsp espresso powder (the secret flavor booster!)
- 120 g granulated sugar
- 1 packet (about 1 tbsp) vanilla sugar
- 2 tsp baking powder
- 1 pinch of salt
- 300 ml strongly carbonated mineral water
- 90 ml neutral oil (like rapeseed or canola)
- Some grease for the pan
For the Ganache & Decoration:
- 600 g vegan whipping cream
- 400 g dark vegan chocolate (chopped)
- 100 g fresh berries (blueberries, blackberries)
- 1 tbsp chocolate shavings
No Problem! Handy Ingredient Swaps
Don’t panic if you’re missing something. Baking is flexible!
- Flour: Spelt flour gives a slightly nutty taste. Regular all-purpose works perfectly.
- Espresso Powder: Instant coffee granules are a fine substitute. It enhances chocolate flavor, don’t skip it!
- Oil: Any neutral vegetable oil like sunflower or even melted coconut oil (for a hint of flavor) will do.
- Vegan Cream: Look for brands meant for whipping. Canned full-fat coconut cream can work but may add a coconut taste.
- Berries: Use frozen (thawed) berries in a pinch, or swap for raspberries or strawberries.
Let’s Get Baking! Your Step-by-Step Guide
Follow these simple steps for a perfect cake every single time.
Step 1: Preheat and Prep
First, get that oven nice and hot. Set it to 180°C (350°F) for top/bottom heat, or 160°C (320°F) if using a fan setting. While it warms up, grab your 26 cm springform pan. Give it a light but thorough greasing with a little oil or vegan butter. This simple step is your insurance policy for a cake that pops out cleanly later. There’s nothing worse than a beautiful cake stuck in the pan!
Step 2: Make the Magical Batter
Now for the fun part. In a large mixing bowl, whisk together all your dry ingredients: flour, cocoa, espresso powder, sugar, vanilla sugar, baking powder, and salt. Watch as the dark cocoa dusts the lighter flour. Now, make a well in the center. Pour in the fizzy mineral water and the neutral oil. The carbonation is key. It reacts with the baking powder to give our cake a wonderful lift without eggs. Use a whisk to quickly but gently combine everything into a smooth, glossy, and irresistible chocolate batter. Pro tip: Mix just until combined. Overmixing can lead to a tough cake.
Step 3: Bake to Perfection
Pour that beautiful batter into your prepared pan. It will be quite liquid, and that’s perfect. Smooth the top with a spatula. Place it carefully in the center of your preheated oven. Bake for 20 to 25 minutes. You’ll know it’s done when the top springs back lightly to the touch and a toothpick inserted comes out with just a few moist crumbs. The smell will be absolutely divine. Once baked, let the cake cool completely in the pan on a wire rack. Patience is a virtue here for easy slicing later.
Step 4: Create the Dreamy Ganache
While the cake cools, make the ganache. Finely chop your dark chocolate and place it in a medium heatproof bowl. The smaller the pieces, the smoother it will melt. In a saucepan, heat the vegan whipping cream over medium heat. You want it to get steamy and just start to bubble around the edges. Don’t let it boil vigorously. Once hot, immediately pour it over the chopped chocolate. Let this sit, untouched, for a full 5 minutes. This allows the heat to gently melt the chocolate from within.
Step 5: Assemble Your Masterpiece
After its rest, take a spatula and start stirring the chocolate and cream mixture from the center outwards. You’ll see it transform into a sleek, homogeneous, glossy chocolate lava. Stir until every last white streak of cream is gone. Now, cover the bowl and chill this ganache for at least 2 hours, preferably overnight, until it’s firm and cold. Chef’s tip: For a super stable ganache, ensure both your cream and chocolate are high-quality and vegan-specific for whipping.
Step 6: The Grand Finale
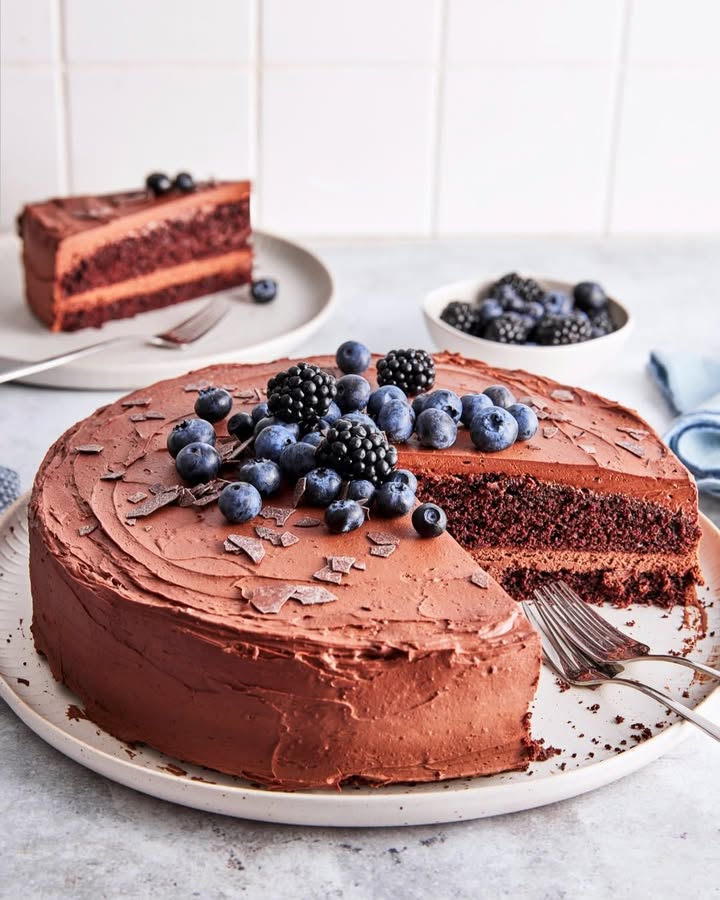
Time for assembly. Once your cake is cool and your ganache is chilled, carefully slice the cake horizontally into two even layers using a long serrated knife. Take your chilled ganache out of the fridge. Whip it with an electric mixer on high speed until it becomes light, fluffy, and holds soft peaks—just like traditional whipped cream! Spread a generous layer of this whipped ganache on the bottom cake layer. Gently place the top layer on. Frost the top and sides with the remaining fluffy ganache. Finally, decorate with a lavish scattering of fresh berries and a snowdrift of chocolate shavings.
Timing is Everything: Your Cake Schedule
- Prep Time: 30 minutes
- Baking Time: 25 minutes
- Cooling Time (Cake): 1 hour
- Chilling Time (Ganache): 2 hours minimum
- Assembly & Decorating: 15 minutes
- Total Time (Including Chilling): About 4 hours
The Chef’s Secret for Unbeatable Flavor
My absolute non-negotiable secret? The espresso powder. You won’t taste coffee. Instead, it amplifies the depth and richness of the chocolate in a way that’s almost magical. It makes the cocoa taste more chocolaty. If you’ve ever found a chocolate cake a bit flat or one-dimensional, this is the trick that will fix it forever. Just a few teaspoons bridges the gap between good and extraordinary.
A Little Extra Chocolate Knowledge
Did you know the type of cocoa makes a huge difference? “Dutched” or alkalized cocoa (like what’s in the recipe) is treated to reduce acidity. It has a darker color, milder flavor, and dissolves more easily in batters. It’s perfect for this cake, giving it that classic deep brown color and smooth taste. Natural cocoa is more acidic and can react differently with baking powder. So for consistent, fudgy results, stick with the baked cocoa listed.
Your Baking Toolbox
You don’t need fancy gear. Here’s what will help:
- 26 cm (10-inch) springform pan
- Large and medium mixing bowls
- Whisk and rubber spatula
- Electric hand mixer or stand mixer
- Saucepan
- Wire cooling rack
- Long serrated knife (for slicing layers)
Keeping Your Cake Fresh and Delicious
If by some miracle you have leftovers, storage is simple. Because the ganache is dairy-free, it’s quite stable. The best place for your decorated cake is in a covered cake carrier or under a large inverted bowl right on the counter for up to 2 days. The fridge can dry out the cake layers slightly, but if your kitchen is very warm, refrigeration is fine for up to 4 days. Let slices come to room temperature for about 20 minutes before serving for the best texture and flavor.
For longer storage, you can freeze individual slices or the whole cake (unfrosted or frosted). Wrap slices tightly in plastic wrap and then foil. They’ll keep for up to 3 months. Thaw overnight in the refrigerator. The ganache may lose a bit of its fluffiness after freezing but will still taste amazing.
A little note on the berries: if you plan to keep the cake for more than a day, consider adding the fresh berry decoration just before serving. This prevents them from bleeding moisture and making the ganache soggy. A sprinkle of chocolate shavings, however, will hold up beautifully from the start.
My Best Tips for Cake Success
- Use room temperature ingredients when possible. It helps everything blend smoothly.
- When measuring flour, spoon it into the measuring cup and level it off. Don’t scoop directly from the bag, as this can pack in too much.
- Don’t open the oven door during the first 20 minutes of baking. A draft can cause the cake to fall.
- Let the cake cool completely before cutting or frosting. A warm cake will melt your beautiful ganache.
- For super clean layers, use dental floss to slice the cake instead of a knife.
Pretty as a Picture: Presentation Ideas
- Arrange the berries in a beautiful circular pattern or a casual, artful heap on top.
- Use a vegetable peeler on a cold bar of chocolate to create elegant curls instead of shavings.
- Dust the very edges of the cake plate with a little extra cocoa powder for a professional touch.
- Add edible flowers like pansies or violets for a special celebration cake.
- Serve each slice with a small pour of vegan berry coulis or a dollop of coconut whipped cream.
Six Fun Ways to Mix Things Up
Love this base recipe? Try these delicious twists!
- Orange Chocolate Cake: Add the zest of two oranges to the cake batter. Use orange liqueur in the ganache instead of a tablespoon of cream.
- Mint Chocolate Delight: Stir 1 tsp of peppermint extract into the ganache after melting. Top with chopped vegan mint chocolate bars.
- Chocolate Raspberry Cake: Spread a layer of seedless raspberry jam between the cake layers before adding the ganache. Use fresh raspberries for decoration.
- Mocha Madness Cake: Increase the espresso powder in the cake to 1 tbsp. Add 1 tsp of instant coffee granules to the hot cream for the ganache.
- Cookie Crunch Cake: Fold 100g of crushed vegan chocolate cookies into the cake batter for a fun texture. Use cookie crumbs to decorate the sides.
- Chocolate Peanut Butter Cake: Swirl ½ cup of smooth peanut butter into half of the whipped ganache for a marbled frosting. Garnish with chopped salted peanuts.
Common Mistakes to Avoid
Steer clear of these pitfalls for a perfect cake.
Mistake 1: Using Flat Mineral Water
The carbon dioxide in the mineral water is a crucial leavening agent. It works with the baking powder to create air bubbles, giving the cake its light texture. If you use still water or soda that has gone flat, your cake will be dense and heavy. Always check that your mineral water is very fizzy right before you open it and mix it in.
Mistake 2: Overmixing the Batter
When you combine the wet and dry ingredients, it’s tempting to beat it until it’s perfectly smooth. Resist! Overmixing develops the gluten in the flour, leading to a tough, chewy cake instead of a tender crumb. Mix just until you see no more big streaks of dry flour. A few small lumps are perfectly fine and will bake out.
Mistake 3: Not Chilling the Ganache Long Enough
Impatience is the enemy of fluffy ganache. If you try to whip the chocolate and cream mixture before it’s completely cold, it will not hold peaks. It will remain a loose, pourable glaze (which is delicious, but not for frosting). Plan ahead and let it chill for the full 2 hours, or even better, overnight. Your patience will be rewarded with a frosting you can spread and pipe.
Mistake 4: Cutting a Warm Cake
You’ve waited for it to bake, and the aroma is intoxicating. But slicing into a warm cake is a recipe for crumbs and breakage. The structure needs time to set as it cools. A warm cake will also melt your carefully whipped ganache into a mess. Let it cool in the pan, then on a rack, until it’s completely room temperature. It’s worth the wait.
Your Vegan Chocolate Cake Questions, Answered
Can I make this cake gluten-free?
Absolutely! You can substitute the wheat or spelt flour with a good quality 1:1 gluten-free all-purpose flour blend. These blends usually contain xanthan gum, which helps bind the cake without gluten. The result might be slightly more delicate, but just as delicious. Be sure your baking powder and other ingredients are certified gluten-free if you have a severe intolerance.
My ganache is too runny. What did I do wrong?
A runny ganache usually means the ratio was off or it wasn’t chilled enough. First, ensure you measured the chocolate and cream by weight for accuracy. If it’s just not setting, you can try re-heating it gently and adding a bit more chopped chocolate. Or, simply put it back in the fridge for longer. On a hot day, your kitchen temperature can affect it, so chilling is key. If all else fails, use it as a delicious glaze instead of a fluffy frosting.
What’s the best vegan chocolate to use for the ganache?
Look for a dark chocolate bar or baking chocolate that is labeled vegan and has a cocoa content between 55% and 70%. This ensures it will melt smoothly and set properly. Avoid chocolate chips if you can, as they often contain stabilizers that prevent easy melting. Brands like Enjoy Life, Baker’s (certain percentages), or organic dark chocolate bars from the grocery store are great choices. Read the label to confirm no dairy products are listed.
Can I bake this in a different pan size?
Yes, but adjustments are needed. For two 8-inch round pans, the baking time will be shorter, around 18-22 minutes. For a 9×13 rectangular pan, the batter will be thinner, so check after 20 minutes. For cupcakes, fill liners ⅔ full and bake for 16-20 minutes. Always do the toothpick test to check for doneness, as the exact time depends on your oven and pan material.
Why did my cake sink in the middle?
A sunken cake often points to too much leavening, undermixing, or, most commonly, opening the oven door too early. The cake’s structure sets in the first part of baking. A cold draft from an opened door can cause it to collapse. Also, ensure your baking powder is fresh. If it’s old, it won’t create enough lift. Finally, be sure you’re mixing the batter adequately after adding the liquids to evenly distribute the baking powder.
Can I make the cake layers ahead of time?
You sure can! This is a great time-saver. Once the baked cake layers are completely cool, wrap them tightly in plastic wrap. You can store them at room temperature overnight. For longer storage, freeze them for up to a month. Thaw, still wrapped, at room temperature before assembling. This can actually make the cake more moist as it allows the flavors to meld.
Is there a substitute for vanilla sugar?
No problem. If you don’t have vanilla sugar, simply use the same amount of regular granulated sugar and add 1 teaspoon of pure vanilla extract to the wet ingredients (the mineral water and oil). The flavor will be just as wonderful. Avoid artificial vanilla if possible, as pure extract gives a warmer, richer taste.
My whipped ganache turned grainy. How can I fix this?
A grainy texture means the chocolate might have seized or wasn’t fully melted. This can happen if the cream wasn’t hot enough or if you stirred too early before the chocolate had a chance to melt. To fix it, gently reheat the ganache in a double boiler or in short bursts in the microwave, stirring until smooth. Then, chill it again and re-whip. Next time, ensure your cream is very hot and let it sit on the chocolate for the full 5 minutes.
Can I decorate the cake the day before?
Yes, you can assemble and decorate the full cake a day ahead. Store it in a cool place, covered with a cake dome or large bowl. The ganache frosting is stable. However, if using fresh berries on top, they may release some juice overnight. For the very best presentation, add delicate fresh fruit decorations a few hours before serving. Chocolate shavings and other dry decorations are fine to add a day ahead.
What can I use instead of espresso powder?
If you don’t have espresso powder, an equal amount of instant coffee granules is the closest substitute. Just make sure it’s a fine powder. You can dissolve 1 ½ teaspoons of instant coffee in 1 tablespoon of hot water, let it cool, and add it with the wet ingredients. In a real pinch, you can leave it out, but remember, it’s there to enhance the chocolate, not to make it taste like coffee.
The Final Slice
This cake proves that indulgence doesn’t need compromise. It’s rich, satisfying, and made with simple, honest ingredients. Whether you’re vegan, dairy-free, or just a chocolate lover in search of an amazing recipe, this cake is for you. It has brought so much joy to my table, and I know it will do the same for yours. So preheat that oven, grab your whisk, and get ready to make some sweet memories. Happy baking
Cheesy Cajun Chicken
Ingredients
Equipment
Method
- Preheat oven to 180°C (350°F) for top/bottom heat or 160°C (320°F) for fan setting; grease a 26 cm springform pan.
- Whisk together dry ingredients: flour, cocoa, espresso powder, sugar, vanilla sugar, baking powder, and salt in a large mixing bowl.
- Make a well in the center of the dry mixture and pour in the mineral water and oil; mix gently until combined.
- Pour the batter into the prepared pan and smooth the top; bake for 20-25 minutes until the top springs back and a toothpick comes out with moist crumbs.
- Let the cake cool completely in the pan on a wire rack.
- While the cake cools, prepare the ganache by placing chopped chocolate in a heatproof bowl; heat vegan whipping cream in a saucepan until just bubbling, then pour it over the chocolate and let sit for 5 minutes.
- Stir the chocolate and cream mixture until it’s smooth and homogeneous; cover and chill for at least 2 hours.
- Once cooled, slice the cake horizontally into two layers; whip the chilled ganache until light and fluffy.
- Spread ganache on the bottom layer, place the top layer on, and frost the top and sides with the remaining ganache; decorate with fresh berries and chocolate shavings.