The Magic of Almond Meringue Sandwiches: A Sweet Symphony
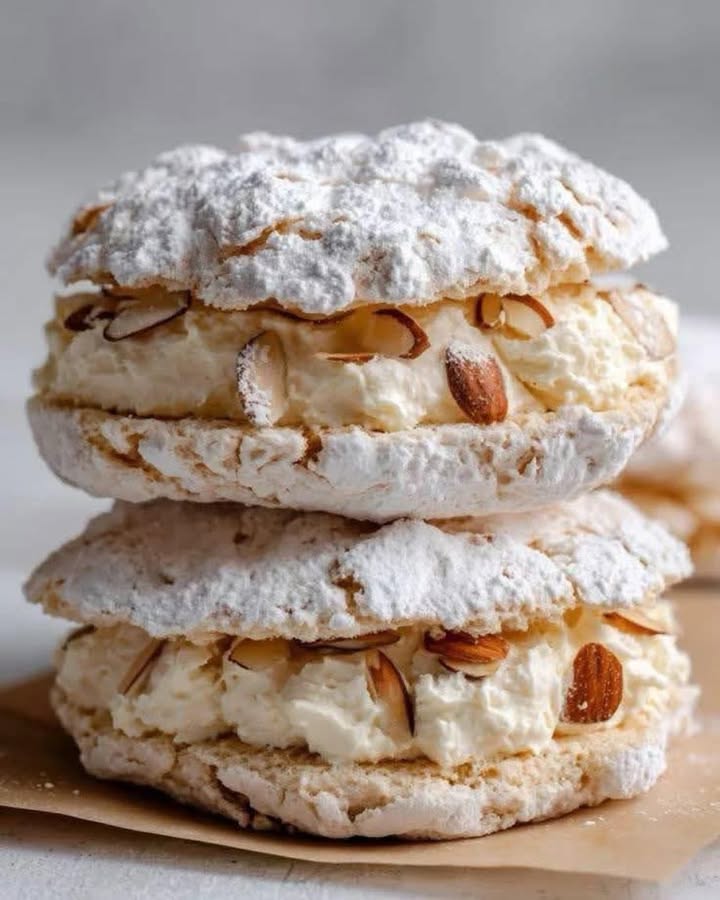
Have you ever had a dessert that feels like a cloud giving you a sweet, crunchy hug? That’s exactly what happened the first time I bit into an almond meringue sandwich. It was at my best friend’s bridal shower, and one bite of that crispy, creamy, melt-in-your-mouth delight took over the whole conversation. We all begged for the recipe! Now, it’s my go-to dessert when I want to impress without a ton of fuss. It looks fancy, tastes heavenly, and honestly, it’s just pure, sugary joy on a plate.
A Dessert That Traveled Through Time
While this specific sandwich is my little twist, the story of meringue is rich and royal. Many food historians believe it was invented in a Swiss village called Meiringen back in the 1600s. From there, clever French chefs perfected it, creating those beautiful, airy pavlovas and dacquoises we love today. My version, with its toasted almond crunch and billowy whipped cream, is a nod to those classic, elegant French pastries, but made simple enough for a busy home cook like me. It’s a perfect blend of tradition and modern, easy baking.
Why You’ll Fall in Love With This Recipe
You’ll adore this recipe because it’s a triple threat: crispy, creamy, and deliciously light. Unlike a heavy cake or pie, these sandwiches feel elegant and indulgent without weighing you down. The process is almost magical—turning simple egg whites and sugar into glossy, sturdy clouds. Plus, they’re incredibly versatile! You can make the meringue discs ahead of time, and the filling options are endless. It’s the kind of dessert that makes people think you spent all day in the kitchen, when really, it’s quite straightforward.
The Perfect Occasion for a Sweet Surprise
This isn’t just an everyday cookie; it’s a special occasion star. I love making these for afternoon tea parties, baby showers, or as the grand finale to a fancy dinner. They’re fantastic for holidays—imagine them on a Christmas dessert table! They also pack beautifully (just assemble right before serving) for picnics or potlucks. Really, any time you want to add a touch of sweet, elegant magic to your gathering, these almond meringue sandwiches are your secret weapon.
What You’ll Need: The Ingredients List
Gathering your ingredients is the first step to success. Here’s everything you need for these heavenly bites:
- 4 large egg whites (at room temperature!)
- 1 cup (200g) of granulated sugar
- 1/4 teaspoon of cream of tartar
- 1 teaspoon of pure vanilla extract
- 1 cup (240ml) of cold heavy whipping cream
- 1/2 cup of sliced almonds
- 1 tablespoon of icing sugar (for dusting)
No Stress Substitutions
Out of something? No worries! Here are some easy swaps:
- For the nuts: Swap sliced almonds for chopped hazelnuts or pecans. They toast up just as nicely.
- For the cream of tartar: You can use 1/2 teaspoon of lemon juice or white vinegar instead. It helps stabilize the whites.
- For the filling: While whipped cream is classic, try a lemon curd, chocolate ganache, or even a light raspberry jam for a different twist.
Let’s Get Baking: Your Step-by-Step Guide
Follow these steps, and you’ll have perfect meringue sandwiches. The key is patience and paying attention to those beautiful peaks!
Step 1: Preheat and Prep
First things first, preheat your oven to 110°C (225°F). This low temperature is crucial for drying out the meringue, not baking it. Line two large baking sheets with parchment paper. I don’t grease the paper—the meringue needs to stick a bit. Take a moment to ensure your mixing bowl and beaters are completely clean and dry. Any trace of grease can ruin your meringue. It feels like a science experiment, and that’s part of the fun!
Step 2: Whip Those Whites
Place your room-temperature egg whites in your sparkling-clean bowl. Add the cream of tartar. Start beating on medium speed. Watch as the clear, slippery whites turn into a frothy, foamy mass. Then, they’ll become soft, cloudy peaks that flop over when you lift the beater. That’s your “soft peak” stage. The air you’re incorporating here is what gives the meringue its incredible lift and crisp texture.
Pro tip: Room temperature egg whites whip up much higher and faster than cold ones. Just take your eggs out about 30 minutes before you start.
Step 3: The Sweet, Steady Stream
Now, increase the mixer speed to medium-high. This is where the magic deepens. Start adding the granulated sugar, just one tablespoon at a time. Let each spoonful fully incorporate before adding the next. This patience builds a strong, glossy meringue. After all the sugar is in, add the vanilla extract. Keep beating until you have stunning, stiff, glossy peaks. The meringue should stand straight up when you lift the beater, and you should be able to turn the bowl upside down without it moving. It’s a proud moment!
Step 4: Shape and Bake
Scoop your beautiful meringue onto the prepared sheets. You can use a piping bag for perfect circles or just use two spoons to form rustic discs. Leave about an inch between them, as they won’t spread much. Sprinkle the tops generously with the sliced almonds. Now, place them in the oven. They’ll need to bake for about 1 to 1.5 hours. The goal is for them to be completely dry and crisp on the outside. They should lift off the parchment paper cleanly.
Step 5: The All-Important Cool Down
Once baked, turn off the oven. Now, here’s a secret: leave the meringue discs in the oven with the door slightly cracked open. Let them cool down completely inside. This slow cooling prevents them from cracking or becoming chewy from a sudden temperature change. It might take an hour or more. Use this time to clean up and whip your cream!
Step 6: Whip and Fill
While the meringues cool, make the filling. Pour your cold heavy whipping cream into a chilled bowl. Whip it on medium-high speed until it holds medium peaks—it should be fluffy and spreadable, not buttery. Place a generous dollop of cream on the flat side of one meringue disc. Gently place a second disc on top, flat side down, to create your sandwich. Don’t press too hard, or you might crack the delicate meringue.
Step 7: The Finishing Touch
Right before serving, give your assembled sandwiches a graceful dusting of icing sugar. It looks like a light snowfall and adds a final touch of sweetness. Serve immediately for the best texture contrast—the crisp shell giving way to the soft, cool cream inside is what makes these truly special.
Chef’s tip: For extra flavor, toast the sliced almonds in a dry pan for a few minutes before sprinkling them on the meringue. It deepens their nutty taste beautifully.
Your Baking Timeline
Let’s break down the time commitment so you can plan your baking session easily.
- Prep Time: 20 minutes
- Baking Time: 1 hour to 1.5 hours
- Cooling Time: 1 hour (in the oven)
- Assembly Time: 10 minutes
- Total Time: About 2.5 to 3 hours (mostly hands-off)
The Sneaky Secret to Super-Crisp Meringues
My best-kept secret? A pinch of cornstarch. After you’ve added all the sugar, sprinkle in one teaspoon of cornstarch along with the vanilla. It absorbs any excess moisture and guarantees an extra-crisp, non-chewy meringue that stays perfect for days. It’s a tiny step that makes a huge difference!
A Little Sweet History
Did you know the name “meringue” might come from the Latin word “merenda,” meaning “light evening meal”? It’s funny to think of these sweet treats as a light meal, but their airy texture certainly fits the bill. It’s also said that the famous chef Marie-Antoine Carême, known as the “king of chefs,” loved using meringue in his elaborate pastry architectures in the 1800s. You’re baking a piece of culinary royalty!
Tools of the Trade
You don’t need fancy equipment, but these tools help a lot:
- Stand mixer or hand mixer (whipping by hand is a serious workout!)
- Two large baking sheets
- Parchment paper or silicone baking mats
- Spatula
- Measuring cups and spoons
- Cooling rack (optional)
How to Keep Your Sandwiches Perfect
For the unfilled meringue discs: Store them in a single layer in an airtight container at room temperature. They can last for up to a week if your house isn’t too humid. You can even freeze them for a month! Just lay them flat in a freezer-safe container.
For the assembled sandwiches: This is the tricky part. Whipped cream doesn’t hold up for long. Assemble them no more than an hour before you plan to serve. If you need to make them ahead, keep the meringue discs and whipped cream separate in the fridge, and put them together at the last minute.
If you have leftovers: Any leftover assembled sandwiches should be stored in the refrigerator, but know that the meringue will start to soften and lose its crispness after a few hours. They’re still tasty, just a different, softer texture.
My Best Tips for Success
- Weather Watch: Avoid making meringue on very humid or rainy days. The extra moisture in the air can make them soft and sticky.
- Egg Freshness: Older egg whites actually whip up better than fresh ones! If you can, separate your eggs a day ahead and keep the whites covered in the fridge.
- Slow and Steady Sugar: I can’t say it enough—adding the sugar slowly is the number one rule for glossy, stable meringue.
- Cool Completely: Rushing the cooling step is a common mistake. Let them cool in the oven for that perfect crisp texture.
Making Them Look as Good as They Taste
- Dust with edible gold dust or colored sprinkles for a festive look.
- Serve on a beautiful white platter to show off their snowy color.
- Add a few fresh berries like raspberries or strawberries on the side for a pop of color.
- For a party, make mini sandwich versions—they’re adorable and easy to eat in one bite.
Mix It Up! Healthier & Fun Variations
Once you master the basic recipe, the world is your oyster! Try these delicious twists.
- Chocolate Dip: Dip half of each assembled sandwich in melted dark chocolate. Let it set for a decadent treat.
- Berry Cream: Fold a few tablespoons of mashed raspberries or strawberry puree into your whipped cream for a pink, fruity filling.
- Coffee-Kissed: Add a teaspoon of instant espresso powder to the meringue along with the sugar for a mocha flavor.
- Coconut Dream: Substitute the almonds with finely shredded coconut for a tropical twist.
- Lemon Zest: Add the zest of one lemon to the meringue and fill with lemon curd mixed with a little whipped cream.
- Spiced Fall Version: Add a pinch of cinnamon and nutmeg to the meringue and use chopped pecans instead of almonds.
Common Mistakes to Avoid
Avoid these simple pitfalls for perfect meringue sandwiches every time.
Mistake 1: Using a Dirty or Greasy Bowl
Any trace of fat or oil in your bowl will prevent the egg whites from achieving their full volume. Even a little bit of leftover egg yolk can cause this. Always wash your mixing bowl and beaters with hot, soapy water and dry them thoroughly right before you start. I sometimes wipe mine down with a little lemon juice or vinegar for extra security!
Mistake 2: Adding Sugar All at Once
Dumping the sugar in quickly will deflate all the precious air you just whipped into the egg whites. This leads to a dense, grainy, and runny meringue that won’t hold its shape. The sugar needs time to dissolve into the protein structure of the whites. Add it one spoonful at a time, waiting about 10-15 seconds between each addition. Patience here is non-negotiable.
Mistake 3: Baking at Too High a Temperature
Meringue needs to dry out slowly, not bake quickly. A high oven temperature will cause the outside to brown or even burn before the inside dries out. It can also make the meringues crack and weep sugary beads. Stick to the low temperature of 110°C (225°F). It feels low, but it’s the perfect setting for a slow, steady dry that results in a crisp texture throughout.
Mistake 4: Assembling Too Far in Advance
The whipped cream filling has moisture, and meringue acts like a sponge. If you assemble your sandwiches hours ahead, the crisp shells will absorb the moisture from the cream and turn soft and soggy. For the perfect textural contrast—the crisp shell breaking to reveal the soft cream—assemble them no more than 30-60 minutes before you plan to serve them.
Your Questions, Answered (FAQ)
Can I make these meringue sandwiches ahead of time?
Yes, but with a smart strategy. You can bake the plain meringue discs (without filling) up to a week in advance. Store them in an airtight container at room temperature, away from humidity. The whipped cream filling should be made fresh. Assemble the sandwiches right before you serve them. This way, you get all the make-ahead convenience without sacrificing that wonderful crispy texture that makes them so special. It’s a lifesaver for party planning!
Why did my meringue turn out chewy or sticky?
A chewy meringue usually has two common causes: humidity or under-baking. If it’s a humid day, moisture in the air is absorbed by the sugar in the meringue, making it sticky. Try baking on a dry day if possible. Under-baking means the meringue’s interior hasn’t dried out. Make sure you bake them long enough so they are completely dry and crisp, and let them cool slowly in the turned-off oven to finish the drying process completely.
What can I use instead of cream of tartar?
If you don’t have cream of tartar, you can use a small amount of an acid as a stabilizer. Lemon juice or white vinegar are perfect substitutes. Use about 1/2 teaspoon of either one in place of the 1/4 teaspoon cream of tartar. The acid helps strengthen the egg white foam, giving you those lovely stiff peaks. The flavor difference is undetectable in the final dessert, so don’t worry!
Can I freeze almond meringue sandwiches?
You can freeze the baked and cooled meringue discs very successfully. Place them in a single layer in a freezer-safe container, separated by parchment paper, for up to a month. Thaw them at room temperature before using. However, I do not recommend freezing the assembled sandwiches with whipped cream. The cream will not thaw well and can make the meringue very soggy and unappetizing.
My egg whites won’t whip up stiff. What went wrong?
This is frustrating! The most likely culprit is a trace of fat (like egg yolk or oil) in your bowl or on your beaters. Even a little bit can ruin the whipping power. Another cause could be using cold egg whites instead of room temperature ones. Cold proteins don’t unwind and trap air as easily. Start over with a scrupulously clean bowl and room-temperature egg whites, and you should see a big difference.
Is there a way to make this recipe less sweet?
The sugar is essential for the structure of the meringue, so you can’t reduce it much without affecting the texture. However, you can balance the sweetness. Use a slightly tangy filling, like whipped cream with a touch of mascarpone cheese or a layer of tart fruit puree. The contrast will make the overall dessert taste less overwhelmingly sweet, even though the meringue shell itself remains the same.
Can I pipe the meringue into different shapes?
Absolutely! Piping is a great way to make uniform and pretty shapes. Fit a piping bag with a large round tip for classic discs, or use a star tip for a more decorative look. Just remember that very intricate shapes might be more fragile. Keep the shapes simple and about the same thickness so they bake and dry evenly. It’s a fun way to get creative.
How do I know when the meringues are done baking?
They are done when they are completely dry and firm to the touch. You should be able to gently lift one off the parchment paper cleanly. The bottoms should be dry, not sticky. If they still feel soft or tacky, they need more time. The low temperature means it’s hard to over-bake them, so if in doubt, give them an extra 15 minutes. A perfect meringue will sound hollow if you tap it gently.
What’s the best way to store whipped cream filling?
Whipped cream is best used immediately. If you must make it ahead, you can store it covered in the refrigerator for a few hours. To help it stay stable, you can add a little stabilizer. Whip in one tablespoon of instant pudding mix (vanilla or white chocolate flavor works well) or a teaspoon of cornstarch when you add the sugar. This will help it hold its shape longer without weeping.
Can I make these without nuts for an allergy?
Of course! Just omit the sliced almonds completely. The meringue will still be deliciously crisp and sweet. For a bit of texture and visual interest, you could sprinkle the meringue discs with a little colored sugar or even mini chocolate chips before baking. The recipe works perfectly well as a simple, nut-free vanilla meringue sandwich.
Ready to Create Something Sweet?
So there you have it—my complete guide to creating these little bites of heaven. Almond meringue sandwiches are more than just a dessert; they’re a moment of pure, crispy, creamy joy. They’ve saved me at countless get-togethers and never fail to bring a smile. I hope you give them a try and share them with someone you love. Remember, the best baking comes from the heart, a little patience, and the willingness to enjoy a cloud-like cookie that just might become your new favorite thing. Happy baking!
Spinach Chicken Bake
Ingredients
Equipment
Method
- Preheat your oven to 110°C (225°F) and line two large baking sheets with parchment paper.
- Place the room-temperature egg whites in a clean bowl and add the cream of tartar. Beat on medium speed until frothy.
- Increase speed to medium-high and add the sugar one tablespoon at a time, allowing it to incorporate fully before the next addition.
- Add the vanilla extract and continue beating until stiff glossy peaks form.
- Scoop the meringue onto the prepared sheets, leaving space between them. Sprinkle with sliced almonds.
- Bake in the oven for about 1 to 1.5 hours until completely dry and crisp.
- Turn off the oven and leave the meringues inside with the door slightly cracked to cool completely.
- Whip the cold heavy cream to medium peaks.
- Assemble the meringue sandwiches with a dollop of whipped cream between two meringue discs.
- Dust assembled sandwiches with icing sugar before serving.