The Ultimate Chocolate Squares Cake: Your New Favorite Dessert!
Have you ever had one of those days where only chocolate will do? I mean, the deep, dark, melt-in-your-mouth kind that makes everything feel a little bit better. I was having exactly one of those days last week, and after trying three different complicated recipes that flopped, I created this gem. This Ultimate Chocolate Squares Cake is my love letter to easy baking. It’s rich, layered, surprisingly simple, and the perfect thing to make when you need a guaranteed win. Let’s get baking!
From Humble Beginnings to Chocolate Heaven
This recipe is a happy mash-up of traditions. It takes the tender crumb of a classic cocoa sponge cake and piles it high with a creamy, dreamy filling inspired by old-fashioned refrigerator cakes. The gelatin in the cream layer is my little secret—it gives you that perfect, sliceable texture without being stiff. It’s a modern twist on a comfort-food classic, perfect for today’s home baker who wants impressive results without the stress.
Why You Will Absolutely Adore This Recipe
First, it’s unbelievably easy. No fancy techniques or equipment needed. Second, it’s a texture dream team: fluffy cake, silky cream, and glossy ganache all in one bite. Third, it’s a make-ahead marvel. You actually need to let it chill, which means no last-minute panic before guests arrive. It’s the kind of dessert that looks like you spent hours in the kitchen, but we’ll keep our little secret just between us!
Perfect Occasions for This Chocolate Masterpiece
- Potluck Parties: Transport it easily and watch it disappear first.
- Book Club Gatherings: Pair a square with coffee and great conversation.
- Weekend Family Treat: A sweet reward after a long week.
- Birthdays: For the friend who prefers cake squares over a layered cake.
- “Just Because” Days: The best reason of all!
Gathering Your Ingredients
Here’s everything you’ll need for this chocolate celebration. Measure with love!
- 2 large eggs
- A pinch of salt
- 120g granulated sugar
- 150 ml whole milk
- 50ml vegetable oil
- 150g all-purpose flour
- 30g unsweetened cocoa powder (the good stuff!)
- 5g baking powder
- 10g unflavored gelatin powder
- 50ml cool water
- 200g sweetened condensed milk
- 200 ml heavy whipping cream, cold
- 50g semi-sweet chocolate (for the ganache)
- 40ml lukewarm heavy cream (for the ganache)
Smart Swaps: Substitution Options
Ran out of something? No worries! Here are some easy swaps:
- Milk: Any non-dairy milk like almond or oat works beautifully.
- Vegetable Oil: Melted coconut oil or a mild olive oil are great substitutes.
- Whipped Cream: For a stabilizer-free version, you can use an extra 200g of cool whipped topping.
- Gelatin: For a vegetarian option, use agar-agar powder, following package instructions for setting liquid.
Creating Your Chocolate Masterpiece
Follow these simple steps for a flawless, delicious result. Let’s do this!
Step 1: The Fluffy Base
Start by cracking your two eggs into a large mixing bowl. Add the sugar and that tiny pinch of salt. Now, whisk with all your might! You want the mixture to become pale, frothy, and leave a gentle ribbon trail when you lift the whisk. This incorporates air, giving your cake a lovely light texture. The scent of the eggs and sugar blending is the first promise of the sweetness to come.
Step 2: The Wet Team Joins In
Slowly pour in the milk and vegetable oil while gently stirring. You’ll see the mixture become smooth, shiny, and slightly thinner. The oil ensures an incredibly moist crumb that won’t dry out. Don’t whisk too vigorously here; just fold until everything is perfectly combined. Pro tip: Let your milk sit out for 10 minutes to take the chill off—it incorporates better with the eggs.
Step 3: The Cocoa Cloud
Time for the chocolate magic! Sift your flour, cocoa powder, and baking powder directly into the wet ingredients. Sifting is not just for show; it breaks up lumps and aerates the dry goods for a lighter cake. Using a spatula, gently fold everything together. Watch as the batter transforms into a thick, luxurious, dark brown paste. Stop as soon as you see no more dry flour streaks.
Step 4: Bake to Perfection
Pour your gorgeous batter into a greased 8×8 inch square baking pan or skillet. Smooth the top with your spatula. Pop it into a preheated oven at 350°F (175°C). Bake for about 15-18 minutes. You’ll know it’s done when the top springs back lightly to the touch and a toothpick inserted comes out clean. Your kitchen will smell absolutely heavenly!
Step 5: The Dreamy Cream Layer
While the cake cools, sprinkle the gelatin over the 50ml of cool water in a small bowl. Let it “bloom” for 5 minutes—it will look like a grainy paste. Then, gently heat this mixture (either in the microwave for 10 seconds or over a double boiler) until it becomes a clear liquid. In a separate bowl, whisk the cold heavy cream until soft peaks form. In another bowl, stir the condensed milk until smooth, then whisk in the liquid gelatin. Finally, fold the whipped cream into the condensed milk mixture. You’ll get a light, fluffy, spreadable cloud.
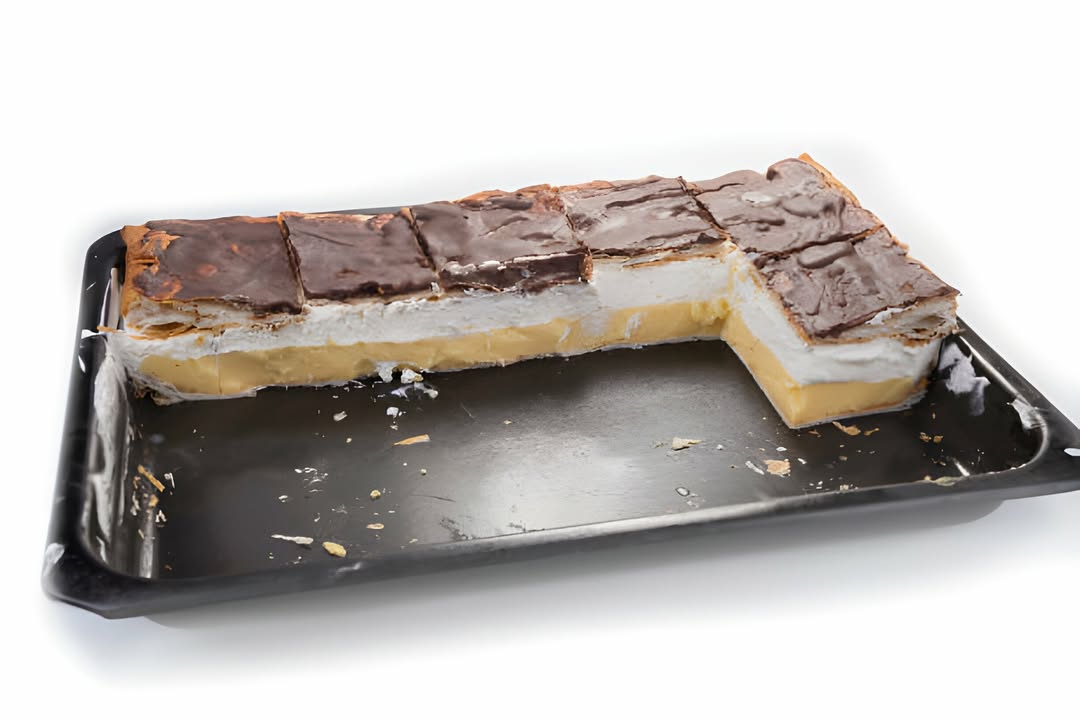
Step 6: Layer and Chill
Once your cake is completely cool, carefully slice it horizontally to create two even layers. Place the bottom layer back in your pan. Spread all of that luscious cream filling over it. Gently place the top cake layer on top, like a cozy blanket. Now, the hard part: patience! Cover the pan and refrigerate for at least 2 hours, or ideally overnight. This allows the gelatin to set the cream perfectly so you get neat squares.
Step 7: The Glossy Ganache Finish
For the grand finale, make the ganache. Chop your 50g of chocolate into small pieces and place in a bowl. Heat the 40ml of cream until it’s just warm (not boiling), then pour it over the chocolate. Let it sit for a minute to melt the chocolate, then stir slowly from the center outwards until you have a smooth, shiny, pourable glaze. Pour this over the chilled cake, spreading it to the edges with a spatula. Let it set for 15 minutes before slicing.
Chef’s tip: For perfect squares, run a sharp knife under hot water and wipe it dry before each cut. It glides through the layers like a dream!
Your Baking Timeline
Here’s a quick breakdown of your time investment:
- Prep Time: 25 minutes
- Baking Time: 15-18 minutes
- Chilling Time: 2 hours (minimum)
- Total Time: About 3 hours (mostly hands-off chilling)
A Secret from My Kitchen
My secret weapon for the cake layer? A pinch of instant coffee granules sifted in with the dry ingredients. You won’t taste coffee, but it deepens the chocolate flavor beautifully, making it taste even richer and more complex. Trust me on this one!
A Sweet Bit of Extra Info
Did you know the word “ganache” is French and supposedly means “fool” or “simpleton”? The story goes that a pastry chef’s apprentice accidentally spilled cream into chocolate, and the chef yelled “Ganache!” But the mistake created one of the most beloved chocolate coatings in the world! Sometimes the best things come from happy accidents.
Necessary Equipment
You don’t need anything fancy! Just gather:
- Two mixing bowls (one large, one medium)
- Whisk and spatula
- 8×8 inch square baking pan
- Hand mixer or stand mixer (for whipping cream)
- Fine mesh sieve (for sifting)
- Small bowl for gelatin
Storing Your Chocolate Squares
In the Refrigerator: This cake must be stored in the fridge, covered tightly with plastic wrap or in an airtight container. The creamy filling and ganache need to stay cool. It will keep beautifully for up to 4-5 days.
For Longer Storage: You can freeze individual squares! Place them on a parchment-lined tray to freeze solid first (about 2 hours), then wrap each square tightly in plastic wrap and place in a freezer bag. They will keep for up to 2 months. Thaw overnight in the refrigerator.
Serving After Storage: Let the squares sit at room temperature for just 5-10 minutes before serving. This slight warming makes the ganache shine and the cake soften to the perfect texture.
Tips and Advice for Success
- Always use room temperature eggs for maximum volume when whisking.
- When folding dry into wet, use a gentle hand to keep the batter airy.
- Don’t skip blooming the gelatin—it ensures it dissolves smoothly without lumps.
- Chill your mixing bowl and beaters before whipping the cream for faster, fluffier results.
Presentation Tips to Impress
Make your squares look bakery-perfect!
- Dust the top with a light snowfall of powdered sugar or cocoa powder.
- Place a fresh raspberry or a strawberry slice on top of each square.
- Add a tiny sprinkle of flaky sea salt right on the ganache for a gourmet touch.
- Serve on a platter with a dessert fork for an elegant feel.
Healthier Twists & Fun Variations
Want to mix it up? Try one of these delicious ideas:
- Peanut Butter Swirl: Swirl 1/4 cup of warm peanut butter into the cream layer before chilling.
- Mint Chocolate: Add 1/2 teaspoon of peppermint extract to the cream filling.
- Orange Zest Delight: Add the zest of one orange to the cake batter for a citrus twist.
- Gluten-Free Version: Swap the all-purpose flour for a 1:1 gluten-free baking blend.
- Cookie Crunch: Sprinkle crushed chocolate wafer cookies between the cake and cream layers.
- Berry Blast: Top the finished squares with a mix of fresh berries just before serving.
Common Mistakes to Avoid
Mistake 1: Not Letting the Cake Cool Completely
It’s so tempting to start layering right away! But if your cake is even slightly warm, it will melt the delicate cream filling. This leads to a soggy cake layer and a filling that won’t set properly. Always, always let your cake cool on a wire rack until it’s completely room temperature to the touch. Patience here is the key to perfect layers.
Mistake 2: Over-mixing the Batter
Once you add the flour and cocoa, you need a gentle hand. Vigorous mixing develops the gluten in the flour, which can make your cake tough and dense instead of tender and light. The goal is to just combine the ingredients until you no longer see dry streaks of flour. A few small lumps are totally fine—they’ll bake out.
Mistake 3: Using Warm Cream for Whipping
Whipping cream only whips up nicely when it’s very cold. If your cream, bowl, or beaters are even a little warm, the fat won’t hold the air bubbles. You’ll end up with a grainy, soupy mess that won’t fold into the condensed milk. For best results, chill your bowl and beaters in the freezer for 15 minutes before you start.
Mistake 4: Skipping the Sifting Step
Cocoa powder and baking powder love to clump up. If you just dump them in, you risk getting little pockets of bitter cocoa or unmixed baking powder in your finished cake. Sifting ensures an even distribution and a smooth, consistent batter. It only takes a minute and makes a big difference in the final texture.
Frequently Asked Questions
Can I make this cake without gelatin?
You can, but the creamy layer will be much softer and not hold its shape as well when sliced. It will be more like a loose custard between the cake layers. For a firm, neat slice that holds together on a plate, gelatin is recommended. Agar-agar is a good plant-based alternative.
My ganache turned out lumpy. What did I do wrong?
Lumpy ganache usually means the cream was too hot and “seized” the chocolate, or the chocolate wasn’t finely chopped. To fix it, add a teaspoon of lukewarm milk or cream and whisk vigorously. If that doesn’t work, you can gently re-warm the whole mixture over a double boiler, stirring constantly until smooth again.
Can I use a different size pan?
You can use a 9-inch round cake pan, but your cake layer will be thinner and will bake faster, so check it at the 12-minute mark. The squares will also be wedge-shaped. A 9×9 pan will give you a slightly thinner cake and more squares. Just adjust your baking time downward by a few minutes.
How do I know when the cake is perfectly baked?
The top should look dry and will spring back lightly when you touch the center. The edges will just start to pull away from the sides of the pan. The most reliable test is the toothpick test: insert it into the center, and it should come out with a few moist crumbs, but not wet batter.
Why did my cream layer not set firmly?
This could be due to a few things: not blooming the gelatin properly, not dissolving it completely after blooming, or not chilling the cake long enough. Make sure your gelatin liquid is clear before adding it to the condensed milk, and give the cake a full 2-4 hours in the fridge to set.
Can I use dark chocolate for the ganache?
Absolutely! Using dark chocolate (70% cocoa) will give you a richer, less sweet ganache that contrasts beautifully with the sweet filling. Just chop it very finely so it melts evenly with the warm cream.
How far in advance can I make this?
This cake is a fantastic make-ahead dessert. You can prepare it completely, up to 2 days in advance. In fact, the flavors meld and improve overnight. Keep it covered in the fridge until you’re ready to serve.
Can I double this recipe?
Yes! Simply double all the ingredients. You’ll need to bake it in a 9×13 inch pan. The baking time will be a bit longer, likely 20-25 minutes. Keep an eye on it and use the toothpick test for doneness.
What can I use instead of condensed milk?
Condensed milk is key for sweetness and body. A direct substitute is hard, but you could try making a pastry cream sweetened with sugar. For a dairy-free version, look for canned coconut condensed milk in specialty stores.
The cake sank in the middle. Why?
A sunken cake is often caused by opening the oven door too early, before the structure has set. Other causes include underbaking or using expired baking powder. Try not to open the oven door for at least the first 12 minutes of baking.
A Final Sweet Word
And there you have it! My foolproof, utterly delicious Ultimate Chocolate Squares Cake. It’s the recipe I turn to when I need a guaranteed smile from my family or want to bring something special to friends. It proves that amazing desserts don’t have to be complicated. So preheat that oven, gather your ingredients, and treat yourself to something wonderful. Don’t forget to share a square (and this recipe) with someone you love. Happy baking!
Creamy Garlic Beef
Ingredients
Equipment
Method
- Crack eggs into a large mixing bowl and add sugar and a pinch of salt. Whisk until pale and frothy.
- Slowly pour in milk and vegetable oil, gently stirring until smooth.
- Sift flour, cocoa powder, and baking powder into the mixture and fold together until combined.
- Pour batter into a greased 8x8 inch baking pan and smooth the top. Bake at 350°F (175°C) for 15-18 minutes or until a toothpick comes out clean.
- While the cake cools, bloom gelatin in cool water, then gently heat until clear.
- Whisk cold heavy cream until soft peaks form, then stir in condensed milk and gelatin mixture. Fold in whipped cream.
- Slice the cooled cake horizontally, layer with the cream filling, cover with the top layer, and refrigerate for at least 2 hours.
- For ganache, chop chocolate and heat cream until warm. Pour over chocolate, stir until smooth, then pour over chilled cake. Let set before slicing.