A Slice of Heaven: The Story Behind This Chocolate-Nut Dream
Picture this: it’s your friend’s birthday, and you want to bring a cake that makes people stop talking. You know, the kind where forks go quiet and eyes get wide. That was me last month! I was sick of boring sheet cakes and wanted something with soul. I remembered those irresistible Ferrero Rocher chocolates and thought, “Why not turn that magic into a cake?” After a few happy kitchen experiments (and some very willing taste-testers), this Rocher Cake was born. It’s not just a dessert; it’s a chocolate-hazelnut celebration that feels like a hug.
Why This Rocher Cake Will Steal Your Heart
You will adore this recipe for so many reasons! First, the flavor is pure nostalgia in the best way. It tastes like your favorite candy, but homemade and extra special. Second, it looks incredibly fancy with minimal effort. No one needs to know how easy it actually is. Finally, it’s wonderfully moist and keeps its texture for days. It’s the perfect treat for when you want to impress without the stress.
When to Bake Your Chocolate-Nut Masterpiece
This cake isn’t just for birthdays. It’s your secret weapon for any gathering that calls for a “wow” factor. Think holiday parties, potlucks, anniversaries, or even a fancy weekend treat for your family. It turns a simple dinner into an event. I love bringing it to book club—it guarantees I get asked for the recipe every single time!
Gathering Your Ingredients for Success
Let’s get everything together. Having your ingredients measured and ready makes the process so smooth.
- 40 g butter (plus extra for greasing)
- 6 eggs, size M (room temperature is best)
- 200 g sugar
- 1 pinch of salt
- 120 g flour, type 405 (all-purpose works perfectly)
- 30 g baking cocoa (use the good stuff!)
- 100 g ground hazelnuts
Smart Ingredient Swaps
No hazelnuts? No problem! Here are some easy swaps:
- Ground Hazelnuts: You can use ground almonds for a similar texture and a more subtle flavor.
- Baking Cocoa: In a pinch, you can use a high-quality chocolate drink powder, but real cocoa powder is much better for rich flavor.
- Flour Type 405: This is simply a fine German wheat flour. Standard all-purpose flour from your supermarket is a perfect substitute.
Let’s Bake! Your Step-by-Step Guide
Step 1: Prep and Preheat
Start by turning your oven to 350°F (180°C). Grab your springform pan (about 9 inches is ideal) and give it a good buttering. You can also line the bottom with a round of parchment paper for foolproof release later. Feel the butter soften under your fingers as you spread it. This little step is the guardian against sticking cakes!
Step 2: Whip the Eggs and Sugar to Perfection
Crack your room-temperature eggs into a large, clean bowl. Add the sugar and that tiny pinch of salt. Now, get your hand mixer ready. Beat on high speed for a good 5-7 minutes. You’re looking for a magical transformation. The mixture will become very pale, thick, and creamy, and leave a visible “ribbon” trail when you lift the beaters. This air is what gives the cake its wonderful lift. Pro tip: Don’t rush this step. The fluffier it gets, the better your cake texture will be.
Step 3: Gently Fold in the Dry Ingredients
In a separate bowl, lovingly whisk together your flour, cocoa powder, and ground hazelnuts. This ensures there are no lumps. Now, take a large spatula and sprinkle about one-third of this dry mix over your fluffy egg foam. Gently, gently fold it in using big, sweeping motions from the bottom up. You want to keep all that precious air. Repeat until all the dry ingredients are just combined and no white streaks remain. The batter will smell amazing—like a chocolate-hazelnut dream.
Step 4: Incorporate the Melted Butter
Melt your butter and let it cool slightly so it’s warm, not hot. Take a small scoop of your delicate batter and stir it into the melted butter in its little cup. This tempers the butter and helps it blend in smoothly. Then, pour this butter-batter mixture back into the main bowl. Fold it in gently until the batter is uniform and gorgeous. See how it glistens? That’s the promise of a moist crumb.
Step 5: Bake to Chocolatey Perfection
Pour your beautiful batter into the prepared pan. Smooth the top with your spatula. Place it in the center of your preheated oven. Now, the hardest part: be patient! Bake for about 25-30 minutes. You’ll know it’s done when the top springs back lightly to your touch and a toothpick inserted in the center comes out with just a few moist crumbs, not wet batter. Your kitchen will smell absolutely divine.
Step 6: Cool with Care
When the cake is done, take it out and let it cool in the pan on a wire rack for 10-15 minutes. Then, run a thin knife around the edge to loosen it. Carefully open the springform latch and remove the ring. Let the cake cool completely before you even think about frosting or decorating. Chef’s tip: Rushing this step can cause the cake to break or become gummy. Let it take its time!
Your Rocher Cake Timeline
Here’s a quick breakdown of how your time will be spent creating this beauty:
- Prep Time: 20 minutes
- Baking Time: 30 minutes
- Cooling Time: 1 hour (minimum)
- Total Time: About 1 hour 50 minutes
The Chef’s Secret for an Extra Rocher Vibe
My secret? I add a handful of finely chopped, toasted hazelnuts to the batter at the very end, just before the butter. It gives little surprise bursts of crunchy, nutty texture that mimics the real candy. It’s a simple trick that takes the experience to the next level!
A Sweet Piece of Trivia
Did you know the hazelnut in this cake is sometimes called a “filbert”? The famous Ferrero Rocher chocolate was inspired by a traditional Italian nut and chocolate dessert. The gold foil wrapper was meant to make it look like a precious gift. When you serve this cake, you’re sharing a little piece of that sweet, golden history.
Tools You’ll Need in Your Kitchen
- 9-inch (24 cm) springform pan
- Hand mixer or stand mixer
- Two mixing bowls (one large, one medium)
- Whisk and rubber spatula
- Fine-mesh sieve (for the cocoa, if lumpy)
- Wire cooling rack
Storing Your Masterpiece
If you have any leftovers (a big if!), you’ll want to store them right. Once the cake is completely cool, you can cover it tightly with plastic wrap or place it in an airtight container. It will stay wonderfully moist at room temperature for up to 2 days.
For longer storage, the fridge is your friend. Wrapped well, it will keep for up to 5 days. The cool temperature makes the texture even fudgier. Let slices come to room temperature for about 20 minutes before serving for the best flavor and texture.
You can also freeze this cake! Wrap the whole cake or individual slices tightly in plastic wrap, then again in foil. It will keep frozen for up to 2 months. Thaw overnight in the refrigerator before serving.
My Best Tips for a Flawless Cake
- Room temp eggs are key for maximum volume when whipping.
- When folding, use a light hand. Overmixing deflates the batter.
- Test for doneness a minute early. It’s better to have a slightly underdone cake than a dry one.
- Let the cake cool fully before slicing for clean, beautiful pieces.
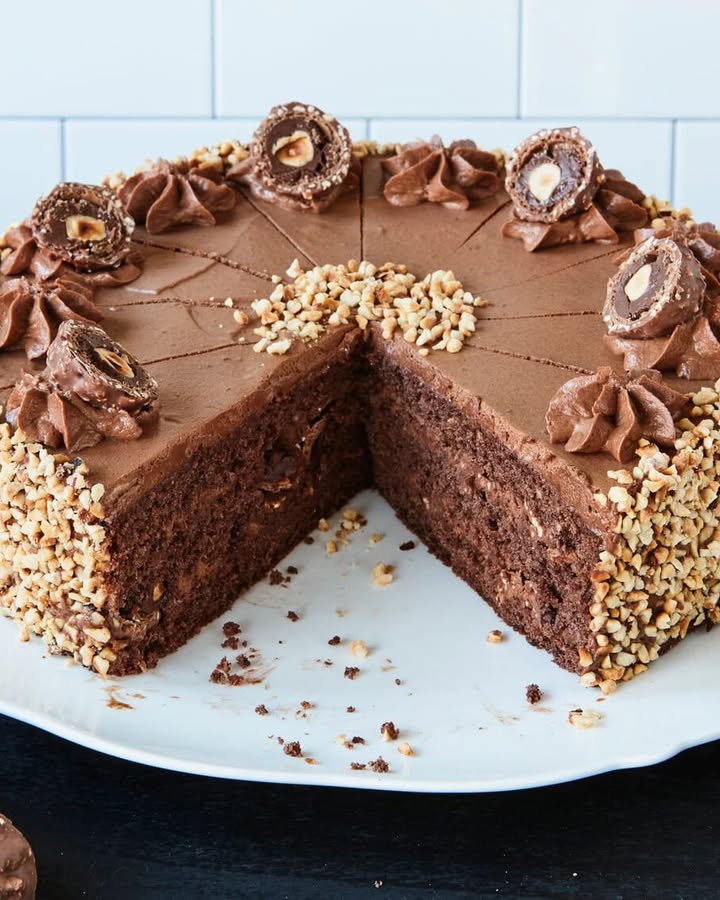
Presentation Ideas to Impress Your Guests
- Dust the top with powdered sugar and cocoa powder for a simple, elegant look.
- Decorate the rim with whole, gold-wrapped Ferrero Rocher chocolates.
- Serve with a dollop of freshly whipped cream or a scoop of vanilla ice cream.
- Drizzle individual slices with a warm chocolate ganache right at the table.
Healthier & Fun Variations to Try
Love the idea but want to mix it up? Here are six delicious twists on the classic Rocher Cake.
- Gluten-Free Rocher Cake: Swap the all-purpose flour for your favorite 1:1 gluten-free baking blend. The nuts and eggs provide great structure, so it works wonderfully.
- Dairy-Free Dream: Use a high-quality vegan butter instead of regular butter. The result is just as rich and fudgy, perfect for those with dairy sensitivities.
- Orange Chocolate Hazelnut Cake: Add the zest of one orange to the egg-sugar mixture. The bright citrus cuts through the richness beautifully.
- Mocha Rocher Cake: Dissolve 1 tablespoon of instant espresso powder into the melted butter before adding it. It deepens the chocolate flavor without tasting like coffee.
- Mini Rocher Cupcakes: Pour the batter into a lined cupcake tin and bake for 18-22 minutes. They’re perfect for parties and portion control!
- Lighter Sponge Version: Separate the eggs. Whip the yolks with half the sugar, and the whites with the other half to stiff peaks, then fold together. It creates an airier, lighter cake.
Common Mistakes to Avoid
Mistake 1: Using Cold Eggs Straight From the Fridge
This is a big one. Cold egg whites don’t whip up as well. They won’t hold as much air, leading to a denser, flatter cake. Your batter won’t get that lovely, voluminous foam. To avoid this, take your eggs out about 30-60 minutes before you start baking. If you’re short on time, place them in a bowl of warm (not hot) water for 5-10 minutes.
Mistake 2: Overmixing After Adding the Flour
Once you add the flour and cocoa, the clock is ticking on gluten development. If you mix too vigorously or for too long, you’ll activate the gluten. This makes the cake tough and chewy instead of tender and light. The key is to fold gently and stop as soon as you see no more dry streaks. A few tiny lumps are better than an overmixed batter.
Mistake 3: Opening the Oven Door Too Early
We’ve all been tempted to peek! But opening the oven door in the first 20 minutes of baking is a recipe for disaster. The sudden drop in temperature can cause your delicate, air-filled cake to collapse in the middle. Trust the process. Turn on the oven light and look through the window instead. Only open the door to test for doneness near the very end of the bake time.
Mistake 4: Frosting or Cutting a Warm Cake
Impatience can ruin a perfect cake. If you try to frost a warm cake, the frosting will melt and slide right off. If you try to cut it, it will crumble and tear into a messy pile. The cake needs time for its structure to set as it cools. Always let it cool completely in the pan, then on a rack. It’s worth the wait for perfect slices.
Your Rocher Cake Questions, Answered
Can I make this cake without a springform pan?
You can, but a springform is highly recommended. It has a removable side that makes it easy to get the delicate cake out without flipping it. If you only have a regular cake pan, be sure to butter and flour it very well, and line the bottom with parchment paper. You’ll need to carefully run a knife around the edges and invert it onto a plate to remove it, which can be a bit risky with such a tender cake.
My cake sank in the middle. What did I do wrong?
A sunken cake is usually a sign of two things: underbaking or too much moisture. If you took it out too early, the center didn’t have time to set. Another cause could be overmixing the batter after adding the flour, which weakens the structure. Make sure your oven is at the right temperature with an oven thermometer, and don’t open the door early. Test with a toothpick—it should come out clean or with a few moist crumbs.
Can I use hazelnut flour instead of grinding my own nuts?
Absolutely! Store-bought hazelnut flour (also called hazelnut meal) works perfectly here. Just make sure it’s fine and fresh for the best texture. Since it’s often more finely ground than what you might make at home, your cake could be slightly more tender. It’s a fantastic time-saver.
How far in advance can I bake this cake?
This cake actually tastes better the next day! The flavors have more time to meld and the texture becomes even more moist. You can bake it 1-2 days before you need it. Just let it cool completely, wrap it tightly in plastic wrap, and store it at room temperature. Frost or decorate it on the day you plan to serve it for the freshest look.
What’s the best way to grind hazelnuts if I don’t have a food processor?
No food processor? No problem. You can use a clean coffee grinder in short pulses. Just be careful not to turn it into butter. You can also place the nuts in a sturdy zip-top bag and go over them repeatedly with a rolling pin. It takes a little elbow grease, but you’ll get a nice coarse grind perfect for this cake.
Can I add chocolate chips to the batter?
You sure can! For an extra indulgent treat, fold in ¾ cup of mini chocolate chips or chopped chocolate after you’ve folded in the dry ingredients. They’ll create lovely melty pockets of chocolate throughout the cake. I recommend dusting them in a teaspoon of the flour first to help prevent them from sinking to the bottom during baking.
Is this cake too sweet?
The sweetness level is just right for a dessert cake, balancing the bitterness of the cocoa and the nuttiness of the hazelnuts. If you prefer less sweetness, you can safely reduce the sugar by about ¼ cup (50g). However, sugar also contributes to moisture and texture, so don’t reduce it too much or the cake may be drier.
My cocoa powder is clumpy. What should I do?
Lumpy cocoa is no one’s friend. The easiest fix is to sift it. Whisk your cocoa powder together with the flour and ground hazelnuts, then sift the whole mixture into the egg mixture. This not only breaks up lumps but also ensures everything is evenly combined, leading to a smoother, more uniform batter with no bitter pockets of dry cocoa.
Can I double this recipe?
Yes, you can double it to make a two-layer cake. Double all the ingredients exactly. You will need to bake it in two separate 9-inch pans. The baking time might be slightly less for two thinner layers, so start checking at around 20-22 minutes. A cake this good layered with chocolate frosting or hazelnut cream is simply spectacular.
What can I use for frosting this cake?
The cake is delicious plain, but frosting makes it a celebration! A simple chocolate ganache (heat cream and pour over chopped chocolate) poured over the top is heavenly. A stabilized whipped cream with a hint of hazelnut liqueur is light and lovely. For the full Rocher experience, try a Nutella buttercream. Any of these choices will take it over the top!
Ready to Create Your Own Dream?
And there you have it—everything you need to bake a Chocolate-Nut Dream Rocher Cake that will have everyone asking for seconds (and the recipe!). Remember, baking is about joy, not perfection. So put on some music, get your ingredients ready, and have fun with it. The smiles you get when you present this gorgeous, fragrant cake are the best reward. Now, go preheat that oven and get baking. Your delicious masterpiece awaits!
Teriyaki Beef Wraps
Ingredients
Equipment
Method
- Preheat the oven to 350°F (180°C) and butter a 9-inch springform pan.
- In a large bowl, beat the room-temperature eggs, sugar, and a pinch of salt on high speed for 5-7 minutes until thick and pale.
- In a separate bowl, whisk together the flour, cocoa powder, and ground hazelnuts to remove lumps.
- Gently fold one-third of the dry mixture into the egg foam, repeating until combined without white streaks.
- Melt the butter and let it cool slightly, then temper it with a scoop of batter before folding it into the main mixture until smooth.
- Pour the batter into the prepared pan and smooth the top. Bake for 25-30 minutes until done.
- Allow the cake to cool in the pan for 10-15 minutes, then run a knife around the edge and remove the springform. Cool completely on a wire rack.