I still remember the first time I bit into a piece of perfectly crispy fried chicken at my grandmother’s kitchen table. The crunch was so loud that everyone at the table turned to look at me. That golden, crackling exterior gave way to the most tender and juuicy meat I’d ever tasted. From that moment on, I was hooked.
Crispy fried chicken holds a special place in American hearts and kitchens. It’s the star of Sunday dinners, backyard picnics, and late-night cravings. Walk into any potluck or family gathering across the USA, and you’ll likely find a platter of golden-brown fried chicken waiting to be devoured. This beloved dish brings people together like few other foods can.
For me, crispy fried chicken represents comfort and home. It’s a dish that crosses all boundaries and brings smiles to faces young and old. Whether you’re grabbing a bucket from your favorite fast-food spot or making it from scratch in your own kitchen, there’s something magical about that satisfying crunch.
In this article, I’ll share everything you need to know about making the best crispy fried chicken at home. You’ll learn the secrets behind that perfect crunch, discover different batter techniques, and understand why certain ingredients make all the difference. By the end, you’ll be ready to create fried chicken that rivals any restaurant version.
Understanding the Basics of Crispy Fried Chicken
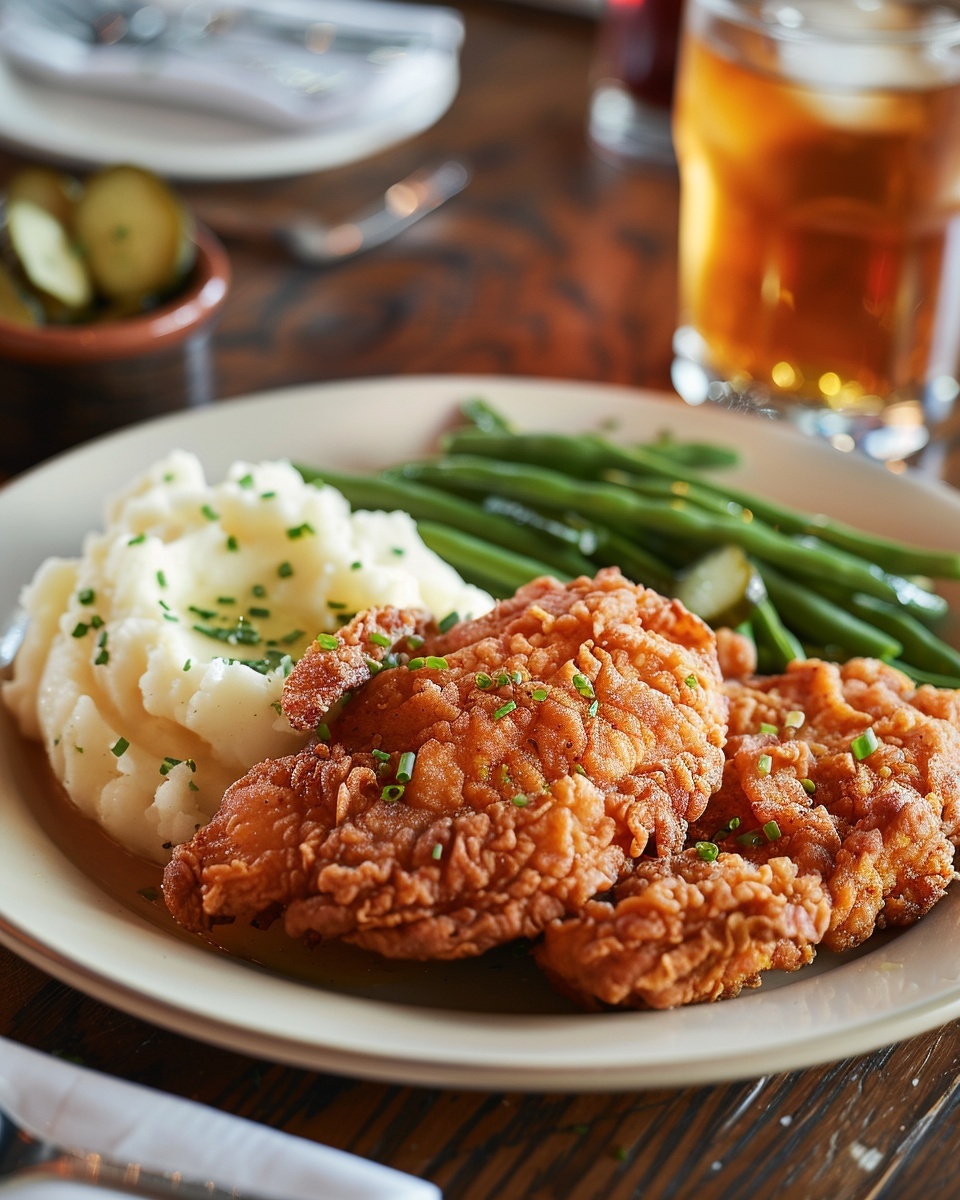
Let’s start with what crispy fried chicken actually is. At its core, it’s chicken pieces coated in a seasoned mixture and deep fried until golden brown. But the magic lies in the details. The best crispy fried chicken has a crunchy, well-seasoned outer layer that stays crispy even after cooling. The meat inside should be juicy and tender, never dry or rubbery.
The right ingredients and techniques separate good fried chicken from great fried chicken. You can’t just throw chicken in flour and hope for the best. Each step matters, from the initial seasoning to the final frying temperature. The coating needs the right balance of ingredients to create that signature crunch we all love.
Different styles of fried chicken have emerged over the years, each with devoted fans. The KFC crispy fried chicken recipe uses a pressure fryer and a secret blend of herbs and spices that create an incredibly crunchy coating. Buttermilk fried chicken soaks the meat in tangy buttermilk before coating, which tenderizes the chicken and adds flavor. Extra crispy fried chicken often uses a double-coating method or adds cornstarch to the flour mixture for an even crunchier bite.
Some recipes call for a wet batter, while others use a dry coating method. The crispy fried chicken batter approach involves dipping chicken in a liquid mixture before frying. This creates a thicker, almost tempura-like coating. The dry method involves coating chicken in seasoned flour, sometimes after a buttermilk soak. Both methods can produce excellent results when done correctly.
Popular variations include Nashville hot chicken with its spicy coating, Korean fried chicken with its light and crispy texture, and Southern-style buttermilk fried chicken. Each region and culture puts its own spin on this classic dish. The best fried chicken recipe often depends on personal preference and the flavors you grew up loving.
Temperature control is critical in any deep fried chicken recipe. If the oil is too hot, the outside burns before the inside cooks through. If it’s too cool, the chicken absorbs too much oil and turns greasy instead of crispy. Most recipes call for oil heated to 350-375°F for the best results.
The buttermilk fried chicken recipe remains one of the most popular approaches in American cooking. The buttermilk’s acidity breaks down proteins in the chicken, making it incredibly tender. It also helps the coating stick better to the meat. Many home cooks swear by soaking chicken in buttermilk for at least four hours or overnight.
The Secret to Crunchy Fried Chicken
So what is the secret to crunchy fried chicken? The answer involves several key factors working together. First, moisture is the enemy of crispiness. You need to start with dry chicken. Pat each piece thoroughly with paper towels before coating. Any excess moisture will create steam during frying, which makes the coating soggy.
The coating itself needs texture to create crunch. Many cooks add cornstarch or baking powder to their flour mixture. Cornstarch creates an extra-light and crispy texture because it doesn’t absorb as much oil as regular flour. Even a small amount makes a noticeable difference. Some recipes use a 3:1 ratio of flour to cornstarch for the perfect balance.
Double coating gives you more crunch to enjoy. After the first coating, let the chicken rest for 10-15 minutes. This allows the coating to set and stick better. Then dip it back in the buttermilk or egg wash and coat it again. This second layer creates those crispy, craggy bits that make fried chicken irresistible.
Oil temperature needs constant attention. Use a thermometer to monitor the heat throughout cooking. When you add cold chicken to hot oil, the temperature drops. Wait for it to come back up before adding more pieces. Overcrowding the pan also lowers the temperature and prevents proper crisping.
The type of oil you use matters too. Peanut oil, vegetable oil, and canola oil all work well for frying. They have high smoke points and neutral flavors. Some cooks swear by lard or shortening for the most authentic taste and texture. I prefer peanut oil for its clean flavor and ability to handle high heat.
Letting the coated chicken rest before frying helps the coating adhere better. Place coated pieces on a wire rack for 20-30 minutes before they hit the oil. This drying time allows the coating to form a sort of crust that won’t fall off during frying.
After frying, don’t stack the chicken pieces on top of each other. Place them on a wire rack instead of paper towels. Paper towels trap steam underneath, which softens the crispy coating you worked so hard to create. A wire rack allows air to circulate all around each piece, keeping everything crispy.
Seasoning needs to happen at multiple stages. Season the chicken itself, season the buttermilk or marinade, and season the flour coating. Each layer of seasoning builds flavor that penetrates throughout the dish. Don’t be shy with salt, pepper, garlic powder, and paprika.
Some cooks add a splash of buttermilk or water to their flour mixture and work it in with their fingers. This creates small clumps in the coating that fry up extra crispy. These little bits give you varied texture in every bite, from smooth crispy areas to extra-crunchy nuggets.


Preparing the Perfect Batter for Crispy Fried Chicken
Now that we understand the principles behind getting that perfect crunch, let’s dive into the actual batter that makes it all happen.
Here’s the thing about batter—it doesn’t have to be complicated to be incredible. My aunt used to say that the best recipes have just a handful of good ingredients mixed with a whole lot of care. She was right. For a classic crispy fried chicken batter, you really only need a few staples that you probably already have in your pantry.
The foundation of most fried chicken starts with all-purpose flour. I use about two cups for a whole chicken cut into pieces. To this, I add a generous tablespoon of salt, a tablespoon of black pepper, and about two teaspoons each of garlic powder and paprika. The paprika doesn’t just add flavor—it gives that gorgeous golden-red color that makes fried chicken look so appetizing.
For the wet component, buttermilk is my go-to choice. You’ll need about two cups for soaking and coating. If you’re in a pinch and don’t have buttermilk, mix regular milk with a tablespoon of lemon juice or white vinegar. Let it sit for five minutes, and you’ve got a decent substitute. I’ve done this more times than I’d like to admit when I’ve realized too late that I’m out of buttermilk.
Some folks prefer adding eggs to their buttermilk mixture. I beat two eggs into my buttermilk along with a splash of hot sauce—not enough to make it spicy, just enough to wake up the flavors. The eggs help the coating stick better and add richness to the final taste.
Cornstarch deserves its own paragraph because it’s honestly a game-changer. I replace about half a cup of the flour with cornstarch in my coating mixture. This simple swap creates a lighter, crispier texture that stays crunchy longer. If you’ve ever wondered what makes chicken crispier flour or cornstarch, the answer is cornstarch wins for pure crunch factor, but flour gives you structure and flavor. Using both together gives you the best of everything.
The mixing process matters more than you’d think. In one large bowl, combine all your dry ingredients—flour, cornstarch, salt, pepper, and spices. Mix them really well with a whisk. In another bowl, whisk together your buttermilk and eggs. Some recipes get fancy with multiple bowls and steps, but honestly, two bowls are all you need.
Funny enough, the secret trick my grandmother taught me involves adding just a few tablespoons of the buttermilk mixture into the flour. Don’t mix it smooth—just drizzle it in and toss it with a fork until you have little pebble-like clumps throughout the flour. These clumps fry up into those extra-crispy bits that everyone fights over. The first time I tried this, I thought she’d made a mistake. Then I tasted the results and never looked back.
When you’re ready to coat your chicken, take each piece from the buttermilk marinade and let the excess drip off. Drop it into the seasoned flour mixture and press down firmly. Turn it over and really pack that flour onto every surface. I use one hand for wet ingredients and one hand for dry to avoid building up a gloppy mess on my fingers.
For the buttermilk fried chicken recipe approach, I let the chicken soak in seasoned buttermilk for at least four hours before coating. Sometimes I’ll prep it the night before and let it hang out in the fridge overnight. The longer soak makes such a difference in both flavor and tenderness. It’s similar to how marinating works when I make chicken curry—time in the marinade equals better results.
If you want extra crispy fried chicken, try the double-dip method. After the first coating, let the chicken rest on a rack for ten minutes. Then dip it back in the buttermilk and coat it again with flour. That second layer builds up an even thicker, crunchier crust that’s absolutely worth the extra step.
By the way, you can customize your batter in so many ways. Add cayenne pepper for heat, dried herbs like thyme or oregano for an herby kick, or even a bit of ground mustard for tang. I’ve experimented with adding ranch seasoning powder to the flour, and let me tell you, it’s dangerous how good that tastes. Once I tried adding some of the same spice blend I use for my turkey chili, and while it was different, it was also delicious.
Deep Frying Techniques for Crispy Fried Chicken
Getting the batter right is only half the battle. How you fry the chicken determines whether you end up with soggy disappointment or crispy perfection.
You don’t need fancy equipment to make a great deep fried chicken recipe. A heavy-bottomed pot or Dutch oven works perfectly. I use a cast-iron Dutch oven that belonged to my mom. It holds heat beautifully and gives me consistent results every time. You’ll also need a good thermometer—this is non-negotiable. I’ve tried guessing the temperature, and it’s just not worth the ruined batches.
Pour in enough oil to come about halfway up the sides of your pot. For me, that’s usually around three to four cups, depending on the pot size. You want enough oil so the chicken can swim freely without touching the bottom too much, but not so much that it might bubble over when you add the chicken.
Heat that oil slowly to 350°F. Don’t rush this part. I clip my thermometer to the side of the pot so I can watch it climb. When it hits 350°F, I’m ready to start frying. Some people prefer 375°F for a faster, crispier cook, but I find 350°F gives me more control and less chance of burning.
Here’s where patience really pays off. Don’t overcrowd the pot. I know it’s tempting to throw everything in at once and be done with it, but that’s a rookie mistake. The temperature drops when you add cold chicken, and if you add too much at once, it drops so much that you’re basically boiling your chicken in oil instead of frying it. I usually fry three or four pieces at a time, depending on their size.
Dark meat takes longer than white meat. Drumsticks and thighs need about 12 to 14 minutes, while breasts and wings are usually done in 10 to 12 minutes. I don’t rely on time alone though. The chicken should be deep golden brown, and when you lift a piece out, it should feel substantial and heavy, not light and greasy.
The most reliable way to check doneness is with an instant-read thermometer inserted into the thickest part of the meat. You’re looking for 165°F. It’s the same temperature I aim for when making baked chicken drumsticks, though the cooking method is obviously very different.
Turning the chicken is an art form. I use long tongs and flip each piece about halfway through the cooking time. You want even browning on all sides. Sometimes a piece will want to float with one side up—just keep encouraging it to turn. If you notice one area browning faster than others, adjust the heat slightly or move the chicken to a cooler spot in the pot.
Safety deserves serious attention when you’re working with hot oil. Never leave your pot unattended. Keep a lid nearby in case of oil fires—never throw water on a grease fire. I learned this the hard way once and nearly burned my eyebrows off. Not fun. Keep kids and pets away from the stove, and use long-handled tools to protect your hands and arms from splatters.
The oil will spit and pop, especially at first. Moisture on the chicken creates those little explosions when it hits the hot oil. I’ve learned to add chicken gently, lowering it into the oil with tongs rather than dropping it from a height. This reduces splashing significantly.
Between batches, let the oil come back up to temperature. This might take a couple of minutes. Skim out any loose bits of coating floating in the oil with a slotted spoon. These bits will burn and make your oil dirty, affecting the flavor of later batches.
When each piece is done, transfer it to a wire rack set over a baking sheet. Never pile hot fried chicken on a plate or in a basket right away. The steam needs somewhere to escape, and a wire rack provides that. If you want to keep early batches warm while you finish frying, put the rack in a 200°F oven.
The beauty of this best fried chicken recipe approach is that once you master the basics, you can adapt it endlessly. The techniques work whether you’re making a traditional Southern-style meal or trying something different like pork tenderloin cutlets with the same coating method. Once you get comfortable with temperature control and timing, fried chicken becomes less intimidating and more like second nature.


Enhancing the Flavor and Texture
After you’ve got the basics down, this is where the real fun begins. You can take your fried chicken from “pretty good” to “people will be talking about this for weeks” with just a few extra steps and flavor tweaks.
Marinating is where magic happens before you even think about frying. Sure, we talked about buttermilk earlier, but let me tell you about the variations that have changed my chicken game completely. I once marinated chicken in buttermilk mixed with pickle juice—sounds weird, right? My cousin brought this idea back from a trip to Nashville, and honestly, it’s brilliant. The brine from the pickles adds this subtle tang and extra moisture that makes the meat incredibly juicy. I use about half a cup of pickle juice to two cups of buttermilk.
Hot sauce in your marinade does more than add heat. It brings acidity and complexity. I mix a few tablespoons of Frank’s RedHot or Louisiana hot sauce into my buttermilk along with smashed garlic cloves and fresh thyme sprigs. The chicken soaks up all those flavors overnight. When you bite into it the next day after frying, there’s this depth that you just don’t get from surface seasoning alone.
Some people swear by brining chicken in salt water before the buttermilk soak. I’ve tried this method, and yeah, it does make the meat more tender and seasoned throughout. Dissolve a quarter cup of salt in four cups of water, submerge your chicken for two to four hours, then proceed with your buttermilk marinade. It’s an extra step, but if you’re making fried chicken for a special occasion, it’s worth considering.
Here’s something I learned from trying to recreate a KFC fried chicken recipe at home—layered seasoning makes all the difference. KFC supposedly uses eleven herbs and spices, and while I don’t know the exact blend, I’ve developed my own version that gets pretty close. Beyond the basics of salt, pepper, garlic powder, and paprika, I add onion powder, dried thyme, dried basil, oregano, celery salt, ground ginger, and white pepper. Each spice contributes something subtle, and together they create this complex, craveable flavor.
Funny enough, I keep my special seasoning blend in an old coffee container. Every time I make fried chicken, I mix up a big batch and store what’s left. It’s also fantastic on roasted vegetables and sprinkled on popcorn, believe it or not. My kids call it “the magic dust.”
Cayenne pepper deserves special mention if you like heat. Just a quarter teaspoon in your flour mixture adds warmth without making it too spicy for most people. If you want legitimate hot chicken, bump it up to two tablespoons and add some to the oil after frying for that authentic Nashville style. I did this once for a party and had to put out three pitchers of sweet tea. No regrets.
MSG gets a bad reputation, but it’s a flavor enhancer that can genuinely improve your fried chicken. A small amount in your flour mixture adds that savory umami depth that makes you wonder what’s different but in the best way. I’m not saying you have to use it, but I’m also not saying I don’t keep some in my spice cabinet specifically for fried chicken.
The texture part is where you can really experiment and find what works for you. We covered the cornstarch addition earlier, but let’s talk about ratios. For the crispiest possible coating, some recipes go as high as a 1:1 ratio of flour to cornstarch. I find this a bit too delicate—the coating can shatter rather than crunch. My sweet spot is three parts flour to one part cornstarch, but you might prefer something different.
Baking powder is another secret weapon. Just a teaspoon mixed into your flour creates tiny air pockets in the coating as it fries. These air pockets make the crust lighter and crispier. The first time I added baking powder, I couldn’t believe such a small amount could make such a noticeable difference. It’s similar to how baking powder affects other dishes, and understanding this kind of cooking efficiency has helped me improve all kinds of recipes beyond just fried chicken.
Double-frying is a technique borrowed from Korean fried chicken, and it’s absolutely worth the extra effort for special occasions. Fry your chicken once at a lower temperature—around 325°F—until it’s just cooked through. Let it rest for ten minutes, then fry it again at 375°F for just two to three minutes. That second fry makes the coating shatter-crisp while keeping the inside perfectly juicy. I made crispy chicken strips this way for my daughter’s birthday party, and parents were asking for the recipe before they even left.
A wire rack isn’t just for resting fried chicken afterward—you can actually use it during the coating process too. After you coat each piece, place it on a wire rack instead of a plate. This allows air to circulate all around the chicken, which helps the coating dry and adhere better. I leave mine on the rack for twenty to thirty minutes before frying. The coating sets up into this almost shell-like layer that doesn’t fall off in the oil.
Here’s a weird tip that actually works: put your coated chicken in the fridge for an hour before frying. The cold coating hitting hot oil creates an even more dramatic crispy texture. I stumbled onto this accidentally when I got a phone call right before I was about to start frying. When I finally got to it an hour later, the chicken came out noticeably crispier than usual. Sometimes the best discoveries happen by accident.
The type of pan you use affects texture too. Cast iron holds heat the most evenly, which means more consistent browning. Stainless steel works fine but requires more attention to temperature fluctuations. I’ve tried using my wok for fried chicken, and while it works, the sloped sides make it harder to maintain consistent oil depth. Stick with a straight-sided pot or Dutch oven for the best results.
Breading styles matter more than you’d think. A shaggy coating with lots of loose bits creates more surface area for crisping. The technique I mentioned earlier about adding buttermilk to your flour creates this naturally. Some people purposely press the flour coating hard, then rough it up with their fingers before frying. Those rough patches turn into crispy nuggets that add textural interest to every bite.
If you’re making chicken strips instead of bone-in pieces, the coating-to-meat ratio changes. You need a thinner coating on strips or they become too bready. I use less buttermilk on strips—just enough to make the flour stick—and I skip the double-coating method. For strips, a single thin coating fried at 375°F for five to six minutes gives you that perfect crunch without overwhelming the chicken.
By the way, don’t throw away your frying oil after one use. Once it cools completely, strain it through a fine-mesh strainer or cheesecloth into a clean container. I reuse my oil two or three times before replacing it. Each time you use it, it actually develops more flavor. Just make sure you’re straining out all the burned bits and storing it in a cool, dark place. When the oil starts looking dark or smelling off, that’s when you know it’s time for fresh oil.
Resting time after frying is just as important as resting time before. I know it’s hard to wait when that chicken is sitting there looking all golden and perfect, but give it at least five minutes. The coating continues to crisp up as it cools slightly, and the juices redistribute throughout the meat. Cutting into chicken straight from the fryer means you lose all those precious juices onto your plate instead of keeping them in the meat.
If you’ve been following along and trying other recipes from this site, you’ll notice that these techniques and the attention to detail apply across different dishes. Whether you’re perfecting fried chicken or exploring other meat and poultry recipes, understanding how ingredients interact and how techniques affect texture will make you a better cook overall.
There’s really no end to how you can customize and improve your fried chicken. I’m still experimenting after years of making it regularly. Sometimes I add lemon zest to my flour. Sometimes I use duck fat instead of oil for an incredibly rich flavor. Last month I tried coating chicken in crushed cornflakes mixed with my seasoned flour, and it created this extra-crunchy texture that my family loved. The point is to master the basics first, then let your creativity run wild. Fried chicken is forgiving enough to handle experimentation while being rewarding enough to make the effort worthwhile.
Making truly great crispy fried chicken at home is completely achievable, and now you’ve got all the knowledge you need to make it happen. Start with quality chicken, take your time with the marinating and coating process, maintain your oil temperature, and don’t skip the resting steps. Every single tip I’ve shared comes from actual experience—both successes and failures in my own kitchen. Your first batch might not be perfect, and that’s completely okay. Even imperfect fried chicken is still fried chicken, which means it’s still pretty darn good. Keep practicing, pay attention to what works, and soon you’ll develop your own instincts and preferences. The beautiful thing about cooking is that it’s both a science and an art, and fried chicken is the perfect example of that balance.
Frequently Asked Questions
How do you crisp up fried chicken?
The best way to crisp up fried chicken is to reheat it in an oven rather than a microwave. Preheat your oven to 400°F and place the chicken on a wire rack over a baking sheet. Heat for about 10-15 minutes until the coating becomes crispy again. The wire rack is essential because it allows hot air to circulate around the chicken, preventing the bottom from getting soggy. You can also use an air fryer set to 375°F for about 5-7 minutes for smaller pieces. Never reheat fried chicken in a microwave if you want to maintain any crispiness—the steam it creates will make the coating completely soggy.
Can I make fried chicken without buttermilk?
Absolutely, though buttermilk does add tenderness and flavor that’s hard to replicate. You can make a quick substitute by adding one tablespoon of lemon juice or white vinegar to one cup of regular milk and letting it sit for five minutes. Regular milk mixed with eggs works too, though you won’t get the same tangy flavor. Some recipes use plain yogurt thinned with a bit of milk as a buttermilk substitute. I’ve even used dill pickle juice mixed with milk in a pinch, and it turned out surprisingly well. The key is having some acidity in your marinade to help tenderize the meat.
Why is my fried chicken not crispy?
Several things can cause soggy fried chicken. Most commonly, your oil temperature is too low, causing the chicken to absorb oil instead of developing a crispy crust. Make sure your oil stays between 350-375°F throughout frying. Another common issue is stacking hot chicken on a plate or paper towels, which traps steam and softens the coating. Always use a wire rack for cooling. Too much moisture on the chicken before coating can also prevent crispiness—pat your chicken very dry before the buttermilk soak. Finally, if you’re adding too many pieces at once, you’re overcrowding the pan and dropping the temperature too much.
How long should I marinate chicken in buttermilk?
I recommend at least four hours for noticeable results, but overnight is ideal. The buttermilk’s acidity needs time to break down the proteins in the chicken, making it more tender. I’ve marinated chicken for up to 24 hours without any negative effects—it just gets more tender and flavorful. If you’re really short on time, even an hour is better than nothing. Just remember that white meat doesn’t need as much time as dark meat. Chicken breasts can become too soft if left longer than 24 hours, though thighs and drumsticks can handle longer marinades without issue.
What oil is best for frying chicken?
Peanut oil is my personal favorite because it has a high smoke point and a clean, neutral flavor. Vegetable oil and canola oil also work excellently and are usually cheaper. Some Southern cooks swear by lard or shortening for the most authentic flavor and texture. Avoid olive oil or butter, which have low smoke points and will burn before your chicken is done. Whatever oil you choose, make sure you have enough to fill your pot at least halfway. You can also mix oils—I sometimes combine peanut oil with a bit of bacon grease for added flavor.
Can I bake chicken instead of frying it and still get it crispy?
Yes, though it won’t be exactly the same as fried. To get baked chicken crispy, coat it the same way, then place it on a wire rack over a baking sheet. Spray the coated chicken with cooking spray or brush it lightly with oil. Bake at 425°F for about 35-45 minutes, depending on the size of your pieces. Flip the chicken halfway through for even browning. Some people use crushed cornflakes or panko breadcrumbs mixed with their flour for extra crunch when baking. It’s a healthier alternative that still delivers good flavor and decent texture, though you won’t get that deep-fried taste and crunch.
Why does my coating fall off when frying?
This usually happens because the coating wasn’t properly adhered before frying. Make sure your chicken is wet enough from the buttermilk or egg wash before coating—the flour needs something to stick to. Press the flour mixture firmly onto each piece and make sure you coat every surface completely. Let the coated chicken rest for at least 15-20 minutes before frying so the coating can set. Don’t move the chicken around too much once it’s in the oil—let it develop a crust before you flip it. Also, make sure your oil is hot enough; if it’s too cool, the coating can slide off before it has a chance to set.
What’s the difference between a batter and a coating for fried chicken?
A batter is a wet mixture that you dip chicken into, like a thick pancake batter made from flour, eggs, milk, and seasonings. It creates a uniform, thick coating similar to fish and chips. A coating, on the other hand, is typically a dry mixture of seasoned flour that sticks to chicken that’s been dipped in buttermilk or egg wash. Most Southern fried chicken uses the coating method because it creates that craggy, irregular crust with lots of crispy bits. Batter tends to create a smoother, more uniform crust. Both can be delicious, just different textures and appearances.
Should I cover my chicken while it’s frying?
No, don’t cover your chicken while frying in a regular pot—this traps steam and will make your coating soggy instead of crispy. The exception is if you’re using a pressure fryer like KFC does, which is specifically designed to cook chicken under pressure while keeping it crispy. For home cooking with a Dutch oven or regular pot, always leave it uncovered. You can use a splatter screen if the popping oil is bothering you, as long as it’s not a solid lid. The steam needs to escape for the coating to crisp properly.
How do I know when my fried chicken is done without a thermometer?
While a thermometer is the most reliable method, you can check doneness by appearance and feel if needed. The chicken should be deep golden brown all over, and when you lift it from the oil, it should feel heavy and substantial, not light. If you pierce it with a knife at the thickest part, the juices should run clear, not pink or bloody. The coating should look set and crispy, not pale or soft. Another test is to listen—when chicken is nearly done, the sizzling sound changes and becomes quieter. That said, I really do recommend investing in an instant-read thermometer for safety and consistency—they’re inexpensive and take the guesswork out of cooking meat.
Crispy Fried Chicken
Ingredients
Equipment
Method
- Pat the chicken pieces dry with paper towels to remove excess moisture.
- In a large bowl, combine flour, cornstarch, salt, pepper, garlic powder, and paprika.
- In another bowl, whisk together the buttermilk, eggs, and a few dashes of hot sauce.
- Soak the chicken in the buttermilk mixture for at least four hours or overnight in the refrigerator.
- Remove each chicken piece from the buttermilk, allowing excess to drip off.
- Dredge the chicken in the flour mixture, pressing to adhere the coating well.
- Let the coated chicken rest on a wire rack for at least 20-30 minutes.
- Heat oil in a Dutch oven or heavy pot to 350°F.
- Fry chicken pieces in batches, ensuring not to overcrowd the pot.
- Fry dark meat (drumsticks and thighs) for about 12-14 minutes, and white meat (breasts and wings) for 10-12 minutes.
- Check the internal temperature of the chicken to reach 165°F.
- Transfer the fried chicken to a wire rack over a baking sheet to cool and keep crispy.