Oh La La! Your New Favorite French Apple Cake Is Here
You know that feeling when you take a bite of something and just have to close your eyes and sigh? That’s this cake. It’s pure magic—a soft, buttery cake filled with sticky, sweet caramel apples. I first made it for my book club, and let’s just say the books were ignored. Everyone wanted the recipe! It tastes like a fancy French patisserie but is secretly so simple. Let’s bake some happiness together.
A Slice of Sweet History
This Délice Moelleux aux Pommes Caramélisées—let’s call it a Caramel Apple Delight Cake—is a star of French home baking. In France, you’ll find a version of this in every grandmother’s recipe box. It’s not a fussy, layered pastry. It’s a humble, heartwarming treat born from farmhouse kitchens where apples were plentiful. The genius move is caramelizing the apples first. This step transforms simple fruit into a deep, rich filling. Modern bakers love it because it feels elegant but doesn’t require fancy skills. It’s tradition, but better.
Why You’ll Fall in Love With This Easy Cake
You’ll adore this recipe for so many reasons! First, the texture is incredible—moist and tender with pockets of soft apple. Second, it’s a one-bowl wonder (almost!). No complicated creaming or folding. The smell of apples and caramel cooking is pure therapy. Best of all, it’s a crowd-pleaser. Kids, adults, guests—they all ask for seconds. It’s the perfect dessert to make you look like a baking pro.
When to Bake This Show-Stopping Dessert
This cake is your secret weapon for any occasion. It’s cozy enough for a Tuesday night family dinner with a cup of tea. It’s also gorgeous enough for a holiday table or a dinner party. Bring it to a potluck and watch it disappear first. Sunday brunch? Absolutely. Honestly, any day that ends in “y” is a good day for this cake.
What You’ll Need: The Ingredients List
Gather these simple ingredients. I promise you probably have most in your pantry right now!
- 4 apples (like Granny Smith or Honeycrisp)
- 150g sugar (divided for caramel and batter)
- 100g butter (plus extra for greasing)
- 3 eggs
- 200g all-purpose flour
- 1 packet baking powder (about 2 tsp)
- A pinch of salt
- 1 tsp cinnamon (optional, but wonderful)
- 100ml milk
No Worries! Handy Ingredient Swaps
- Gluten-Free: Use a 1:1 gluten-free flour blend instead of all-purpose flour.
- Dairy-Free: Swap butter for plant-based butter and use almond or oat milk.
- Less Sugar: You can reduce the sugar in the batter slightly, but keep it for the caramel.
- Apple Variety: Any firm baking apple works. Mix tart and sweet for fun!
- Spice It Up: Try a pinch of nutmeg or cardamom instead of cinnamon.
Let’s Get Baking! Your Step-by-Step Guide
Step 1: Get Your Oven Ready
First, turn on your oven to 180°C (350°F). This lets it heat up fully while you work. A properly preheated oven is key for a perfect rise. Grab your favorite cake pan—an 8 or 9-inch round or square is perfect. Give it a quick butter and flour coating. This prevents sticking and makes for an easy release later.
Step 2: Make the Caramel Apple Magic
Peel your apples and cut them into small, bite-sized cubes. Now, the fun part! Melt 50g of butter in a pan over medium heat. Add 100g of sugar. Don’t stir yet. Let it melt and bubble into a gorgeous golden caramel. It will smell like butterscotch. Gently add the apple cubes. They’ll sizzle! Cook for about 10 minutes, stirring now and then. The apples will soften and get coated in that shiny, delicious caramel. Pro tip: Don’t walk away from the caramel. It can burn quickly!
Step 3: Whisk Up the Base
In a large mixing bowl, crack in your three eggs. Add the remaining 50g of sugar. Use a whisk or electric mixer to beat them together. Whisk for a good 2-3 minutes until the mixture is pale, thick, and creamy. This adds air and makes your cake light. You’ll see ribbons form when you lift the whisk. It’s a beautiful sight!
Step 4: Bring the Dry Ingredients Together
Place a sieve over your bowl. Add the flour, baking powder, salt, and cinnamon (if using). Sift everything right into the egg mixture. This removes lumps and mixes the dry goods evenly. It’s a small step that makes a big difference. Then, pour in the milk. Grab your spatula and gently fold everything together. Stop when you just see no more dry streaks of flour.
Step 5: Add the Final Touch of Richness
Melt the remaining 50g of butter. Let it cool for a minute so it doesn’t cook the eggs. Make a well in the center of your batter. Pour the warm, melted butter in. Fold it gently until the batter is smooth, shiny, and completely combined. The smell is already amazing.
Step 6: Gently Fold in the Star of the Show
Take your beautiful caramelized apples. Let them cool for just a minute. Then, add them to the batter, along with every last bit of caramel from the pan. Fold them in with a light hand. You want to distribute them evenly without breaking them up too much. The batter will turn a lovely caramel-speckled color.
Step 7: Bake to Golden Perfection
Pour the batter into your prepared pan. Smooth the top with your spatula. Place it in the center of your hot oven. Bake for 30-35 minutes. Your kitchen will fill with the most incredible aroma. The cake is done when the top is golden and a knife or skewer poked in the center comes out clean. Chef’s tip: Don’t open the oven door before the 25-minute mark. You might let the heat out and cause the cake to fall.
Step 8: The Hardest Part—Waiting!
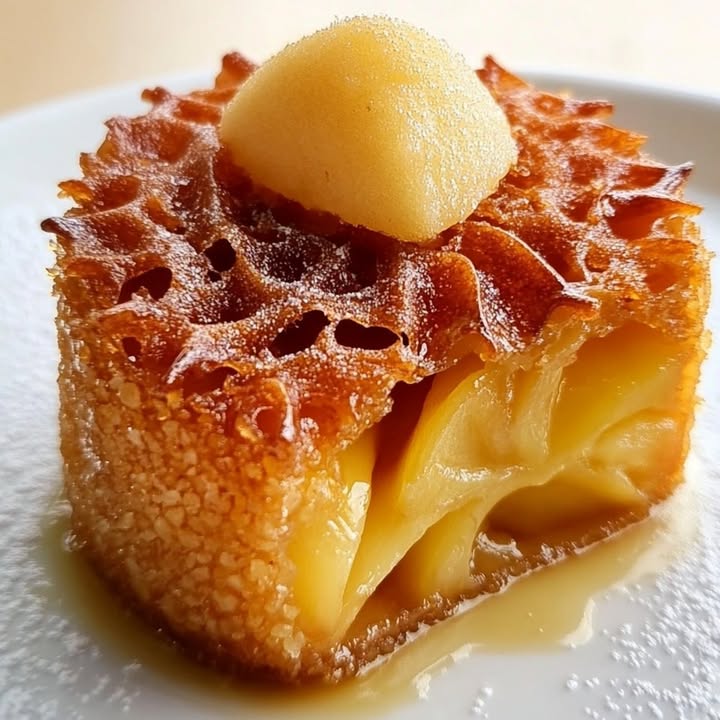
Take the cake out of the oven. Let it cool in the pan for about 15 minutes. This lets it set so it doesn’t break. Then, run a knife around the edge and turn it out onto a wire rack. Serve it slightly warm, at room temperature, or cold. It’s fantastic all ways. A scoop of vanilla ice cream on top? Heavenly.
Your Time Investment
This cake is wonderfully quick from bowl to table.
- Prep Time: 20 minutes (perfect for a little kitchen therapy)
- Cook Time: 35 minutes (time for a coffee break!)
- Cooling Time: 15-20 minutes (the patience test)
- Total Time: About 1 hour 15 minutes
My Secret Chef’s Weapon
My secret is in the apples. I use two different types! I love one tart apple (like Granny Smith) and one sweeter one (like Fuji). The tart ones keep their shape, and the sweet ones melt into the caramel. It creates a more complex, interesting flavor in every bite. Trust me, it’s a game-changer.
A Fun Fact for Your Next Dinner Party
Did you know that caramel was originally a method of preserving sugar? In the 17th century, French confectioners heated sugar to create a stable, delicious product. Adding cream or butter to make a sauce came later. So when you make your caramel for this cake, you’re doing a little edible history! It’s science and dessert all in one pan.
Tools You’ll Need
You don’t need fancy equipment. Just your basic kitchen helpers:
- A medium saucepan (for the caramel apples)
- A large mixing bowl
- A whisk and a spatula
- An 8 or 9-inch cake pan (springform works great too)
- A cooling rack
- Measuring cups and spoons or a kitchen scale
How to Keep Your Cake Delicious
Short-Term Storage: Once completely cool, you can keep this cake right on the counter. Just cover it with a cake dome or some aluminum foil. It will stay fresh and moist for up to 2 days. The flavors often get even better the next day!
Long-Term Storage: To keep it longer, wrap the whole cake or individual slices tightly in plastic wrap. Then, place them in an airtight container or freezer bag. It freezes beautifully for up to 2 months. This is my trick for always having dessert ready for surprise guests.
Reheating: Thaw frozen cake overnight in the fridge. Want that “just-baked” feel? Warm a slice in the microwave for 15 seconds or in a 150°C (300°F) oven for 5-10 minutes. The caramel will get soft and gooey again. Perfection!
My Best Tips for Success
- Use room temperature eggs. They blend into the batter more smoothly.
- When making caramel, use a light-colored pan so you can see the color change.
- Don’t overmix the batter after adding the flour. Mix just until combined for a tender crumb.
- Let the caramel apples cool a bit before adding to the batter so they don’t “cook” the eggs.
Make It Look Like a Million Bucks
Presentation is the final touch of love!
- Dust the top with powdered sugar right before serving for a snowy, elegant look.
- Serve with a dollop of freshly whipped cream or, my favorite, vanilla bean ice cream.
- Drizzle a little extra salted caramel sauce on the plate.
- Garnish with a few thin, fresh apple slices for a pretty touch.
Try These Tasty Variations
Love this base recipe? Play with it! Here are six fun ideas:
- Pear and Ginger Delight: Swap apples for ripe pears. Add 1 tsp of grated fresh ginger to the caramel. It’s warm and spicy.
- Nutty Crunch Cake: Fold ½ cup of chopped pecans or walnuts into the batter with the apples. The nuts add a wonderful texture.
- Chocolate Caramel Apple Cake: Add ½ cup of dark chocolate chips to the batter. The chocolate and caramel are a dream team.
- Boozy Adult Version: Add a tablespoon of Calvados (apple brandy) or rum to the caramel apples as they finish cooking.
- Individual Mini Cakes: Bake the batter in a muffin tin (lined with papers) for individual portions. Reduce baking time to 20-25 minutes.
- Streusel-Topped Wonder: Before baking, top the batter with a quick streusel made from 50g each of flour, brown sugar, and cold butter rubbed together. It adds a crunchy top.
Common Mistakes to Avoid
Mistake 1: Burning the Caramel
This is the most common pitfall. Caramel goes from perfect to burnt in seconds. People often turn the heat too high trying to speed things up. Use a medium heat and watch it closely. The sugar will melt, then bubble, and finally turn a light golden amber. Have your apples ready to go the second it hits that color. If you see black bits, it’s burnt. Sadly, you need to start over or it will taste bitter.
Mistake 2: Overmixing the Batter
Once you add the flour, too much mixing is the enemy. Vigorous stirring develops the gluten in the flour. This makes your cake tough and dense, not soft and “moelleux.” The key is to fold gently. Use a spatula and a light hand. Stop as soon as you see no more dry flour patches. A few small lumps are totally fine.
Mistake 3: Using the Wrong Apples
Not all apples are created equal for baking. Using a very soft apple like a Red Delicious means they will turn to complete mush in the caramel and the cake. You want apples that hold their shape and offer a slight bite. Firm, tart varieties like Granny Smith, Braeburn, or Honeycrisp are your best friends here. They become tender but don’t disappear.
Mistake 4: Opening the Oven Door Too Early
We all want to peek! But opening the oven door in the first 25 minutes of baking is risky. The sudden drop in temperature can cause your delicate cake to collapse in the center. Trust the process. Use the oven light to check on it. Only open the door to do the skewer test when the time is almost up and the top looks nicely set and golden.
Your Questions, Answered!
Can I make this cake gluten-free?
Absolutely! This recipe adapts very well to gluten-free flour. Use a good quality 1:1 gluten-free baking blend that contains xanthan gum. I’ve had great success with brands like Bob’s Red Mill or King Arthur. The texture might be slightly more dense, but it will still be deliciously moist and flavorful. Make sure all your other ingredients (like baking powder) are certified gluten-free if you have a severe allergy.
What type of apple works best for baking?
The best apples for baking are firm and hold their shape under heat. My top picks are Granny Smith (for tartness), Honeycrisp (sweet and crisp), Braeburn, or Pink Lady. These varieties won’t turn into applesauce in your caramel. They soften beautifully but keep a nice texture in the final cake. Avoid Red Delicious or Gala for this specific recipe, as they can get too mushy.
My caramel became hard and lumpy when I added the apples. What did I do wrong?
This happens if the caramel gets too hot or dark before you add the apples. The caramel solidifies when it hits the cooler fruit. To fix it, just keep cooking! On medium-low heat, keep stirring the apples in the hard caramel. The moisture from the apples will eventually dissolve the caramel again into a smooth sauce. It takes a minute or two of patience and stirring. Next time, take the caramel off the heat just as it turns a light amber color.
Can I prepare any parts of this recipe ahead of time?
Yes, you can be a step ahead! You can caramelize the apples up to a day in advance. Let them cool, then store them covered in the fridge. Bring them to room temperature before folding into your batter. You can also mix the dry ingredients (flour, baking powder, salt, cinnamon) the night before. The full, unbaked cake batter is best made just before baking for the best rise and texture.
How do I know for sure the cake is done baking?
The best test is the trusty skewer or toothpick test. Around the 30-minute mark, insert a thin skewer or toothpick into the very center of the cake. Pull it out. If it comes out clean or with a few dry crumbs, it’s done. If you see wet, gooey batter, it needs more time. Also look for visual clues: the edges will pull slightly away from the pan, and the top will be a springy golden brown.
Can I use a different pan, like a loaf pan or bundt pan?
You can, but baking times will change. A loaf pan is deeper, so it may need 45-50 minutes. Check it early with a skewer. A bundt pan works beautifully and looks stunning! Make sure to grease and flour it very, very well, especially all the nooks. The baking time for a bundt pan might be closer to 40-45 minutes. Always rely on the skewer test, not just the clock.
Why did my cake sink in the middle after baking?
A sunken cake usually has a few common causes. The batter might have been underbaked. The oven door was opened too early, causing a temperature shock. Or, there was too much leavening agent (baking powder). Make sure your baking powder is fresh. Measure your flour correctly—don’t scoop directly from the bag. Spoon it into your measuring cup and level it off. And remember, no peeking until the end!
Is it necessary to use the cinnamon?
Not at all! The cinnamon is a wonderful, warm complement to the apples and caramel. But if you’re not a fan, or if someone is allergic, you can simply leave it out. The cake will still be fantastic with the pure flavors of butter, caramel, and apple. You could also try a different spice, like a tiny pinch of nutmeg or allspice for a different twist.
Can I reduce the sugar in this recipe to make it healthier?
You can reduce the sugar in the cake batter a little, maybe by 20g, without huge issues. However, I don’t recommend reducing the sugar in the caramel step. That sugar is necessary for the chemical process of caramelization. Without it, you won’t get that deep, rich flavor. For a healthier treat, focus on portion size and serve it with fresh fruit or yogurt instead of ice cream.
How long will leftovers stay fresh, and how should I store them?
This cake stores wonderfully. At room temperature in a covered container or under a cake dome, it’s perfect for 2 days. For longer storage, keep it in the fridge for up to 5 days. The texture remains lovely. You can also freeze it for up to 2 months. Wrap slices tightly in plastic wrap and then in foil or a freezer bag. Thaw at room temperature or warm gently in the oven.
Ready to Bake Some Memories?
There you have it! Your guide to baking a truly special French apple cake. It’s more than just a dessert. It’s the smell of caramel filling your home. It’s the joy of sharing something made with your own hands. It’s that happy silence when everyone takes their first bite. So, tie on your apron, grab those apples, and create a little délice of your own. I promise, you’ve got this. Happy baking!
Cheesy Spring Casserole
Ingredients
Equipment
Method
- Preheat your oven to 180°C (350°F) and prepare your cake pan by buttering and flouring it.
- Peel and cut apples into small, bite-sized cubes. Melt 50g of butter in a pan, add 100g of sugar, and let it bubble into a golden caramel without stirring.
- Gently add the apple cubes to the caramel and cook for about 10 minutes, stirring occasionally until softened.
- In a mixing bowl, whisk together 3 eggs and the remaining 50g of sugar for 2-3 minutes until pale and creamy.
- Sift flour, baking powder, salt, and cinnamon into the egg mixture and fold in with a spatula, adding the milk until just combined.
- Melt the remaining 50g of butter, cool slightly, and fold it into the batter until smooth.
- Gently fold in the caramelized apples along with the remaining caramel.
- Pour the batter into the prepared pan and smooth the top. Bake for 30-35 minutes until golden and a skewer comes out clean.
- Let the cake cool in the pan for 15 minutes, then turn it out onto a wire rack. Serve warm, at room temperature, or cold.