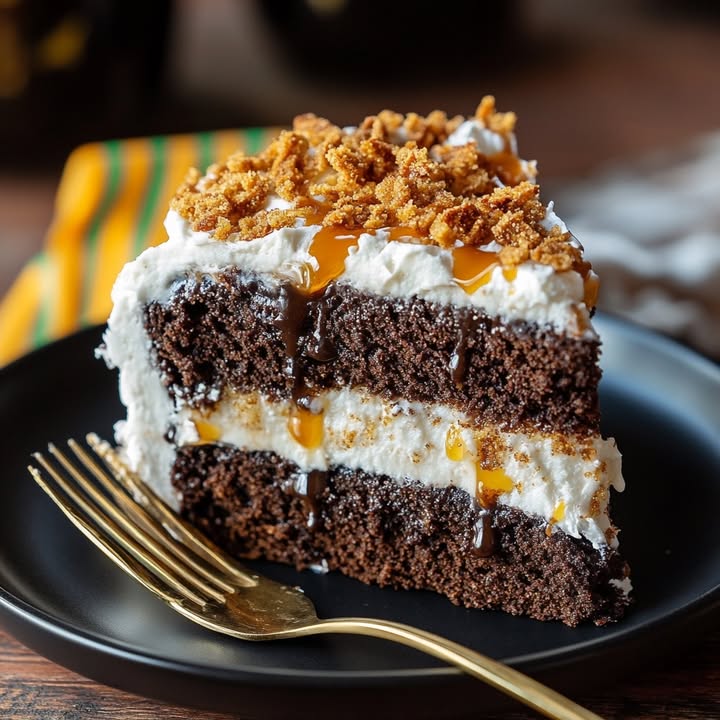
The Ultimate Butterfinger Cake: Your New Favorite Dessert
Have you ever had a dessert so good it makes you want to do a little happy dance right there in the kitchen? That’s this Butterfinger Cake for you. It’s the kind of easy, crowd-pleasing treat that disappears faster than you can say “save me a slice!” I first made it for my son’s birthday, and let me tell you, the excited, crumb-covered smiles around the table told me this recipe was a forever-keeper. It’s silly simple, gloriously messy, and tastes like a chocolate-caramel dream.
A Sweet Slice of Nostalgia: The Story of Butterfinger Cake
While I can’t claim this cake has centuries-old roots, its magic comes from a classic American icon: the Butterfinger bar. That crispy, flaky, peanut-buttery center coated in chocolate has been a lunchbox favorite since the 1920s. This cake is a brilliant example of what I call “semi-homemade magic.” It takes that beloved candy and transforms it into a spectacular, shareable dessert. Recipes like this were born in home kitchens—think busy moms and clever grandmas looking for a way to make a box mix taste like a million bucks. It’s a modern classic built on convenience and pure, unadulterated joy.
Why You’ll Absolutely Adore This Recipe
You will love this Butterfinger cake recipe because it’s a guaranteed success with almost zero stress. The flavor combo is a home run: rich chocolate, gooey caramel, sweet creaminess, and that signature Butterfinger crunch. It’s a textural party in every bite! Best of all, it uses simple ingredients and a straightforward process. You don’t need to be a pastry chef to make a dessert that looks and tastes like you fussed for hours. It’s the perfect recipe for when you need something impressive but don’t have all day to spend in the kitchen.
Perfect Occasions for This Butterfinger Dessert
This cake is your secret weapon for so many events! It’s a superstar at potlucks and summer barbecues because it’s served cold and travels well. It’s a birthday hit for kids (and adults who are kids at heart). Need a last-minute treat for a school function or a book club meeting? This is your answer. I even love making it just because—sometimes a Tuesday deserves a fantastic, easy Butterfinger dessert to make it special.
Gathering Your Ingredients
Here’s what you’ll need to create this masterpiece:
- 1 chocolate cake (9×13 inch), baked and slightly cooled. Use your favorite box mix or homemade recipe.
- 1 can (14 ounces) sweetened condensed milk
- 1 jar (12-16 ounces) caramel ice cream topping or sauce
- 1 tub (8 ounces) frozen whipped topping (like Cool Whip), thawed, or an equal amount of homemade whipped cream
- 6-8 full-size Butterfinger candy bars, crushed
- Chocolate syrup for drizzling
Easy Swaps: Substitution Options
No worries if you’re missing something! This recipe is very flexible.
- Cake: A devil’s food cake mix works beautifully, but yellow or even a caramel cake mix would be delicious too.
- Sweetened Condensed Milk: For a different flavor, try dulce de leche (which is cooked condensed milk). It’s thicker and richer!
- Caramel Sauce: Salted caramel sauce adds a wonderful sweet-and-salty twist.
- Whipped Topping: Freshly made whipped cream, sweetened with a little powdered sugar, is a fantastic fresh alternative.
- Candy Bars: In a pinch, use other crunchy chocolate-peanut butter candy bars. Heath toffee bits or chopped Snickers could also work!
Creating Your Butterfinger Masterpiece
Let’s get baking! Follow these simple steps for the best Butterfinger poke cake you’ve ever tasted.
Step 1: Bake and Prep Your Canvas
First, bake your chocolate cake according to the package or recipe directions in a standard 9×13 inch pan. Let the wonderful aroma of baking chocolate fill your kitchen. Once it’s done, pull it out and let it cool just slightly on a wire rack. You want it to be warm, but not so hot you burn your fingers. This warm stage is crucial for the next, most satisfying step.
Step 2: Poke Those Holes!
Now for the fun part! Take the handle of a wooden spoon, a chopstick, or the round handle of a spatula. Poke holes all over the top of the warm cake. Don’t be shy—poke right down to the bottom. You’re creating little tunnels for the goodness to seep into. The cake will look a bit like a friendly sponge, ready to soak up all the delicious liquid you’re about to add.
Pro tip: Wipe your poking tool off every few jabs to prevent cake clumps from building up.
Step 3: The Sweet Soak
Slowly pour the entire can of sweetened condensed milk over the cake. Try to pour it evenly so it drips down into all those holes you made. Watch as the thick, creamy milk disappears into the cake, promising incredible moisture and sweetness in every single bite. Be patient and let it soak in for a minute.
Step 4: Drizzle on the Caramel
Next, open your jar of caramel sauce. Drizzle it generously over the entire cake, following the same method. Use a spoon to gently spread it if needed, encouraging it to find its way into the holes. The combination of the condensed milk and caramel will make the cake incredibly rich and decadent.
Step 5: The Cool Down
This is a very important step: walk away. Let the cake cool completely to room temperature. You can even pop it in the fridge for a bit to speed things up. If you spread the whipped topping on a warm cake, it will melt into a sad, soupy mess. We want fluffy clouds, not puddles!
Step 6: Top with Fluffy Clouds
Once the cake is completely cool, take your thawed whipped topping. Spread it in an even, thick layer over the entire surface of the cake. This acts as the perfect creamy “frosting” and a glue for our crunchy topping. Make it smooth or make it swirly—it’s your cake!
Step 7: The Crunchy Finale
Time for the star of the show! Take your crushed Butterfingers and sprinkle them liberally over the whipped topping. Cover every inch! You’ll love the sound of the candy pieces hitting the fluffy topping. For an extra dose of chocolate love, take your chocolate syrup and artfully drizzle it back and forth over the crushed candy.
Step 8: The Patient Wait
I know it’s hard, but you must cover the cake and refrigerate it for at least 2 hours, preferably longer or even overnight. This chill time lets all the flavors marry and the cake set up perfectly. It becomes firm enough to cut beautiful slices. This waiting period is the secret to the best texture.
Chef’s tip: Reserve a small handful of crushed Butterfinger to sprinkle on right before serving. This keeps some pieces extra crunchy for a better texture contrast!
Butterfinger Cake Timing Breakdown
Here’s a quick look at your time investment for this easy dessert:
- Prep Time: 20 minutes
- Cook Time: 30-35 minutes (for the cake)
- Cooling Time: 1 hour
- Chill Time: 2 hours (minimum)
- Total Time: About 4 hours (mostly hands-off)
My Chef’s Secret for the Best Butterfinger Cake
My absolute best trick is to freeze the Butterfinger bars for 15-20 minutes before crushing them. A cold candy bar crushes into perfect, small pieces and crumbs without turning into a sticky, melty paste. Put them in a sealed plastic bag and whack them with a rolling pin or the bottom of a heavy pan. It’s strangely therapeutic and gives you the ideal texture.
A Fun Candy Bar Fact
Did you know the original Butterfinger slogan was “Crispety, Crunchety, Peanut-Buttery!”? That’s the perfect description of what this candy brings to our cake. The unique “flaky” center is created by a process called “glassification,” which makes it crisp and light. Luckily for us, we just need to crush it up to get that amazing texture into our dessert!
Necessary Kitchen Equipment
You likely have everything you need already:
- 9×13 inch baking pan
- Mixing bowls (for cake batter if not using a box)
- Wooden spoon handle or similar poking tool
- Wire cooling rack
- Spatula for spreading
- Plastic bag and rolling pin for crushing candy
Storing Your Leftover Butterfinger Dessert
This cake stores beautifully. Always keep it covered in the refrigerator. The whipped topping and creamy layers need to stay cold. Press a piece of plastic wrap directly onto the cut sides of any leftover slices to help keep the cake moist.
You can store it for up to 3-4 days in the fridge. The cake actually gets more moist as it sits, as the flavors continue to meld. The candy topping will soften slightly but will still be delicious.
I do not recommend freezing this cake. The whipped topping and the texture of the soaked cake do not thaw well. It’s best enjoyed fresh from the fridge within a few days of making it.
Helpful Tips and Advice
- Let the cake cool completely before adding the whipped topping. This is the #1 rule!
- For easier drizzling, microwave the caramel sauce for 10-15 seconds to thin it slightly.
- Make this a day ahead! It’s even better the next day after a long chill in the fridge.
- If using homemade whipped cream, stabilize it with a little instant pudding mix so it holds up for days.
Presentation Tips for a Stunning Dessert
- Serve slices on individual plates with a tiny extra drizzle of caramel and chocolate syrup.
- Garnish each plate with a whole mini Butterfinger bar or a few peanut butter chips.
- For parties, cut the cake into small squares and serve as “finger food” desserts.
- Use a sharp, thin knife dipped in hot water for super clean cuts through the layers.
Healthier & Fun Recipe Variations
Want to mix it up? Here are six fantastic ideas:
- Peanut Butter Lover’s Version: Mix ½ cup of creamy peanut butter into the sweetened condensed milk before pouring it over the cake.
- Cookie Butter Twist: Use speculoos cookie butter instead of caramel sauce for a warm, spiced flavor.
- Lighter Cake: Use a sugar-free cake mix, light whipped topping, and sugar-free caramel and chocolate syrups.
- Frozen Treat: Freeze individual slices for a fantastic frozen cake pop-like dessert on a stick.
- Cupcake Style: Bake the cake in cupcake tins, poke holes, and soak each one. Top individually for perfect single servings.
- Different Candy Bar: Create a “Snickers Cake” or “Heath Bar Cake” using the same method with different crushed candies.
Common Mistakes to Avoid
Steer clear of these simple errors for perfect results every time.
Mistake 1: Poking Holes That Are Too Shallow
If you only poke partway into the cake, the sweetened condensed milk and caramel will just sit on top. They won’t soak into the deeper layers. This makes the top overly sweet and soggy while the bottom stays dry. Always use a tool that lets you poke all the way down to the bottom of the pan. This ensures every bite is infused with flavor.
Mistake 2: Adding Topping to a Warm Cake
Impatience is the enemy here! Spreading whipped topping on a cake that’s even slightly warm will cause it to melt immediately. You’ll lose the fluffy white layer and end up with a runny, messy-looking cake. The cake must be completely cool to the touch. Rushing this step ruins the texture and presentation.
Mistake 3: Skipping the Chill Time
This cake needs time to set. If you cut it right after assembling, the layers will ooze and slide apart. It will be hard to serve a neat slice. The refrigeration time allows the soaked cake to firm up and the flavors to blend perfectly. For the best experience, plan ahead and give it the full 2+ hours to chill.
Mistake 4: Crushing the Candy Bars Incorrectly
If you try to chop Butterfingers on a cutting board with a knife, they can become a sticky, gummy mess. They also might fly all over your kitchen. The best method is to place them in a sturdy zip-top bag and crush them with a rolling pin. Remember the chef’s secret: freezing them first makes this process clean and easy.
Your Butterfinger Cake Questions, Answered
Can I make Butterfinger cake ahead of time?
Absolutely, and I highly recommend it! This cake is actually better the next day. You can bake the cake, poke the holes, and add the condensed milk and caramel up to a day in advance. Cover it and refrigerate. Then, add the whipped topping, candy, and chocolate drizzle a few hours before you plan to serve it. The long soak time makes the cake incredibly moist and flavorful. It’s the ultimate make-ahead dessert for stress-free entertaining.
What’s the best way to crush Butterfinger candy bars?
The easiest and cleanest method is to use a zip-top plastic bag and a rolling pin. First, break the bars into smaller pieces with your hands. Place them in a heavy-duty freezer bag. Seal it tightly, pressing out the air. Then, use a rolling pin, a meat mallet, or even the bottom of a heavy saucepan to gently crush them. For more uniform pieces, you can pulse them a few times in a food processor, but be careful not to turn them into dust. Freezing the bars for 15 minutes first prevents them from getting too sticky.
Can I use homemade whipped cream instead of Cool Whip?
Yes, you can definitely use homemade whipped cream. It will taste wonderfully fresh. Whip 1 ½ to 2 cups of heavy cream with 2-3 tablespoons of powdered sugar and a teaspoon of vanilla extract until you get stiff peaks. The only thing to note is that real whipped cream doesn’t hold its shape as long as stabilized whipped topping. Your cake will still be delicious, but it’s best served within a day. For a more stable homemade version, add a tablespoon of instant vanilla pudding mix while whipping.
How long does this cake last in the fridge?
Properly stored in the refrigerator and covered tightly with plastic wrap or in a cake carrier, your Butterfinger cake will stay fresh for 3 to 4 days. The candy topping will gradually soften but will still taste great. The cake itself becomes more moist as it sits because the liquids continue to absorb. Always use your best judgment—look for any changes in smell or texture if keeping it for the full four days.
Can I freeze Butterfinger poke cake?
I do not recommend freezing the fully assembled cake. The whipped topping layer and the texture of the soaked cake do not freeze and thaw well. They can become watery and separate, resulting in a mushy texture. If you need to get ahead, you can bake and cool the plain cake base, wrap it well, and freeze it. Then, thaw it, poke the holes, and continue with the recipe from there. The final product is best enjoyed fresh from the fridge.
What can I use instead of caramel sauce?
If you don’t have caramel sauce, you have a few tasty options. You can use hot fudge sauce for a double-chocolate experience. Butterscotch ice cream topping is a classic alternative with a similar color and a rich, buttery flavor. For a nuttier twist, try warming up some creamy peanut butter with a little milk to make it drizzle-able. You could even skip it and just use the sweetened condensed milk for a simpler, still-delicious cake.
Why is my cake soggy?
A soggy cake usually happens for one of two reasons. First, you might have overdone the liquids. While the recipe asks for a full can of condensed milk and a jar of caramel, make sure you’re pouring slowly and letting it absorb. Second, and more commonly, the cake wasn’t allowed to cool before adding the whipped topping. The residual heat trapped under the topping can create steam, making the texture unpleasantly wet. Always ensure the cake is completely cool before moving to the final steps.
Can I make this in a different pan size?
You can adapt this recipe, but a 9×13 inch pan is ideal. If you use a larger sheet pan, the cake layer will be thinner and will soak through more quickly. You may need to reduce the amount of condensed milk and caramel slightly to avoid soupiness. For a thicker cake in a 9-inch round pan, you might need to adjust baking time. The key is to end up with a cake depth of about 1.5 to 2 inches to properly hold all the delicious soak and toppings.
Is there a way to make this recipe without sweetened condensed milk?
The sweetened condensed milk is key for the signature moisture and flavor of a poke cake. It’s difficult to substitute directly. However, you could try making a thin pudding or custard mixture (using milk, sugar, and cornstarch) to pour over the holes. It won’t be exactly the same, but it will add moisture. Another idea is to use a can of full-fat coconut milk mixed with sugar, simmered until slightly reduced and thickened, for a dairy-free alternative.
My whipped topping slid off the cake. What did I do wrong?
This almost always happens because the cake was still warm when you added the topping, or the caramel/condensed milk layer on top was still loose and wet. The whipped topping needs a cool, relatively stable surface to adhere to. Make sure your cake is 100% cooled in the fridge. Also, after adding the caramel and condensed milk, let it sit for a bit so those ingredients can set up and thicken slightly before you add the fluffy layer on top.
The Final Slice
And there you have it—the complete guide to the most delicious, easy, and crowd-pleasing Butterfinger Cake. It’s more than just a dessert; it’s a memory maker. It’s the cake that gets requested for every family gathering and the one that friends will ask you for the recipe. So grab those candy bars, bake that cake, and get ready for the compliments. Happy baking, and enjoy every crunchy, creamy, chocolatey bite!
Creamy Cajun Linguine
Ingredients
Equipment
Method
- Bake the chocolate cake in a 9x13 inch pan according to package or recipe directions and let it cool slightly.
- Poke holes all over the top of the warm cake using the handle of a wooden spoon or similar tool.
- Pour the entire can of sweetened condensed milk over the cake, ensuring it seeps into the holes.
- Drizzle the caramel sauce generously over the entire cake.
- Let the cake cool completely to room temperature or refrigerate to speed up the process.
- Spread the thawed whipped topping evenly over the cooled cake.
- Sprinkle the crushed Butterfinger candy bars over the whipped topping.
- Cover and refrigerate for at least 2 hours, preferably longer or overnight, before serving.