You know that moment when the air turns crisp, leaves start to fall, and you get the undeniable urge to bake something cozy? But then you remember your oven is already on overdrive for the big meal. That’s where this magic happens. This No-Bake Pumpkin Cheesecake with a Gingersnap Crust is my absolute lifesaver every single autumn. It delivers all that dreamy pumpkin spice flavor and creamy texture without ever turning on the oven. It’s the dessert I get asked for on repeat, and I’m so excited to share it with you!
The Cozy Story Behind the Cheesecake
Cheesecake has been a beloved treat for centuries, but the no-bake version is a modern blessing for busy folks like us. I first threw this recipe together during a chaotic Thanksgiving week years ago. My oven was completely occupied with the turkey and rolls, but I desperately wanted a show-stopping pumpkin dessert. I combined the classic flavors of a pumpkin pie with the ease of a chilled cheesecake. Adding a gingersnap crust was a happy accident—I was out of graham crackers! That spicy-sweet snap against the cool, creamy filling was a revelation. It instantly became our new tradition.
Why You’ll Be Head Over Heels for This Dessert
Let me count the ways you’ll adore this recipe! First, it’s impossibly creamy and rich, like the best pumpkin pie you’ve ever had, but with a delightful cheesecake tang. Second, it’s a true no-fuss dessert. No water baths, no cracked tops, no stressing over baking times. Just mix, chill, and impress. The gingersnap crust adds a warm, spicy crunch that makes it so much more interesting than a plain crust. Plus, it’s make-ahead magic, freeing you up to actually enjoy your guests.
Perfect Occasions for This Crowd-Pleaser
This cheesecake isn’t just for Thanksgiving (though it certainly shines there!). It’s perfect for any fall gathering. Think about a Halloween party, a cozy Friendsgiving, a weekend football watch party, or even just a Friday night treat to celebrate the season. It brings that special “wow” factor without any of the oven-related drama. I’ve even brought it to a fall potluck, and it was the first empty plate on the table!
What You’ll Need: The Ingredients List
Let’s gather our cozy ingredients. The beauty is in its simplicity!
For the Gingersnap Crust:
- 2 cups gingersnap cookie crumbs (about 10 oz of cookies)
- 1/4 cup granulated sugar
- 6 tablespoons unsalted butter, melted
For the Pumpkin Cheesecake Filling:
- 8 oz cream cheese, fully softened
- 1 cup powdered sugar
- 1 teaspoon pure vanilla extract
- 1 1/2 cups canned pumpkin puree (not pumpkin pie filling)
- 1 teaspoon pumpkin pie spice
- 1/2 teaspoon ground cinnamon
- 1/2 teaspoon ground nutmeg
- 1 1/2 cups heavy whipping cream
No Problem! Handy Substitution Options
Out of something? Don’t worry, we can adapt!
- Gingersnap Cookies: Graham crackers work beautifully. Use 2 cups of crumbs and add 1/2 teaspoon of ground ginger to the crust mix.
- Heavy Cream: For a lighter version, you can use cold full-fat coconut cream (the solid part from a can) and whip it. The texture will be slightly different but still delicious.
- Pumpkin Pie Spice: Make your own! Mix 1 1/2 tsp cinnamon, 3/4 tsp ginger, 1/2 tsp nutmeg, and 1/4 tsp allspice or cloves. Use 1 teaspoon for this recipe.
- Cream Cheese: Full-fat is best for set and texture, but reduced-fat will work in a pinch.
Let’s Make Some Magic: Step-by-Step Instructions
Put on some cozy tunes, and let’s create this masterpiece together. It’s easier than you think!
Step 1: Prepare the Gingersnap Crust
First, let’s make that crunchy, spicy foundation. If you’re starting with whole cookies, pop them in a food processor and pulse until you have fine, even crumbs. It sounds like a gentle autumn rain! In a medium bowl, combine the fragrant gingersnap crumbs with the granulated sugar. Pour in the warm, melted butter and mix it all together. You’ll know it’s ready when the mixture holds together when you squeeze a bit in your hand. Now, press it firmly and evenly into the bottom of a 9-inch springform pan. I like to use the bottom of a glass or a measuring cup to really tamp it down. Pop the crust in the fridge to set. This gives it a head start on being perfectly firm.
Pro tip: For a clean release later, you can line the bottom of your springform pan with a round of parchment paper before adding the crust.
Step 2: Make the Dreamy Pumpkin Filling
Now for the star of the show! In a large mixing bowl, beat your softened cream cheese until it’s completely smooth and creamy. No lumps allowed! Gradually add the powdered sugar and keep mixing. You’ll see it transform into a silky, sweet base. Now, stir in the vanilla extract, that gorgeous orange pumpkin puree, and all those warm spices—pumpkin pie spice, cinnamon, and nutmeg. The kitchen will smell incredible already. Mix it all until it’s one beautifully smooth, orange-hued mixture. Take a moment to taste it (I always do!) and adjust the spice if you like.
Step 3: Whip the Cream to Cloud-like Peaks
In a separate, clean, cold bowl, pour your heavy whipping cream. Using a hand mixer or stand mixer, whip the cream on medium-high speed. Watch it go from liquid to soft peaks, and then to lovely, stiff peaks. You’ll know it’s ready when you can pull the beaters straight up and the peaks stand tall without flopping over. This whipped cream is the secret to our no-bake wonder—it gives the filling its light, airy texture.
Pro tip: Chill your bowl and beaters in the freezer for 10 minutes before whipping. This helps the cream whip up faster and higher.
Step 4: Gently Fold and Assemble
This step is key for a fluffy texture. Add about one-third of your whipped cream to the pumpkin mixture. Gently fold it in with a rubber spatula using big, slow, sweeping motions. This lightens the dense pumpkin mix. Once incorporated, gently fold in the remaining whipped cream. Be patient! You want to keep as much of that air in as possible. The mixture will become gloriously light and creamy. Take your chilled crust from the fridge. Pour the filling over the top and spread it out evenly with your spatula. Give the pan a few gentle taps on the counter to settle everything and remove any air bubbles.
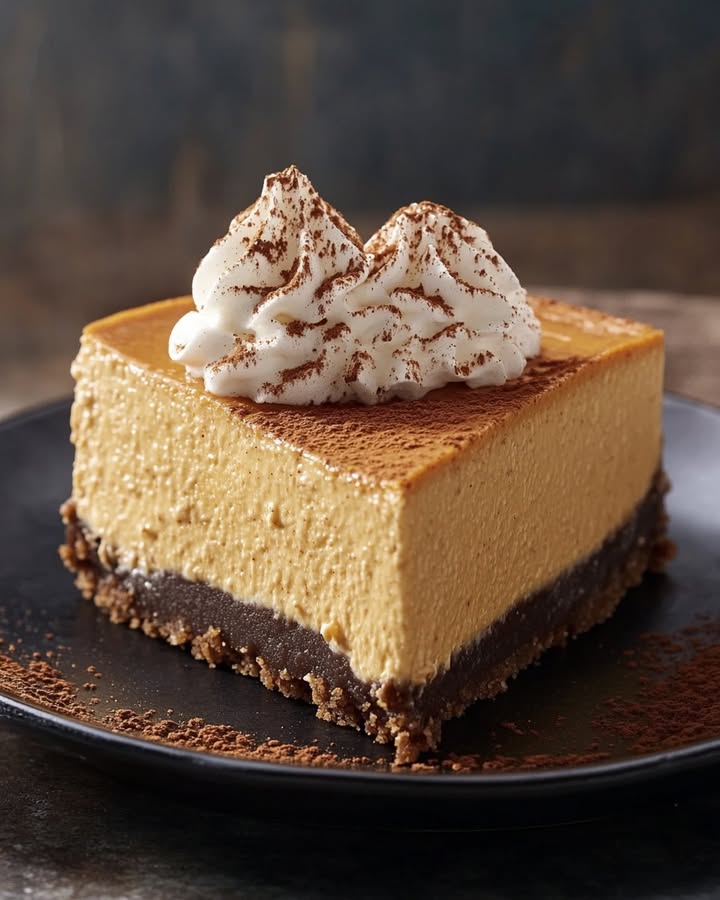
Step 5: The Chill Time & Final Touches
Cover the pan loosely with plastic wrap or foil. Now, the hardest part—waiting! Let it chill in the refrigerator for at least 4 hours, but overnight is truly best for the perfect, firm slice. When you’re ready to serve, run a thin knife around the edge of the pan before unlatching the springform ring. For a beautiful finish, top with extra dollops of whipped cream and a light dusting of cinnamon or even some extra crushed gingersnaps. Slice with a clean, hot knife (dip it in hot water and dry it) for the cleanest cuts.
Chef’s tip: For an elegant touch, pipe the extra whipped cream around the border and place a few whole gingersnap cookies on top for decoration.
Timing Is Everything
- Prep Time: 25 minutes (fun, hands-on time)
- Chill Time: 4 hours minimum (perfect for doing other things!)
- Total Time: 4 hours 25 minutes
- Servings: 8-10 happy people
My Secret Weapon for the Perfect Slice
Here’s my little secret for picture-perfect servings: dental floss. Yes, the unflavored kind! Slide a long piece underneath the set cheesecake (between the crust and pan bottom if you didn’t use parchment), cross the ends over the top, and pull. It gives you a super clean cut without smooshing the beautiful layers. It’s a total game-changer for nice presentation.
A Little Fun Fact About Pumpkin
Did you know the pumpkin we use for puree is actually a type of squash? It’s specifically bred to be sweet, smooth, and perfect for baking. That’s why you want 100% pumpkin puree, not the “pie filling” which already has sugars and spices added. Using the plain puree lets you control the sweetness and spice level exactly to your family’s taste!
Gear You’ll Need
You don’t need fancy equipment!
- 9-inch Springform Pan (essential for easy removal)
- Mixing bowls (a couple different sizes)
- Hand mixer or stand mixer (a whisk and strong arm can work for the cream!)
- Rubber spatula
- Food processor (for the cookie crumbs, or a zip-top bag and rolling pin)
- Measuring cups and spoons
Keeping Your Cheesecake Happy: Storage Tips
This cheesecake stores wonderfully. Keep it covered in the springform pan or on a cake stand with a dome in the refrigerator. It will stay fresh and delicious for up to 4-5 days. The crust might soften just a tiny bit by day 4 or 5, but the flavor will still be amazing.
You can also freeze this cheesecake for longer storage. Wrap the whole cheesecake or individual slices tightly in plastic wrap, then again in foil or place in an airtight freezer bag. It will keep well for up to 2 months. When you’re ready for a slice, simply thaw it overnight in the refrigerator.
Avoid leaving the cheesecake out at room temperature for more than 2 hours, as the dairy-based filling can spoil. For parties, I like to set it out just before serving and put any leftovers right back in the fridge.
My Best Tips for Guaranteed Success
- Soften that cream cheese! Let it sit out on the counter for a good hour. Soft cream cheese mixes smoothly and prevents lumps in your filling.
- Chill your tools. A cold bowl and beaters help the heavy cream whip up much faster and give you more volume.
- Don’t skip the fridge time for the crust. That quick chill helps the butter in the crust solidify, giving you a solid base that won’t crumble when you slice.
- Use canned pumpkin, not fresh. Canned puree has a consistent moisture content and flavor. Fresh pumpkin puree is often too watery and can make your filling soggy.
Make It Picture-Perfect: Presentation Ideas
- Top with a drizzle of caramel sauce and a sprinkle of sea salt.
- Create a fall leaf pattern using thinly sliced pear or apple pieces.
- Serve with a side of spiced cranberry compote for a tangy contrast.
- For individual servings, make mini cheesecakes in a muffin tin lined with cupcake papers.
- Dust the serving plates with a little cocoa powder or extra pumpkin pie spice before placing the slice.
Mix It Up! Healthier & Fun Variations
Love the idea but want to tweak it? Here are six fantastic twists:
- Vegan Pumpkin Cheesecake: Use vegan cream cheese and coconut cream. Substitute maple syrup for powdered sugar. The crust can be made with vegan butter and gingersnaps.
- Lower-Sugar Option: Use a sugar substitute approved for baking in both the crust and filling. Opt for a plain, full-fat Greek yogurt blended into the filling for extra tang and protein.
- Chocolate Swirl Delight: Melt 1/2 cup of chocolate chips with a splash of cream. Drizzle it over the assembled cheesecake and use a toothpick to swirl it decoratively before chilling.
- Maple Pecan Version: Add 1/4 cup of pure maple syrup to the filling. Before chilling, top the cheesecake with a layer of toasted pecans for a fantastic crunch.
- Individual Jars: Layer the crust and filling in small mason jars. This is great for portion control and makes a adorable, portable dessert.
- Ginger-Infused Cream: Steep some freshly grated ginger in the heavy cream for 30 minutes before whipping it. Strain it out, then whip as usual for a more pronounced ginger flavor.
Common Mistakes to Avoid
Let’s sidestep a few common pitfalls so your cheesecake is perfect on the first try!
Mistake 1: Using Cold, Hard Cream Cheese
This is the number one reason for a lumpy filling. Cold cream cheese won’t blend smoothly with the other ingredients. No matter how long you mix, you’ll end up with little bits of cheese throughout your beautiful pumpkin mixture. The fix is simple. Plan ahead! Take the cream cheese out of the fridge at least one hour before you start baking. Let it soften on the counter until it’s easily spreadable. You’ll be rewarded with a velvety, perfectly smooth filling.
Mistake 2: Over-whipping or Under-whipping the Cream
The whipped cream gives our no-bake cheesecake its structure and airy lift. Under-whipped cream (soft peaks) won’t provide enough support, leading to a filling that doesn’t set firmly. Over-whipped cream turns grainy and can quickly become butter, which will make your filling oily and separate. Stop mixing when you have stiff peaks. The cream should hold its shape firmly on the beaters when you lift them. If you see it starting to look clumpy or granular, you’ve gone too far.
Mistake 3: Rushing the Chill Time
I know it’s tempting to slice into it after just a couple of hours. But patience is key here! The cheesecake needs that full 4+ hours (overnight is ideal) for the fats to firm up and the structure to set. If you cut it too soon, it will be a soft, messy pool on your plate—still tasty, but not the neat slice you dreamed of. Think of the chill time as an essential part of the “cooking” process for no-bake desserts. Your future self, holding a perfect slice, will thank you for waiting.
Mistake 4: Confusing Pumpkin Puree with Pumpkin Pie Filling
They sit right next to each other on the grocery store shelf, but they are not the same! Pumpkin pie filling is pre-sweetened and pre-spiced. If you use it in this recipe, your cheesecake will likely be way too sweet and the spice balance will be off. You want the can that says “100% Pure Pumpkin” or “Pumpkin Puree.” This gives you a blank, flavorful canvas to season exactly how you like. Always double-check the label before you toss it in your cart.
Your Questions, Answered (FAQ)
1. Can I make this cheesecake ahead of time?
Absolutely, and I highly recommend it! This cheesecake is actually better made a day ahead. The flavors have more time to meld and develop, and it ensures it’s fully and firmly set. You can make it up to two days before you need to serve it. Just keep it tightly covered in the refrigerator. Add any fresh whipped cream or garnish right before serving so it looks its best.
2. My filling seems too soft after chilling. What happened?
A soft filling usually points to one of three things. First, the whipped cream may have been under-whipped and didn’t provide enough structure. Second, the cream cheese might not have been full-fat, as low-fat versions have more water. Third, the chill time simply may not have been long enough. Stick it back in the fridge for a few more hours or even overnight. For next time, ensure your cream is whipped to stiff peaks and use standard, full-fat block cream cheese.
3. Can I use fresh pumpkin puree instead of canned?
You can, but you need to be very careful. Fresh pumpkin puree often contains much more water than canned. To use it, you must drain it very well. Spread the homemade puree in a thin layer on a baking sheet lined with paper towels. Let it sit for an hour to release moisture, then blot the top with more towels. Using watery puree will make your filling loose and prevent it from setting. For guaranteed results and ease, canned is the reliable choice.
4. How do I get a clean slice without it sticking?
There are two great tricks for this! The first is to use a thin, sharp knife. Run it under very hot water, wipe it dry completely, and then make your slice. Clean the knife with hot water and dry it between each cut. The second trick is my secret weapon: unflavored dental floss. Slide a long piece underneath the slice, cross the ends over the top, and pull them through. It gives a amazingly clean cut every single time.
5. Is it okay to freeze this no-bake pumpkin cheesecake?
Yes, it freezes beautifully! Wrap the whole cheesecake (or individual slices) very tightly in plastic wrap. Then, wrap it again in aluminum foil or place it in a heavy-duty freezer bag. It will keep well for 1-2 months. To serve, thaw it overnight in the refrigerator. The texture may be just a touch softer after freezing, but the flavor will still be fantastic. I don’t recommend freezing it with any whipped cream topping—add that fresh after thawing.
6. Why did my crust turn out soggy?
A soggy crust usually means the butter wasn’t fully mixed with the crumbs, or the crust wasn’t given time to set before adding the filling. Make sure you mix the melted butter into the crumbs until every bit is moistened—it should feel like wet sand. Then, press it firmly into the pan. That firm press is important! Finally, don’t skip that initial 15-20 minute chill in the fridge before adding the filling. This solidifies the butter, creating a barrier.
7. Can I use a different type of pan?
A springform pan is really the best tool because the removable sides make serving so easy. If you don’t have one, a 9-inch deep-dish pie plate will work. You’ll just serve it directly from the plate. Note that the crust-to-filling ratio might be a little different. You could also use a 9×9 square baking dish. Line it with parchment paper with overhanging edges so you can lift the whole cheesecake out for cleaner slicing.
8. How can I tell if the heavy cream is whipped to “stiff peaks”?
Great question! Start whipping on medium speed. First, you’ll get “soft peaks.” If you lift the beater, the cream will form a peak that immediately curls over at the top. Keep going. For “stiff peaks,” the cream will look thick and hold very firm, straight peaks when you lift the beaters. The cream will also have clear trails from the beaters in the bowl. Be careful not to go beyond this to the “over-whipped” stage where it looks curdled.
9. What’s the best way to crush gingersnap cookies?
The easiest method is a food processor. Just pulse the cookies until you have fine, even crumbs. No processor? No problem! Place the cookies in a large, sturdy zip-top plastic bag. Seal it, removing as much air as possible. Then use a rolling pin, a heavy saucepan, or even a wine bottle to roll and crush them. Crush them until you have uniform crumbs without any big chunks for the best crust texture.
10. Can I make this recipe without nuts or common allergens?
This recipe as written is naturally nut-free. Just double-check your gingersnap cookie ingredients, as some brands may be processed in facilities with nuts or contain traces. For a completely dairy-free and vegan version, use vegan butter for the crust, vegan cream cheese, and whip the solid part from a can of full-fat coconut cream instead of heavy whipping cream. The results are surprisingly similar and delicious!
A Final Cozy Thought
And there you have it! My most requested, never-fail, no-bake pumpkin cheesecake. It’s more than just a dessert; it’s a little bit of peace during a busy season. It’s the recipe that lets you join the party instead of being stuck in the kitchen. I hope it becomes a cherished, stress-free tradition in your home, just like it is in mine. Now, go whip one up, put your feet up while it chills, and get ready to take a well-deserved bow. Happy baking (or rather, happy no-baking)!
Creamy Sugar Doughnuts
Ingredients
Equipment
Method
- Prepare the gingersnap crust by pulsing cookies into fine crumbs and mixing with sugar and melted butter, then press into a 9-inch springform pan and refrigerate.
- Beat softened cream cheese until smooth, then gradually add powdered sugar and mix until silky.
- Stir in vanilla extract, pumpkin puree, pumpkin pie spice, cinnamon, and nutmeg until well combined.
- In a separate bowl, whip heavy cream until stiff peaks form.
- Gently fold about one-third of the whipped cream into the pumpkin mixture, then fold in the remaining whipped cream.
- Pour the filling into the chilled crust, smoothing the top.
- Cover and refrigerate for at least 4 hours or overnight.
- Serve with additional whipped cream and a sprinkle of cinnamon or crushed gingersnaps for garnish.