The No-Bake Dessert That Always Brings the Sunshine: Pineapple Cheesecake
You know that feeling when you need a dessert that feels like a tropical vacation but is as easy as a summer breeze? I was in that exact spot last week. My book club was coming over, and I wanted something impressive but not fussy. I remembered my grandma’s old notebook and found her “Sunshine Cheesecake” recipe. With a few tweaks (and a lot less elbow grease than her version!), I created this Pineapple Cheesecake Bliss. The moment that creamy, tangy-sweet slice hit their lips, the reviews were in: “Perfection!” Let me show you how to make it.
A Slice of Sweet History
While classic cheesecake has roots in ancient Greece, the pineapple version is a more modern, tropical twist. Pineapple became a symbol of hospitality in America centuries ago. Adding its bright, juicy flavor to the rich, creamy canvas of cheesecake was a stroke of genius. My version skips the oven entirely, making it a true “icebox” cheesecake. It’s a fusion of classic comfort food and a fun, fruity escape. It’s the dessert that says, “Relax, enjoy, and have another slice.”
Why You’ll Love This Pineapple Cheesecake Recipe
This recipe is a winner for so many reasons! First, there’s zero baking involved. This means no cracked tops or water baths to worry about. Second, the flavor is incredible. The creamy cheesecake filling is perfectly balanced by the bright, tangy punch of pineapple. And third, it’s incredibly forgiving. Even if you’re new to desserts, you can make this and look like a pro. It’s my go-to for a guaranteed crowd-pleaser that doesn’t keep me in the kitchen all day.
Perfect Occasions for a Taste of Paradise
This cheesecake isn’t just for summer! Its sunny disposition is perfect for:
- Potlucks & BBQs: It travels well and always disappears fast.
- Weekend Family Dinners: A special treat that feels celebratory.
- Baby or Bridal Showers: The lovely pale yellow color is so pretty on a dessert table.
- Just Because: Sometimes you need a little midweek bliss in a slice.
Gathering Your Ingredients for Bliss
Simple ingredients make magic here. Let’s gather everything:
For the Crust:
- 2 cups of crushed cornstarch biscuits (like Maria cookies or graham cracker crumbs)
- 1/2 cup melted butter
For the Pineapple Cheesecake Filling:
- 2 cups cream cheese, softened
- 1 cup of refined (caster) sugar
- 1 teaspoon vanilla extract
- 2 cups crushed pineapple, very well drained
- 1 cup fresh cream (heavy whipping cream)
- 1/4 cup confectioners (icing) sugar
No Stress Substitutions
Don’t have something? No problem! Here are easy swaps:
- Biscuits: Graham cracker crumbs are a perfect substitute.
- Fresh Cream: Use a tub of ready-made whipped topping (like Cool Whip) for extra ease. Fold it in at the end instead of making the whipped cream.
- Pineapple: Canned crushed pineapple works great. Just drain it extremely well. You can also use tidbits or chunks, chopped smaller.
- Flavor Twist: Add a tablespoon of lemon or lime zest to the filling for a citrusy zing.
Creating Your Pineapple Cheesecake Masterpiece
Follow these simple steps for a flawless, no-bake dessert. Let’s get mixing!
Step 1: Build Your Buttery Base
Start by crushing your biscuits into fine crumbs. You can use a food processor or put them in a zip-top bag and roll with a rolling pin. Pour the melted butter over the crumbs. Mix it until it looks like wet sand and holds together when you pinch it. Press this mixture firmly and evenly into the bottom of a springform pan. Use the bottom of a glass to get it nice and tight. Pop it in the fridge to set. Pro tip: A firm base won’t crumble when you slice! This chilling time gives the butter a chance to firm up, creating a solid foundation for all that creamy pineapple cheesecake bliss to come.
Step 2: Whip Up the Dreamy Filling Base
Take your softened cream cheese and beat it with the caster sugar in a large bowl. Use an electric mixer on medium speed. Beat it until it’s completely smooth, with no lumps in sight. This might take 2-3 minutes. Scrape down the sides of the bowl. Now, add the vanilla extract and mix it in. You’ll have a beautifully creamy, sweet base that’s just begging for some fruit. The aroma is already heavenly!
Step 3: Fold in the Sunny Pineapple
This step is crucial! Take your crushed pineapple and drain it extremely well. I even give it a gentle squeeze in a clean kitchen towel or paper towels to remove every last drop of extra juice. Too much liquid will make your filling runny. Gently fold the well-drained pineapple into the cream cheese mixture. Use a spatula and a light hand to keep the filling airy. You’ll see lovely flecks of yellow start to swirl through the white cream.
Step 4: Prepare the Fluffy Cloud of Cream
In a separate, clean, cold bowl, pour your fresh cream. Add the confectioners’ sugar. Beat it on medium-high speed until stiff peaks form. This means when you lift the beaters, the cream stands straight up and doesn’t droop. This whipped cream is what gives the cheesecake its light, mousse-like texture. It’s a cloud of sweet deliciousness ready to be folded in.
Step 5: Gently Bring It All Together
Now for the magic. Add about one-third of your whipped cream to the pineapple-cheese mixture. Fold it in gently to lighten it up. This makes it easier to fold in the rest without deflating the cream. Once incorporated, add the remaining whipped cream. Fold gently until no white streaks remain. You’ll have a gorgeous, thick, and fluffy pale yellow filling.
Step 6: Assemble and Let the Magic Happen
Take your chilled crust from the fridge. Pour the filling over the crust. Smooth the top with your spatula, making it as even as you can. Cover the pan loosely with plastic wrap. This is the hard part: patience! Place it in the refrigerator for at least 4 hours, but overnight is truly best. This long chill allows the flavors to meld and the cheesecake to become perfectly firm and sliceable.
Chef’s Tip
For super clean slices, run a thin knife under hot water, wipe it dry, and then cut. Repeat for each slice!
Your Pineapple Cheesecake Timeline
| Activity | Time Needed |
|---|---|
| Preparation & Mixing | 20-25 minutes |
| Chilling Time (Critical!) | Minimum 4 hours (Overnight ideal) |
| Total Time | 4 hours 25 minutes+ |
A Little Extra Info: The Pineapple Power
Did you know pineapple contains an enzyme called bromelain? This enzyme can break down protein, which is why it can sometimes make meats tender. In our no-bake cheesecake, we don’t have to worry about it affecting the dairy. But it’s a fun fact to share while you’re serving your masterpiece!
Necessary Equipment
- 9-inch springform pan (the removable sides are key!)
- Electric hand mixer or stand mixer
- Large mixing bowls
- Spatula
- Measuring cups and spoons
Storing Your Slice of Sunshine
This cheesecake must always be stored in the refrigerator. Keep it covered with plastic wrap or in an airtight container. The cold will keep the filling firm and fresh.
It will stay delicious for up to 4-5 days. After that, the crust may start to soften a bit from the moisture of the filling, but it will still taste wonderful.
You can also freeze this cheesecake for longer storage. Wrap the whole cheesecake or individual slices tightly in plastic wrap and then in foil. It will keep frozen for up to 2 months. Thaw overnight in the refrigerator before serving.
My Best Tips and Advice
- Soft Cream Cheese is Non-Negotiable: Take it out of the fridge at least an hour before. This prevents a lumpy filling.
- Drain, Drain, Drain That Pineapple: I can’t say it enough. Extra juice is the enemy of a firm filling.
- Chill Your Bowl and Beaters: For the whipped cream, a cold bowl helps it whip up faster and higher.
- Don’t Rush the Chill: The longer it sets, the better the texture and flavor. Overnight is a gift to your future self.
Presentation Tips to Wow Your Guests
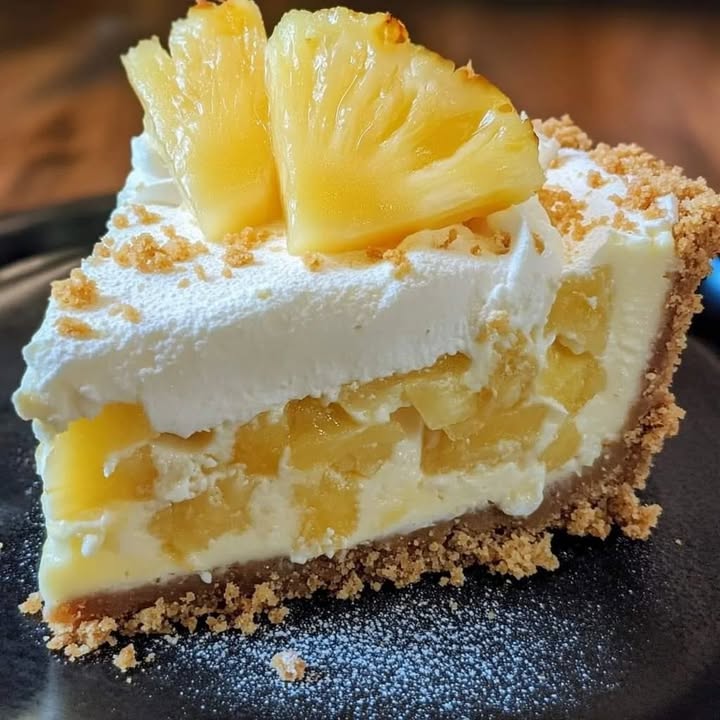
- Top with fresh pineapple chunks, a twist of lime, or a sprinkle of toasted coconut right before serving.
- Drizzle a little caramel or passion fruit sauce on the plate under each slice.
- For a party, make mini cheesecakes in a muffin tin lined with cupcake liners. Just reduce the chilling time.
- Serve on a bright, colorful plate to highlight its cheerful color.
Healthier & Fun Alternative Recipes
Want to mix it up? Here are six delicious twists on the classic:
- Lighter Pineapple Cheesecake: Use reduced-fat cream cheese and light whipped topping. Add an extra teaspoon of vanilla for richness.
- Vegan Tropical Bliss: Substitute with vegan cream cheese, coconut cream (whipped), and use a date-nut crust. Agave syrup works instead of sugar.
- Pina Colada Cheesecake: Add 1/4 cup of cream of coconut to the filling and use a macadamia nut crust. Top with toasted coconut.
- Pineapple-Mango Fusion: Replace half the pineapple with pureed ripe mango for a double-tropical punch.
- Individual Greek Yogart Pots: Layer crushed biscuits, a mix of Greek yogurt, a little honey, and drained pineapple in glasses for a quick parfait.
- Grilled Pineapple Topping: Grill pineapple rings and place one on top of each plain cheesecake slice for a warm, smoky contrast.
Common Mistakes to Avoid
Mistake 1: Using Cold, Hard Cream Cheese
This is the biggest culprit for a lumpy, grainy filling. Cold cream cheese just won’t blend smoothly with the sugar. You’ll end up over-mixing and still have little bits of cheese. Always plan ahead. Let your cream cheese sit on the counter for 60-90 minutes until it’s soft to the touch. It should spread easily. Your filling will be silky smooth because of this one simple step.
Mistake 2: Not Draining the Pineapple Enough
That juice in the can is delicious, but it’s water that will thin out your filling. A runny filling won’t set properly, leading to a soupy mess instead of firm pineapple cheesecake bliss. After dumping the pineapple into a sieve, press down on it with a spoon or clean hands. For the best results, spread it on a few layers of paper towels and gently pat it dry. Taking five extra minutes here saves dessert.
Mistake 3: Under-Whipping or Over-Whipping the Cream
The whipped cream gives structure. If it’s too soft (soft peaks), it will deflate and make the filling loose. If you go too far and make butter (you’ll see it separate and get grainy), it won’t fold in smoothly. Stop beating when the cream forms stiff peaks. The beaters should leave clear marks, and a dollop of cream should hold its shape perfectly when you lift the whisk.
Mistake 4: Skipping the Long Chill Time
Impatience is the enemy of no-bake desserts. Pulling the cheesecake out after two hours because it “looks set” leads to a slice that collapses on the plate. The filling needs time for the ingredients to fully hydrate and bond in the cold. Four hours is the bare minimum. For perfect, clean slices that hold their shape, let it chill overnight. Your future self will thank you for the wait.
Frequently Asked Questions
Can I use canned pineapple for this recipe?
Absolutely! Canned crushed pineapple is actually perfect for this recipe. It’s consistently sweet and already in small pieces. The key is to drain it extremely well. Pour it into a fine-mesh strainer and press out all the excess liquid. You might even want to spread it on paper towels and pat it dry. This step is non-negotiable for the right texture. Fresh pineapple can be used too, but make sure it’s very ripe and sweet, and chop it very finely.
Why did my cheesecake turn out runny and not set?
A runny cheesecake usually points to two issues. First, the pineapple likely had too much liquid. Even a little extra juice can prevent proper setting. Second, the whipping cream may not have been whipped to stiff peaks, or it was folded in too roughly and deflated. Also, not chilling it long enough is a common culprit. The fridge time is when it firms up. If it’s still soft after 4 hours, just give it more time, even overnight. It will continue to set.
How far in advance can I make this pineapple cheesecake?
This dessert is a fantastic make-ahead treat. You can and should make it 1-2 days before you need it. The flavors actually improve as they meld together in the fridge. Just be sure to keep it tightly covered with plastic wrap. Add any fresh fruit toppings right before you serve it so they don’t get soggy or wilted. This makes it a stress-free choice for parties and gatherings.
Can I freeze this no-bake pineapple cheesecake?
Yes, you can freeze it very successfully. To freeze the whole cheesecake, let it set completely in the fridge first. Then, wrap the entire pan tightly in plastic wrap, followed by a layer of heavy-duty aluminum foil. You can also slice it and wrap individual slices. It will keep well for up to 2 months. When you’re ready to enjoy it, transfer it to the refrigerator to thaw overnight. The texture will remain creamy and delightful.
What can I use instead of cornstarch biscuits for the crust?
Graham cracker crumbs are the most common and delicious substitute. You’ll need about 1.5 to 2 cups of crumbs. Digestive biscuits or even vanilla wafers also work wonderfully. The process is the same: crush them finely, mix with melted butter, and press into the pan. You want any dry, slightly sweet biscuit or cookie that will hold together when mixed with butter. Get creative with ginger snaps for a spiced kick!
My cream cheese filling is lumpy. Can I fix it?
Prevention is best, but there is a fix. If you have small lumps after mixing, try pressing the filling through a fine-mesh sieve with a spatula. This can help smooth it out before you add the pineapple and cream. For future tries, remember to let your cream cheese soften fully. Also, beat the cream cheese and sugar together for a full 2-3 minutes on medium speed before adding anything else. This initial creaming is vital for smoothness.
Do I have to use a springform pan?
A springform pan is highly recommended because it has removable sides. This makes it incredibly easy to release the cheesecake without damaging it. If you don’t have one, you can use a regular pie dish or a deep tart pan. You’ll just serve the cheesecake directly from the dish. For a clean lift from a regular pan, you can line it with parchment paper strips that hang over the sides to use as handles.
Can I make this recipe without an electric mixer?
You can, but it will be a workout! A sturdy whisk and some strong arm muscles can whip the cream cheese if it’s very soft. For the heavy cream, a whisk will take much longer and requires a very cold bowl. A balloon whisk is best for that job. While possible, an electric hand mixer makes the process much faster and ensures you get the right consistency for both the cheese and the whipped cream with less effort.
What’s the best way to cut a cheesecake cleanly?
Use a long, thin-bladed knife. Run the blade under very hot water for about 30 seconds, then wipe it completely dry with a towel. Make a clean, swift cut. Wipe the knife blade clean, reheat it under the water, dry it, and make the next cut. Repeat for each slice. The heat helps the knife glide through the creamy filling without sticking or dragging, giving you those gorgeous, professional-looking slices.
Is there a way to make a less sweet version?
Sure! You can slightly reduce the sugar in the filling. Try using 3/4 cup of caster sugar instead of a full cup. Taste the mixture before adding the whipped cream to see if it’s sweet enough for you. Remember, the pineapple also adds sweetness. Using unsweetened crushed pineapple (if you can find it) is another option. The crust will still be sweet from the biscuits, but the overall dessert will be balanced and tangier.
Your Ticket to Tropical Dessert Bliss
And there you have it! My family’s favorite, foolproof recipe for pure Pineapple Cheesecake Bliss. It’s more than just a dessert; it’s a little bowl of sunshine that makes any day feel special. I love seeing the smiles it brings to my friends’ faces. It proves that amazing food doesn’t have to be complicated. So, go grab that can of pineapple, soften that cream cheese, and get ready for the compliments. Don’t forget to save a slice for yourself—you’ve earned it! Happy cooking!
Pumpkin Cheesecake Bliss
Ingredients
Equipment
Method
- Crush the biscuits into fine crumbs and mix with melted butter until it resembles wet sand.
- Press the mixture firmly into the bottom of a springform pan and refrigerate to set.
- Beat softened cream cheese with caster sugar until smooth, then mix in vanilla extract.
- Drain crushed pineapple thoroughly and gently fold it into the cream cheese mixture.
- In a separate bowl, beat fresh cream with confectioners' sugar until stiff peaks form.
- Fold the whipped cream into the pineapple-cheese mixture in two additions until smooth.
- Pour the filling over the crust, smooth the top, and cover with plastic wrap.
- Refrigerate for at least 4 hours, preferably overnight, to set.