Marzipan and Peanut Butter Cheesecake: My Go-To Showstopper Dessert!
You know that feeling when you take a bite of something so good, you just have to close your eyes and smile? That’s exactly what happened the first time I made this Marzipan and Peanut Butter Cheesecake. My book club friends went absolutely quiet—the best compliment a baker can get! It’s a magical mix of nutty, sweet, creamy, and crunchy that feels like a huge hug.
The Sweet Story Behind This Flavor Pairing
Marzipan, made from almonds and sugar, is a classic European confection loved for centuries. I’ve always adored its sweet, almost floral flavor. Peanut butter is, of course, an American pantry superstar. One day, I was nibbling on a piece of marzipan and eating a spoonful of peanut butter (don’t judge me!), and a lightbulb went off. Why not put them together in a cheesecake? The creamy, salty peanut butter balances the intense sweetness of marzipan perfectly. It’s a modern twist that respects tradition while creating something utterly new and addictive.
Why You’ll Fall in Love With This Cheesecake
This isn’t just another dessert. First, it’s a no-bake recipe, which is a lifesaver in the summer heat. No water baths or cracked tops to worry about! Second, the texture is unbelievably smooth and silky, thanks to the blended marzipan. Third, it has that perfect sweet-and-salty combo that keeps you coming back for “just one more” tiny sliver. It’s surprisingly simple but looks and tastes like it came from a fancy patisserie.
Perfect Occasions for This Irresistible Cheesecake
This cheesecake is your secret weapon for celebrations. It’s always a hit at birthday parties, especially for anyone who loves Reese’s cups. Bring it to a holiday potluck—it’s a festive showstopper alongside pumpkin pie. I also love making it for a special weekend family treat; seeing my kids’ eyes light up makes every minute worth it. It’s the dessert you make when you want to say “I love you” or “Thank you” in the sweetest way possible.
Gathering Your Ingredients
Here’s everything you need to create this masterpiece. I recommend having everything at room temperature (except the butter for melting) for the smoothest blending.
- 1 package of Maria cookies (or any plain tea biscuit)
- 2 sachets of powdered gelatin (about 14g total)
- 2 tbsp of peanut butter (for the base)
- 60 g of melted butter
- 370 g of cream cheese (full-fat for best texture)
- 10 marzipans (roughly 200g)
- 1 cup of milk
- 1 cup of half cream (media crema)
- 1/2 cup of sugar
- 2 tbsp of peanut butter (for the filling)
- 5 tbsp of water
- 1 tbsp of vanilla essence
- Chocolate syrup to decorate
- Chopped peanuts to decorate
Smart Ingredient Substitutions
Don’t stress if you’re missing an item! Baking is all about creativity.
- Maria Cookies: Graham crackers or digestive biscuits work beautifully.
- Half Cream (Media Crema): You can use an equal amount of full-fat sour cream or a well-shaken can of evaporated milk.
- Powdered Gelatin: If you prefer a vegetarian option, agar-agar powder is a great substitute. Use about 1.5 teaspoons and follow package instructions for setting liquid.
- Marzipan: In a pinch, you can use 1 1/2 cups of ground almonds mixed with 1/2 cup of powdered sugar and a tablespoon of almond extract, though the texture will be grainier.
- Peanut Butter: Use a creamy, no-stir variety for the best consistency. Almond butter makes a lovely, sophisticated alternative.
Creating Your No-Bake Masterpiece
Let’s get mixing! Follow these steps for a perfect, fuss-free cheesecake.
Step 1: Create the Cookie Crumbs
Open your package of Maria cookies and tip them into the blender. Pulse them until they transform into fine, even crumbs that look like golden beach sand. You want no big pieces left, as this will ensure your base holds together nicely. The sound of the cookies crushing is so satisfying! Pro tip: If you don’t have a blender, you can put the cookies in a sturdy zip-top bag and roll over them with a rolling pin.
Step 2: Mix and Press the Base
In a medium bowl, pour your beautiful cookie crumbs. Add the two tablespoons of peanut butter and the 60 grams of melted, slightly cooled butter. Now, get your hands in there! Mix it all together until it resembles wet sand and every crumb is coated. Press this mixture firmly and evenly into the bottom of your springform pan. I use the bottom of a flat glass to get it really compact. Pop the pan in the fridge to set while you make the magical filling.
Step 3: Prepare the Gelatin
This step is the key to a sliceable, no-bake cheesecake. Sprinkle the powdered gelatin over the five tablespoons of cold water in a small, microwave-safe bowl. Let it sit and “bloom” for about five minutes. It will become a firm, spongy mass. Then, heat it in the microwave for a short 15-second burst until it turns into a clear liquid. Be careful not to boil it. Stir it smooth and set it aside to cool slightly.
Step 4: Blend the Dreamy Filling
This is the fun part! Into your blender, add the room-temperature cream cheese, marzipans (break them up a little), milk, half cream, sugar, two tablespoons of peanut butter, vanilla essence, and the slightly cooled, liquid gelatin. Put the lid on tight and blend on high. Watch everything come together into a gloriously smooth, pale, and creamy mixture. The aroma of almond and peanut butter will make your kitchen smell heavenly. Blend for a full minute to ensure there are no lumps of marzipan or cream cheese left.
Step 5: Assemble and Chill
Take your pan with the set base from the fridge. Pour the silky cheesecake filling over the top. Gently tap the pan on the counter a few times to release any air bubbles. Now, the hardest part: patience. Carefully place the pan in the refrigerator to set for at least 4 to 6 hours, but overnight is truly best. This long chill allows all the flavors to marry and the texture to become perfectly firm and sliceable.
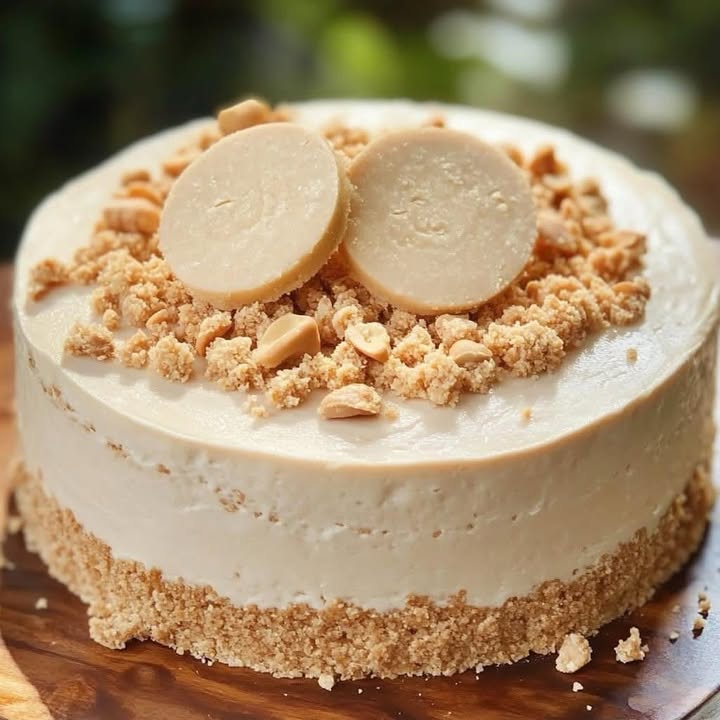
Step 6: The Grand Finale – Decorate!
Once your cheesecake is fully set, run a thin knife around the edge of the pan before releasing the springform clasp. Drizzle luxurious swirls of chocolate syrup over the top. Don’t be shy! Then, generously sprinkle chopped peanuts over the chocolate. This adds a wonderful crunch and makes it look professional. Slice with a hot, clean knife for the cleanest pieces. Then, get ready for the applause!
Chef’s tip: For an extra flair, lightly toast the chopped peanuts in a dry pan for a minute before sprinkling. It deepens their flavor amazingly.
Timing Your Sweet Project
- Preparation Time: 30 minutes
- Setting Time: 4-6 hours minimum (overnight recommended)
- Total Time: 4 hours 30 minutes to 6 hours 30 minutes
- Servings: 8 generous slices
- Calories: Approximately 400 kcal per serving
A Little Extra Secret From My Kitchen
My secret weapon for an ultra-creamy texture? Use full-fat everything. Lower-fat cream cheese or milk can sometimes lead to a looser set or a less rich mouthfeel. For this special dessert, splurging on the good stuff makes all the difference. Trust me, it’s worth the few extra calories for that melt-in-your-mouth experience.
Fun Fact: The Joy of Marzipan
Did you know marzipan isn’t just for eating? In many parts of Europe, especially Germany, it’s a festive art form! Around Christmas, you’ll find marzipan shaped and painted into tiny, incredibly realistic fruits, vegetables, and animals. My recipe uses it to add incredible flavor and natural sweetness, but maybe next time I’ll try making a little marzipan bee to sit on top of my cheesecake!
Equipment You’ll Need
- A 9-inch springform pan (essential for easy release!)
- A high-powered blender or food processor
- A medium mixing bowl
- A small microwave-safe bowl
- A spatula
- A measuring cups and spoons set
Storing Your Delicious Creation
Once decorated, this cheesecake is best enjoyed within 24 hours. Keep it covered in the refrigerator until you’re ready to serve. The peanuts may soften slightly from the moisture over time, but the flavor will still be fantastic.
If you have leftovers (a rare event in my house!), store them in an airtight container in the fridge. It will stay fresh and delicious for up to 3 days. You can also place plastic wrap directly on the cut surface to prevent it from drying out.
I do not recommend freezing this cheesecake. The gelatin-set filling can sometimes become grainy or separate when thawed. It’s truly a “make and enjoy fresh” kind of treat, perfect for sharing with a crowd.
My Best Tips and Advice for You
- Let your cream cheese sit on the counter for an hour before starting. Room temperature cream cheese blends smoothly without lumps.
- When melting the gelatin, just warm it until liquid. Overheating can destroy its setting power.
- For a cleaner slice, dip your knife in hot water and wipe it dry between each cut.
- If your base is too crumbly, add another half tablespoon of melted butter until it holds together when pressed.
Presentation Ideas to Impress Your Guests
- Serve each slice on a drizzle of chocolate syrup with a tiny scoop of vanilla bean ice cream on the side.
- Garnish with a whole salted peanut and a delicate twist of orange zest for color.
- For a dinner party, pre-slice the cheesecake and place each piece on individual plates. Add a gold leaf flake on top for incredible luxury.
- Use a piping bag to create elegant chocolate designs on the plate before setting down the slice.
Healthier and Creative Recipe Variations
Love the idea but want to mix it up? Here are six delicious spins on this classic.
- Chocolate Swirl Cheesecake: Reserve 1/3 cup of the plain filling. Mix it with 2 tbsp of cocoa powder and swirl it into the main filling before chilling.
- Vegan Marzipan Delight: Use vegan cream cheese, coconut cream instead of dairy, agar-agar, and a butter/peanut butter mix with coconut oil for the base.
- Berry Bliss Cheesecake: Top the set cheesecake with a layer of fresh strawberry or raspberry compote instead of the chocolate and peanuts.
- Salty Caramel Twist: Swap the chocolate syrup for a generous drizzle of salted caramel sauce and use salted peanuts for topping.
- Mini Cheesecake Bites: Make the recipe in a muffin tin with paper liners. Perfect for portion control and parties!
- Espresso Infusion: Add 1-2 tablespoons of very strong cooled espresso or instant coffee granules to the filling for a mocha flavor.
Common Mistakes to Avoid
Avoid these simple pitfalls for a flawless cheesecake every single time.
Mistake 1: Not Pressing the Base Firmly Enough
If you just sprinkle the crumb mixture in the pan and pat it lightly, your base will fall apart when you slice the cheesecake. This happens because the butter and peanut butter haven’t properly bonded all the crumbs. To avoid a crumbly disaster, really press the base down hard. Use the bottom of a glass or a measuring cup to compact it into a solid, even layer. It should feel like a firm cookie crust.
Mistake 2: Using Cold Cream Cheese
Blending cold, hard cream cheese straight from the fridge is a top cause of lumpy filling. No matter how long you blend, those little lumps can remain. The result is a cheesecake that isn’t perfectly smooth. Always plan ahead! Take the cream cheese out of the fridge at least an hour before you start. Soft, room-temperature cream cheese blends into a silky, dreamy filling with ease.
Mistake 3: Not Letting the Cheesecake Set Long Enough
Impatience is the enemy of no-bake cheesecakes. If you try to slice it after just 2 or 3 hours, it will be a soupy, delicious mess on your plate. The gelatin needs ample time to work its magic and firm everything up. Respect the 4-6 hour minimum, but truly, letting it set overnight in the fridge is the golden rule. You’ll be rewarded with clean, beautiful slices that hold their shape.
Mistake 4: Overheating the Gelatin
When you microwave the bloomed gelatin, you only want to warm it until it becomes a clear liquid. If you let it boil or get too hot, you can damage its setting properties. This can lead to a cheesecake that never fully firms up. Heat it in short bursts (like 10-15 seconds), stir, and only heat more if needed. It should be warm to the touch, not scalding hot.
Frequently Asked Questions
Can I make this cheesecake without gelatin?
Yes, but the texture and method will change. You can use a vegetarian alternative like agar-agar, but you must follow the packet instructions carefully as it sets differently. Another option is to use 1 cup of heavy whipping cream, whipped to stiff peaks, and fold it into the blended filling. This creates a lighter, mousse-like texture that still needs several hours to set firmly in the fridge.
What can I use instead of a springform pan?
A springform pan is ideal because the removable sides make serving easy. If you don’t have one, you can use a regular pie dish or a deep cake pan. You’ll need to serve slices directly from the pan. For removal, line your chosen pan with parchment paper with overhanging edges to create “handles” to lift the cheesecake out.
My filling seems too runny after blending. What did I do wrong?
Don’t panic! This can happen if your ingredients were too warm or if the gelatin wasn’t prepared correctly. First, ensure the melted gelatin liquid was slightly cooled before adding it to the blender—adding it hot can warm the dairy. Second, just pour the runny filling onto the base and refrigerate immediately. Gelatin sets as it chills, so it will likely firm up perfectly given the full 6+ hours. Trust the process.
How far in advance can I make this cheesecake?
You can make the entire cheesecake up to 24 hours in advance. In fact, I recommend it! This gives it plenty of time to set and allows the flavors to develop fully. Store it covered in the refrigerator. I would add the final chocolate and peanut decorations on the day you plan to serve it for the best texture and appearance.
Can I use chunky peanut butter?
You can, but it will change the texture. For the base, chunky peanut butter adds a nice bit of crunch. For the filling, I strongly recommend smooth, creamy peanut butter. Chunky peanut butter in the filling can get caught in the blender and may not create the perfectly silky, uniform texture we’re aiming for.
Is it possible to reduce the sugar in this recipe?
The marzipan itself contains a lot of sugar, so reducing the added sugar in the filling is possible. You could try cutting the 1/2 cup of sugar down to 1/3 cup. However, keep in mind that sugar contributes to the texture and setting of the cheesecake. A significant reduction might affect the final consistency. The flavor will also be less sweet, allowing the saltiness of the peanut butter to come forward more.
Why did my base stick to the pan?
To prevent sticking, always prepare your springform pan. You can lightly grease the bottom with butter or, even better, place a round of parchment paper on the base before locking on the sides. When you press the crumb mixture in, it goes on top of the paper. After chilling and releasing the sides, you can slide the whole cheesecake (on the paper) onto a serving plate.
Can I use a different type of cookie for the base?
Absolutely! Maria cookies are mild and sweet, but graham crackers are a classic choice. Digestive biscuits, vanilla wafers, or even Biscoff cookies would make incredible, flavorful bases. Just be sure to crush them into fine crumbs and use the same weight or volume as the Maria cookies called for.
My cheesecake is sweating after I took it out of the fridge. Why?
This is condensation, and it’s totally normal! When a cold dessert hits warm, humid air, tiny water droplets form on its surface. To minimize this, let the cheesecake sit out at room temperature for just 10-15 minutes before serving. Also, decorate it right before serving. If beads of water do form, you can gently dab them away with a clean paper towel.
How do I get the chocolate syrup drizzle to look professional?
The secret is in the bottle and temperature. Use a squeeze bottle with a fine tip, or put the syrup in a zip-top bag and snip a tiny corner. Make sure your cheesecake is completely cold and set. Drizzle in long, flowing lines, or create zig-zags and swirls. Practice on a plate first! For thicker lines, warm the syrup slightly. For thin, delicate lines, use it straight from the fridge.
Your New Favorite Dessert Awaits
This Marzipan and Peanut Butter Cheesecake is more than just a recipe. It’s a conversation starter, a celebration, and a testament to how two simple flavors can create pure magic. It has never failed me, and I know it won’t fail you. So gather your ingredients, clear some fridge space, and get ready to make something truly special. Happy baking, and don’t forget to save a slice for yourself!
Creamy Garlic Beef Rotini
Ingredients
Equipment
Method
- Pulse the Maria cookies in a blender until finely crushed, or crush in a zip-top bag with a rolling pin.
- Mix the cookie crumbs with peanut butter and melted butter until it resembles wet sand. Press into the springform pan and refrigerate.
- Sprinkle gelatin over cold water in a small bowl, let bloom for 5 minutes, then microwave for 15 seconds until clear.
- Blend cream cheese, marzipans, milk, half cream, sugar, peanut butter, vanilla essence, and cooled gelatin until smooth.
- Pour over the set base in the pan, tap to release air, and refrigerate for at least 4-6 hours, preferably overnight.
- Run a knife around the edge, release the springform, and decorate with chocolate syrup and chopped peanuts before serving.