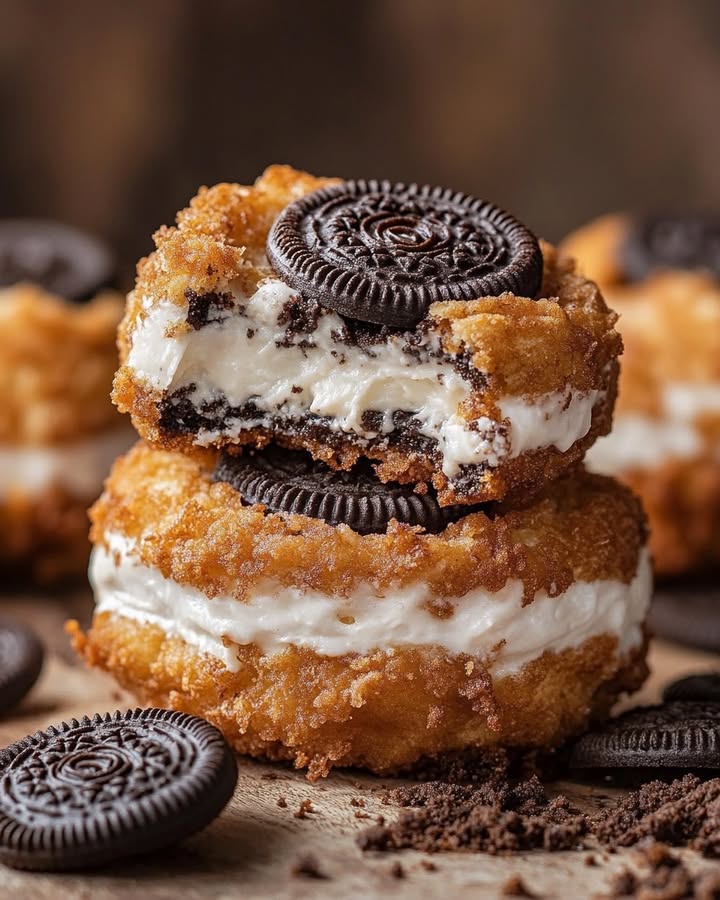

You know that moment at the county fair? The air is thick with the smell of funnel cakes and excitement, and the one treat that always calls my name is a hot, powdered-sugary, impossibly decadent Deep-Fried Oreo. I decided I needed to bring that magic home. After a few (very delicious) experiments, I perfected this simple recipe. It’s a guaranteed smile-maker for kids and a nostalgic trip for adults. Let’s make some fair food magic in your own kitchen!
The Sweet Story of a Fairground Legend
Believe it or not, the deep-fried Oreo is a relatively modern invention! It burst onto the scene at state and county fairs across America in the early 2000s. Food vendors were in a friendly arms race to create the most outrageous, shareable, and Instagram-worthy treats (before Instagram was even a thing!). Someone had the brilliant idea to dunk America’s favorite cookie into simple funnel cake batter and give it a hot oil bath. The result was an instant legend. It’s the perfect blend of crispy, warm, gooey, and sweet. While the classic version is unbeatable, home cooks like us have gotten creative, adding sprinkles to the batter or drizzling them with chocolate sauce. It’s less of a formal recipe and more of a delicious tradition of fun.
Why You’ll Love This Deep-Fried Oreos Delight
First, it’s incredibly easy. The batter comes together in one bowl with three ingredients you probably have right now. Second, it’s fast. From craving to eating takes about 20 minutes total. But the real magic is in the first bite. The outer shell fries up crisp and golden, while the Oreo inside becomes soft, warm, and almost cake-like. That contrast in texture is pure joy. It’s also a fantastic recipe to get kids involved in the kitchen. They love the dipping and the (safe) watching from a distance as the cookies puff up and turn golden. This recipe turns an ordinary evening into a mini kitchen carnival.
When to Whip Up These Fried Delights
This isn’t an everyday recipe, and that’s what makes it special! It’s perfect for turning a regular gathering into a party. Think game day with friends, a fun family movie night, a birthday party for all ages, or even a quirky dessert bar at a sleepover. I love making them for our backyard summer barbecues—they’re the stunning finale after burgers and hot dogs. Anytime you want to create a “wow” moment with minimal effort, these are your secret weapon.
What You’ll Need: The Ingredients List
Simplicity is key here. Here’s your shopping list:
- 1 cup pancake mix (the “just add water” kind works great)
- 1 large egg
- 1/2 cup milk
- 18 Oreo cookies (Classic or try a fun flavor!)
- 2 cups vegetable oil (for frying; canola or peanut oil also work)
- Powdered sugar, for a snowy dusting
No Pancake Mix? Try These Swaps!
Ran out of pancake mix? No problem! You can use:
- All-purpose flour: Use 1 cup of flour mixed with 1 ½ teaspoons of baking powder and a tablespoon of sugar.
- Tempura batter mix: This will give you an extra light and crisp coating.
- For a dairy-free version: Swap the milk for your favorite non-dairy milk like almond or oat.
The goal is a batter that’s thick enough to coat the back of a spoon but still drips off slowly. A little adjustment with extra milk or flour is totally fine!
Crafting Your Deep-Fried Oreos Delight: A Step-by-Step Guide
Step 1: Make Your Magical Batter
Grab a medium-sized mixing bowl. Crack in that large egg and pour in the milk. Give it a quick whisk to combine. Now, sprinkle the pancake mix over the wet ingredients. Whisk it all together until you have a smooth, lump-free batter. It should be like a thick pancake batter—creamy and pourable. If it seems too thick, add a splash more milk. Pro tip: Let the batter sit for 5 minutes while you heat the oil. This allows the gluten to relax and helps create a tender, crisp coating once fried.
Step 2: Heat the Oil to Perfect Temperature
Pour your oil into a heavy-bottomed pot or deep skillet. You want it to be about 1 ½ inches deep. Attach a candy or deep-fry thermometer to the side of the pot. Heat the oil over medium heat until it reaches a steady 375°F (190°C). This is crucial! If the oil is too cool, the Oreos will soak up oil and become greasy. If it’s too hot, the outside will burn before the inside warms up. The oil should shimmer and seem lively, but not be smoking aggressively.
Step 3: The Fun Part: Dipping and Coating
Now, set up a little station: bowl of batter, plate of Oreos, and a clean plate or wire rack for the coated cookies. Using a fork or your fingers (I use my fingers for better coverage!), submerge one Oreo completely into the batter. Swirl it around gently to ensure every millimeter is covered. Lift it up and let any excess batter drip back into the bowl for a few seconds. A light, even coat is what you want—not a thick, doughy blanket.
Step 4: Frying to Golden Perfection
Carefully lower the battered Oreo into the hot oil. I fry 3-4 at a time to avoid crowding the pot and dropping the oil temperature. They’ll sink for a second, then float right back up. Let them fry for about 90 seconds, then gently flip them with a slotted spoon or tongs. Fry for another 60-90 seconds until they are a beautiful, uniform golden brown all over. You’ll see the coating puff up slightly—that’s exactly what you want!
Step 5: Drain, Dust, and Devour!
Use your slotted spoon to lift the golden beauties out of the oil. Immediately transfer them to a plate lined with several paper towels. Let them drain for a minute—this step ensures they stay crispy and not oily. While they’re still warm, place them on your serving plate and generously dust with powdered sugar. I use a small fine-mesh strainer for a light, even snowstorm of sweetness. Chef’s tip: For maximum “wow,” serve them in a paper basket or on a rustic wooden board. They’re best served warm, when the chocolate center is soft and dreamy.
Timing is Everything
- Prep Time: 10 minutes (mostly for making batter and heating oil)
- Cooking Time: 10 minutes (frying in batches)
- Total Time: 20 minutes to pure deliciousness
- Servings: Makes about 18 glorious fried Oreos.
My Secret for the Ultimate Fry
My secret weapon is a wire rack set over a baking sheet, instead of just paper towels. After I pull the Oreos from the oil, I let them drain on the rack for a minute. This allows air to circulate all around them, preventing any steam from making the bottom soggy. It’s the guaranteed trick for the crispiest result every single time.
A Fun Fact About Your Main Ingredient
The Oreo cookie itself has been around since 1912! For over a century, the “twist, lick, and dunk” ritual has been a beloved part of childhood. Deep-frying it is like giving this classic cookie a luxurious, grown-up (and incredibly fun) makeover. It’s a treat that connects generations through a shared love of simple, sweet joy.
Gear You’ll Need
- Heavy-bottomed pot or deep skillet
- Candy/deep-fry thermometer (non-negotiable for success!)
- Mixing bowl and whisk
- Slotted spoon or spider strainer
- Plates, paper towels, and a wire rack for draining
Storing Your Leftover Delights (If You Have Any!)
Let’s be honest, these are best eaten immediately. The crispy coating softens as they sit. However, if you have leftovers, let them cool completely on the wire rack.
Once cool, you can store them in a single layer in an airtight container at room temperature for up to a day. I don’t recommend refrigerating, as the moisture will make them soggy.
To reheat, place them on a baking sheet in a 350°F oven for 5-7 minutes. This will help crisp them up a bit and melt the filling again. They won’t be quite as perfect as fresh, but they’ll still be tasty!
Tips & Tricks for Frying Success
- Oil Temperature Check: If you don’t have a thermometer, drop a tiny bit of batter into the oil. If it sizzles immediately and floats to the top, it’s ready.
- Keep it Steady: Adjust your burner as you fry to maintain that 375°F temperature. Adding cold batter will bring the temp down, so let it recover between batches.
- Safety First: Never leave hot oil unattended. Keep kids and pets at a safe distance, and have a lid nearby to cover the pot in case of a flare-up.
Making Them Look as Good as They Taste
- Stack them high on a pretty plate with a final dusting of powdered sugar just before serving.
- Drizzle with chocolate sauce, caramel sauce, or even a raspberry coulis for a restaurant-style look.
- Serve with small bowls of toppings for dipping: whipped cream, chocolate spread, or crushed nuts.
- For a party, set them on a platter with mini flags or labels for different Oreo flavors you fried.
Healthier & Creative Twists on the Classic
Want to mix it up? Here are six fun variations to try:
- Baked “Fried” Oreos: For a less messy version, coat the Oreos in batter, place on a parchment-lined baking sheet, spray lightly with cooking spray, and bake at 400°F for 6-8 minutes. They’ll be softer but still delicious.
- Funfetti Fun: Add a handful of colorful sprinkles directly into your batter before dipping. It adds a festive crunch and look.
- Chocolate-Dipped Dream: After frying and dusting, dip half of each Oreo in melted chocolate and let it set. It’s over-the-top in the best way.
- Oreo Flavor Adventure: Use different Oreo varieties! Mint, peanut butter, or birthday cake Oreos add a whole new flavor dimension.
- Mini Oreo Bites: Use Mini Oreos instead! They cook faster and are perfect for popping in your mouth. Fry for just 60-90 seconds total.
- Gluten-Free Friendly: Use your favorite gluten-free pancake mix and gluten-free sandwich cookies. The method stays exactly the same.
Common Mistakes to Avoid
Mistake 1: Skipping the Thermometer
Guessing your oil temperature is the number one way to end up with greasy or burnt fried Oreos. Oil that’s too cool absorbs into the batter, creating a heavy, soggy mess. Oil that’s too hot will burn the outside before the cookie inside even gets warm. Using a simple, clip-on candy thermometer gives you complete control and guarantees a perfect, crisp golden shell every single time. It’s the best few dollars you’ll spend for kitchen success.
Mistake 2: Overcrowding the Pot
It’s tempting to fry all the cookies at once, but patience is key here. Adding too many battered Oreos at once plummets the oil temperature fast. This leads to uneven cooking and oily cookies. Fry in small batches of 3-4. This keeps the oil hot and steady, allowing each cookie enough space to bob and cook evenly on all sides. You’ll get better results and it’s actually faster in the long run.
Mistake 3: Applying a Thick, Doughy Coat of Batter
More batter does not mean better! A thick, gloppy coating will take longer to cook through and can result in a raw, doughy center or an overcooked shell. The goal is a thin, even layer that just clings to the cookie. After dipping, let the excess batter drip off for a good 5-10 seconds back into the bowl. You should still be able to see the outline of the Oreo cookie through the batter.
Mistake 4: Not Draining Them Properly
Placing your hot, fried Oreos directly on a plate or even just a single paper towel traps steam and oil underneath. This creates a soggy spot that ruins the wonderful crisp texture. Always drain them on a wire rack set over a baking sheet or on a plate lined with several layers of paper towels that you can change out. Letting air circulate around them is the secret to keeping that perfect crunch from the first bite to the last.
Your Deep-Fried Oreos Questions, Answered
Can I make the batter ahead of time?
You can, but I don’t recommend it for the best texture. The baking powder in the pancake mix will start to activate as soon as it’s mixed with the liquid. If you let it sit for too long (more than 30 minutes), you might get a less puffy, slightly denser coating. For the crispiest, lightest results, mix your batter right before you plan to fry. It only takes a minute to whisk together, so it’s truly a last-minute step.
What’s the best oil for frying Oreos?
You want an oil with a high smoke point and a neutral flavor. Vegetable oil, canola oil, and peanut oil are all excellent choices. They can handle the 375°F temperature without smoking or breaking down, and they won’t add their own flavor to your sweet treat. Avoid oils like extra virgin olive oil or butter, as they have lower smoke points and stronger flavors that would clash with the Oreo.
How do I dispose of the used frying oil?
Please don’t pour it down the drain! It can clog your pipes. Let the oil cool completely in the pot. Once cool, carefully pour it through a fine-mesh strainer (lined with cheesecloth if you have it) into an old, sealable container like a juice jug or the original oil bottle. You can then throw this sealed container in the trash. If you’ve only used the oil once for a clean fry like this, you can sometimes reuse it once more for another batch of sweets, but always strain it first.
Can I use an air fryer instead?
You can try, but it won’t be exactly the same. The classic “fried” texture comes from submersion in hot oil. For an air fryer method, spray the battered Oreos very generously with cooking spray on all sides. Air fry at 400°F for 4-6 minutes, flipping halfway. The coating will be more like a cooked dough or pastry—still tasty, but not as crisp and light as the deep-fried version. It’s a good compromise for a slightly less messy option.
What can I serve with Deep-Fried Oreos?
While amazing on their own, they become a next-level dessert with a few simple sides. A scoop of vanilla ice cream is the classic pairing—the hot and cold contrast is magical. Whipped cream, chocolate or caramel sundae sauce, or a berry compote are all fantastic. For a fun twist, offer a small bowl of peanut butter for dipping, or even a salted caramel sauce to balance the sweetness.
Are there any safety tips I should know?
Absolutely! Always start with a dry pot and dry Oreos—water makes hot oil splatter violently. Use a pot that’s deep enough so the oil only fills it halfway, preventing dangerous boil-overs. Gently lower food into the oil away from you to avoid splashes. Never, ever leave hot oil unattended on the stove. Keep a lid nearby to smother a potential fire (never use water!). And keep kids and pets out of the kitchen during the frying process.
My batter is too thick/too thin. How do I fix it?
Batter consistency can vary based on your exact pancake mix brand. If it’s too thick (like cookie dough), it will coat too heavily. Simply whisk in an extra tablespoon of milk at a time until it flows slowly off the whisk. If it’s too thin (like runny cream), it won’t stick to the Oreo. Sprinkle in an extra tablespoon of pancake mix and whisk until incorporated. You’re aiming for a batter that smoothly and completely coats the back of a spoon.
Can I use Double Stuf Oreos?
You absolutely can, and they are incredibly decadent! The process is the same. Just be aware that the extra cream filling might ooze out a tiny bit more during frying. This isn’t a bad thing—it creates delicious little caramelized pockets! Make sure your oil is at the correct temperature to quickly seal the batter, and handle them with a little extra care when flipping.
How can I tell when they are done frying?
Visual cues are your best friend. They will turn a lovely, appetizing golden brown color. They should also puff up slightly in the oil. The total frying time is usually 2-3 minutes. If they are browning too quickly, your oil is too hot. If they are pale and taking forever, your oil is too cool. Trust the color—a deep golden brown means a crisp, cooked coating.
Do I have to use pancake mix?
No, you don’t! While it’s the easiest shortcut, you can make a simple batter from scratch. Combine 1 cup all-purpose flour, 1 tablespoon sugar, 1 ½ teaspoons baking powder, and a pinch of salt. Then whisk in 1 egg and ½ cup milk (or buttermilk for extra tang). It works just as beautifully and lets you control the exact ingredients.
The Final Bite
And there you have it! Making Deep-Fried Oreos at home is easier than you think, and the payoff is huge. It’s about more than just a dessert; it’s about creating a fun, memorable experience right at your kitchen counter. The look on your friends’ or family’s faces when you bring out a plate of these warm, sugary, crispy delights is worth every minute. So grab that Oreo package, heat up that oil, and get ready to make some seriously delicious memories. Happy frying
Loaded Cheesy Tacos
Ingredients
Equipment
Method
- In a medium-sized mixing bowl, whisk together the egg and milk.
- Sprinkle pancake mix over the wet ingredients and mix until smooth.
- Let the batter sit for 5 minutes while you heat the oil.
- Pour the oil into a heavy-bottomed pot or deep skillet, about 1 ½ inches deep, and heat to 375°F (190°C).
- Dip an Oreo into the batter, ensuring it is fully covered, then let excess batter drip off.
- Carefully lower the battered Oreo into the hot oil, frying 3-4 at a time.
- Fry for about 90 seconds, then flip and fry for another 60-90 seconds until golden brown.
- Remove with a slotted spoon and let drain on paper towels or on a wire rack for extra crispiness.
- Dust with powdered sugar before serving.